- Preface
- Cisco Broadband Access Center Overview
- Cisco Broadband Access Center Architecture
- Configuration Workflows
- CPE Provisioning Overview
- Dynamic Configuration File Management
- DOCSIS Configuration
- PacketCable Voice Configuration
- CableHome Configuration
- Managing Cisco Broadband Access Center
- Monitoring Cisco Broadband Access Center
- Understanding the Administrator User Interface
- Using the Administrator User Interface
- Configuring Cisco Broadband Access Center
- Support Tools and Advanced Concepts
- Database Management
- Troubleshooting Cisco Broadband Access Center
- Alert and Error Messages
- Option Support
- Mapping PacketCable DHCP Options to Cisco BAC Properties
- Provisioning API Use Cases
- FAQs on Provisioning Broadband Access Center
- Glossary
- Index 4.2
Cisco Broadband Access Center Administrator Guide for 4.2
Bias-Free Language
The documentation set for this product strives to use bias-free language. For the purposes of this documentation set, bias-free is defined as language that does not imply discrimination based on age, disability, gender, racial identity, ethnic identity, sexual orientation, socioeconomic status, and intersectionality. Exceptions may be present in the documentation due to language that is hardcoded in the user interfaces of the product software, language used based on RFP documentation, or language that is used by a referenced third-party product. Learn more about how Cisco is using Inclusive Language.
- Updated:
- August 16, 2011
Chapter: Using the Administrator User Interface
Using the Administrator User Interface
This chapter describes the administration tasks performed from the Cisco Broadband Access Center (Cisco BAC) administrator user interface. These tasks mainly involve monitoring the actions of various Cisco BAC components and include:

Note ![]() The procedures described in this chapter are presented in a tutorial manner. Wherever possible, examples are included to illustrate the possible results of each procedure.
The procedures described in this chapter are presented in a tutorial manner. Wherever possible, examples are included to illustrate the possible results of each procedure.
User Management
Managing users involves adding, modifying, and deleting users who administer Cisco BAC. Depending on your user type, you can use this menu to add, modify, and delete users. This menu displays all users configured to use Cisco BAC and identifies their user types.
There are three types of Cisco BAC users: an Administrator, a Read/Write user, and a Read-Only user. Each has different levels of access, with unique permissions to ensure access control and the integrity of provisioning data.
The assigned user type appears near the top-right corner of every screen on the administrator user interface.
Administrator
Cisco BAC recognizes only one administrator and allows this user to view, add, modify, and delete device data, and create other users. As an administrator, you can also change other users' permissions from Read/Write to Read Only, and vice versa. In addition, you can also change the passwords of any other user type.
You cannot delete the administrator user.
Read/Write User
As a Read/Write user, you can perform the same functions as the administrator except creating other users, changing the user types of others, or changing their passwords. Read/Write users can change their own passwords.
Read-Only User
As a Read-Only user, you have basic access including the ability to change your password and to view, but not change, device data. You cannot perform any action that is considered disruptive; you cannot, for example, perform reset or regenerate configurations.
Note ![]() During migration from an acceptable previous release to Cisco BAC 4.2, all migrated users are assigned Read/Write privileges.
During migration from an acceptable previous release to Cisco BAC 4.2, all migrated users are assigned Read/Write privileges.
You can add and delete users only if you are logged in as the Administrator.
The following sections contains instructions for managing Cisco BAC users including:
Adding a New User
Adding a new user is a simple process of entering the user's name and creating a password. However, while creating a new user you must determine the type of user: a Read/Write user or a Read-Only user.
Note ![]() Cisco BAC comes with one Administrator user already created; you cannot create an administrator as a new user.
Cisco BAC comes with one Administrator user already created; you cannot create an administrator as a new user.
To add a new user:
Step 1 ![]() Click the Users tab.
Click the Users tab.
The Manage Users page appears.
Step 2 ![]() Click Add to display the Add User page.
Click Add to display the Add User page.
Step 3 ![]() Enter the new user's username.
Enter the new user's username.
Step 4 ![]() Select an authentication mode for the user from the drop-down list. The authentication modes are:
Select an authentication mode for the user from the drop-down list. The authentication modes are:
Local - Authenticates the user credentials in the RDU database.
RDU Defaults - Authenticates the user with the authentication mode configured in the RDU Defaults page.
RADIUS - Authenticates the user credential in the RADIUS server.
Empty - Since authentication mode is not mandatory for the user, you need not select any value from the drop-down list. In that case, the user would be authenticated based on the authentication mode configured in the RDU defaults page.
Note ![]() For RADIUS mode, configuration properties must be specified in RDU Defaults page. For more information, see section Configuration Details for RADIUS Authentication of chapter Configuring Cisco Broadband Access Center.
For RADIUS mode, configuration properties must be specified in RDU Defaults page. For more information, see section Configuration Details for RADIUS Authentication of chapter Configuring Cisco Broadband Access Center.
Step 5 ![]() For Local and RDU Defaults authentication mode, enter a password and confirm it. Ensure that the password that you enter has at least 8 characters.
For Local and RDU Defaults authentication mode, enter a password and confirm it. Ensure that the password that you enter has at least 8 characters.
Note ![]() For RADIUS authentication mode, user does not need to enter password.
For RADIUS authentication mode, user does not need to enter password.
Step 6 ![]() Click the appropriate radio button to determine the new user's role. See earlier sections for descriptions of each user type.
Click the appropriate radio button to determine the new user's role. See earlier sections for descriptions of each user type.
Step 7 ![]() You can restrict the number of concurrent sessions a user can have by specifying the value in the Number of sessions allowed field. If you do not specify any value in this filed, the number of sessions allowed for the user would be decided on the value of the field at the RDU defaults page.
You can restrict the number of concurrent sessions a user can have by specifying the value in the Number of sessions allowed field. If you do not specify any value in this filed, the number of sessions allowed for the user would be decided on the value of the field at the RDU defaults page.
Step 8 ![]() Enter a short description of the new user.
Enter a short description of the new user.

Tip ![]() Use the description field to identify the user's job, position, or any detail that uniquely identifies the new user.
Use the description field to identify the user's job, position, or any detail that uniquely identifies the new user.
Step 9 ![]() Click Submit.
Click Submit.
The Manage Users page appears with the new user added.
Note ![]() Remember to record and store the new user's password in a safe place to help prevent loss or theft and possible unauthorized entry.
Remember to record and store the new user's password in a safe place to help prevent loss or theft and possible unauthorized entry.
Modifying Users
Although any user type can modify their password and user description, only the administrator can modify another user's information. The authentication mode can be modified while modifying the username and password.
To change user properties:
Step 1 ![]() Click the Users tab.
Click the Users tab.
The Manage User page appears.
Step 2 ![]() Click the correct username to access the Modify User page for that user.
Click the correct username to access the Modify User page for that user.
Step 3 ![]() If you want to change the authentication mode, select an authentication mode for the user from the drop-down list. The authentication modes are:
If you want to change the authentication mode, select an authentication mode for the user from the drop-down list. The authentication modes are:
Local - Authenticates the user credentials in the RDU database.
RDU Defaults - Authenticates the user with the authentication mode configured in the RDU Defaults page.
RADIUS - Authenticates the user credential in the RADIUS server.
You may also remove the already selected authentication mode of the user, from the drop-down list. In that case, the user would be authenticated based on the mode configured in the RDU defaults page.
Note ![]() For RADIUS mode, configuration properties must be specified in RDU Defaults page. For more information, see section Configuration Details for RADIUS Authentication of chapter Configuring Cisco Broadband Access Center.
For RADIUS mode, configuration properties must be specified in RDU Defaults page. For more information, see section Configuration Details for RADIUS Authentication of chapter Configuring Cisco Broadband Access Center.
Step 4 ![]() For Local and RDU Defaults authentication mode, make the necessary changes to the password, confirm the password, and the user's description. Ensure that the password that you enter has at least 8 characters.
For Local and RDU Defaults authentication mode, make the necessary changes to the password, confirm the password, and the user's description. Ensure that the password that you enter has at least 8 characters.
Note ![]() For RADIUS authentication mode, user does not need to enter password.
For RADIUS authentication mode, user does not need to enter password.
Step 5 ![]() Change the number of concurrent sessions a user can have by modifying the value in the Number of sessions allowed field. If you do not specify any value in this filed, the number of sessions allowed for the user would be decided on the value of the field at the RDU defaults page.
Change the number of concurrent sessions a user can have by modifying the value in the Number of sessions allowed field. If you do not specify any value in this filed, the number of sessions allowed for the user would be decided on the value of the field at the RDU defaults page.
Step 6 ![]() Click Submit.
Click Submit.
The Manage Users page appears with the changed user information.
Deleting Users
Only the administrator can delete any other user that appears in the Manage Users page. You cannot delete the default user, called admin. To delete a user:
Step 1 ![]() Click Users.
Click Users.
The Manage User page appears.
Step 2 ![]() Click the Delete icon (
Click the Delete icon ( ) corresponding to the user you want to delete.
The Delete User dialog box appears.
Step 3 ![]() Click OK.
Click OK.
The Manage Users page appears without the deleted user.
Device Management
Use the Devices menu to provision and manage various devices. You can:
•![]() Search for a specific device or for a group of devices that share criteria that you specify. See Searching for Devices.
Search for a specific device or for a group of devices that share criteria that you specify. See Searching for Devices.
•![]() Add, modify, or delete devices in the RDU database. See:
Add, modify, or delete devices in the RDU database. See:
•![]() View device data, such as configuration, and properties. See Viewing Device Details.
View device data, such as configuration, and properties. See Viewing Device Details.
•![]() Regenerate device configurations. See Regenerating Device Configurations.
Regenerate device configurations. See Regenerating Device Configurations.
•![]() Relate and unrelate any device to a specific group. See Relating and Unrelating Devices.
Relate and unrelate any device to a specific group. See Relating and Unrelating Devices.
•![]() Reset, or reboot, a device. See Resetting Devices.
Reset, or reboot, a device. See Resetting Devices.
Manage Devices Page
The Manage Devices page appears when you click the Devices tab on the primary navigation bar. You can also click the Devices link on the Main Menu to get to the Manage Devices page.
Searching for Devices
Using Cisco BAC, you can search for device information in a number of ways.
To select the search type, from the Manage Devices page, click the Search Type drop-down list. Subsequent search pages contain screen components that may be unique to the search type that you selected.
The Manage Devices page uses two separate but related areas to generate search results that allow you to manage the devices in your network. These areas are the:
•![]() Search Type drop-down list, which defines which search to perform.
Search Type drop-down list, which defines which search to perform.
•![]() An additional value field, which qualifies the search type that you selected. These fields include IP Address, MAC Address or MAC Address wildcard, Group Name (Group Type), and Owner ID.
An additional value field, which qualifies the search type that you selected. These fields include IP Address, MAC Address or MAC Address wildcard, Group Name (Group Type), and Owner ID.
From the Manage Devices page, you can perform these searches:
•![]() DUID Search—Searches using the DHCP Unique Identifier (DUID) of a device in an IPv6 environment. The accepted format for a DUID is a two-octet type code represented in network byte order, followed by a variable number of octets that make up the identifier; for example, 00:03:00:01:02:03:04:05:07:a0. See Troubleshooting Devices by Device ID, for information on how you can effectively use this search criteria.
DUID Search—Searches using the DHCP Unique Identifier (DUID) of a device in an IPv6 environment. The accepted format for a DUID is a two-octet type code represented in network byte order, followed by a variable number of octets that make up the identifier; for example, 00:03:00:01:02:03:04:05:07:a0. See Troubleshooting Devices by Device ID, for information on how you can effectively use this search criteria.
•![]() FQDN Search—Searches by using the fully qualified domain name (FQDN) associated with the device that is assigned by the DNS Server. This search is especially useful when the device MAC address is unknown. For example, www.myhost.example.com is a fully qualified domain name. Where myhost identifies the host, example identifies the second-level domain, and .com identifies the third-level domain.
FQDN Search—Searches by using the fully qualified domain name (FQDN) associated with the device that is assigned by the DNS Server. This search is especially useful when the device MAC address is unknown. For example, www.myhost.example.com is a fully qualified domain name. Where myhost identifies the host, example identifies the second-level domain, and .com identifies the third-level domain.
•![]() IP Address Search—Searches by returning all devices on the network that currently have the specified DHCP leased IP address.
IP Address Search—Searches by returning all devices on the network that currently have the specified DHCP leased IP address.
•![]() MAC Address Search—Searches by using the precise MAC address for a specific modem or all devices with a specific vendor-prefix that unambiguously identifies the equipment vendor. The vendor-prefix is the first three octets of the MAC address. For example, for MAC address 1,6,aa:bb:cc:dd:ee:ff, the vendor-prefix is "aa:bb:cc". Therefore, if you perform a MAC address search, you can identify the manufacturer and the type of device. See Troubleshooting Devices by Device ID, for information on how you can effectively use this search criteria.
MAC Address Search—Searches by using the precise MAC address for a specific modem or all devices with a specific vendor-prefix that unambiguously identifies the equipment vendor. The vendor-prefix is the first three octets of the MAC address. For example, for MAC address 1,6,aa:bb:cc:dd:ee:ff, the vendor-prefix is "aa:bb:cc". Therefore, if you perform a MAC address search, you can identify the manufacturer and the type of device. See Troubleshooting Devices by Device ID, for information on how you can effectively use this search criteria.
•![]() Group search—Searches devices that are part of a particular group or group type.
Group search—Searches devices that are part of a particular group or group type.
•![]() Owner ID Search—Searches by using the owner ID associated with the device. The owner ID may identify the service subscriber's account number, for example. This search function does not support wildcard searching.
Owner ID Search—Searches by using the owner ID associated with the device. The owner ID may identify the service subscriber's account number, for example. This search function does not support wildcard searching.
•![]() Provisioning Group Search—Searches by using the provisioning group to which the device belongs.
Provisioning Group Search—Searches by using the provisioning group to which the device belongs.
•![]() Class of Service search includes:
Class of Service search includes:
–![]() Registered Class of Service search—Searches by using the Class of Service that a device has been provisioned with.
Registered Class of Service search—Searches by using the Class of Service that a device has been provisioned with.
–![]() Related Class of Service search—Searches by using both the registered and selected Class of Service.
Related Class of Service search—Searches by using both the registered and selected Class of Service.
–![]() Selected Class of Service search—Searches by using the Class of Service selected by the RDU for a device that, for one reason or another, cannot retain its registered Class of Service.
Selected Class of Service search—Searches by using the Class of Service selected by the RDU for a device that, for one reason or another, cannot retain its registered Class of Service.
•![]() DHCP Criteria search includes:
DHCP Criteria search includes:
–![]() Registered DHCP Criteria search—Searches for devices that belong to certain DHCP Criteria.
Registered DHCP Criteria search—Searches for devices that belong to certain DHCP Criteria.
–![]() Related DHCP Criteria search—Searches using both the registered and selected DHCP Criteria.
Related DHCP Criteria search—Searches using both the registered and selected DHCP Criteria.
–![]() Selected DHCP Criteria search—Searches using the DHCP Criteria selected by the RDU for a device that, for one reason or another, cannot retain its registered DHCP Criteria.
Selected DHCP Criteria search—Searches using the DHCP Criteria selected by the RDU for a device that, for one reason or another, cannot retain its registered DHCP Criteria.
Note ![]() Normally, the Related and Selected Class of Service and the Related and Selected DHCP Criteria are identical. If they are not, you should investigate and modify the Selected Class of Service/DHCP Criteria to match the Related Class of Service/DHCP Criteria.
Normally, the Related and Selected Class of Service and the Related and Selected DHCP Criteria are identical. If they are not, you should investigate and modify the Selected Class of Service/DHCP Criteria to match the Related Class of Service/DHCP Criteria.
Some searches that you can perform allow the use of a wildcard character (*) to enhance the search function. Cisco BAC provides specific wildcards for each search, as described in Table 12-1.
Note ![]() We do not recommend using the wildcard search (*) in systems that support hundreds of thousands, or more, devices. Such a search can return thousands of results, and use extensive system resources so as to impact performance.
We do not recommend using the wildcard search (*) in systems that support hundreds of thousands, or more, devices. Such a search can return thousands of results, and use extensive system resources so as to impact performance.
Figure 12-1 identifies a sample Manage Devices page featuring a search for devices using the DUID search option.
Figure 12-1 Manage Devices Page
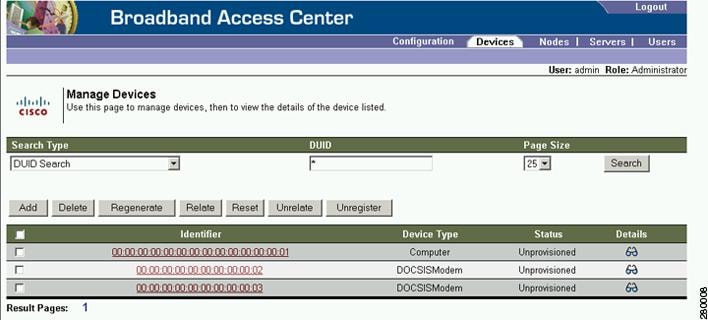
A Page Size drop-down list on the Manage Devices page lets you limit the number of search results that display per page. You can select 25, 50, or 75 results for display. If the number of results returned for a search exceeds the number selected, a screen prompt appears at the lower left corner of the page. These controls let you scroll backward or forward one page at a time, or to select a specific page.
A maximum of 1,000 results are returned for any query, with a maximum of 75 results appearing per page. To change the default maximum:
1. ![]() Change the /adminui/maxReturned property in the BPR_HOME/rdu/conf/adminui.properties file.
Change the /adminui/maxReturned property in the BPR_HOME/rdu/conf/adminui.properties file.
2. ![]() Restart the Cisco BAC Tomcat process for the administrator user interface:
Restart the Cisco BAC Tomcat process for the administrator user interface:
# /etc/init.d/bprAgent restart tomcat
Device Management Controls
The device management controls are located directly below the search function fields and are generally used with the search function. For example, you might search for devices belonging to a specific group of devices in order to perform some sort of management function.
The following buttons are available, although each management function may not be available depending on the search type you use.
•![]() Add—Use the Add button to add a new device to the RDU database. See Adding Device Records.
Add—Use the Add button to add a new device to the RDU database. See Adding Device Records.
•![]() Delete—Use the Delete button to delete a device from the RDU database. See Deleting Devices.
Delete—Use the Delete button to delete a device from the RDU database. See Deleting Devices.
•![]() Regenerate—Use the Regenerate button to force immediate regeneration of configurations for selected devices. See Regenerating Device Configurations.
Regenerate—Use the Regenerate button to force immediate regeneration of configurations for selected devices. See Regenerating Device Configurations.
•![]() Relate—Use the Relate button to associate a device (using its MAC address or its DUID) with a specific group. See Relating and Unrelating Devices.
Relate—Use the Relate button to associate a device (using its MAC address or its DUID) with a specific group. See Relating and Unrelating Devices.
•![]() Reset—Use the Reset button to automatically reboot a device.
Reset—Use the Reset button to automatically reboot a device.
•![]() Unrelate—Use the Unrelate button to cancel the relationship between a selected device and the group that the device is currently related to. See Relating and Unrelating Devices.
Unrelate—Use the Unrelate button to cancel the relationship between a selected device and the group that the device is currently related to. See Relating and Unrelating Devices.
Searching for devices returns results under the following headings or links that appear on the page:
•![]() Identifier—Identifies all devices matching the search criteria. Each of the identifiers that appear links to another page from which you can modify the device.
Identifier—Identifies all devices matching the search criteria. Each of the identifiers that appear links to another page from which you can modify the device.
•![]() Device Type—Displays the available device types. Available selections include:
Device Type—Displays the available device types. Available selections include:
–![]() CableHome MAN-Data
CableHome MAN-Data
–![]() CableHome MAN-WAN
CableHome MAN-WAN
–![]() DOCSIS Modem
DOCSIS Modem
–![]() Computer
Computer
–![]() PacketCable Multimedia Terminal Adapter (MTA)
PacketCable Multimedia Terminal Adapter (MTA)
–![]() Set-top box (STB)
Set-top box (STB)
•![]() Status—Identifies whether or not the device is provisioned. A provisioned device is one that has been registered using the application programming interface (API), or the administrator user interface, and has booted on the network.
Status—Identifies whether or not the device is provisioned. A provisioned device is one that has been registered using the application programming interface (API), or the administrator user interface, and has booted on the network.
•![]() Details—Displays all available details for the selected device. For additional information, see Viewing Device Details.
Details—Displays all available details for the selected device. For additional information, see Viewing Device Details.
Viewing Device Details
You can view the details of any device identified in the search results. To view any device details, click the View Details icon ( ) corresponding to the device you want to view, and the View Device Details page appears.
Note ![]() The information that appears in the View Device Details page largely depends on the type of device you choose. The sample figures used in Table 12-2 identify the details that typically appear for most devices.
The information that appears in the View Device Details page largely depends on the type of device you choose. The sample figures used in Table 12-2 identify the details that typically appear for most devices.
|
|
|
|---|---|
|
|
|
Device Type |
Identifies the device type; for example, a DOCSIS modem. |
MAC Address |
Identifies the MAC address of the device. |
DUID |
Identifies the DUID of the device. |
FQDN |
Identifies the fully qualified domain name (FQDN) for the device; for example, IGW-1234.EXAMPLE.COM. |
Host Name |
Identifies the host. For example, in the FQDN description above, IGW-1234 is the hostname. |
Domain Name |
Identifies the domain within which the host resides. For example, in the FQDN description above, EXAMPLE.COM is the domain name. |
OID |
Specifies the Object Identifier, which is the value that identifies a specific SNMP Object in the MIB database. |
Revision Number |
Identifies the OID revision numbers that are validated before processing. |
Behind Device |
Identifies the device that is behind this device. |
Provisioning Group |
Identifies the provisioning group to which the device has been pre-assigned or assigned automatically. This is an active link that, if clicked, displays the Provisioning Group Details page. |
Registered DHCP Criteria |
Identifies the DHCP Criteria used. Except in the case of the default DHCP Criteria, this is an active link that, if clicked, displays the appropriate Modify DHCP Criteria page. If you select the default DHCP Criteria, the DHCP Criteria that is configured as the default on the Systems Defaults page is applied. |
Device Properties |
Identifies any properties, other than those that appear on this page, that can be set for this device. This field includes the display of custom properties. |
Device Provisioned State |
Specifies if the device is provisioned. A device is provisioned only when it is registered and has booted on the network. |
Device Registered State |
Identifies if the device is registered. |
Client Identifier |
Identifies the client identification used by the device in its DHCP messages. |
Client Request Host Name |
Identifies the hostname that the client requests in its DHCP messages. |
Registered Class of Service |
Identifies the Class of Service assigned to the device. This is an active link that, if clicked, displays the appropriate Modify Class of Service page. If a different Class of Service has been selected for the device by extension, an additional field with Selected Class of Service appears. |
Owner Identifier |
Identifies the device. This may be a user ID or an account number; the field may also be blank. |
Detected Properties |
Identifies properties returned by the RDU device-detection extensions when configuration for the device is generated. |
Selected Properties |
Identifies properties returned by the RDU service-level selection extensions for the detected device type when the configuration for the device is generated. |
Is Behind Required Device |
Specifies "false" if the DeviceDetailsKeys.IS_BEHIND_REQUIRED_DEVICE property has been used to establish a required relay agent device and the service-level selection extension determines that this device did not boot behind the required relay agent. |
Is In Required Provisioning Group |
Specifies "false" if the IPDeviceKeys.MUST_BE_IN_PROV_GROUP property has been used to establish a required provisioning group and the service-level selection extensions determine that this device did not boot in the required provisioning group. |
Selected Access |
Identifies the access granted to the device by the service-level selection extensions: • • • • |
Selected Class of Service |
Identifies the name of the Class of Service used to generate the configuration for the device. This is an active link that, if clicked, displays the appropriate Modify Class of Service page. |
Selected DHCP Criteria |
Identifies the name of the DHCP Criteria used to generate the configuration for the device. This is an active link that, if clicked, displays the appropriate Modify DHCP Criteria page. |
Selected Explanation |
Provides a textual description of why the service-level selection extensions selected the access they granted the device. For example, the device may have been granted default access because it did not boot in its required provisioning group. |
Selected Reason |
Identifies why the service-level selection extensions selected the access they granted the device as an enumeration code. The possible values are: • • • • • • • • Most of these indicate violations of requirements for granting registered or promiscuous access, resulting in default access being granted. |
Related Group Name (Group Type) |
Identifies the groups to which this device is related. This is an active link that, if clicked, displays the appropriate Modify Group page. See Group Management. |
|
Note |
|
DHCP Inform Dictionary |
Identifies additional information that the Cisco Network Registrar extensions send to the RDU when requesting the generation of a configuration. This is for internal Cisco BAC use only. |
DHCP Request Dictionary |
Identifies the DHCP Discover or DHCP Request packet details sent from the Network Registrar extensions to the RDU when requesting the generation of a configuration. |
DHCP Response Dictionary |
This field is for internal Cisco BAC use only; it should always be empty. |
DHCP Environment Dictionary |
This field is for internal Cisco BAC use only; it should always be empty. |
|
Note |
|
IP Address |
Identifies the IPv4 address of the device. |
DHCP Lease Properties |
Identifies the lease properties, along with an IPv4 update, that Network Registrar sends to the RDU. |
|
Note |
|
DHCPv6 Inform Dictionary |
Identifies additional information that the Cisco Network Registrar extensions send to the RDU when requesting the generation of a configuration. This is for internal Cisco BAC use only. |
DHCPv6 Request Dictionary |
Identifies the DHCP Discover or DHCP Request packet details sent from the Network Registrar extensions to the RDU when requesting the generation of a configuration. |
DHCPv6 Relay Request Dictionary |
Identifies DHCP packet details sent from the Network Registrar extensions to the RDU when requesting the generation of a configuration. This data, however, is derived from the CMTS, and includes information on the CMTS, and the DOCSIS version that the CMTS uses. |
DHCPv6 Response Dictionary |
This field is for internal Cisco BAC use only; it should always be empty. |
DHCPv6 Environment Dictionary |
This field is for internal Cisco BAC use only; it should always be empty. But if you set a value for the Attributes from Environment Dictionary on the Network Registrar default (Configuration > Defaults > NR Defaults) page, that value appears here. |
|
Note |
|
IP Address |
Identifies the IPv6 address of the device. |
DHCPv6 Lease Properties |
Identifies the lease properties, along with an IPv6 update, that Network Registrar sends to the RDU. |
|
Note |
|
XGCP Ports |
Identifies the ports on which the Gateway Control Protocol is active. |
DOCSIS Version |
Identifies the DOCSIS version currently in use. |
Managing Devices
The Devices menu lets you add devices to the RDU database and update preprovisioned data. Device management includes:
•![]() Adding, deleting, and modifying RDU devices records
Adding, deleting, and modifying RDU devices records
•![]() Regenerating configurations
Regenerating configurations
•![]() Relating devices to management objects, such as Provisioning Group, Class of Service, and Group.
Relating devices to management objects, such as Provisioning Group, Class of Service, and Group.
This section describes how to perform various device management functions on new or existing devices. Several information fields appear consistently in all device management pages. These fields include:
•![]() Device Type—When adding a device, this is a drop-down list that identifies the available device types you can create within Cisco BAC. Available selections, as they appear on screen, include:
Device Type—When adding a device, this is a drop-down list that identifies the available device types you can create within Cisco BAC. Available selections, as they appear on screen, include:
–![]() CableHomeWanData
CableHomeWanData
–![]() CableHomeWanMan
CableHomeWanMan
–![]() Computer
Computer
–![]() DOCSISModem
DOCSISModem
–![]() PacketCableMTA
PacketCableMTA
–![]() STB
STB
When modifying a device, the device type cannot be edited or changed.
•![]() MAC Address—Identifies the MAC address of the device.
MAC Address—Identifies the MAC address of the device.
Enter the MAC address of the device being added in this field. When doing this, ensure that you enter the commas (,) and colons (:) appropriately. For example, 1,6,00:00:00:00:00:AE.
•![]() DUID—Identifies the DUID of the device.
DUID—Identifies the DUID of the device.
Enter the DUID of the device being added in this field. When doing this, ensure that you enter the colons (:) appropriately. For example, 00:03:00:01:02:03:04:05:06:a0.
•![]() Host Name—Identifies the device host. For example, from an FQDN of node.example.com, node is the hostname.
Host Name—Identifies the device host. For example, from an FQDN of node.example.com, node is the hostname.
•![]() Domain Name—Identifies the domain within which the host resides. For example, from an FQDN of node.example.com, example.com is the domain name.
Domain Name—Identifies the domain within which the host resides. For example, from an FQDN of node.example.com, example.com is the domain name.
•![]() Owner Identifier—Identifies the device by using something other than the hostname. This may be a user ID, or an account number; for example, 1000000000000000000. You can also leave this field blank.
Owner Identifier—Identifies the device by using something other than the hostname. This may be a user ID, or an account number; for example, 1000000000000000000. You can also leave this field blank.
•![]() Registered Class of Service—Specifies the Class of Service that the device is provisioned with; for example, the default option or a Class of Service that you defined.
Registered Class of Service—Specifies the Class of Service that the device is provisioned with; for example, the default option or a Class of Service that you defined.
•![]() Registered DHCP Criteria—Specifies the DHCP Criteria that the device is provisioned with; for example, the default option or a DHCP Criteria that you defined.
Registered DHCP Criteria—Specifies the DHCP Criteria that the device is provisioned with; for example, the default option or a DHCP Criteria that you defined.
Adding Device Records
To add a device record:
Step 1 ![]() From the Manage Devices page, click Add.
From the Manage Devices page, click Add.
The Add Device page appears.
Step 2 ![]() Choose the device type from the options available in the drop-down list.
Choose the device type from the options available in the drop-down list.
Step 3 ![]() Enter details for the other fields on the page, such as MAC address, DUID, and hostname.
Enter details for the other fields on the page, such as MAC address, DUID, and hostname.
Step 4 ![]() Choose the Class of Service, and the DHCP Criteria registered for the device.
Choose the Class of Service, and the DHCP Criteria registered for the device.
Step 5 ![]() In addition to the values that you provided for the device earlier, you can optionally add new values for existing property name/value pairs.
In addition to the values that you provided for the device earlier, you can optionally add new values for existing property name/value pairs.
•![]() Property Name—Identifies the name of the custom or built-in device property.
Property Name—Identifies the name of the custom or built-in device property.
•![]() Property Value—Identifies the value of the property.
Property Value—Identifies the value of the property.
Step 6 ![]() Click Submit.
Click Submit.
Modifying Device Records
To modify a device record:
Step 1 ![]() From the Manage Devices page, click the Identifier link corresponding to the device.
From the Manage Devices page, click the Identifier link corresponding to the device.
The Modify Device page appears.
Step 2 ![]() Enter data that you want to add or change. You can modify any existing property name/value pairs by clicking Add, or delete any of them by clicking Delete.
Enter data that you want to add or change. You can modify any existing property name/value pairs by clicking Add, or delete any of them by clicking Delete.
Step 3 ![]() Click Submit to save the changes made to this device.
Click Submit to save the changes made to this device.
To delete the values that you entered, click Reset.
Deleting Devices
Deleting device records is a simple process, but one that you should use carefully. To undo the delete, you must restore a previously backed-up database or readd the device. If restoration of a backed-up database becomes necessary, see Database Restore.
To delete a device record:
Step 1 ![]() From the Manage Devices page, locate the device that you want to delete. You can use one of the search types for this purpose.
From the Manage Devices page, locate the device that you want to delete. You can use one of the search types for this purpose.
Step 2 ![]() Check the check box to the left of the device.
Check the check box to the left of the device.
Step 3 ![]() Click Delete.
Click Delete.
The device record stored in the RDU database is removed.
Regenerating Device Configurations
The Regenerate button or API operation forces immediate regeneration of configurations for a device that are sent to the DPEs in the device's provisioning group.
Normally, the process of regenerating the configuration is automatically triggered following changes to the device, Class of Service, or other such impacting changes. However, after a change to a Class of Service, the system takes time to regenerate configurations for all devices. You can use the Regenerate button to expedite regeneration of configurations for a given device; this option is especially useful during proactive troubleshooting.
It is sometimes necessary to change many Class of Service or DHCP Criteria parameters. When this happens, existing device configurations become stale and require regeneration of the configuration. To eliminate the need to manually regenerate each configuration, and reduce the potential for introducing errors, Cisco BAC provides a configuration regeneration service (CRS) that you can use to automatically regenerate all device configurations.
Device configurations are automatically regenerated whenever:
•![]() A file related to a Class of Service, that is, a template or script, is updated.
A file related to a Class of Service, that is, a template or script, is updated.
•![]() The default Class of Service or DHCP Criteria for a device type is changed.
The default Class of Service or DHCP Criteria for a device type is changed.
•![]() A DHCP Criteria property is changed.
A DHCP Criteria property is changed.
•![]() The provisioning group object is changed via the administrator user interface or the API.
The provisioning group object is changed via the administrator user interface or the API.
•![]() The Class of Service object properties are changed.
The Class of Service object properties are changed.
•![]() The DPE sends a configuration regeneration request to the RDU.
The DPE sends a configuration regeneration request to the RDU.
•![]() The device properties or relationship are updated.
The device properties or relationship are updated.
•![]() Extended Dynamic TFTP Filename scripts associated to devices are replaced.
Extended Dynamic TFTP Filename scripts associated to devices are replaced.
Some configurations cannot be automatically regenerated because Cisco BAC cannot determine if the change impacts device configuration. In such cases, manually regenerate configurations using the generationConfiguration() method or from the administrator user interface. Configurations that you must manually regenerate are those that become necessary when:
•![]() A technology default is changed, except for the default Class of Service and the default DHCP Criteria. Changing the technology default properties for the default Class of Service and DHCP Criteria does trigger regeneration of the devices that are given the default DHCP Criteria or default Class of Service.
A technology default is changed, except for the default Class of Service and the default DHCP Criteria. Changing the technology default properties for the default Class of Service and DHCP Criteria does trigger regeneration of the devices that are given the default DHCP Criteria or default Class of Service.
•![]() The system defaults are changed.
The system defaults are changed.
•![]() A file that is included within another DOCSIS template is changed.
A file that is included within another DOCSIS template is changed.
Note ![]() Regardless of how configurations are regenerated, they are not propagated to the devices until the device configuration is activated, that is, the device contacts the DPE either on schedule or as a result of a connection request initiated from the DPE.
Regardless of how configurations are regenerated, they are not propagated to the devices until the device configuration is activated, that is, the device contacts the DPE either on schedule or as a result of a connection request initiated from the DPE.
To regenerate a configuration for a device:
Step 1 ![]() From the Manage Devices page, locate the device for which you want to regenerate a configuration. You can use one of the search types for this purpose.
From the Manage Devices page, locate the device for which you want to regenerate a configuration. You can use one of the search types for this purpose.
Step 2 ![]() Check the check box to the left of the device.
Check the check box to the left of the device.
Step 3 ![]() Click Regenerate.
Click Regenerate.
The RDU regenerates a configuration for the specific device.
Relating and Unrelating Devices
The concept of relating devices is similar to that of Class of Service or DHCP Criteria inasmuch as a device is related to a specific Class of Service or to a specific DHCP Criteria. The significant difference is that the Class of Service and DHCP Criteria are considered to be predefined groups and that you use groups to group devices into arbitrary groups that you define.
In this context, the Relate function lets you associate a device, using its MAC address or DUID, to a specific group, which is in turn associated with a specific group type.
By relating a device to a specific group, information indicating that the device is related to a specific group is stored in the database. If you relate the device to the predefined system-diagnostics (system) group, you can use available information to troubleshoot potential problems.
Relating a Device to a Group
You can relate and unrelate only one device at a time from the administrator user interface.
To relate a device:
Step 1 ![]() From the Manage Devices page, locate the device that you want to relate to a group. You can use one of the search types for this purpose.
From the Manage Devices page, locate the device that you want to relate to a group. You can use one of the search types for this purpose.
Step 2 ![]() Check the check box to the left of the device.
Check the check box to the left of the device.
Step 3 ![]() Click Relate. The Relate Device to Group page appears.
Click Relate. The Relate Device to Group page appears.
Step 4 ![]() Select the group type from the drop-down list and the group from the list of defined groups.
Select the group type from the drop-down list and the group from the list of defined groups.
Note ![]() To select multiple groups from the Groups list, press Control or Shift.
To select multiple groups from the Groups list, press Control or Shift.
Step 5 ![]() Click Submit.
Click Submit.
To verify if the device is related to the group you specified, click the View Details icon corresponding to the device. On the Device Details page that appears, check the status against Related Group Name (Group Type).
Unrelating a Device from a Group
To unrelate a device from a group:
Step 1 ![]() From the Manage Devices page, locate the device that you want to unrelate from a group.
From the Manage Devices page, locate the device that you want to unrelate from a group.
Step 2 ![]() Check the check box corresponding to the device identifier, and click the Unrelate button.
Check the check box corresponding to the device identifier, and click the Unrelate button.
The Unrelate Device from Group page appears.
Step 3 ![]() From the list of defined groups, select the group from which you want to unrelate the device.
From the list of defined groups, select the group from which you want to unrelate the device.
Note ![]() To select multiple groups from the Groups list, press Control or Shift.
To select multiple groups from the Groups list, press Control or Shift.
Step 4 ![]() Click Submit. The Manage Devices page appears.
Click Submit. The Manage Devices page appears.
Searching Devices in a Group
To search for devices belonging to a particular group:
Step 1 ![]() From the Manage Devices page, select the Group Search option from the drop-down list under Search Type.
From the Manage Devices page, select the Group Search option from the drop-down list under Search Type.
The Group Name (Group Type) appear.
Step 2 ![]() From the Group Name (Group Type) drop-down list, select the name of the group to which the devices are associated.
From the Group Name (Group Type) drop-down list, select the name of the group to which the devices are associated.
Step 3 ![]() Click Search.
Click Search.
The devices related to the group appear.
Resetting Devices
The Reset button lets you reboot any selected device.
To reset a device:
Step 1 ![]() From the Manage Devices page, locate the device that you want to reboot. You can use one of the search types for this purpose.
From the Manage Devices page, locate the device that you want to reboot. You can use one of the search types for this purpose.
Step 2 ![]() Check the check box corresponding to the device.
Check the check box corresponding to the device.
Step 3 ![]() Click Reset.
Click Reset.
The device reboots.
Group Management
Group management allows you to create, change, and delete groups and group types. Within the context of Cisco BAC, group types can be considered as sets of groups, while groups themselves make up the group type.
Managing Group Types
Access the Manage Groups page by selecting Groups from the Main Menu or the primary navigation bar. Group Type is the default setting when this page appears.
Adding a Group Type
To add a new group type:
Step 1 ![]() From the Manage Groups page, click Add.
From the Manage Groups page, click Add.
The Add Group Type page appears.
Step 2 ![]() Enter a name for the new group type.
Enter a name for the new group type.
Note ![]() If you previously added custom properties, you can choose the appropriate Property Name from the drop-down list and enter the required Property Value. Click Add to increase the number of applicable Property Name/Property Value pairs.
If you previously added custom properties, you can choose the appropriate Property Name from the drop-down list and enter the required Property Value. Click Add to increase the number of applicable Property Name/Property Value pairs.
Step 3 ![]() Enter the priority value for the new group type.
Enter the priority value for the new group type.
The value can range between 1 and 100. The value 1 has the highest priority and 100 has the lowest priority. For example, if the priority values of two member groups are 5 and 20, then the group with priority value 5 has more priority than the group with priority value 20.
By default, the Group Type Priority is set to 50.
If two member groups have the same priority value, the group type names are sorted in alphabetical order to decide the priority.
Step 4 ![]() Click Submit.
Click Submit.
The new group type is recorded in the RDU, and the Manage Group page appears with the new group type added.
Modifying Group Types
To modify group type priority:
Step 1 ![]() From the Manage Groups page, click the specific group type.
From the Manage Groups page, click the specific group type.
The Modify Group Type page appears.
Note ![]() If you previously added custom properties, you can make the necessary changes to the Property Name/Property Value pairs. If you need to delete a specific pair, click Delete next to that pair.
If you previously added custom properties, you can make the necessary changes to the Property Name/Property Value pairs. If you need to delete a specific pair, click Delete next to that pair.
Step 2 ![]() Make the necessary changes to the Group Type Priority.
Make the necessary changes to the Group Type Priority.
Step 3 ![]() Click Submit.
Click Submit.
The Manage Group page appears with the modified details.
Deleting Group Types
To delete group types:
Step 1 ![]() From the Manage Groups page, click the Delete icon () corresponding to the group type you want to delete.
From the Manage Groups page, click the Delete icon () corresponding to the group type you want to delete.
Step 2 ![]() In the confirmation dialog box that appears, click OK to delete the selected group type.
In the confirmation dialog box that appears, click OK to delete the selected group type.
The Manage Groups page appears without the deleted group type.
Managing Groups
You can create and modify groups, delete unwanted groups, relate and unrelate groups and group types, and view the devices that you associated with a group.
Adding a New Group
To add a new group:
Step 1 ![]() On the Manage Groups page, select Groups from the Search Type drop-down list.
On the Manage Groups page, select Groups from the Search Type drop-down list.
Step 2 ![]() Click Add.
Click Add.
The Add Group page appears.
Step 3 ![]() Enter the new group name and select the appropriate Group Type for this group.
Enter the new group name and select the appropriate Group Type for this group.
Note ![]() If you previously added custom properties, you can choose the appropriate Property Name from the drop-down list and enter the required Property Value. Click Add to increase the number of applicable Property Name/Property Value pairs.
If you previously added custom properties, you can choose the appropriate Property Name from the drop-down list and enter the required Property Value. Click Add to increase the number of applicable Property Name/Property Value pairs.
Step 4 ![]() Click Submit.
Click Submit.
The new group is recorded in the RDU, and the Manage Groups page appears with the new group added.
Searching for Devices in a Group
To view devices associated with a group:
Step 1 ![]() From the Manage Groups page, select the Groups option from the Search Type drop-down list.
From the Manage Groups page, select the Groups option from the Search Type drop-down list.
Step 2 ![]() You can choose to search either by group type or group name.
You can choose to search either by group type or group name.
•![]() By Group Type—Provides a drop-down list of predefined groups.
By Group Type—Provides a drop-down list of predefined groups.
•![]() By Group Name—Provides a Group or Group Wildcard field in which you can enter the name of the name or a wildcard (*) character.
By Group Name—Provides a Group or Group Wildcard field in which you can enter the name of the name or a wildcard (*) character.
Step 3 ![]() Click Search.
Click Search.
Step 4 ![]() Click the View Details icon under the Devices parameter corresponding to the group.
Click the View Details icon under the Devices parameter corresponding to the group.
Doing this displays the Group Search function on the Manage Devices page.
Step 5 ![]() From the Manage Devices page, select the appropriate Group Type. See Searching for Devices, for additional information on search functions.
From the Manage Devices page, select the appropriate Group Type. See Searching for Devices, for additional information on search functions.
The devices associated with the group appear.
Modifying a Group
To modify group properties:
Step 1 ![]() From the Manage Groups page, click the desired group link.
From the Manage Groups page, click the desired group link.
The Modify Group page appears.
Note ![]() If you previously added custom properties, you can make the necessary changes to the Property Name/Property Value pairs. If you need to delete a specific pair, click Delete next to that pair.
If you previously added custom properties, you can make the necessary changes to the Property Name/Property Value pairs. If you need to delete a specific pair, click Delete next to that pair.
Step 2 ![]() Click Submit.
Click Submit.
The Manage Groups page appears with the changed description.
Deleting Groups
You can delete any group that appears in the Manage Groups page by checking the check box corresponding to the group and clicking Delete.
The group is deleted from the database.
Relating and Unrelating Group Types to Groups
The relate and unrelate functions are used to establish a relationship between specific groups and group types.
To either relate or unrelate this relationship:
Step 1 ![]() From the Manage Groups page, choose Groups from the Search Type drop-down list.
From the Manage Groups page, choose Groups from the Search Type drop-down list.
Step 2 ![]() Choose the group type for which you want to relate or unrelate groups using the group type or group name search criteria.
Choose the group type for which you want to relate or unrelate groups using the group type or group name search criteria.
Step 3 ![]() Click Search.
Click Search.
The specified group appears.
Step 4 ![]() Click the Relate to Group or Unrelate from Group link.
Click the Relate to Group or Unrelate from Group link.
Depending on the link you clicked, either the Relate Group or the Unrelate Group page appears.
Step 5 ![]() Select the appropriate Group Type from the drop-down list, and select the group to which the group is to be related or unrelated.
Select the appropriate Group Type from the drop-down list, and select the group to which the group is to be related or unrelated.
Step 6 ![]() Click Submit.
Click Submit.
The Manage Groups page appears.
Viewing Group Details
To view details relating to a group:
Step 1 ![]() From the Manage Groups page, select the Groups option from the Search Type drop-down list.
From the Manage Groups page, select the Groups option from the Search Type drop-down list.
Step 2 ![]() Using the group type or group name search criteria, choose the group whose details you want to view.
Using the group type or group name search criteria, choose the group whose details you want to view.
Step 3 ![]() Click Search.
Click Search.
Step 4 ![]() Click the link corresponding to the Group whose details you want to view.
Click the link corresponding to the Group whose details you want to view.
The Modify Group page appears, with details of the Group Name and Group Type.
Viewing Servers
This section describes the Cisco BAC server pages:
•![]() Viewing Device Provisioning Engines
Viewing Device Provisioning Engines
•![]() Viewing Network Registrar Extension Points
Viewing Network Registrar Extension Points
•![]() Viewing Regional Distribution Unit Details
Viewing Regional Distribution Unit Details
Viewing Device Provisioning Engines
The Manage Device Provisioning Engines page (Servers > DPEs) lets you monitor the list of all DPEs currently registered with the Cisco BAC database. Each DPE name that appears on this page is a link to another page that displays the details for that DPE. Click the DPE link to display the details page, whose content is similar to the details described in Table 12-3.
Note ![]() The RDU determines the names of the Network Registrar extensions and DPEs by performing a reverse DNS lookup on the DPE interfaces through which the DPE contacts the RDU.
The RDU determines the names of the Network Registrar extensions and DPEs by performing a reverse DNS lookup on the DPE interfaces through which the DPE contacts the RDU.
|
|
|
|---|---|
|
|
|
Host Name |
Identifies the DPE hostname. |
Port |
Identifies the DPE port number from which DPE established connection to the RDU. |
IP Address |
Identifies the IP address of the DPE. |
Primary Provisioning Group(s) |
Identifies the primary provisioning groups that the selected DPE belongs to. This is an active link that, if clicked, displays the Provisioning Group Details page for that provisioning group. |
Secondary Provisioning Group(s) |
Identifies the secondary provisioning group (provided that this DPE belongs to a secondary provisioning group) that the selected DPE belongs to. This is an active link that, if clicked, displays the Provisioning Group Details page for that provisioning group. |
Properties |
Identifies the properties configured for the DPE. |
Version |
Identifies the version of DPE software currently in use. |
Up Time |
Specifies the total duration that the DPE has been operational since its last startup. |
State |
Identifies whether the DPE is ready for operations. These states include: • • • • • For details on each state, see DPE-RDU Synchronization. Note |
|
This section specifies the status of the TFTP and ToD protocols on the DPE. |
|
TFTPv4 |
Specifies if TFTPv4 is enabled or disabled on the DPE. |
TFTPv6 |
Specifies if TFTPv6 is enabled or disabled on the DPE. |
ToDv4 |
Specifies if ToDv4 is enabled or disabled on the DPE. |
ToDv6 |
Specifies if ToDv6 is enabled or disabled on the DPE. |
|
This section specifies the capabilities that all DPEs in this provisioning group registered with the RDU. |
|
IPv4 - DOCSIS 1.0/1.1 |
Identifies whether the DOCSIS 1.0 and 1.1 versions are enabled on this DPE in the IPv4 mode. |
IPv4 - DOCSIS 2.0 |
Identifies whether the DOCSIS 2.0 version is enabled on this DPE in the IPv4 mode. |
IPv4 - DOCSIS 3.0 |
Identifies whether the DOCSIS 3.0 version is enabled on this DPE in the IPv4 mode. |
IPv4 - PacketCable |
Identifies whether the PacketCable voice technology is enabled on this DPE in IPv4 mode. |
IPv4 - CableHome |
Identifies whether the home networking technology is enabled on this DPE in IPv4 mode. |
IPv6 - DOCSIS 3.0 |
Identifies whether the DOCSIS 3.0 version is enabled on this DPE in the IPv6 mode. |
Dynamic TFTP Compression |
Identifies whether dynamic TFTP compression is enabled on this DPE. By enabling this feature, you can compress the size of dynamic configurations that are stored at the DPE. When used with dynamic TFTP configuration, this feature dramatically reduces the size of the DPE cache. Note |
Extended TFTP Config Filename |
Identifies whether Extended TFTP Config Filename is enabled on this DPE. If you enable this feature, the dynamic TFTP file names can be labeled with dynamic content (for example, COS, vendor-make/model, CPE and so on). |
|
|
|
DPE Log File |
Features the View Details icon that if clicked displays the View Log File Contents page, which provides details of dpe.log. |
|
|
|
Hits |
Identifies the number of cache hits that occurred since the last time the DPE was started. |
Misses |
Identifies the number of cache misses that occurred since the last time the DPE was started. |
Lease Updates |
Identifies the number of IPv4 and IPv6 leases that were updated. |
Files |
Identifies the number of cache files that are currently stored in the DPE. |
Configurations |
Identifies how many device configuration files are saved in cache. |
|
|
|
Packets Received |
Identifies the number of TFTPv4 packets that were received by the selected DPE. |
Packets Dropped |
Identifies the number of TFTPv4 packets that were dropped because of an overloaded DPE. |
Packets Successful |
Identifies the number of TFTPv4 packets that were transmitted successfully. |
Packets Failed |
Identifies the number of TFTPv4 packets that failed during transmission. |
|
|
|
Packets Received |
Identifies the number of TFTPv6 packets that were received by the selected DPE. |
Packets Dropped |
Identifies the number of TFTPv6 packets that were dropped because of an overloaded DPE. |
Packets Successful |
Identifies the number of TFTPv6 packets that were transmitted successfully. |
Packets Failed |
Identifies the number of TFTPv6 packets that failed during transmission. |
|
|
|
Packets Received |
Identifies the number of Time of Day v4 packets that were received by the selected DPE. |
Packets Dropped |
Identifies the number of Time of Day v4 packets that were dropped because of an overloaded DPE. |
Packets Successful |
Identifies the number of Time of Day v4 packets that were transmitted successfully. |
Packets Failed |
Identifies the number of Time of Day v4 packets that failed during transmission. |
|
|
|
Packets Received |
Identifies the number of Time of Day v6 packets that were received by the selected DPE. |
Packets Dropped |
Identifies the number of Time of Day v6 packets that were dropped because of an overloaded DPE. |
Packets Successful |
Identifies the number of Time of Day v6 packets that were transmitted successfully. |
Packets Failed |
Identifies the number of Time of Day v6 packets that failed during transmission. |
|
|
|
SNMP Informs Successful |
Identifies the number of inform requests that were successfully sent. |
SNMP Sets Successful |
Identifies the number of successful SNMP sets. |
SNMP Configuration Informs Successful |
Identifies the number of SNMP informs received from PacketCable MTAs indicating that they were successfully provisioned. |
SNMP Configuration Informs Failed |
Identifies the number of SNMP informs received from PacketCable MTAs indicating that they failed to be provisioned. |
|
|
|
MTA AP Requests Received |
Specifies the number of AP-REQ messages received by the DPE from the MTA. |
MTA AP Responses Sent |
Specifies the number of AP-REP messages sent by the DPE to the MTA. |
|
|
|
KDC FQDN Requests Received |
Specifies the number of FQDN-REQ messages sent by the KDC to the DPE. |
KDC FQDN Responses Sent |
Specifies the number of FQDN-REP messages sent by the DPE to the KDC. |
|
|
|
Provisioning Group Communication |
Specifies details related to the provisioning group to which the DPE belongs. |
IPv4 Provisioning |
Specifies details of the DPE interface that is configured for IPv4 provisioning. These details are: • • • Note |
IPv6 Provisioning |
Specifies details of the DPE interface that is configured for IPv6 provisioning. These details are: • • • Note |
Viewing Network Registrar Extension Points
The Manage Network Registrar Extension Points page (Servers > NRs) lists the extension points for all Network Registrar servers that have been registered with the RDU, and are configured for use with
Cisco BAC. Network Registrar servers automatically register with the RDU when those servers are started.
Each Network Registrar extension point that appears on this page is a link to a secondary page that displays details of that extension point. Click the Network Registrar extension point link to display the details page, which displays details as described in Table 12-4.
|
|
|
|---|---|
|
|
|
Host Name |
Displays the hostname of the system running Network Registrar. |
IP Address |
Identifies the IP address of the Network Registrar server. |
Provisioning Group |
Identifies the provisioning group for the Network Registrar server. This is an active link that, if clicked, displays the Provisioning Group Details page for that provisioning group. |
Properties |
Identifies the properties that are applied to the Network Registrar server. |
Version |
Identifies the extension point software currently in use. |
Up Time |
Specifies the total time that the Network Registrar extension point has been operational since its last startup. This time is indicated in hours, minutes, and seconds. |
State |
Identifies whether the DPE is ready for operations. These states include: • • • • • For details on each state, see DPE-RDU Synchronization. Note |
|
|
|
DHCPv4 |
Identifies if DHCPv4 is enabled or disabled. |
DHCPv6 |
Identifies if DHCPv6 is enabled or disabled. |
|
|
|
IPv4 - DOCSIS 1.0/1.1 |
Identifies whether the DOCSIS 1.0 and 1.1 versions are enabled in the IPv4 mode on the DPE that connects to the Network Registrar server. |
IPv4 - DOCSIS 2.0 |
Identifies whether the DOCSIS 2.0 version is enabled in the IPv4 mode on the the DPE that connects to the Network Registrar server. |
IPv4 - DOCSIS 3.0 |
Identifies whether the DOCSIS 3.0 version is enabled in the IPv4 mode on the DPE that connects to the Network Registrar server. |
IPv4 - PacketCable |
Identifies whether the PacketCable voice technology is enabled in the IPv4 mode on the DPE that connects to the Network Registrar server. |
IPv4 - CableHome |
Identifies whether the home networking technology is enabled in IPv4 mode on the DPE that connects to the Network Registrar server. |
IPv6 - DOCSIS 3.0 |
Identifies whether the DOCSIS 3.0 version is enabled in the IPv6 mode on the DPE that connects to the Network Registrar server. |
|
|
|
DHCPv4 Packets Received |
Identifies the number of DHCPv4 packets that were received. |
DHCPv4 Packets Ignored |
Identifies the number of DHCPv4 packets that were ignored. |
DHCPv4 Packets Dropped |
Identifies the number of DHCPv4 packets that were dropped. |
DHCPv4 Packets Successful |
Identifies the number of DHCPv4 packets that transferred successfully. |
DHCPv4 Packets Failed |
Identifies the number of DHCPv4 packets that failed to be transferred. |
DHCPv6 Packets Received |
Identifies the number of DHCPv6 packets that were received. |
DHCPv6 Packets Ignored |
Identifies the number of DHCPv6 packets that were ignored. |
DHCPv6 Packets Dropped |
Identifies the number of DHCPv6 packets that were dropped. |
DHCPv6 Packets Successful |
Identifies the number of DHCPv6 packets that transferred successfully. |
DHCPv6 Packets Failed |
Identifies the number of DHCPv6 packets that failed to be transferred. |
|
Note |
|
DPE |
Identifies the IP address of the DPE. |
Port |
Identifies the port number from which the DPE established a connection to the RDU. |
Type |
Identifies whether this DPE is a primary or secondary DPE. |
Status |
Identifies whether the DPE is operational. |
Viewing Provisioning Groups
The Manage Provisioning Groups page (Servers > Provisioning Groups) lets you monitor all current provisioning groups. Each provisioning group appearing in this list is a link to its own details page. Click this link to display the details page, which displays details as described in Table 12-5.
|
|
|
|---|---|
|
|
|
Name |
Identifies the provisioning group name selected from the Manage Provisioning Groups page. |
Primary Device Provisioning Engine |
Identifies the hostnames of the DPEs that are primary for this provisioning group. This is an active link that, if clicked, displays the View Device Provisioning Engine Details page. |
Secondary Device Provisioning Engine |
Identifies the hostnames of the DPEs that are secondary for this provisioning group. This is an active link that, if clicked, displays the View Device Provisioning Engine Details page. |
Network Registrar Extension Points |
Identifies the hostname of the Network Registrar server assigned to this provisioning group. This is an active link that, if clicked, displays the View Network Registrar Extension Point Details page. |
Number of Devices |
Specifies the number of devices that belong to this provisioning group. |
|
|
|
LeaseQuery AutoConfig |
Enables or disables autoconfiguration of lease query addresses. This feature is enabled by default. If you enable this feature, the RDU adjusts its lease query configuration to set both IPv4 and IPv6 address lists from the Network Registrar servers in the provisioning group. If you disable this feature, the RDU does not change its lease query configuration upon registering with the Network Registrar server. Note |
Configured IP Address List (IPv4) |
Displays the list of IPv4 addresses on the Network Registrar extensions that the RDU is configured to use for sending DHCPv4 lease query requests. |
Configured IP Address List (IPv6) |
Displays the list of IPv6 addresses on the Network Registrar extensions that the RDU is configured to use for sending DHCPv6 lease query requests. |
|
Using these fields, you manually enable or disable the device type support that DPEs in the provisioning group, based on their capabilities, register with the RDU at startup. If the field is Disabled, it means that the provisioning group is not capable of supporting a given device type or feature. See Provisioning Group Capabilities. The values for these fields include: • • • |
|
IPv4 - DOCSIS 1.0/1.1 |
Enables or disables support for DOCSIS 1.0 and 1.1 modems and the computers behind them in the IPv4 mode. To support this feature, you must also enable TFTPv4 on the DPEs in the provisioning group and the Network Registrar DHCP server that supports DHCPv4. |
IPv4 - DOCSIS 2.0 |
Enables or disables support for all DOCSIS 1.0 and 1.1 devices and DOCSIS 2.0 modems in the IPv4 mode. |
IPv4 - DOCSIS 3.0 |
Enables or disables support for DOCSIS 1.0, 1.1, 2.0, and 3.0 modems in the IPv4 mode and the set-top boxes behind these modems. To support this feature, ensure that all DPEs in the provisioning group run Cisco BAC 4.2. |
IPv4 - PacketCable |
Enables or disables support for PacketCable MTAs in the IPv4 mode. To support this feature, you must enable PacketCable on all your DPEs in the provisioning group. |
IPv4 - CableHome |
Enables or disables support for home networking devices in the IPv4 mode. |
IPv6 - DOCSIS 3.0 |
Enables or disables support for DOCSIS 3.0 modems in the IPv6 mode and the set-top boxes behind these modems. To support this feature, you must enable TFTPv6 on the DPEs in the provisioning group and the Network Registrar DHCP server that supports DHCPv6. |
Dynamic TFTP Compression |
Enables or disables dynamic TFTP compression for DPEs in this provisioning group. If you enable this feature, the dynamic TFTP files that a DPE caches are compressed, thus enhancing DPE performance. Enable dynamic TFTP compression if most of the devices in your network use large files. To use this feature, ensure that all DPEs in the provisioning group run at least Cisco BAC 4.1. |
Extended TFTP Config Filename |
Enables or disables Extended TFTP Config filename for DPEs in this provisioning group. If you enable this feature, the dynamic TFTP file names can be labeled with dynamic content (for example, COS, vendor-make/model, CPE and so on). This gives flexibility to write your own scripts to define the file names. Enable this feature if you want to customize the Dynamic TFTP filenames. To use this feature, ensure that all DPEs in the provisioning group run at least Cisco BAC 4.2. For more information about Extended TFTP filename. refer to TFTP File-Naming Convention. |
Viewing Regional Distribution Unit Details
The RDU option, from the Servers menu, displays details of the RDU as described in Table 12-6.
 Feedback