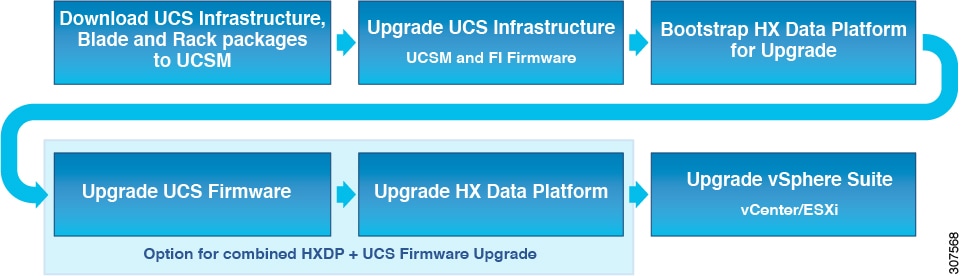
Upgrading to the Intermediate Release
This upgrade requires that you upgrade to an intermediate release before upgrading to your destination release. Perform the following tasks, using the specified software releases to upgrade to your intermediate release:
-
Download software bundles.
-
Install software bundles.
-
Upgrade UCS Firmware to a minimum version of 4.0(4e).
-
Upgrade HyperFlex Data Platform Software to Version 3.5(2f).
-
Perform the second upgrade process to the destination version.
Software Downloads: Upgrading to the Intermediate Release
Download the software bundles needed for your upgrade from the Cisco Software Downloads:
Software Download for UCS Firmware 4.0(4e)
Before starting the upgrade process, download and install the UCS Infra Package that matches your installation as well as the UCS Blade, and the UCS C-series Package.
 Note |
At the time of authoring 4.0(4e) was the compatible UCS server firmware for the suggested HXDP release of 3.5(2f). Before selecting a UCS server firmware to use, start with the current suggested HX release, and choose the corresponding UCS server firmware. For more information about the latest suggested release, see Navigating the Cisco HyperFlex Data Platform Software Downloads. |
Download Link: https://software.cisco.com/download/home/286305544/type/286305994/release/3.5(2f)
UCS Infra Package Download
UCS 6200 Fabric Interconnects: ucs-k9-bundle-infra.4.0.4e.A.bin
6300 series UCS Infra package: ucs-6300-k9-bundle-infra.4.0.4e.A.bin
6400 series UCS Infra package: ucs-6400-k9-bundle-infra.4.0.4e.A.bin
UCS Blade Package:
ucs-k9-bundle-b-series.4.0.4e.B.bin
UCS C-series Package:
ucs-k9-bundle-c-series.4.0.4e.C.bin
Software Download for HXDP Release 3.5(2f)
Before starting the upgrade process, download and install all software bundles needed to complete this upgrade.
-
Upgrade Package: storfs-packages-3.5.2f-31787.tgz
-
Link: https://software.cisco.com/download/home/286305544/type/286305994/release/3.5(2f)
Software Installation
To install your software bundles, follow the detailed steps located in the Cisco UCS Manager Firmware Management Guide
Upgrade the UCS Infrastructure Package
Before you begin:
-
Perform all tasks in the Prerequisites section of this guide.
-
Download the software bundles needed for your upgrade from the Cisco Software Downloads:
Configuring UCS Infrastructure
Perform the following steps:
-
Open the UCS Manager GUI.
-
Select Equipment > Firmware Management > Firmware auto-install
-
Click Install Infrastructure Firmware.
-
The Install Infrastructure Firmware window appears, select ignore all.
-
-
Select the desired UCS infrastructure version. Refer the compatibility matrix to identify the version desired for your use case.
-
Click Next.
-
-
Check the Upgrade Now box.
-
Click Finish.
Note
The expected upgrade behavior is for the UCS Manager to stop and then restart with the new version. Wait until the UCS Manager is back online to log back in to UCS Manager and complete the next steps.
You may check the Ignore All box for warnings are not critical to user environment.
-
If the UCS blade server chassis is present, wait for IO Modules (IOM) to upgrade.
-
Select Equipment > Installed Firmware. Expand each chassis and check the Update Status of the IO Module.
-
During upgrade, the IOM status is Upgrading.
-
When the update process completes, the IOMs state is Pending Next Boot for Activate status.
-
After the IOM upgrade is complete, the IOM state is Ready.
-
-
-
Wait for Subordinate Fabric Interconnects (FI) to be activated.
-
Select Equipment > Installed Firmware > Fabric Interconnects.
-
Check the Activate Status of the kernel and switch images.
Note
During upgrade, the Activate Status is set to Activating.
-
-
During FI reboot, all HX traffic is forwarded to the primary FI (based on ESXi vSwitch failover policy).
-
This will cause a brief traffic interruption.
-
This will not cause storage IO failures.
-
-
Verify subordinate FI has rebooted and joined the UCS cluster.
-
Select Equipment > Installed Firmware > Fabric Interconnects.
-
After activation, the Activate Status of the FI is set to Ready.
-
Verify that the Overall Status of the FI is operable.
-
Verify that the kernel and switch versions of the FI match the desired and updated version.
-
Verify that the FI has no fault.
-
Verify that the FI cluster membership is Subordinate.
-
-
If the UCS blade server chassis is present, wait for IO Modules (IOM) to upgrade.
Note
Only the IOMs connected to the subordinate FI will enter Ready state, IOMs attached to the Primary FI will remain in Pending Next Boot Activate Status.
-
Select Equipment > Blade Chassis > IO Module.
-
Wait for the Activate Status of the IOM to change to Ready.
-
-
Wait until HX traffic is re-pinned to both FIs.
Wait for UCS Manager vNIC faults to be cleared. The fault clearing indicates ESXi has loaded the ENIC driver and the interface is up. The traffic is not re-pinned immediately when the network interface goes up because ESXi has a fail back timer. But the
Net.teampolicyupdelaytimer is very low by default (100ms). -
Verify the HX Cluster is online, and healthy before rebooting the primary fabric interconnect.
-
Access summary tab from the vSphere Web Client Navigator. Select Home > vCenter Inventory Lists > Cisco HyperFlex Systems > Cisco HX Data Platform > cluster > Summary.
-
-
In the UCS manager GUI toolbar, click Pending Activities.
-
Click on Fabric Interconnects tab that display the tasks requiring user acknowledgment before they can complete.
-
Click Reboot Now for each pending activity that you want to deploy immediately.
-
Click OK. Cisco UCS Manager immediately reboots the primary FI and makes the subordinate FI the primary FI (FI failover).
During FI reboot, all HyperFlex traffic is forwarded to the new primary FI. This will cause a brief traffic interruption, but it will not cause storage IO failures.
-
-
Wait for UCS Manager to disconnect, then reconnected the UCS Manager to the other FI. This step is necessary because a UCS fail over occurs during the primary FI reboot (step 15).
-
Verify the FI settings:
-
Verify that the subordinate FI is primary.
-
Verify that the FI cluster membership is Primary.
-
-
Once the FI is activated, Select Equipment > Installed Firmware > Fabric Interconnects.
-
Wait for the Activate Status of the FI to be Ready and verify the following:
-
Check the Overall Status of FI is operable.
-
Check the FI has no fault.
-
Verify FI has rebooted and joined the UCS cluster as subordinate.
-
Check that the FI cluster membership is Subordinate.
-
-
Wait for IOM activation to complete, then select Equipment > Blade Chassis > IO Module.
-
Wait for the Activate Status of the IP module to be Ready.
-
You can monitor the status on the FSM tab.
Note
You will lose connectivity to UCS Manager throughout the entire upgrade. This is normal behavior
-
-
Wait for the HX traffic to re-pin to both FIs.
-
In the UCS manager GUI, wait for all server vNIC faults to clear.
-
In the vSphere Web Client Navigator. Select Home > vCenter Inventory Lists > Cisco HyperFlex Systems > Cisco HX Data Platform > cluster > Summary. Verify the HX Cluster is online and healthy after rebooting the FI.
Combined HXDP and UCS Firmware Upgrade
Upgrade the Plugin User Interface (UI)
-
From the vSphere Web Client Navigator, select vCenter Inventory Lists > Cisco HyperFlex Systems > Cisco HX Data Platform > cluster.
-
Navigate to Actions > Summary and note the Cluster Management IP address.
-
SSH to the cluster management IP address with root privileges.
-
Transfer the latest HX Data Platform upgrade bundle to the controller VM's
/tmpdirectory. Depending on your operating system, use you can either use SCP directly or download third-party tools, such as WinSCP or MobaXterm. -
From the controller VM shell, change to the
/tmpdirectory.
Warning
Do not use any folder other than
/tmpand do not create any subfolders.
-
Uncompress and extract all files to the root using tar
–zxvf <storfs package name>.tgz.Example:
storfs-packages-3.5.2f-31787.tgz -
To invoke the cluster-bootstrap.sh script to bootstrap packages for upgrade, execute the command
~# ./cluster-bootstrap.sh-
Enter the vCenter FQDN or IP address and administrator level username and password.
-
Wait for the system management service to restart and the bootstrap process to complete. Verify if the HX Data Platform Plug-in is now updated.
-
-
Log out from the cluster management IP controller VM.
-
Log out of vSphere Web Client.
Note
Do not merely close the browser.
-
Log in to vSphere Web Client again to refresh the HX Data Platform Plug-in.
-
Verify the plugin version in vCenter by navigating to Administration > Client Plug-Ins > Springpath Plugin in the vSphere Web Client. Confirm the current version matches the new version you are upgrading to.
Upgrade the HXDP/UCS Firmware from the Plugin UI
-
From the vSphere Web Client Navigator, select vCenter Inventory Lists > Cisco HyperFlex Systems > Cisco HX Data Platform > HX-Cluster > Summary.
-
Select Upgrade Cluster.
-
Select both, HX Data Platform and UCS Firmware.
-
Click Next.
-
Navigate to the
.tgzpackage file on your local PC. Upload the Cisco HX Data Platform upgrade bundle. This is the same.tgzpackage file that was used to upgrade the HX Data Platform Plug-in. -
To verify the integrity of the uploaded upgrade package bundle, enter administrator level vCenter credentials.
-
Under Advanced Options, enter the MD5 Checksum # information. The file checksum can be found on the Cisco.com download page by clicking on the download title to reveal the md5 checksum.
-
-
Enter administrator level UCS Manager credentials.
-
To view the current firmware package version, click Discover.
-
Type the latest version of Cisco UCS firmware in the Target version field.
Important
Type the release number exactly as shown, for example 4.0(4e)
-
Click Upgrade.
The Cisco UCS servers are now upgraded with the desired firmware packages. The pending activities are automatically acknowledged in a rolling fashion.
Note
You can monitor the progress in the Cisco UCS Manager GUI, under the FSM tab for the service profile. The Validation screen shows the progress of checks performed. Fix validation errors, if any.
The upgrade process proceeds as follows:
-
HyperFlex cluster readiness for upgrade is checked.
-
One by one, the HX nodes enter maintenance mode.
-
HyperFlex vSphere Installation Bundles (VIBs) on Hypervisor are upgraded.
-
Cisco HX Data Platform is upgraded followed by a reboot of the host server.
-
The HX Data Platform requests Cisco UCS Manager to begin firmware upgrade. This process can take up to 1 hour.
-
HX node exits maintenance mode.
-
Cluster will begin to rebuild back to full health.
-
Once the cluster is healthy, upgrade moves on to the next node in the HyperFlex cluster.
-
Confirm Upgrade is completed
-
 Feedback