New and Changed Information

The following table provides an overview of the significant changes up to this current release. The table does not provide an exhaustive list of all changes or of the new features up to this release.

Cisco ACI CNI plug-in Release Version

Feature

6.1(1)

Cisco Application Centric Infrastructure (ACI) supports Red Hat OpenShift 4.18 nested in Red Hat OpenStack Platform (OSP).

OpenShift 4.18 on OpenStack

Cisco Application Centric Infrastructure (ACI) supports Red Hat OpenShift 4.18 nested in Red Hat OpenStack Platform (OSP) 17.1. To enable this support, Cisco ACI provides customized Ansible modules to complement the upstream OpenShift installer. This document provides instructions and guidance that follows the recommended OpenShift on OpenStack User-Provisioned Infrastructure (UPI) installation process as outlined in the following documents:

  • Installing a cluster on OpenStack with customizations for OpenShift 4.18 on the Red Hat OpenShift website

  • Installing OpenShift on OpenStack User-Provisioned Infrastructure on GitHub


Note


If you have an existing OpenShift 4.17 cluster installed with Cisco ACI CNI, you can upgrade to OCP 4.18 by first upgrading the ACI CNI (refer to the Upgrading the Cisco ACI CNI Plug-in guide), and then following Red Hat documentation to upgrade from OpenShift 4.17 to 4.18.


Network Design and the Cisco ACI CNI Plug-in

This section provides information about the network design that takes advantage of the Cisco ACI Container Network Interface (CNI) plug-in.

The design separates OpenShift node traffic from the pod traffic on different Neutron networks. The separation results in the bootstrap, control, and compute virtual machines (VMs) having two network interfaces, as shown in the following illustration:

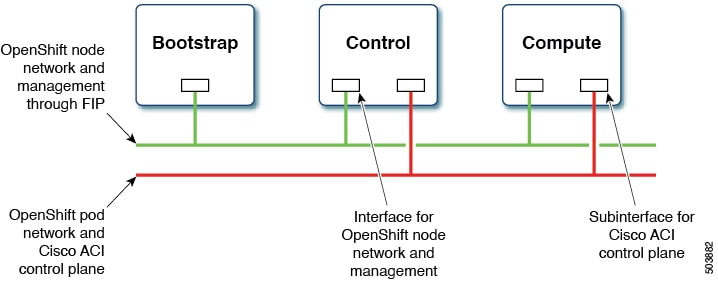
One interface is for the node network and the second is for the pod network. The second interface also carries Cisco ACI control plane traffic. A VLAN tagged subinterface is configured on the second interface to carry the pod traffic and the Cisco ACI control plane traffic.

This network design requires some changes to the Red Hat OpenShift Installer UPI Ansible modules. These changes are implemented in the Cisco-provided OpenShift Installer UPI Ansible modules, which are packaged in the OpenShift installer tar file (openshift_installer-6.1.1<z>.src.tar.gz) that is made available along with the other Cisco ACI CNI 6.1.(1) release artifacts. More specifically, the changes are to:

  • Create a second Neutron network in a separate playbook.

  • Modify the existing playbooks that launch the control, and compute virtual machines (VMs) to:

    • Create a second port on the second Neutron network and add it as a second interface to the VM configuration.

    • Add an extra attribute "nat_destination" to the Neutron floating IP address.

  • Update the playbook that creates the first Neutron network to:

    1. Create the Neutron address-scope to map to a predefined Cisco ACI virtual routing and forwarding (VRF) context.

    2. Create a Neutron subnet-pool for the address-scope in the previous step.

    3. Change the subnet creation to pick a subnet from the subnet-pool in the previous step.

    4. Set the maximum transmission unit (MTU) for the neutron Network (which is picked up from the configuration file described later).

  • In addition to creating a second network interface (and subinterfaces on that interface), the stock ignition files created by the “openshift-install create ignition-configs” step need to be updated. This is being done by additional playbooks, which are also provided.


Note


The configuration required to drive some of the customization in this section done through new parameters in the inventory file.

Prerequisites for Installing OpenShift 4.18

To successfully install OpenShift Container Platform (OCP) 4.18 on OpenStack 17.1, you must meet the following requirements:

Cisco ACI

  1. Configure a Cisco ACI Layer 3 outside connection (L3Out) in an independent Cisco ACI VRF and "common" Cisco ACI tenant so that endpoints can do the following:

    • Reach outside to fetch packages and images.

    • Reach the Cisco Application Policy Infrastructure Controller (APIC).

  2. Configure a separate L3Out in an independent VRF that is used by the OpenShift cluster (configured in the acc-provision input file) so that the endpoints can do the following:

    • Reach API endpoints outside the OpenShift cluster.

    • Reach the OpenStack API server.

    The OpenShift pod network uses this L3Out.

  3. Identify the Cisco ACI infra VLAN.

  4. Identify another unused VLAN that you can use for OpenShift cluster service traffic.

    The service is configured in the service_vlan field in the acc_provision input file for the OpenShift cluster.

OpenStack

  1. Install Red Hat OpenStack Platform (OSP) 17.1 with Cisco ACI Neutron plug-in (release 5.2(3)) in nested mode by setting the following parameters in the Cisco ACI .yaml Modular Layer 2 (ML2) configuration file:

    • ACIOpflexInterfaceType: ovs

    • ACIOpflexInterfaceMTU: 8000

    To update an existing installation (and if the above two parameters are not configured), see Cisco ACI Installation Guide for Red Hat OpenStack Using the OpenStack Platform 17.1 Director on Cisco.com.

  2. Create an OpenStack project and the required quotas to host the OpenShift cluster and perform the other required configuration.

    Follow the procedure Installing a cluster on OpenStack on your own infrastructure for OpenStack 4.18 on the Red Hat OpenStack website.

  3. Create an OpenStack Neutron external network, using the relevant Cisco ACI extensions and mapping to the OpenStack L3Out to include the following:

    • A subnet configured for Secure Network Address Translation (SNAT).

    • A subnet that is configured for floating IP addresses.

    Refer to the chapter "OpenStack External Network" in Cisco ACI Installation Guide for Red Hat OpenStack Using the OpenStack Platform 17.1 Director on Cisco.com.


    Note


    All OpenStack projects can share the OpenStack L3Out and Neutron external network.
  4. If direct access to the OpenShift node network is required (i.e by not using the Neutron Floating IPs) from endpoints that are not managed by the Cisco ACI fabric, identify every IP subnet from where this direct access is anticipated. These IP subnets will later be used to create Neutron subnet pools during the installation process.

  5. Follow the instructions in the section "Red Hat Enterprise Linux CoreOS (RHCOS)" of Installing OpenShift on OpenStack User-Provisioned Infrastructure to obtain the RHCOS and create an OpenStack image:

    $ openstack image create --container-format=bare --disk-format=qcow2 --file rhcos-4.18.0-x86_64-openstack.x86_64.qcow2 rhcos-4.18

OpenShift

Identify the SNAT IP address that will be used by the Cisco ACI Container Network Interface (CNI) for source NATing the traffic from all the pods during installation. You will use the SNAT IP addresses in the cluster_snat_policy_ip configuration in the aci_cni section of the inventory.yaml file.

Installer Host

You need access to a Linux host to run installation scripts with access to node network and OpenStack Director API. It should have the following installed:

  • Install Ansible 6.7 or later.

    Refer to Installing Ansible on the Ansible website.

  • Python 3

  • jq – JSON linting

  • yq – YAML linting: sudo pip install yq

  • python-openstackclient 5.4 or later: sudo pip install python-openstackclient==6.5.0

  • openstacksdk 1.0 and later : sudo pip install openstacksdk==3.0.0

  • python-swiftclient 3.9.0: sudo pip install python-swiftclient==4.5.0

  • Kubernetes module for Ansible: sudo pip install openshift==0.13.2


Note


Cisco has validated the above versions with ansible version 6.7.0 and python 3.8.10. However, subsequent minor releases are also expected to work.


This document uses the name openupi for the OpenShift cluster and the directory structure: ~/openupi/openshift-env/upi.
$ cd ~/
$ mkdir -p openupi/openshift-env/upi
$ cd openupi/
$ tar xfz <path>/openshift_installer-6.1.1.<z>.src.tar.gz
$ cp openshift_installer/upi/openstack/* openshift-env/upi/

Installing OpenShift 4.18 on OpenStack 17.1

You initiate installation from the installer host that you prepared earlier.

Before you begin

Complete the tasks in the Prerequisites section .

Procedure


Step 1

Download and untar the oc client and openshift-install binary file:

$ cd ~/openupi/openshift-env/
$ wget https://mirror.openshift.com/pub/openshift-v4/clients/ocp/latest-4.18/openshift-client-linux.tar.gz
$ tar xfz  openshift-client-linux.tar.gz
$ mv oc /usr/local/bin/
$ wget https://mirror.openshift.com/pub/openshift-v4/clients/ocp/latest-4.18/openshift-install-linux.tar.gz
$ tar xfz openshift-install-linux.tar.gz

Note

 
The links in the preceding text refer to the OpenShift 4.18.16 release, which Cisco has validated. However, subsequent minor releases are also expected to work.

Step 2

Install the acc-provision package present in the Cisco ACI Container Network Interface (CNI) 6.1(1) release artifacts.

Note


Due to Python 3 dependencies that are currently available only on RHEL8, acc-provision tool is supported to only run on RHEL8 operating system.

Step 3

Run the acc-provision tool to configure the Cisco APIC for the OpenShift cluster, which will also generate the manifests for installing the Cisco ACI CNI plug-in.

Example:

$ cd ~/openupi
$ acc-provision -a -c acc-provision-input.yaml -u <user> -p <password> -o aci_deployment.yaml -f openshift-4.18-openstack

This step generates the aci_deployment.yaml file and also a tar file containing the Cisco ACI CNI manifests with the name aci_deployment.yaml.tar.gz. Note the location of the aci_deployment.yaml.tar.gz file; you will need to specify it later in the install-config.yaml file.

The following is an example of an acc-provision input file: (Note that the acc-provision flavor used here is openshift-4.18-openstack.)

#
# Configuration for ACI Fabric
#
aci_config:
  system_id: <cluster-name>             # Every opflex cluster on the same fabric must have a distinct ID
  tenant:
    name: <openstack-tenant-name>
  apic_hosts:                           # List of APIC hosts to connect to for APIC API access
    - <apic-ip>
  apic_login:
    username: <username>
    password: <password>
  vmm_domain:                           # Kubernetes VMM domain configuration
    encap_type: vxlan                   # Encap mode: vxlan or vlan
    mcast_range:                        # Every vxlan VMM on the same fabric must use a distinct range
        start: 225.125.1.1
        end: 225.125.255.255
  # The following resources must already exist on the APIC,
  # this is a reference to use them
  aep: sauto-fab3-aep         # The attachment profile for ports/VPCs connected to this cluster
  vrf:                        # VRF used to create all subnets used by this Kubernetes cluster
    name: l3out_2_vrf         # This should exist, the provisioning tool does not create it
    tenant: common            # This can be tenant for this cluster (system-id) or common
  l3out:                      # L3out to use for this kubernetes cluster (in the VRF above)
    name: l3out-2             # This is used to provision external service IPs/LB
    external_networks:
        - l3out_2_net         # This should also exist, the provisioning tool does not create it
#
# Networks used by Kubernetes
#
net_config:
  node_subnet: 10.11.0.1/27         # Subnet to use for nodes
  pod_subnet: 10.128.0.1/16         # Subnet to use for Kubernetes Pods
  extern_dynamic: 150.3.1.1/24      # Subnet to use for dynamically allocated ext svcs
  extern_static: 150.4.1.1/21       # Optional: Subnet for statically allocated external services
  node_svc_subnet: 10.5.168.1/21    # Subnet to use for service graph
  service_vlan: 1022                # The VLAN used for external LoadBalancer services
  infra_vlan: 4093
  interface_mtu: 1400

Ensure that the system_id you use in the above acc-provision input file conforms to the Cisco ACI Object Naming and Numbering: Best Practices. This will also be the case for the tenant name you choose at the time of the OpenStack project creation (and which you will provide in the input file above).

Step 4

The install, create, wait-for OpenShift installer commands are run from the openshift-env directory.

Ensure that the clouds.yaml file is either present in the current working directory or in ~/.config/openstack/clouds.yaml with the environment OS_CLOUD set to the correct cloud name.

See Configuration for python-openstackclient3.12.3.dev2 on the OpenStack website.

Step 5

Untar the aci_deployment.yaml.tar.gz file which the acc-provision tool generated earlier.

$ cd ~/openupi
$ tar xfz aci_deployment.yaml.tar.gz

Step 6

Create the install-config.yaml as described in the "Install Config" section of Installing OpenShift on OpenStack User-Provisioned Infrastructure for release 4.18 on GitHub.

$ cd ~/openupi/openshift-env
$ ./openshift-install create install-config --dir=upi --log-level=debug

The following is an example of an install-config.yaml file that sets Cisco ACI Container Network Interface (CNI) as the networkType:

apiVersion: v1
baseDomain: noiro.local
compute:
- architecture: amd64
  hyperthreading: Enabled
  name: worker
  platform: {}
  replicas: 0
controlPlane:
  architecture: amd64
  hyperthreading: Enabled
  name: master
  platform: {}
  replicas: 3
metadata:
  creationTimestamp: null
  name: openupi
networking:
  clusterNetwork:
  - cidr: 15.128.0.0/14
    hostPrefix: 23
  machineNetwork:
  - cidr: 15.11.0.0/27
  networkType: CiscoACI
  serviceNetwork:
  - 172.30.0.0/16
platform:
  openstack:
    cloud: openstack
    computeFlavor: aci_rhel_huge
    externalDNS: ["<ip>"]
    externalNetwork: sauto_l3out-2
lbFloatingIP: 60.60.60.199
    octaviaSupport: "0"
    region: ""
    trunkSupport: "1"
    clusterOSImage: rhcos-4.18
publish: External
proxy:
  httpsProxy: <proxy-ip>
  httpProxy: <proxy-ip>
  noProxy: "localhost,127.0.0.1,<add-more-as-relevant>,172.30.0.1,172.30.0.10,oauth-
      openshift.apps.openupi.noiro.local,console-openshift-
      console.apps.openupi.noiro.local,downloads-openshift-      
      console.apps.openupi.noiro.local,downloads-openshift-
      console.apps.openupi.noiro.local,alertmanager-main-openshift-
      monitoring.apps.openupi.noiro.local"
pullSecret: 
sshKey:

Step 7

Edit the file generated in the previous step to match your environment.

As noted in the example, the edits must include changing the networkType as described in the "Fix the Node Subnet" and "Empty Compute Pools" sections of Installing OpenShift on OpenStack User-Provisioned Infrastructure for Release 4.18 on GitHub.

Step 8

Edit the inventory.yaml file to match the relevant fields in the install-config.yaml and acc-provision-input.yaml files, as shown in the following example:

all:
  hosts:
    localhost:
      aci_cni:
        acc_provision_tar: <path>/aci_deployment.yaml.tar.gz
        kubeconfig: <path>/kubeconfig
      ansible_connection: local
      ansible_python_interpreter: "{{ansible_playbook_python}}"

      # User-provided values
      os_subnet_range: '15.11.0.0/27'
      os_flavor_master: 'aci_rhel_huge'
      os_flavor_worker: 'aci_rhel_huge'
      os_image_rhcos: 'rhcos-4.18.'
      os_external_network: 'l3out-2'
      # OpenShift API floating IP address
      os_api_fip: '60.60.60.6'
      # OpenShift Ingress floating IP address
      os_ingress_fip: '60.60.60.8'
      # Subnet pool prefixes
      cluster_network_cidrs: '15.128.0.0/14'
      
      # Name of the SDN.
      os_networking_type: 'CiscoACI'

      # Number of provisioned Control Plane nodes
      # 3 is the minimum number for a fully-functional cluster.
      os_cp_nodes_number: 3
      # Number of provisioned Compute nodes.
      # 3 is the minimum number for a fully-functional cluster.
      os_compute_nodes_number:0
      os_apiVIP: '{{ os_subnet_range | next_nth_usable(5) }}'
      os_ingressVIP: '{{ os_subnet_range | next_nth_usable(7) 
      }}'

Note

 
  • The inventory.yaml file is updated after you run the update_ign.py script later in this procedure. We recommend that you make a copy of the inventory.yaml file at this stage so you can reuse it to install the same cluster again.

  • The Cisco ACI CNI-specific configuration is added to the aci_cni section of the inventory.yaml file. The example in this step captures the required fields; however, more optional configurations are available. For a list of the options see the Optional Configurations section in this guide.

Note that after you run update_ign.py as described in Step 12, some default and derived values are added to the inventory file. For example, to see the configuration with all optional and derived values that are populated, see openshift_installer/upi/openstack/inventory.yaml on GitHub.

Step 9

Generate the OpenShift manifests and copy the Cisco ACI CNI manifests:

Note

 
Remove the control-plane Machines, as described in the "Machines and MachineSets" section of Installing OpenShift on OpenStack User-Provisioned Infrastructure for Release 4.18 on GitHub.
$ cd ~/openupi/openshift-env
$ ./openshift-install create manifests  --log-level debug --dir=upi
# Copy the ACI CNI manifests obtained earlier in Step 5
$ cp ../cluster-network-* upi/manifests/
$ rm -f upi/openshift/99_openshift-cluster-api_master-machines-*.yaml
$ rm -f upi/openshift/99_openshift-machine-api_master-control-plane-machine-set.yaml 

Step 10

Disable the creation of the OpenStack Octavia load balancer for Cisco ACI network type.


$ cd ~/openupi/openshift-env/upi
$ ansible-playbook -i inventory.yaml disable-octavia.yaml

Step 11

Make control-plane nodes unschedulable.

Follow the instructions in the "Make control-plane nodes unschedulable" section of Installing OpenShift on OpenStack User-Provisioned Infrastructure for Release 4.18 on GitHub.

Step 12

Update the ignition files:

$ cd ~/openupi/openshift-env
$ ./openshift-install create ignition-configs --log-level debug --dir=upi
$ cd upi
$ export INFRA_ID=$(jq -r .infraID metadata.json)
$ echo "{\"os_net_id\": \"$INFRA_ID\"}" | tee netid.json
$ source ~/openupi/overcloudrc
# Run the update_ign.py from the Cisco OpenShift installer package
$ python update_ign.py # This assumes that the inventory file is already configured

$ swift upload bootstrap bootstrap.ign 
(To be executed in undercloud after copying the ignition file or host having connectivity to openstack controller with overcloudrc)

$ swift post bootstrap --read-acl ".r:*,.rlistings" 

(To be executed in undercloud after copying the ignition file host having connectivity to openstack controller with overcloudrc)

The commands in this step create the ignition files and update them according to Cisco ACI CNI and upload the bootstrap.ign file to swift storage. It also generates the bootstrap-ignition-shim as described in the "Bootstrap Ignition Shim" section of Installing OpenShift on OpenStack User-Provisioned Infrastructure for Release 4.18 on GitHub.

Step 13

Complete the following tasks by running Ansible playbooks obtained from the Cisco OpenShift installer package:

  1. Create security groups and networks:

    ansible-playbook -i inventory.yaml security-groups.yaml
    ansible-playbook -i inventory.yaml network.yaml
    ansible-playbook -i inventory.yaml update-network-resources.yaml 
    ansible-playbook -i inventory.yaml 021_network.yaml
    
  2. For direct access to the OpenShift node network from endpoints that are not managed by the Cisco ACI fabric, create a Neutron subnet pool for every IP subnet from where this direct access is anticipated, as shown in the following example:

    $ neutron subnetpool-create --pool-prefix <direct_access_src_subnet> --address-scope node_network_address_scope <subnetpool_name>

    In the preceding example, node_network_address_scope is the name of the Neutron address-scope that is created by the network.yaml file.

  3. Install the control plane:

    ansible-playbook -i inventory.yaml bootstrap.yaml
    ansible-playbook -i inventory.yaml control-plane.yaml
    
  4. Check that the bootstrap/control plane installation is complete:

    ./openshift-install wait-for bootstrap-complete --dir=upi --log-level=debug 
  5. After the control plane is installed, remove the bootstrap node:

    ansible-playbook -i inventory.yaml down-bootstrap.yaml
    
    
  6. (Optional) After the control plane is up, configure cluster Source IP Network Address Translation (SNAT) policy:

    ansible-playbook -i inventory.yaml cluster_snat_policy.yaml
  7. Launch the compute nodes by scaling the worker machinesets as described below:

    
    $ oc get machineset -A	
    NAMESPACE	NAME	DESIRED	CURRENT	READY	AVAILABLE	AGE
    openshift-machine-api	openupi-vkkn6-worker	0	0		5h10m
    $ oc scale machineset -n openshift-machine-api	openupi-vkkn6-worker --replicas=1

    Note


    When the control-plane.yaml playbook is running, it automatically updates the machineset configuration to support multiple network interfaces which enables scaling the replicas as shown above, when non-zero os_compute_nodes_number is mentioned in the inventory file.

Step 14

If you created the compute nodes through Ansible playbooks, approve the pending Certificate Signing Requests.

oc get csr -ojson | jq -r '.items[] | select(.status == {} ) | .metadata.name' | xargs oc adm certificate approve

Step 15

Update the default IngressController publish strategy to use the LoadBalancerService:

ansible-playbook -i inventory.yaml post-install.yaml

Step 16

Check the status of the installation:

./openshift-install wait-for install-complete --dir=upi --log-level=debug 

Step 17

Destroy the cluster:

ansible-playbook -i inventory.yaml down-compute-nodes.yaml
ansible-playbook -i inventory.yaml down-control-plane.yaml
ansible-playbook -i inventory.yaml down-network.yaml
ansible-playbook -i inventory.yaml down-security-groups.yaml

After your run the playbooks in this step, the Cisco ACI BridgeDomain corresponding to the node network will also be deleted. To reinstall the cluster, run acc-provision again with the -a as described earlier in this document.


Optional Configurations

This section provides instructions for making several optional configurations.

Enabling Multus CNI Plug-in in OpenShift 4.x Cluster with ACI CNI

You can enable Multus in a new cluster or in an already-installed cluster.

Enabling Multus in a new cluster installation

When running acc-provision, set the disable-multus argument to False.


$ acc-provision -a -c acc_provision_input.yaml -f openshift-4.18-openstack -u <username> -p <password> -o aci_deployment.yaml --disable-multus false

The procedure below, is for enabling Multus in an already-installed cluster.

Procedure


Step 1

Generate a new ACI CNI deployment configuration.

$ acc-provision -c acc_provision_input.yaml -f openshift-4.18-openstack -u <username> -p <password> -o aci_deployment.yaml --disable-multus false

Note


The above command does not use the -a flag.

Step 2

Delete acicontainersoperator CR.

$ oc delete acicontainersoperator acicnioperator -n aci-containers-system

Step 3

Apply the new aci_deployment.yaml file.

$ oc apply -f aci_deployment.yaml

Step 4

Remove “disableMultiNetwork: true” from current OpenShift Network Object by editing cluster-network-03-config.yaml.

$ oc edit -f cluster-network-03-config.yaml

Update MachineConfig to support change in interface names

Post upgrade of OSP 17.1, network interface names on the nodes may differ from what was observed in earlier versions of OSP. This can cause issues for the nodes that was added by scaling the worker MachineSet. To address this issue, update the MachineConfig of the nodes to use the new names for the interfaces.

First update the worker nodes, followed by the control plane nodes. To update the control plane nodes, the ControlPlaneMachineSet (CPMS) must be used. If CPMS is not already configured, refer to the steps outlined in Enable CPMS to manage control plane nodes.

Follow these steps to Update MachineConfig to support change in interface names :

Procedure


Step 1

Update 02-worker-network machine config. Use the following MachineConfig to add interface configuration for enp*s* interfaces.

apiVersion: machineconfiguration.openshift.io/v1
kind: MachineConfig
metadata:
  labels:
    machineconfiguration.openshift.io/role: worker
  name: 02-worker-network
spec:
  config:
    ignition:
      config: {}
      security:
        tls: {}
      timeouts: {}
      version: 3.1.0
    networkd: {}
    passwd: {}
    storage:
      files:
      - contents:
          source: data:text/plain;charset=utf-8;base64,VFlQRT1FdGhlcm5ldApERVZJQ0U9ZW5zMwpPTkJPT
                  1Q9eWVzCkJPT1RQUk9UTz1kaGNwCkRFRlJPVVRFPXllcwpQUk9YWV9NRVRIT0Q9bm9uZQpCUk9XU0V
                  SX09OTFk9bm8KTVRVPTE1MDAKSVBWNF9GQUlMVVJFX0ZBVEFMPW5vCklQVjZJTklUPW5vCkVUSFRPT
                  0xfT1BUUz0iLUsgZW5zMyB0eC1jaGVja3N1bS1pcC1nZW5lcmljIG9mZiIKTkFNRT0iU3lzdGVtIGV
                  uczMi
          verification: {}
        filesystem: root
        mode: 420
        path: /etc/sysconfig/network-scripts/ifcfg-ens3
      - contents:
          source: data:text/plain;charset=utf-8;base64,VFlQRT1FdGhlcm5ldApERVZJQ0U9ZW5zNApPTkJPT
                  1Q9eWVzCkJPT1RQUk9UTz1kaGNwCkRFRlJPVVRFPW5vClBST1hZX01FVEhPRD1ub25lCkJST1dTRVJ
                  fT05MWT1ubwpNVFU9MTUwMApJUFY0X0ZBSUxVUkVfRkFUQUw9bm8KSVBWNklOSVQ9bm8KRVRIVE9PT
                  F9PUFRTPSItSyBlbnM0IHR4LWNoZWNrc3VtLWlwLWdlbmVyaWMgb2ZmIgpOQU1FPSJTeXN0ZW0gZW5
                  zNCI=
          verification: {}
        filesystem: root
        mode: 420
        path: /etc/sysconfig/network-scripts/ifcfg-ens4
      - contents:
          source: data:text/plain;charset=utf-8;base64,VkxBTj15ZXMKVFlQRT1WbGFuClBIWVNERVY9ZW5zN
                  ApWTEFOX0lEPTMzMDEKUkVPUkRFUl9IRFI9eWVzCkdWUlA9bm8KTVZSUD1ubwpQUk9YWV9NRVRIT0Q
                  9bm9uZQpCUk9XU0VSX09OTFk9bm8KQk9PVFBST1RPPWRoY3AKREVGUk9VVEU9bm8KSVBWNF9GQUlMV
                  VJFX0ZBVEFMPW5vCklQVjZJTklUPW5vCk5BTUU9b3BmbGV4LWNvbm4tZW5zNApERVZJQ0U9ZW5zNC4
                  zMzAxCk9OQk9PVD15ZXMKTVRVPTE1MDAKRVRIVE9PTF9PUFRTPSItSyBlbnM0LjMzMDEgdHgtY2hlY
                  2tzdW0taXAtZ2VuZXJpYyBvZmYiCg==
          verification: {}
        filesystem: root
        mode: 420
        path: /etc/sysconfig/network-scripts/ifcfg-opflex-conn-ens4
      - contents:
          source: data:text/plain;charset=utf-8;base64,VFlQRT1FdGhlcm5ldApERVZJQ0U9ZW5wM3MwCk9OQk
                  9PVD15ZXMKQk9PVFBST1RPPWRoY3AKREVGUk9VVEU9eWVzClBST1hZX01FVEhPRD1ub25lCkJST1dTR
                  VJfT05MWT1ubwpNVFU9MTUwMApJUFY0X0ZBSUxVUkVfRkFUQUw9bm8KSVBWNklOSVQ9bm8KRVRIVE9P
                  TF9PUFRTPSItSyBlbnAzczAgdHgtY2hlY2tzdW0taXAtZ2VuZXJpYyBvZmYiCk5BTUU9IlN5c3RlbSB
                  lbnAzczAi
          verification: {}
        filesystem: root
        mode: 420
        path: /etc/sysconfig/network-scripts/ifcfg-enp3s0
      - contents:
          source: data:text/plain;charset=utf-8;base64,VFlQRT1FdGhlcm5ldApERVZJQ0U9ZW5wNHMwCk9OQk
                  9PVD15ZXMKQk9PVFBST1RPPWRoY3AKREVGUk9VVEU9bm8KUFJPWFlfTUVUSE9EPW5vbmUKQlJPV1NFU
                  l9PTkxZPW5vCk1UVT0xNTAwCklQVjRfRkFJTFVSRV9GQVRBTD1ubwpJUFY2SU5JVD1ubwpFVEhUT09M
                  X09QVFM9Ii1LIGVucDRzMCB0eC1jaGVja3N1bS1pcC1nZW5lcmljIG9mZiIKTkFNRT0iU3lzdGVtIGV
                  ucDRzMCI=
          verification: {}
        filesystem: root
        mode: 420
        path: /etc/sysconfig/network-scripts/ifcfg-enp4s0
      - contents:
          source: data:text/plain;charset=utf-8;base64,VkxBTj15ZXMKVFlQRT1WbGFuClBIWVNERVY9ZW5wNH
                  MwClZMQU5fSUQ9MzMwMQpSRU9SREVSX0hEUj15ZXMKR1ZSUD1ubwpNVlJQPW5vClBST1hZX01FVEhPR
                  D1ub25lCkJST1dTRVJfT05MWT1ubwpCT09UUFJPVE89ZGhjcApERUZST1VURT1ubwpJUFY0X0ZBSUxV
                  UkVfRkFUQUw9bm8KSVBWNklOSVQ9bm8KTkFNRT1vcGZsZXgtY29ubi1lbnA0czAKREVWSUNFPWVucDR
                  zMC4zMzAxCk9OQk9PVD15ZXMKTVRVPTE1MDAKRVRIVE9PTF9PUFRTPSItSyBlbnA0czAuMzMwMSB0eC
                  1jaGVja3N1bS1pcC1nZW5lcmljIG9mZiIK
          verification: {}
        filesystem: root
        mode: 420
        path: /etc/sysconfig/network-scripts/ifcfg-opflex-conn-enp4s0
      - contents:
          source: data:text/plain;charset=utf-8;base64,QUREUkVTUzA9MjI0LjAuMC4wCk5FVE1BU0swPTI0MC
                  4wLjAuMApNRVRSSUMwPTEwMDAK
          verification: {}
        filesystem: root
        mode: 420
        path: /etc/sysconfig/network-scripts/route-opflex-conn-ens4
      - contents:
          source: data:text/plain;charset=utf-8;base64,QUREUkVTUzA9MjI0LjAuMC4wCk5FVE1BU0swPTI0MC
                  4wLjAuMApNRVRSSUMwPTEwMDAK
          verification: {}
        filesystem: root
        mode: 420
        path: /etc/sysconfig/network-scripts/route-opflex-conn-enp4s0 

The following settings from the current MachineConfig to avoid binding the configuration to a specific interface:

  • HWADDR: This setting attempts to tie the network configuration to a specific MAC address.

  • UUID: Removing this ensures that the interface configuration (opflex-conn) can apply to both ens* and enp*s* interfaces.

After you apply the above configuration, use the oc get mcp worker command to monitor the progress and see if the MachineConfig is applied to all the existing worker nodes.

Important


The base64-encoded configurations corresponding to /etc/sysconfig/network-scripts/ifcfg-opflex-conn-ens4 and /etc/sysconfig/network-scripts/ifcfg-opflex-conn-enp4s0 from the above MachineConfig configuration must be updated with the correct infrastructure VLAN ID as per the fabric configuration.

All base64-encoded content should be configured on a single line.

Step 2

(Optional) Configure scale worker Machineset for new VMs.

After scaling machineset new worker machines will come up with enp*s* interfaces, which include VLAN interfaces corresponding to OpFlex connections.

Step 3

Delete old worker machines (having ens interfaces) one by one until all old machines are removed, using these substeps:

  1. Run the following to list the machines:

    $ oc get machine -n openshift-machine-api
  2. Cordon the machine to prevent new workloads from being scheduled:

    $ oc adm cordon <Machine-Name>
  3. Drain the machine to safely evict workloads:

    $ oc adm drain <Machine-Name> --ignore-daemonsets --delete-local-data
  4. Delete the machine object:

    $ oc delete machine <Machine-Name> -n openshift-machine-api

Note


The machine name is the same as the node name.

After deleting the machine object in step d, the Machine API Controller will automatically provision a new VM to maintain the desired replica count specified in the MachineSet.

After the new VM is up, verify that it uses an enp*s* interface.

Step 4

Update the 02-worker-network MachineConfig to remove the interface configuration related to ens-named interfaces.

This change will result in the removal of the following files from the new VMs:

  • /etc/sysconfig/network-scripts/ifcfg-ens3

  • /etc/sysconfig/network-scripts/ifcfg-ens4

  • /etc/sysconfig/network-scripts/ifcfg-opflex-conn-ens4

After the reconciliation of machine-config-pool resource corresponds to worker node is complete, all machines will have only enp*s* interfaces configured, and the /etc/sysconfig/network-scripts/ directory inside the nodes will no longer contain files associated with ens* interfaces.


Update master nodes

Follow these steps to update the master nodes:

Before you begin

Ensure that the ControlPlaneMachineSet (CPMS) is configured before proceeding with the following steps.

Procedure


Step 1

Use this MachineConfig to add interface configuration for enp*s* interfaces:

apiVersion: machineconfiguration.openshift.io/v1
kind: MachineConfig
metadata:
  labels:
    machineconfiguration.openshift.io/role: master
  name: 02-master-network
spec:
  config:
    ignition:
      config: {}
      security:
        tls: {}
      timeouts: {}
      version: 3.1.0
    networkd: {}
    passwd: {}
    storage:
      files:
      - contents:
          source: data:text/plain;charset=utf-8;base64,VFlQRT1FdGhlcm5ldApERVZJQ0U9ZW5zMwpPTkJPT1
                  Q9eWVzCkJPT1RQUk9UTz1kaGNwCkRFRlJPVVRFPXllcwpQUk9YWV9NRVRIT0Q9bm9uZQpCUk9XU0VSX
                  09OTFk9bm8KTVRVPTE1MDAKSVBWNF9GQUlMVVJFX0ZBVEFMPW5vCklQVjZJTklUPW5vCkVUSFRPT0xf
                  T1BUUz0iLUsgZW5zMyB0eC1jaGVja3N1bS1pcC1nZW5lcmljIG9mZiIKTkFNRT0iU3lzdGVtIGVuczM
                  i
          verification: {}
        filesystem: root
        mode: 420
        path: /etc/sysconfig/network-scripts/ifcfg-ens3 
      - contents:
          source: data:text/plain;charset=utf-8;base64,VFlQRT1FdGhlcm5ldApERVZJQ0U9ZW5zNApPTkJPT1
                  Q9eWVzCkJPT1RQUk9UTz1kaGNwCkRFRlJPVVRFPW5vClBST1hZX01FVEhPRD1ub25lCkJST1dTRVJfT
                  05MWT1ubwpNVFU9MTUwMApJUFY0X0ZBSUxVUkVfRkFUQUw9bm8KSVBWNklOSVQ9bm8KRVRIVE9PTF9P
                  UFRTPSItSyBlbnM0IHR4LWNoZWNrc3VtLWlwLWdlbmVyaWMgb2ZmIgpOQU1FPSJTeXN0ZW0gZW5zNCI
                  =
          verification: {}
        filesystem: root
        mode: 420
        path: /etc/sysconfig/network-scripts/ifcfg-ens3
      - contents:
          source: data:text/plain;charset=utf-8;base64,VFlQRT1FdGhlcm5ldApERVZJQ0U9ZW5zNApPTkJPT1
                  Q9eWVzCkJPT1RQUk9UTz1kaGNwCkRFRlJPVVRFPW5vClBST1hZX01FVEhPRD1ub25lCkJST1dTRVJfT
                  05MWT1ubwpNVFU9MTUwMApJUFY0X0ZBSUxVUkVfRkFUQUw9bm8KSVBWNklOSVQ9bm8KRVRIVE9PTF9P
                  UFRTPSItSyBlbnM0IHR4LWNoZWNrc3VtLWlwLWdlbmVyaWMgb2ZmIgpOQU1FPSJTeXN0ZW0gZW5zNCI
                  =
          verification: {}
        filesystem: root
        mode: 420
        path: /etc/sysconfig/network-scripts/ifcfg-ens4
      - contents:
          source: data:text/plain;charset=utf-8;base64,VkxBTj15ZXMKVFlQRT1WbGFuClBIWVNERVY9ZW5zNA
                  pWTEFOX0lEPTQwOTMKUkVPUkRFUl9IRFI9eWVzCkdWUlA9bm8KTVZSUD1ubwpQUk9YWV9NRVRIT0Q9b
                  m9uZQpCUk9XU0VSX09OTFk9bm8KQk9PVFBST1RPPWRoY3AKREVGUk9VVEU9bm8KSVBWNF9GQUlMVVJF
                  X0ZBVEFMPW5vCklQVjZJTklUPW5vCk5BTUU9b3BmbGV4LWNvbm4tZW5zNApERVZJQ0U9ZW5zNC40MDk
                  zCk9OQk9PVD15ZXMKTVRVPTE1MDAKRVRIVE9PTF9PUFRTPSItSyBlbnM0LjQwOTMgdHgtY2hlY2tzdW
                  0taXAtZ2VuZXJpYyBvZmYi
          verification: {}
        filesystem: root
        mode: 420
        path: /etc/sysconfig/network-scripts/ifcfg-opflex-conn-ens4
      - contents:
          source: data:text/plain;charset=utf-8;base64,VFlQRT1FdGhlcm5ldApERVZJQ0U9ZW5wM3MwCk9OQk
                  9PVD15ZXMKQk9PVFBST1RPPWRoY3AKREVGUk9VVEU9eWVzClBST1hZX01FVEhPRD1ub25lCkJST1dTR
                  VJfT05MWT1ubwpNVFU9MTUwMApJUFY0X0ZBSUxVUkVfRkFUQUw9bm8KSVBWNklOSVQ9bm8KRVRIVE9P
                  TF9PUFRTPSItSyBlbnAzczAgdHgtY2hlY2tzdW0taXAtZ2VuZXJpYyBvZmYiCk5BTUU9IlN5c3RlbSB
                  lbnAzczAi
          verification: {}
        filesystem: root
        mode: 420
        path: /etc/sysconfig/network-scripts/ifcfg-enp3s0
      - contents:
          source: data:text/plain;charset=utf-8;base64,VFlQRT1FdGhlcm5ldApERVZJQ0U9ZW5wNHMwCk9OQk
                  9PVD15ZXMKQk9PVFBST1RPPWRoY3AKREVGUk9VVEU9bm8KUFJPWFlfTUVUSE9EPW5vbmUKQlJPV1NFU
                  l9PTkxZPW5vCk1UVT0xNTAwCklQVjRfRkFJTFVSRV9GQVRBTD1ubwpJUFY2SU5JVD1ubwpFVEhUT09M
                  X09QVFM9Ii1LIGVucDRzMCB0eC1jaGVja3N1bS1pcC1nZW5lcmljIG9mZiIKTkFNRT0iU3lzdGVtIGV
                  ucDRzMCI=
          verification: {}
        filesystem: root
        mode: 420
        path: /etc/sysconfig/network-scripts/ifcfg-enp4s0
      - contents:
          source: data:text/plain;charset=utf-8;base64,VkxBTj15ZXMKVFlQRT1WbGFuClBIWVNERVY9ZW5wNH
                  MwClZMQU5fSUQ9NDA5M wpSRU9SREVSX0hEUj15ZXMKR1ZSUD1ubwpNVlJQPW5vClBST1hZX01FVEhP
                  RD1ub25lCkJST1dTRVJfT05MWT1ubwpCT09UUFJPVE89ZGhjcApERUZST1VURT1ubwpJUFY0X0ZBSUx
                  VUkVfRkFUQUw9bm8KSVBWNklOSVQ9bm8KTkFNRT1vcGZsZXgtY29ubi1lbnA0czAKREVWSUNFPWVucD
                  RzMC40MDkzCk9OQk9PVD15ZXMKTVRVPTE1MDAKRVRIVE9PTF9PUFRTPSItSyBlbnA0czAuNDA5MyB0e
                  C1jaGVja3N1bS1pcC1nZW5lcmljIG9mZiI=
          verification: {}
        filesystem: root
        mode: 420
        path: /etc/sysconfig/network-scripts/ifcfg-opflex-conn-enp4s0
      - contents:
          source: data:text/plain;charset=utf-8;base64,QUREUkVTUzA9MjI0LjAuMC4wCk5FVE1BU0swPTI0MC
                  4wLjAuMApNRVRSSUMwPTEwMDAK
          verification: {}
        filesystem: root
        mode: 420
        path: /etc/sysconfig/network-scripts/route-opflex-conn-ens4
      - contents:
          source: data:text/plain;charset=utf-8;base64,QUREUkVTUzA9MjI0LjAuMC4wCk5FVE1BU0swPTI0MC
                  4wLjAuMApNRVRSSUMwPTEwMDAK
          verification: {}
        filesystem: root
        mode: 420
        path: /etc/sysconfig/network-scripts/route-opflex-conn-enp4s0

Use these settings from the current MachineConfig to avoid binding the configuration to a specific inerface:

HWADDR: This setting attempts to tie the network configuration to a specific MAC address.

UUID: Removing this ensures that the interface configuration (opflex-conn) can apply to both ens* and enp*s* interfaces.

Once the above config is applied, use the oc get mcp master command to monitor the progress and see if the MachineConfig is applied to all the existing master nodes

Important


The base64-encoded configurations corresponding to /etc/sysconfig/network-scripts/ifcfg-opflex-conn-ens4 and /etc/sysconfig/network-scripts/ifcfg-opflex-conn-enp4s0 from the above MachineConfig configuration must be updated with the correct infrastructure VLAN ID as per the fabric configuration.

All base64-encoded content should be configured on a single line.

Step 2

Remove old master VMs by deleting the machine machine manually. The control plane achine set replaces the deleted machine with one using the specification in the control plane machine set custom resource:

  1. Run this list to the master machines:

    $ oc get machine -n openshift-machine-api | grep master

  2. Delete the master machine:

    $ oc delete machine <Machine-Name> -n openshift-machine-api

  3. Monitor the replacement process:

    $ oc get machines -n openshift-machine-api –w

    $ oc get nodes –w

    Note


    Replace only one master node at a time to maintain cluster availability.

    Wait for each replacement to complete before proceeding to the next node.

    Ensure the new node joins the cluster and etcd is healthy and verify it uses an enp*s* interface.

Step 3

Update the 02-master-network MachineConfig to remove the interface configuration related to ens-named interfaces. This change will result in the removal of the following files from the new VMs:

  • /etc/sysconfig/network-scripts/ifcfg-ens3

  • /etc/sysconfig/network-scripts/ifcfg-ens4

  • /etc/sysconfig/network-scripts/ifcfg-opflex-conn-ens4

Once the reconciliation of machine-config-pool resource corresponds to master node is complete, all machines will have only enp*s* interfaces configured, and the /etc/sysconfig/network-scripts/ directory inside the nodes will no longer contain files associated with ens* interfaces.


Enable CPMS to manage control plane nodes

You can leverage the Control Plane Machine Set (CPMS) resource to auto-manage the control plane nodes.

Follow these steps to enable CPMS:

Procedure


Step 1

Create machine objects for the existing control plane nodes.

This is an example of a machine config for the control-plane node.

apiVersion: machine.openshift.io/v1beta1
kind: Machine
metadata:
  labels:
    machine.openshift.io/cluster-api-cluster: openupi-tvqjc
    machine.openshift.io/cluster-api-machine-role: master
    machine.openshift.io/cluster-api-machine-type: master
  name: openupi-tvqjc-master-0
  namespace: openshift-machine-api
  annotations:
    machine.openshift.io/instance-id: 6c578563-f295-487a-a1c1-e81a942bfd28
spec:
  lifecycleHooks: {}
  metadata: {}
  providerSpec:
    value:
      apiVersion: openstackproviderconfig.openshift.io/v1alpha1
      cloudName: openstack
      cloudsSecret:
        name: openstack-cloud-credentials
        namespace: openshift-machine-api
      flavor: aci_rhel_medium
      image: rhcos-4.18
      kind: OpenstackProviderSpec
      metadata:
        creationTimestamp: null
      networks:
      - filter: {}
        subnets:
        - filter:
            name: openupi-tvqjc-nodes
            uuid:
            - ec2413e7-2b02-46ef-9a2f-bf308eeb5a0c
        uuid: c5f49c1d-3e78-47ff-af4e-3c89d47e4ae5
      - filter: {}
        subnets:
        - filter:
            name: openupi-tvqjc-acicontainers-nodes
            uuid:
            - d577cf9d-0920-4b60-bf2c-ae76b24e42e6
        uuid: a29eb31a-c590-47f1-a592-4a35e265c2b3
      securityGroups:
      - filter: {}
        name: openupi-tvqjc-master
      serverGroupName: openupi-tvqjc-master
      serverMetadata:
        Name: openupi-tvqjc-master
        openshiftClusterID: openupi-tvqjc
      tags:
      - openshiftClusterID=openupi-tvqjc
      trunk: true
      userDataSecret:
        name: master-user-data
  providerID: openstack:///6c578563-f295-487a-a1c1-e81a942bfd28 

Use the manifest to create a machine object for each of the existing master nodes. Update these fields from the template:

  • Replace openupi-tvqjc with OpenShift cluster ID of your cluster.

  • metadata.name: Set this field with name of master node.

  • metadata.annotations.machine.openshift.io/instance-id: Set this field with openstack server ID corresponds to this master node.

  • spec.providerSpec.value.flavor: Set this field with openstack flavor name used for creating master nodes.

  • spec.providerSpec.value.image: Set this field with openstack image name that corresponds to RHCOS image used for creating master nodes.

  • spec.providerSpec.value.networks: Update this config section with openstack network/subnet details that will be used for creating master nodes.

  • spec.providerID: Update UUID from this field with openstack server ID corresponds to this master node.

After you apply these manifests for each of the master nodes, verify that machines are created and show as "Running" by issuing the following command:

$ oc get machines -n openshift-machine-api

Step 2

Create a Control Plane Machine Set (CPMS) resource.

This is an example of a CPMS resource:

apiVersion: machine.openshift.io/v1
kind: ControlPlaneMachineSet
metadata:
  name: cluster
  namespace: openshift-machine-api
spec:
  replicas: 3
  selector:
    matchLabels:
      machine.openshift.io/cluster-api-cluster: openupi-tvqjc
      machine.openshift.io/cluster-api-machine-role: master
      machine.openshift.io/cluster-api-machine-type: master
  state: Active
  strategy:
    type: RollingUpdate
  template:
    machineType: machines_v1beta1_machine_openshift_io
    machines_v1beta1_machine_openshift_io:
      metadata:
        labels:
          machine.openshift.io/cluster-api-cluster: openupi-tvqjc
          machine.openshift.io/cluster-api-machine-role: master
          machine.openshift.io/cluster-api-machine-type: master
      spec:
        lifecycleHooks: {}
        metadata: {}
        providerSpec:
          value:
            apiVersion: openstackproviderconfig.openshift.io/v1alpha1
            cloudName: openstack
            cloudsSecret:
              name: openstack-cloud-credentials
              namespace: openshift-machine-api
            flavor: aci_rhel_medium
            image: rhcos-4.18
            kind: OpenstackProviderSpec
            metadata:
              creationTimestamp: null
            networks:
            - filter: {}
              subnets:
              - filter:
                  name: openupi-tvqjc-nodes
            - filter: {}
              subnets:
              - filter:
                  name: openupi-tvqjc-acicontainers-nodes
            securityGroups:
            - filter: {}
              name: openupi-tvqjc-master
            serverGroupName: openupi-tvqjc-master
            serverMetadata:
              Name: openupi-tvqjc-master
              openshiftClusterID: openupi-tvqjc
            tags:
            - openshiftClusterID=openupi-tvqjc
            trunk: true
            userDataSecret:
              name: master-user-data

Update these fields before applying the cofiguration:

  • Replace openupi-tvqjc with OpenShift cluster ID of your cluster.

  • spec.template.spec.providerSpec.value.flavor: Set this field with openstack flavor name used for creating master nodes.

  • spec.template.spec.providerSpec.value.image: Set this field with openstack image name that corresponds to RHCOS image used for creating master nodes.

  • spec.template.spec.providerSpec.value.networks: Update this config section with openstack network/subnet details that will be used for creating master nodes.

    Note


    For the ControlPlaneMachineSet to be in operation, you must set spec.state to active.

    network/subnet UUIDs are not supported in ControlPlaneMachineSet.

Step 3

After you create the Create a Control Plane Machine Set (CPMS) resource, the existing master nodes will be replaced with new ones. You can monitor its progress using these commands:

$ oc get controlplanemachineset -n openshift-machine-api    # To check CPMS status

$ oc get machines -n openshift-machine-api    # To check machines status

$ oc get nodes -l node-role.kubernetes.io/master    # To check nodes status


Enable IP forwarding on worker nodes

To test the service with a node-port configuration, you must enable IP forwarding on the worker nodes.

Use this procedure to enable IP forwarding on the worker nodes.

Procedure


Step 1

Assign a floating IP to the worker VM.

Step 2

Allow SSH traffic by adding a security rule to permit SSH access in the security group associated with the worker nodes.

Step 3

Enable IP Forwarding on each worker node by SSHing into them and running this command:

sudo sysctl -w net.ipv4.ip_forward=1

Optional Inventory Configurations

In the section Installing OpenShift 4.18 on OpenStack , Step 8 we noted the required fields for Cisco ACI Container Network Interface (CNI) configuration in the aci_cni section of the inventory.yaml file.. This section provides optional configurations and the default values.

Option

Description and Default Values

cluster_snat_policy_ip

By default, this value is not set.

The Source IP Network Address Translation (SNAT) IP address is used to create a Cisco ACI-CNI SNAT policy that applies to the whole cluster. This SNAT policy is created by running the cluster_snat_policy.yaml Ansible playbook as described in Installing OpenShift 4.18 on Openstack section in this guide. (If this value is not set, do not run this playbook.)

dns_ip

By default, this value is not set.

Set this field if you do not follow the procedure that is described in the section "Subnet DNS (optional)" in Installing OpenShift on OpenStack User-Provisioned Infrastructure on GitHub. The procedure controls the default resolvers that your Nova servers use.

Use the value to set the dns_nameservers field of the subnet associated with the *-primaryClusterNetwork network. You can specify one or more DNS server IPs.

network_interfaces

node

name

The name of the node network interface as set by the RHCOS image.

The default value is “enp3s0”.

mtu

The MTU set for the *-primaryClusterNetwork Neutron network.

The default value is 1500.

opflex

name

The name of the node network interface as set by the RHCOS image.

The default value is “enp4s0”.

mtu

The MTU set for the *-secondaryClusterAciNetwork Neutron network.

The default value is 1500.

subnet

The default value is 192.168.208.0/20.

This is the CIDR used for the subnet that is associated with the *-secondaryClusterAciNetwork Neutron network. The size of this subnet should at least be as large as that of the one used for the *-primaryClusterNetwork Neutron network. It should also not overlap any other CIDR in the OpenShift project’s address scope.


Caution


In a fresh installation of OSP 17.1, network interface names on the nodes may differ from what is observed with earlier versions of OSP. Interfaces may appear as enp*s instead of ens*. This naming variation is controlled by the hw_machine_type parameter in Nova's configuration on compute nodes. To prevent installation issues, ensure the correct interface names are updated in the inventory.yaml file, as outlined in this section.