New and Changed Information
The following table provides an overview of the significant changes up to this current release. The table does not provide an exhaustive list of all changes or of the new features up to this release.
|
Cisco APIC Release Version |
Feature |
Description |
|---|---|---|
|
6.2(2) |
Support for Custom EPG name in Nutanix VMM integration |
Provides the flexibility to define custom names for Endpoint Groups (EPGs), microsegmented EPGs (uSeg EPGs), and Endpoint Security Groups (ESGs) within the Nutanix VMM domain. This allows for better alignment with organizational naming conventions and simplifies management of network constructs. |
|
6.1(4) |
Support for microsegmentation with Nutanix VMM integration |
Microsegmentation support for the Nutanix VMM domain. Also, support for:
|
|
6.0(3) |
Support for Nutanix AHV integration |
You can integrate Nutanix AHV with Cisco Application Centric Infrastructure (ACI). Integration enables you to use Cisco Application Policy Infrastructure Controller (APIC) to create and work with Nutanix network constructs. |
Cisco APIC and Nutanix AHV integration
Beginning with Cisco Application Policy Infrastructure Controller (APIC) Release 6.0(3), you can integrate Nutanix AHV with Cisco Application Centric Infrastructure (ACI).
The Cisco APIC integrates with Nutanix AHV and enhances the network management capabilities. The integration provides virtual and physical network automation and VM endpoints visibility in Cisco ACI.
This document provides information for integrating Nutanix AHV with Cisco ACI, including prerequisites and installation. You should be familiar with Nutanix AHV and Cisco ACI. For detailed information about Nutanix AHV, see the Nutanix website.
Benefits of the integration
Following are the benefits of the integration:
-
Native integration with Nutanix cluster running AHV.
-
Visibility into the cluster (Nutanix) from APIC. Fetch inventory data like VMs, hosts, switches, subnets, security policies from Nutanix.
-
Collect statistics and provide statistics display from APIC. The collected statistics are:
-
VM Nic Stats (Transmit Packets and Bytes, Received Packets and Bytes)
-
Host Nic Stats (Transmit Packets and Bytes, Received Packets and Bytes)
-
Host Stats (CPU and memory usage )
-
VM stats (CPU and memory usage)
-
-
Support for EPGs to configure networking on Nutanix.
-
Support for intra-EPG policies (intra-EPG contract is not supported).
Cisco ACI and Nutanix terminology
Some terminology differs between Cisco ACI and Nutanix. The following table lists differences to be aware of.
|
Cisco ACI |
Nutanix AHV |
|---|---|
|
EPG/ port group |
Subnet |
|
Data center |
Cluster |
|
Cluster controller |
Prism element |
|
Cluster |
Prism central |
|
ESG, uSeg EPG |
Secured entity |
|
Contract |
Security policy rules |
Guidelines and limitations
Following are the guidelines and limitations for the Cisco ACI-Nutanix AHV integration:
-
One VMM domain can be associated to only one Prism Central and one Prism Element.
-
No two subnets can have the same VLAN on a vSwitch.
-
Nutanix VMM domain supports only the pre-provision resolution immediacy.
-
If a subnet is in use by a VM, the following operations cannot be done on Nutanix even if the configuration is changed on APIC:
-
the subnet VLAN, IP address pool cannot be changed.
-
the subnet cannot be deleted.
-
-
Bond type configuration for uplink of virtual switch is not supported from Cisco APIC.
-
NetFlow, floating L3Out and layer 4 to layer 7 device running on Nutanix VMM domain are not supported.
-
Multi-site integration is not supported, that is, no support for association of EPG to Nutanix VMM from NDO (Nexus Dashboard Orchestrator).
See the Virtualization Compatibility Matrix for the supported Prism Central and AOS versions.
Workflow for the integration
The following section elaborates the tasks involved for the integration. It is a combination of procedures to be accomplished on the Cisco APIC 6.0(3) GUI and the Nutanix Prism Central GUI. The tasks to be performed on the Cisco APIC GUI and the Nutanix Prism Central GUI are listed below.
-
(on Cisco APIC) Create a Nutanix VMM domain.
-
(on Nutanix Prism Central) Assign host links to the virtual switch.
-
(on Cisco APIC) Associate EPGs for the VMM domain.
-
(on Nutanix Prism Central) Assign VMs to subnets and categories.
The details of the procedures performed on the Cisco APIC GUI are available in the subsequent pages. The Nutanix-relevant tasks are explained in the context of the integration, for more details about the procedure and GUI, refer the Nutanix website.
Topology

The image above shows a sample topology. The Cisco APIC manages the ACI fabric and policies. The VMs connected to the virtual switch are managed by the Nutanix Prism. ACI fabric provides network connectivity for VMs in AHV Hosts with the uplinks (Uplink1 and 2).
EPG association with the Nutanix VMM domain
Each EPG created on the Cisco APIC can be associated with a Nutanix VMM domain. The VMM domain creates a corresponding subnet on the Nutanix Prism. The EPG configuration also creates default categories. They are:
-
AppType : aci-domainname~TenantName~APName -
AppTier : aci-domainname~TenantName~APName~EPGName -
AciOwnerTag : aci-domainname~Tenantname~APName~EPGName
The subnet(s) created on Nutanix are:
-
aci-domainname|TenantName|APName|EPGName (default)
-
custom epg name if Custom EPG Name is specified

Note
The supported character length limit for subnet name is 55 characters. If the subnet name exceeds that limit, the subnet is not created.
A Custom EPG Name /Custom Tag Value is a metadata attribute attached to an EPG, uSEG EPG, and ESG. It allows user to configure custom name to be used in category value and security policy name on nutanix prism central.
When Custom EPG Name/Custom Tag Value is configured, the ACI-specific categories use the custom name instead of the DN (distinguished name), for example
-
ACI-EPG/ACI-uSEG-EPG: acidomainname~TenantName~APName~EPGName -
ACI-ESG : aci-domainname~TenantName~APName~ESGName
In ACI 6.2. 2 release with custom EPG support, Nutanix classification uses ACI-EPG/ACI-uSEG-EPG/ACI-ESG categories with values of the form aci-<domain>|<CustomEPGName>, or aci-<domain>|<CustomTagValue>.This keeps category values shorter and easier to correlate with the custom-named subnet on Prism Central.
The Custom EPG Name is applicable for EPG and uSeg EPGs and the Custom Tag Value is applicable for ESG.
In older releases, APIC created AppType, AppTier, and AciOwnerTag categories using aci-domainname~TenantName~APName~EPGName.These categories are discontinued from 6.2.2 onwards.
When you configure a Custom EPG Name, APIC uses that custom name for the Nutanix subnet name and the ACI‑EPG category value. Ensure the Custom EPG Name is short enough to satisfy Nutanix limits (for example, subnet name ≤ 55 characters, category value ≤ 64 characters), otherwise subnet and/or category creation can fail on Prism Central.
The total length of the Nutanix Security Policy name must not exceed 63 characters.
Note |
The Custom EPG Name or Custom Tag Value may include only the following characters: uppercase and lowercase letters (A-Z, a-z), digits (0-9), and the special characters dot (.), underscore (_), and hyphen (-). |
Other than Nutanix subnet name, custom name is also used for creating Nutanix FNS security policy.
Its of following format
For EPG & uSeg EPG: aci-<domainName> <customEPgName>
For ESG: aci-<domainName> <customTagValue>
Upgrade Downgrade behavior
Upgrade behavior :
For EPGs associated with Nutanix VMM domain with custom name already configured (Brownfield), category and security policy format is not changed after upgrading to release 6.2(2). New format names is used only for EPGs/uSeg EPGs and ESGs that are created new (Greenfield) after fabric is upgraded to release 6.2(2).
If the Custom EPG Name / Custom Tag Value is changed for a brownfield EPG after upgrading to 6.2(2):
-
A new tag and policy based on the custom name will be created and pushed.
-
VMs from old tag will be moved to new tag created based on custom name.
-
Security Policy will be updated to reflect the new tag.
Downgrade behavior: For downgrading from release 6.2(2) → 6.2(1).
-
Downgrade blocked until custom EPG names are unset for all EPGs which are configured with custom names after upgrading to 6.2(2x).
-
Ensures tags and policies revert to encoded names
aci-dom|tn|app|epgfor compatibility with ACI versions prior to 6.2(2). -
After downgrade APIC pushes tags: AppType, AppTier, and AciOwnerTag for subnet.
Intra-EPG isolation
Intra-EPG Isolation is a security mechanism that blocks communication between physical or virtual endpoints within the same EPG. By default, endpoints in the same EPG can communicate with each other. However, in some situations, it may be necessary to completely isolate these endpoints from one another within an EPG.
A Cisco ACI Nutanix VMM domain creates a security policy in the Nutanix Prism Central for each EPG that has intra-EPG isolation
enabled. Nutanix applies the security policy for the AppType category (see categories mentioned in the section above) and prevents the communication of VMs in the associated AppTier.
From APIC release 6.1(4), FNS next-gen (NG) security policy is used to configure intra-EPG isolation. The category is automatically associated to the EPG member VMs and the security policy blocks communication between the VMs. ACI-EPG tag is created for the EPGs; the VMs that are part of the EPG are automatically assigned to this ACI-EPG tag. No manual intervention is required on the Nutanix Prism Central.
Note |
Intra-EPG isolation is not supported for IPv6 traffic because intra-EPG solution is implemented by Nutanix security policy for the Nutanix VMM domain. Nutanix security policy is applicable to IPv4 traffic only. However, IPv6 traffic is allowed by default even if intra EPG isolation is configured from APIC. You can change the security policy setting on the Nutanix UI to deny IPv6 traffic. This will deny all IPv6 traffic to and from the VMs which are associated with the security policy. |
Intra-ESG isolation
Intra-ESG isolation is a security mechanism that prevents physical or virtual endpoints that are in the same ESG from communicating with each other. After enabling intra ESG isolation, endpoints in an ESG cannot communicate with each other. A corresponding security policy is created or updated on Prism Central.
To enable intra-ESG isolation, on the APIC GUI, navigate to Tenants > Application Profiles > Endpoint Security Groups. On the ESG screen, under Policy, for the Intra ESG Isolation field, select the Enforced option.
For the detailed procedure about creating an ESG, see the Endpoint Security Groups chapter in the Cisco APIC Security Configuration Guide.
IP address management
When you enable IP Address Management (IPAM) on an EPG, Nutanix creates an internal DHCP server for the subnet corresponding to the EPG. IPv4 addresses for VMs in this subnet are allocated by this internal DHCP server. If the EPG is created without enabling IPAM, you may need to use an external DHCP server for VM IP assignment. See the Associate an EPG to a VMM domain section for details about IPAM configuration.
Create a VMM domain
Use this procedure to create a VMM domain. A VMM domain needs to be created to specify the connectivity details to the Nutanix Controller. The VMM domain will also provide visibility into the Nutanix Cluster.
Before you begin
Confirm that the Nutanix cluster is up; Prism Central and Prism Element are healthy.
Procedure
|
Step 1 |
Log in to Cisco APIC. |
|
Step 2 |
Go to Virtual Networking > Nutanix. The Domains page appears. |
|
Step 3 |
At the upper right of the Domains page, click Actions > Create Domain. |
|
Step 4 |
In the Create Domain page, complete the following steps: |
What to do next
-
Log in to Nutanix Prism Central.
-
Navigate to Network and Security > Subnets > Network Config.
-
On the Network Configuration window that is displayed, select the Virtual Switch tab. The list of virtual switches available on Nutanix is displayed. You can use a virtual switch from the available list or create new one (see sub-step (c) in the above procedure).
-
Configure the interfaces of the virtual switch. Select the interfaces in the hosts that are connected to the ACI fabric.
-
To set the uplink configuration, select the Bond type. The bond types and the associated APIC configurations are:
Bond Type
APIC Configuration
No Uplink Bond
Configure Leaf Access Port Policy Group and associate to the Interface
Active-Active
Configure PC or VPC Policy Group and associate to the interfaces
Active-Backup
Configure Leaf Access Port Policy Group and associate to the Interface
Active-Active with MAC pinning
Configure Leaf Access Port Policy Group and associate to the Interface
For details about port policy configurations, see the Cisco APIC Basic Configuration Guide, Release 6.0(x).
-
If intra-EPG isolation is configured, microsegmentation needs to be enabled in Prism Central for the clusters managed by VMM domains. Navigate to Prism Central Settings > Flow > Microsegmentation.
Associate an EPG to a VMM domain
Use this procedure for associating an EPG to a VMM domain. You can enable IPAM if you need Nutanix to create an internal DHCP server for the subnet corresponding to the EPG.
Each EPG created on APIC, which is associated with an Nutanix VMM domain, will create a corresponding subnet on Nutanix Prism. The EPG configuration will also create a few default categories corresponding to the EPG.
Following are the guidelines and restrictions, if IPAM is enabled using the procedure given below:
-
IPAM Gateway is mandatory, cannot be modified after creation.
-
DHCP Server Override address is optional, cannot be modified after creation.
-
DHCP pool can be dynamically modified but ensure the VM address usage is valid during DHCP pool changes.
-
After enabling IPAM on an EPG, you cannot disable it. You need to delete the VMM association and re-associate (with IPAM disabled).
-
IPAM configuration can be modified if the subnet is not associated to a VM NIC.
Note |
It is recommended to manage IPAM configuration from Cisco APIC. If you must manage IPAM directly on Nutanix, do not configure IPAM on Cisco APIC. Ensure that you are configuring IPAM on either Cisco APIC or on Nutanix. |
Before you begin
The required prerequisites are:
-
Create a VMM domain.
-
Create a tenant, application profile and at least one EPG.
-
If you are enabling intra-EPG isolation using the procedure detailed below, ensure to enable microsegmentation on Nutanix Prism Central for the clusters managed by VMM domains.
Procedure
|
Step 1 |
Log in to Cisco APIC. |
||
|
Step 2 |
Go to Tenants > tenant > Application Profiles > application_profile > Application EPGs > application_epg > Domains (VMs and Bare-Metals). |
||
|
Step 3 |
Choose Domains (VMs and Bare-Metals), click the Action icon at the upper right of the central pane and choose Add VMM Domain Association. The action icon is indicated by a crossed hammer and wrench. |
||
|
Step 4 |
In the Add VMM Domain Association dialog box, enter the following details:
|
||
|
Step 5 |
Click Submit. |
||
|
Step 6 |
(Optional) To enable intra-EPG isolation, navigate to Tenant > Application Profiles > AP_name > Application EPGs > EPG_name.
|
What to do next
-
Log in to Nutanix Prism Central.
-
Navigate to Compute and Storage > VMs.
-
From the displayed list of VMs, select the required VM. Click the Actions button > Update.
-
On the Update VM window, in the Resources tab > Networks area, click Attach to Subnet. Select the subnet.
When an EPG is created and associated to a domain, a subnet is created on Nutanix (as described in the Associate EPG to a VMM Domain procedure, above).
-
Click Next.
-
On the Management tab, select the Category from the drop down list. Associate two categories for each EPG. They are-
AppTier:aci,AppType:aci. These two categories are default category types on Prism Central. The values/ tags are created for these categories after EPG association to the VMM domain (as seen below).AppType : aci-domainname~TenantName~APName AppTier : aci-domainname~TenantName~APName~EPGName -
(Optional) If intra EPG isolation is enabled on the EPG, navigate to Network and Security > Security Policies to confirm if the rule has been created. Security policies (in Enforced status) are created by the Cisco APIC to support intra EPG isolation.
Microsegmentation for the Nutanix VMM domain
Microsegmentation is a network security technique that:
-
divides a network into logical security zones for improved isolation,
-
enables assignment of endpoints to dynamic groups based on network or VM-based attributes, and
-
allows enforcement of granular policies within distributed virtualized environments
For generic microsegmentation-related information, and details about basic microsegmentation constructs, see the Microsegmentation with Cisco ACI chapter in the Cisco ACI Virtualization Guide. We assume that you are familiar with EPGs, ESGs, tenants, contracts, and other key concepts relating to Cisco ACI policies.
Beginning with Cisco APIC 6.1(4), microsegmentation is supported for the Nutanix VMM domain. Unlike the other integrations, the Nutanix virtual switch (vSwitch) does not support private VLAN (PVLAN). For classification and enforcement of contracts for the VM traffic, you need to enable Flow Network Security (FNS) policies on the Nutanix Prism Central.
Microsegmentation for the Nutanix VMM domain can be achieved by creating microsegment endpoint groups (uSeg EPGs) or Endpoint Security Groups (ESGs). An ESG or uSeg EPG is mapped to a secured entity in Nutanix. For each ESG or uSeg EPG, a category and tag are created in Nutanix, and VMs classified into the ESG or uSeg EPG are assigned the corresponding tag. Secured entities in Nutanix are defined based on these tags. ACI contracts are implemented through Nutanix security policies using FNS next-gen.
Flow network security
Flow network security (FNS) is a microsegmentation solution provided by Nutanix. FNS implements microsegmentation with a simplified policy management system. FNS offers
-
policy-based network security tightly integrated into Nutanix AHV and Prism Central.
-
rich visualization, automation, and security for virtual machines (VMs) running on AHV. By using multiple Prism Central categories (logical groups), you can create a powerful distributed firewall that works as an application-centric policy management tool for securing VM traffic.
FNS version 5.0.1 is the supported version for the APIC integration.
FNS elements
The key FNS elements for the integration are:
-
Categories: a simple text key-value pair used to define groups of VMs that policies are applied to. Categories allow you to flexibly group VMs based on attributes to define security policies. When you use logical categories, you no longer need to base policy definitions solely on network addresses or manually update policies to handle network changes. Your security policy can automatically apply to a VM independent of its network configuration.
-
Security Policies: rules that determine what is allowed between a source and a destination. Objects which have security policies applied to them are referred to as Secured Entities (SE). A logical grouping of SEs that share common security policies form a Secured Entity Group (SEG). A rule inside an application policy includes all the inbound and outbound traffic for specific secured entities. A single rule can include multiple sources and multiple destinations.
Policy translation
Filter Rule: Allow TCP traffic on port 8000
Consumer: ESG_DB
Provider: ESG_APP
Nutanix security policies are symmetric and based on destination ports. Based on the contract, two security policies are created on Nutanix, one for each ESG.
Policy for ESG_APP (Provider)
Inbound Rule:
From ESG_DB, allow traffic on TCP port 8000
Outbound Rule:
To ESG_DB, allow traffic on TCP ANY (permit)
Policy for ESG_DB (Consumer)
Inbound Rule:
From ESG_APP, allow traffic on TCP ANY (permit)
Outbound Rule:
To ESG_APP, allow traffic on TCP port 8000
Limitations for microsegmentation on the Nutanix VMM domain
Generic limitations
-
vzAny is not supported.
-
Intra-ESG and intra-EPG contracts are not supported.
-
VLAN basic subnet is not supported (only VLAN subnet is supported).
-
In a mixed VMware and Nutanix environment, only contract filters supported in Nutanix FNS are allowed to be configured.
-
Mac / IP-based tags are not supported.
-
Contract related statistics for policy enforced on Nutanix is not pulled into APIC (due to API support limitation on Nutanix).
-
Only one vNIC per VM is supported.
Filtering capability-related limitations
These limitations are applicable as the rules in Nutanix differ for filtering capabilities provided by ACI contracts.
-
Bidirectional TCP/UDP/ICMP filters with “reverse filter ports” as true are supported.
-
Only DST port-based filtering is supported (no support for SRC port-based filtering).
-
Only permit rules are allowed (no support for deny).
-
PBR/copy support is not supported.
-
IPv6 is not supported.
Requirements for configuring microsegmentation on the Nutanix VMM domain
On the APIC GUI
-
Navigate to Virtual Networking > Nutanix and check the following for the prism central installed on the Nutanix cluster:
-
FNS next-generation, version 5.0.1
Use the allssh cat /home/nutanix/flow/flow_version.txt command to check the FNS version.
-
Prism Central (PC) version is pc.2024.2.0.x
-
AOS version 6.10
-
-
Create an EPG (or EPGs) on which the uSeg EPG and ESG will be configured.
On the Nutanix GUI
-
Run the commands, flow_cli flow.enable_cisco_aci_mode and allssh genesis stop flow microseg; cluster start to enable aci mode and restart fns, respectively.
-
Navigate to Prism Central Settings and confirm that the Network Controller Service Status is set to Enabled and check the Set as default check-box to set the VLAN as a network VLAN. Then, click Microsegmentation on the left navigation pane, the Microsegmentation screen is displayed. Check the Enable Microsegmentation check-box. FNS next-gen is displayed.
-
Create a category to classify the VMs (example: ACI_VM_Category).
Configure microsegmentation using microsegment endpoint groups
Use the following procedure to configure microsegmentation with Cisco ACI on the Nutanix VMM domain. Microsegmentation for the Nutanix VMM domain can be achieved by creating uSeg EPGs based on existing application EPGs. Ensure to choose the same bridge domain (BD) for the new uSeg EPG and the application EPG.
For details about EPGs, see the Cisco APIC Layer 2 Networking Configuration Guide.
Before you begin
See the Requirements for configuring microsegmentation on the Nutanix VMM domain section.
Procedure
|
Step 1 |
Log into the Cisco APIC. |
||
|
Step 2 |
Choose Tenants and then choose the tenant where you want to create a microsegment. |
||
|
Step 3 |
In the tenant navigation pane, expand the tenant folder, the Application Profiles folder, and the profile folder.
|
||
|
Step 4 |
In the tenant navigation pane, right-click the uSeg EPGs folder and then choose Create uSeg EPG. |
||
|
Step 5 |
In the Create uSeg EPG Step 1 > Identitydialog box, complete the following steps to create a uSeg EPG for a group of VMs: |
||
|
Step 6 |
In the Create USeg EPG Step 2 > Domains, complete the following steps to associate the uSeg EPG with a VMM domain.
|
||
|
Step 7 |
In the uSeg EPG folder > Domains, complete the following steps to configure the Custom uSeg EPGname |
||
|
Step 8 |
In the navigation page for the tenant, open the folder for the uSeg EPG that you just created. |
||
|
Step 9 |
Click the uSeg Attributes folder. The uSeg Attributes work pane is displayed, allowing you to configure attributes to filter which VMs you want to add to the uSeg EPG. |
||
|
Step 10 |
From the match drop-down list, choose Match Any or Match All. The match feature enables you to use multiple attributes to filter VMs for the uSeg EPG. The default is Match Any. The match all feature is supported for VM-based attributes only. |
||
|
Step 11 |
Click the + or the +( icon to add a filtering statement. The + icon allows you to create a simple statement, one that creates a filter for a single attribute. You can add multiple simple statements to filter for multiple attributes. The +( icon allows you to create a block, or nested, statement, which allows you to set attributes in a hierarchy, which filters for the highest-level attribute first and then filters for lower-level attributes. For Nutanix VMM domain, only the VM– Tag attribute is supported. Select the category, an operator and the tag value. The category and tag value are created on Prism Central. Associate the category to the VM. Based on the example mentioned in the prerequisites section, the category (indicated in the box below) corresponds to the ACI_VM_Category. 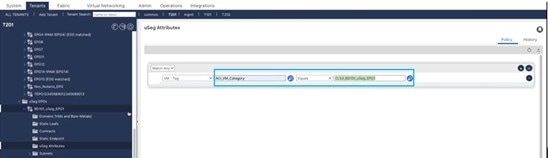
Based on the uSeg EPG created on APIC, the ACI-uSeg-EPG category is created in Prism Central. The value is indicated in this
format:
|
Configure microsegmentation using endpoint security groups
Use this procedure to create an endpoint security group which will classify the VMs on Nutanix. For classifying EPGs using ESGs for the Nutanix VMM domain, the supported parameters are Tag Selector and EPG selector. For details about selectors, see the Cisco APIC Security Configuration Guide.
Before you begin
See the Requirements for configuring microsegmentation on the Nutanix VMM domain section.
Procedure
|
Step 1 |
Log into the Cisco APIC. |
|
Step 2 |
Choose Tenants and then choose the tenant where you want to create a microsegment. |
|
Step 3 |
In the tenant navigation pane, expand the tenant folder, the Application Profiles folder, and the profile folder.
|
|
Step 4 |
See the Creating an ESG procedure in the Cisco APIC Security Configuration Guide. Ensure to adhere to the following: See the Applying a Contract to an ESG procedure in the Cisco APIC Security Configuration Guide to define a contract between ESGs. |
Classification of virtual machines
The classification of the virtual machines in Nutanix is based on the associated ESGs or the uSeg-EPGs. After the creation of uSeg EPGs (or ESGs) on APIC, the VMs are matched to ESGs or uSEg-EPGs by their custom tags or by their EPGs. Security policies are enforced on a VM based on the ACI-defined category assigned to it.
|
Nutanix Prism Central |
Cisco APIC |
|---|---|
|
VM is attached to a subnet |
ACI tag for the subnet is calculated and automatically assigned. |
|
VM matches an ESG |
ACI-ESG tag is assigned to the VM. |
|
VM matches an uSeg-EPG |
ACI-uSeg EPG tag is assigned to the VM. |
|
VM does not match any ESG or uSeg-EPG |
ACI-EPG tag remains assigned to the VM. |
Tag precedence for the VMs (in descending order):
-
ESG match based on tag selector.
-
ESG match based on uSeg-EPG selector.
-
uSeg-EPG match based on tag.
-
ESG match based on EPG selector.
-
ACI-EPG tag based on the attached subnet.
Sample usecases
Microsegmentation using uSeg EPGs
Outline of the usecase: segmentation for endpoints in the same subnet.
All endpoints are in the same subnet but due to security requirements, they cannot communicate with each other or can only communicate with each other on a particular UDP/TCP port. The endpoints can be in the same Nutanix domain or could reside in different domains (such as VMware).
Topology:
EPG1, EPG2 are both in Bridge domain 1 (BD1)
VM11, VM12, VM13 are endpoints in the Nutanix VMM domain
E1, E2 are endpoints in the VMware Domain
E1, VM11, VM12, VM13 in EPG1
E2 in EPG2
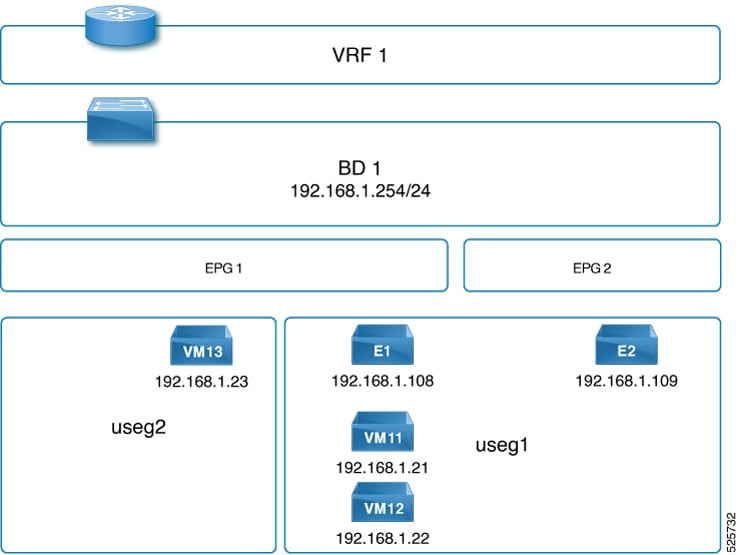
Solution: Define two uSeg EPGs: uSeg1 and uSeg2 and configure the required uSeg attributes to enforce communication between VM13 and the other endpoints.VM13 can communicate with the other endpoints when a contract is applied between useg1 and useg2.
Microsegmentation using ESGs
Outline of the usecase:
-
Grouping endpoints from different EPGs (EPG1, EPG2, EPG3) in a single ESGA, so those endpoints VM1-1, VM1-2, VM2, VM3 can communicate without any contract. This helps to simplify the security configuration.
-
Allow segmentation between endpoints even when they are in same subnet. For example VM3, VM4 are in same subnet but they cannot communicate with each other.
Topology:
EPG1, EPG2 are both in Bridge domain 1 (BD1)
EPG3 in BD2
VM1-1, VM1-2 are in EPG1 and ESGA
VM2 is in EPG2 and ESGA
VM3 is in EPG3 and ESGA
VM4 is in EPG3 and ESGB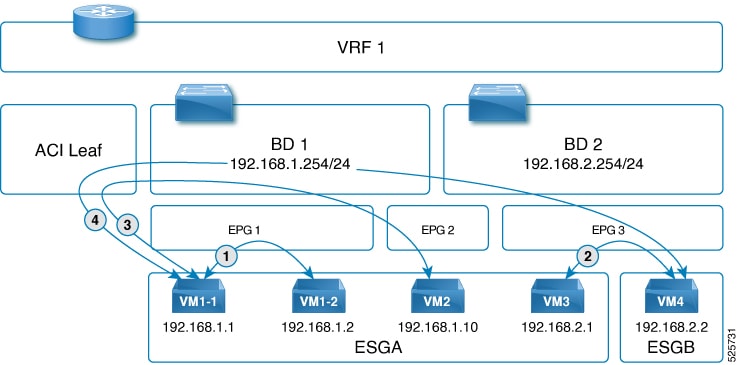
Solution:
Consider ESGA as Host-1 and ESGB as Host-2. Both the hosts are in the same cluster and the same VMM domain.
-
For intra-host, intra-EPG, and inter-ESG (VM3 and VM4), contract enforcement happens on the Nutanix side.
-
For intra-host, inter-EPG, intra-ESG (VM1-1 and VM2), contract enforcement happens on the Nutanix side.
-
For inter-host, inter-EPG and inter-ESG (VM1-1 and VM4), contract enforcement happens on the Nutanix side and on the ACI fabric too.
-
For inter-domain traffic, contract enforcement always happens on the ACI fabric.
 Feedback