Cisco DNA Center ITSM Integration Guide, Release 2.2.2
Bias-Free Language
The documentation set for this product strives to use bias-free language. For the purposes of this documentation set, bias-free is defined as language that does not imply discrimination based on age, disability, gender, racial identity, ethnic identity, sexual orientation, socioeconomic status, and intersectionality. Exceptions may be present in the documentation due to language that is hardcoded in the user interfaces of the product software, language used based on RFP documentation, or language that is used by a referenced third-party product. Learn more about how Cisco is using Inclusive Language.
Cisco DNA Center Integration with a Generic REST Endpoint
The following table describes the procedure for configuring Cisco DNA Center integration with a generic REST endpoint. You may wish to publish network and SWIM events to a REST endpoint (outside of
a configuration management database) for performance, security, event response, or other reasons.
Table 1. Cisco DNA Center to Generic REST Endpoint Integration Procedure
Step
Description
Step 1
Install or upgrade to Cisco DNA Center, Release 2.2.2.
Determine the REST endpoint (system location and IP address) for the publication of the Assurance (network) events and/or SWIM events.
Step 3
Configure network events using Events window in the Cisco DNA Center GUI.
You can configure REST API endpoints for events using the GUI. Click Platform > Developer Toolkit > Events. Review the network events listed in the window and click a specific event to configure, then click Subscribe to create a REST API endpoint.
Network event notifications are sent when the event actually occurs and not according to any polling schedule that you configure.
Step 4
Configure network event settings in Event Settings.
The Cisco DNA Center platform and ITSM integration allows the user to choose from a list of
possible issues to create and modify the severity of events,
incidents, or problems to match business priorities.
Access the REST endpoint and review the network event data that has been posted using the REST APIs in this procedure. Begin
to review and manipulate this data according to your business or network needs.
Configure Network Events
You can subscribe to specific events that may occur in your network. After you subscribe, you receive a notification by REST
API whenever the event occurs. You subscribe to an event using the Events window in the Cisco DNA Center platform GUI.
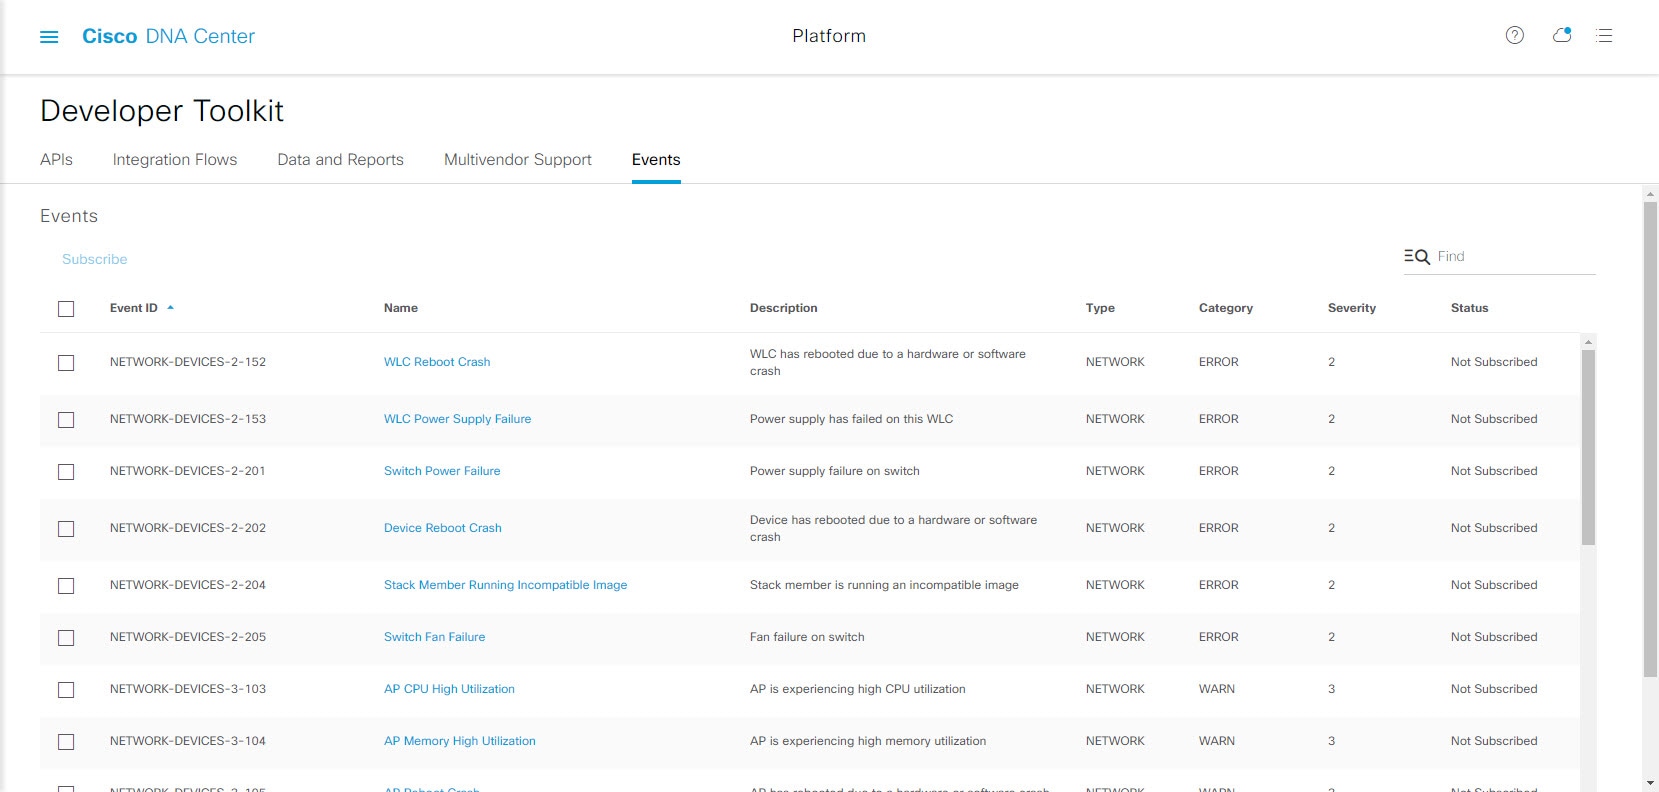
Figure 1. Cisco DNA Center Platform Events Window
Before you begin
For a REST API subscription of events, you have configured the REST API event
notifications in the Webhook window in Cisco DNA Center. You access the Webhook window by clicking the
Menu icon () > System
> Settings > External
Services > Destinations >
Webhook.
You must have the appropriate permissions to perform the tasks described in this procedure. For information about Role-Based
Access Control for the Cisco DNA Center platform, see the Cisco DNA Center Platform User Guide.
Procedure
Step 1
In the Cisco DNA Center GUI, click the Menu icon () and choose Platform > Developer
Toolkit > Events.
Step 2
In the Events window, review the events displayed in the table.
Note
You can adjust the events that are displayed by entering a keyword in the Find field.
Step 3
Review the data on an individual event within the table.
The following Events data is provided:
Event ID: Identification number for the event.
Name: Name of the event (link).
If you click this link, the Nameslide-in pane opens for the selected event. The Nameslide-in pane consists of two tabs: Events Details and Active Subscriptions.
Description: Brief description of the event.
Type: Network, App, System, Security, or Integrations type of event.
Category: Error, Warn, Info, Alert, Task Progress, or Task Complete.
Severity: 1 through 5.
Note
Severity 1 is the most important or critical priority and should be assigned for this type of event.
Status: Subscription status (whether a user has subscribed to the event and will appear in the Active Subscriptions tab). If subscribed to an event, the type of notification also appears in the Broadcast Methods column (REST URL, email, or SNMP trap).
Step 4
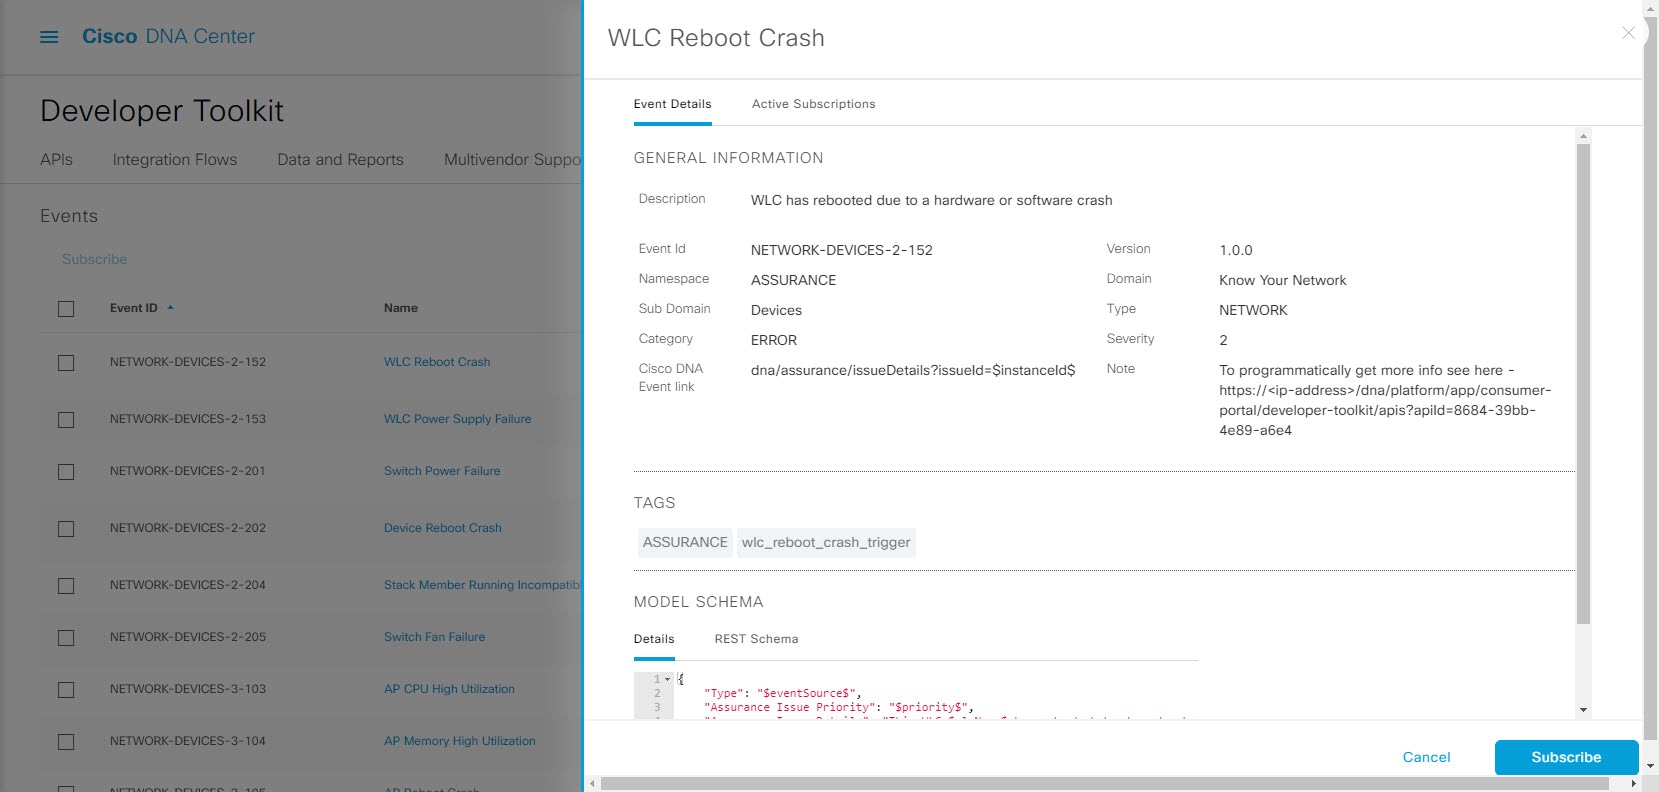
Click a Name link to open an event subscription slide-in pane.
Figure 2. Individual Event Window
Step 5
Review the data displayed in the event subscription slide-in pane.
The following Event Details tab data is displayed:
Description: Brief description of the event and how it is triggered.
Event ID: Identification number of the event.
Version: Version number of the event.
Namespace: Namespace of the event.
The default value for all events is ASSURANCE.
Domain: REST API domain to which the event belongs.
Sub Domain: Sub-group under the REST API domain to which the event belongs.
Type: Network, App, System, Security, or Integrations type of event.
Severity 1 is the most important or critical priority and should be assigned for this type of event.
Cisco DNA Event Link: Event broadcast using REST URL.
Note: Additional information about the event or to assist in further understanding the event.
Tags: Cisco DNA Center component that is affected by the event. The default value is ASSURANCE with additional syntax for the specific Assurance
issue.
Model Schema: Model schema about the event:
Details: Example of model schema detail for the event.
REST Schema: REST schema format for the event.
Step 6
Click the Active Subscriptions tab.
The following data is displayed:
Broadcast Methods: Email, REST API, or SNMP trap.
Count and Instances: Number of instances of notifications for emails, REST APIs, or SNMP traps.
Click the subscription count under Count and Instances. To edit the subscription, click Edit. To unsubscribe, click Unsubscribe. For multiple subscriptions, you need to unsubscribe from each subscription one at a time. The ability to subscribe to or
unsubscribe from multiple subscriptions is not supported using the GUI.
Actions: Either unsubscribe or edit the active subscription.
Note
After subscribing to an event, a Try It button appears in the Active Subscriptions tab. To run an event simulation, click Try It. For information about this feature, see the Cisco DNA Center Platform User Guide.
Step 7
To add the event to your active subscription of events and receive future notifications, click Subscribe.
You subscribe to an event to receive either an email, REST API endpoint, or SNMP trap notification. If you subscribe to a
REST API endpoint notification (for example for a web hook), then configure the following fields:
Name: Name of the event.
Subscription Type: REST
Subscription type can be set for either email, REST API endpoint, or SNMP trap.
Select an existing endpoint: Select the Subscription Endpoint and URL by using the drop down arrow.
Create a new endpoint: Click the active link to access the Webhook tab and configure the settings for the REST API endpoint.
Note
After you configure the values in the Webhook tab, return to the event and select it as your configured REST API endpoint.
Trust certificate: Choose whether a trust certificate is required for REST API endpoint notification.
HTTP Method: Choose either the PUT or POST method.
Authentication: Select the Authentication type:
Basic: Authentication where the client sends HTTP requests with the Authorization header that contains the word 'Basic', followed
by a space and a base64-encoded string 'username:password'. If you select Basic, then the Header Key field is automatically populated with the Authorization value.
Token: Authentication where users are authenticated using a security token provided by the server. If you select Token, the Header Key field is automatically populated with the X-Auth-Token value.
No Authentication: No authentication needed.
Headers: Enter the Header Name and Header Value. Click Add to add the header values.
Note
The Header Name field may be auto-populated depending upon your Authentication selection above.
Click Subscribe to save and enable the subscription or Cancel to cancel and exit the window.
Configure Event Settings
The Cisco DNA Center platform and ITSM integration permits you to choose from a list of possible issues to create and modify the severity of events, incidents,
or problems in ServiceNow to match your business priorities. You perform these tasks in the Events Settings window. The Events Settings window is accessible from the Configurations menu option in the Cisco DNA Center platform.
Note
For this release, there are no SWIM events to configure in Event Settings, you only configure network assurance events.
Important
The Event Settings window and its functionality are applicable only to events for an ITSM (ServiceNow) integration and not for events configured
to other destinations. To configure events to a webhook or other destination, click the link above the columns. Use the Events window to configure events for an email, webhook, or SNMP trap.
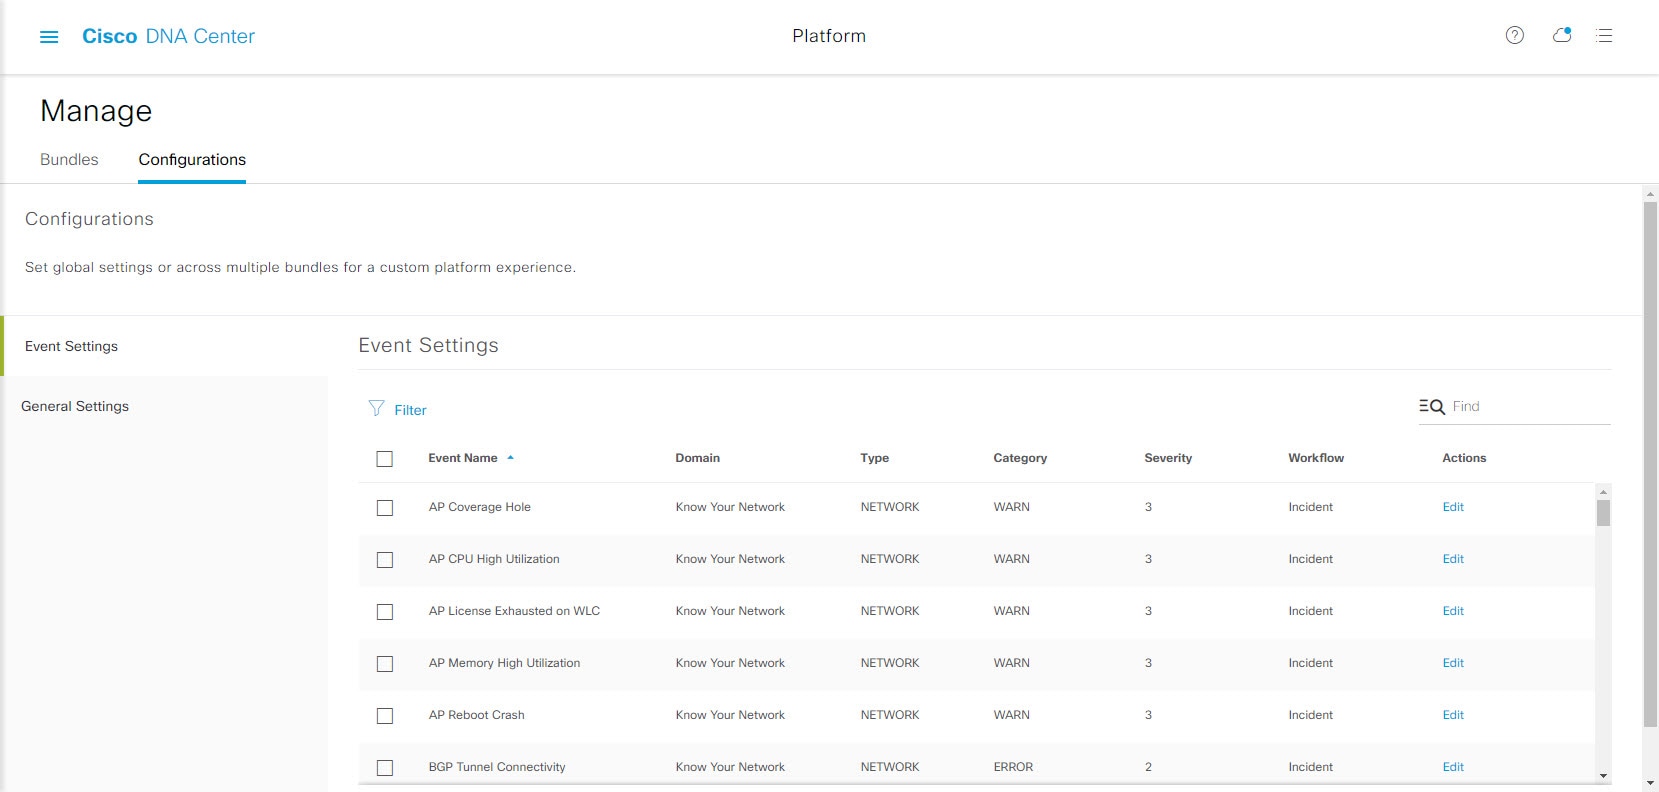
Figure 3. Events Settings Window
Before you begin
You must have the appropriate permissions to perform the tasks as described in this procedure. For information about Role-Based
Access Control for the Cisco DNA Center platform, see the Cisco DNA Center Platform User Guide.
Procedure
Step 1
In the Cisco DNA Center GUI, click the Menu icon () and choose Platform > Manage > Configurations.
A Configurations window that contains an Events Settings section is displayed.
Step 2
Review the information presented in the Event Settings section:
Event Name: Name of the Cisco DNA Center event.
Domain: Domain of the Cisco DNA Center event.
Type: Network, App, System, Security, or Integrations.
Category: Error, Warn, Info, Alert, Task Progress, or Task Complete.
Severity: P1 (Severity 1) through P5 (Severity 5).
Note
Severity 1 is the most important or critical priority and should be assigned for this type of event.
Workflow: Incident, Problem, Event, or RFC (Request for Change).
Actions: Edit.
To adjust what is displayed in the table, click the Filter icon or enter a keyword in the Find field. For example, to display all access point notifications, enter AP in the Find field. To view all network notifications, enter Network in the Find field. To view all severity notifications, enter 1 in the Find field.
Step 3
To edit an event, click Edit in the Actions column.
To choose a setting, click the down-arrow and adjust the value. For example, click Network and adjust to App. This changes the event type from a network type to an application type. Click Severity and adjust the setting from 5 to 1. The severity level is raised from 5 to 1.
Step 4
Click the box next to the event name to enable notifications.
This enables notifications through Cisco DNA Center when the event occurs in the future.
Step 5
Click Save.
Cisco DNA Center Integration with ServiceNow Without the Cisco DNA App
The following table describes the procedure for configuring Cisco DNA Center integration with ServiceNow without using the Cisco DNA app. Follow the procedure to configure integration for network events, SWIM events, or both event types depending upon the
functionality that you require.
Note
You can also use the Basic ITSM (ServiceNow) CMDB synchronization bundle with this workflow. If you use this bundle, be sure to choose Post device inventory details to a staging table as the destination type. The other destination type (Synchronize device inventory directly with CMDB) requires the Cisco DNA App. Additionally, the Post device inventory details to a staging table destination type only sends data to the REST API endpoint. You will need to create a script to perform any further action
on the data.
Table 2. Cisco DNA Center to ServiceNow Integration without the Cisco DNA App Procedure
Step
Description
Step 1
Install or upgrade to Cisco DNA Center, Release 2.2.2.
This bundle enables Change Management between the two systems (Cisco DNA Center and ServiceNow). Change Management and Incident/Problem Management workflows should be enabled based on the automation or
assurance use cases that you want to log tickets to in ServiceNow.
Step 4
Configure network event settings in Event Settings.
The Cisco DNA Center platform and ITSM integration allows the user to choose from a list of
possible issues to create and modify the severity of events,
incidents, or problems in ServiceNow to match business
priorities.
Step 5
Configure the Cisco DNA Center Automation events for ITSM (ServiceNow) bundle.
The Cisco DNA Center Automation events for ITSM (ServiceNow) bundle has been improved for this release. This bundle retrieves events relating to software image updates required for compliance,
security or any other operational triggers from Cisco DNA Center. With past releases, the bundle published the event data on a user-defined recurring schedule to an ITSM (Service Now) system.
In this release, SWIM event notifications are sent from Cisco DNA Center to ServiceNow when they occur and not on a polling and notify schedule. Additionally, for this release there is no SWIM event
that you must configure in Event Settings. Previous releases required that you configure a single SWIM event (Device Image Outdated).
Access your ServiceNow instance and review the network and SWIM event data that has been posted using the REST APIs in this
procedure. Begin to review and manipulate this data in ServiceNow per your business or network needs.
Note
The ServiceNow user must have the role of evt_mgmt_integration to post events to the event table (em_event).
Configure the Network Issue Monitor and Enrichment for ITSM (ServiceNow) Bundle
Perform this procedure to set up monitoring for network for assurance and maintenance issues, as well as publishing event
details to a ServiceNow system.
Note
Event data can be published to the Event table in ServiceNow. This requires that you have the Event Management plugin in your ServiceNow instance. If you do not have
the Event Management plugin in your ServiceNow instance, the bundle can be configured to send the data to a REST API endpoint
in the Cisco DNA App.
Before you begin
You must have the appropriate permissions to perform the tasks as described in this procedure. For information about Role-Based
Access Control for the Cisco DNA Center platform, see the Cisco DNA Center Platform User Guide.
Procedure
Step 1
In the Cisco DNA Center GUI, click the Menu icon () and choose Platform > Manage > Bundles.
Review the displayed bundles and their current status.
Step 2
Click the Network Issue Monitor and Enrichment for ITSM (ServiceNow) bundle link or icon (colored square with initial) for additional information about the bundle.
Additional information provided may include the following:
General information: Vendor, version, platform, tags displayed under the square icon.
Information: Tab that displays general information (purpose of bundle and how bundle works in the network), sample schemas, configuration
notes, and other data about the bundle.
Contents: Tab that accesses the APIs and integration flows that make up the bundle, or provides information about the integration
flows that make up the bundle.
Release Notes: Tab that displays latest release information about the bundle, including its version.
Step 3
Click each of the above tabs and review the information about the bundle.
Step 4
Click the Enable button to enable the bundle.
An Information field appears in the window.
Step 5
In the Information field, click the Enable button to confirm enabling the bundle.
After clicking the Enable button to confirm, a success message appears.
Step 6
Click OK in the success message.
Step 7
Click the Configure button to configure at the bundle level.
A configuration slide-in pane appears.
Step 8
In the configuration slide-in pane, click ServiceNow Access Settings to configure a ServiceNow Connection instance.
Step 9
Click the radio button to configure either an existing ServiceNow Connection instance or configure a new instance.
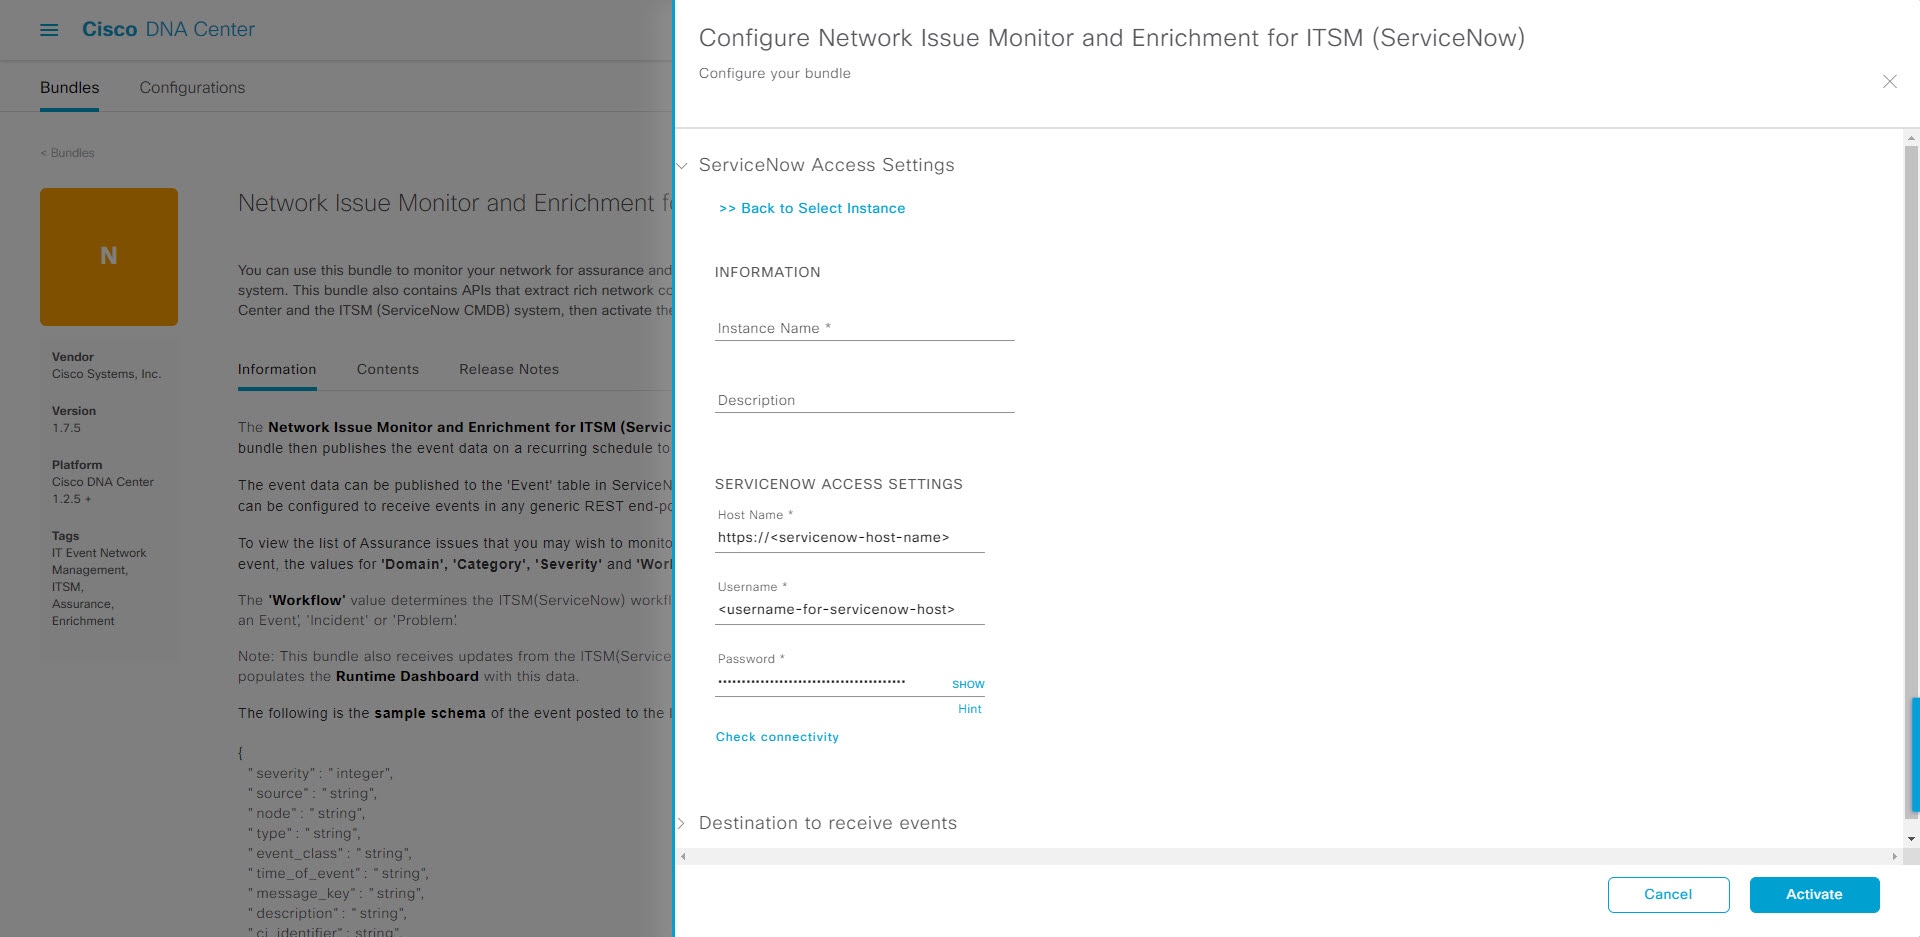
Figure 4. Example of ServiceNow Instance Configuration Fields
For configuring an existing ServiceNow Connection instance, choose it from the drop-down menu in the window and click Activate.
Step 10
For configuring a new ServiceNow Connection instance, the following additional information must be entered.
Instance Name: Name of the instance.
Description: Descriptive text of the instance.
Host name: Host name for the ServiceNow system.
Username: Username required to access the ServiceNow system.
Password: Password required to access the ServiceNow system.
Step 11
Click Check Connectivity to test whether you can connect to the server where the endpoint is located.
After a successful test of connectivity to the server, proceed to configure Destination to receive events.
Step 12
In the configuration slide-in pane, click Destination to receive events to configure a Destination Connection instance.
Step 13
Click the radio button to configure either an existing Destination Connection instance or configure a new instance.
Figure 5. Example of Destination to Receive Events Configuration Fields
For configuring an existing Destination Connection instance, choose it from the drop-down menu in the window and click Activate.
Step 14
For configuring a new Destination instance, the following additional information must be entered.
Instance Name: Name of the instance.
Description: Descriptive text of the instance.
Destination to receive events: Choose one of the following:
Event Management: When setting up Cisco DNA Center integration with ServiceNow without using the Cisco DNA App, choose the Event Management option. The Event Management option also requires that you have the Event Management plugin configured within the ServiceNow instance.
REST API Endpoint: The REST API Endpoint option can be used with the Cisco DNA App. Data is sent to a REST API endpoint within the Cisco DNA App with the REST API Endpoint option.
Generic REST Endpoint in ServiceNow: For the Generic REST Endpoint in ServiceNow option, you can send the data to a different staging table in ServiceNow.
Destination URI: Enter a destination URI (Uniform Resource Indicator) for the Generic REST Endpoint in ServiceNow option. This field is mandatory for this option.
After entering this information, proceed to the next step.
Step 15
Click Activate to save your changes and activate the bundle or click Cancel to cancel the configuration and close the slide-in pane.
The changes made to the bundle begin to take effect immediately. Additionally, the bundle status changes from ENABLED to ACTIVE.
Configure Event Settings
The Cisco DNA Center platform and ITSM integration permits you to choose from a list of possible issues to
create and modify the severity of events, incidents, or problems in ServiceNow to
match your business priorities. You perform these tasks in the Events
Settings window. The Events Settings window
is accessible from the Configurations menu option in the Cisco DNA Center platform.
Note
For this release, there are no SWIM events to configure in Event Settings, you only configure network assurance events.
Important
The Event Settings window and its functionality is only
applicable to events for an ITSM (ServiceNow) integration and not for events
configured to other destinations. For events being configured to a webhook or
other destination, click the link above the columns to access the
Events window. Use the Events
window to configure events for an email, webhook, or SNMP trap.
Figure 6. Events Settings Window
Before you begin
You must have the appropriate permissions to perform the tasks as described in this procedure. For information about Role-Based
Access Control for the Cisco DNA Center platform, see the Cisco DNA Center Platform User Guide.
Procedure
Step 1
In the Cisco DNA Center GUI, click the Menu icon () and choose Platform > Manage > Configurations.
A Configurations window opens that contains an Events Settings section.
Step 2
Review the Event Settings section that appears.
The following Event Settings information is displayed:
Severity: P1 (Severity 1) through P5 (Severity 5).
Note
Severity 1 is the most important or critical priority and should be assigned as such.
Workflow: Incident, Problem, Event, or RFC (Request for Change)
Actions: Edit
You can adjust what is displayed in the table by clicking the Filter icon and using the filter, or by typing a keyword in the Find field. For example, to display all access point notifications, type 'AP' in the Find field. To view all network notifications, type 'Network' in the Find field. To view all severity notifications, type '1' in the Find field.
Step 3
Click Edit in the Actions column to edit an event.
Choose a setting by clicking on the downward pointing angle and adjust the value. For example, click Network and adjust to App. This changes the event type from a network type to an application type. Click Severity and adjust to 1 from 5. This raises the severity level from 5 to 1.
Step 4
Click the box next to the Event name to enable notifications.
This enables notifications through Cisco DNA Center when the event occurs in the future.
Step 5
Click Save to save your configuration.
Configure the Cisco DNA Center Automation Events for ITSM (ServiceNow) Bundle
Perform this procedure to set up monitoring and publishing events requiring software image updates for compliance, security,
or other operational triggers to a ServiceNow system.
Note
Event data can be published to the Event table in ServiceNow. This requires that you have the Event Management plugin in your ServiceNow instance. If you do not have
the Event Management plugin in your ServiceNow instance, the bundle can be configured to send the data to a REST API endpoint
in the Cisco DNA App.
Before you begin
You must have the appropriate permissions to perform the tasks as described in this procedure. For information about Role-Based
Access Control for the Cisco DNA Center platform, see the Cisco DNA Center Platform User Guide.
Procedure
Step 1
In the Cisco DNA Center GUI, click the Menu icon () and choose Platform > Manage > Bundles.
Review the displayed bundles and their current status.
Step 2
Click the Cisco DNA Center Automation events for ITSM (ServiceNow) bundle link or icon (colored square with initial) for additional information about the bundle.
Additional information provided may include the following:
General information: Vendor, version, platform, tags displayed under the square icon.
Information: Tab that displays general information (purpose of bundle and how bundle works in the network), sample schemas, configuration
notes, and other data about the bundle.
Contents: Tab that accesses the APIs and integration flows that make up the bundle, or provides information about the integration
flows that make up the bundle.
Release Notes: Tab that displays latest release information about the bundle, including its version.
Step 3
Click each of the above tabs and review the information about the bundle.
Step 4
Click the Enable button to enable the bundle.
An Information field appears in the window.
Step 5
Click the Enable button in the Information field to confirm enabling the bundle.
After clicking the Enable button to confirm, a success message appears.
Step 6
Click OK in the success message.
Step 7
Click the Configure button to configure at the bundle level.
A configuration slide-in pane appears.
Step 8
In the configuration slide-in pane, click ServiceNow Access Settings to configure a ServiceNowConnection instance.
Step 9
Click the radio button to configure either an existing ServiceNow Connection instance or configure a new instance.
Figure 7. Example of ServiceNow Instance Configuration Fields
For configuring an existing ServiceNow Connection instance, choose it from the drop-down menu in the window and click Activate.
Step 10
For configuring a new ServiceNowConnection instance, the following additional information must be entered.
Instance Name: Name of the instance.
Description: Descriptive text of the instance.
Host name: Host name for the ServiceNow system.
Username: Username required to access the ServiceNow system.
Password: Password required to access the ServiceNow system.
Step 11
Click Check Connectivity to test whether you can connect to the server where the endpoint is located.
After a successful test of connectivity to the server, proceed to activate the bundle.
Step 12
In the configuration slide-in pane, click Destination to receive events to configure an Destination Connection instance.
Step 13
Click the radio button to configure either an existing Destination Connection instance or configure a new instance.
Figure 8. Example of Destination to Receive Events Configuration Fields
For configuring an existing Destination Connection instance, choose it from the drop-down menu in the window and click Activate.
Step 14
For configuring a new Destination instance, the following additional information must be entered.
Instance Name: Name of the instance.
Description: Descriptive text of the instance.
Destination to receive events: Choose one of the following:
Event Management: When setting up Cisco DNA Center integration with ServiceNow without using the Cisco DNA App, choose the Event Management option. The Event Management option also requires that you have the Event Management plugin configured within the ServiceNow instance.
REST API Endpoint: The REST API Endpoint option can be used with the Cisco DNA App. Data is sent to a REST API endpoint within the Cisco DNA App with the REST API Endpoint option.
Generic REST Endpoint in ServiceNow: For the Generic REST Endpoint in ServiceNow option, you can send the data to a different staging table in ServiceNow.
Destination URI: Enter a destination Uniform Resource Indicator (URI) for the Generic REST Endpoint in ServiceNow option. This field is mandatory for this option.
After entering this information, proceed to the next step.
Step 15
Click Activate to save your changes and activate the bundle or click Cancel to cancel the configuration and close the slide-in pane.
Note
By clicking Activate, you enable the changes made to the bundle and the changes take effect immediately. Additionally, the bundle's status changes
from ENABLED to ACTIVE.
Cisco DNA Center Integration with ServiceNow Using the Cisco DNA App
Cisco DNA Center supports an application (Cisco DNA) that facilitates integration with ServiceNow. This application or app is designed to work with ServiceNow without its Event Management plugin.
The Cisco DNA app is installed within the ServiceNow instance and performs the following tasks:
Schedules the basic one-way synchronization of Cisco DNA Center discovered devices into the ServiceNow Configuration Management Database (CMDB) using Cisco DNA Center inventory as a source of truth. The Cisco DNA app supports CMDB synchronization from Cisco DNA Center to ServiceNow.
Automatically triggers problem, incident, and change workflows for network events published by Cisco DNA Center.
Enriches ITSM tickets with network details from Cisco DNA Center. The Cisco DNA app makes REST API calls into Cisco DNA Center for fetching enrichment information of various types such as device, issue, user, and client for a user created ticket.
Supports integration of the Cisco DNA Center platform with ServiceNow for an automated way to create change request (CR) tickets in ServiceNow for network events.
The following table describes the procedure for configuring Cisco DNA Center integration with ServiceNow using the Cisco DNA app. Follow the procedure to configure integration for network events, SWIM events, or both event types depending upon the
functionality that you require.
Table 3. Cisco DNA Center to ServiceNow Integration with Cisco DNA App Procedure
Step
Description
Step 1
Install or upgrade to Cisco DNA Center, Release 2.2.2.
Synchronizing the network device inventory with the ServiceNow CMDB is a prerequisite to enable the auto-generation of ITSM
tickets. Therefore, the CMDB Sync must be enabled first (if it is not already done outside of Cisco DNA Center). Check with your ServiceNow administrator to see whether the CMDB Sync is being done elsewhere.
This bundle enables data to be sent from Cisco DNA Center to create any type of workflow in ServiceNow. Change Management and Incident/Problem Management workflows should be enabled
based on the automation or assurance use cases that you want to log tickets to in ServiceNow.
Step 7
Configure network event settings in Event Settings.
The Cisco DNA Center platform and ITSM integration allows the user to choose from a list of
possible issues to create and modify the severity of events,
incidents, or problems in ServiceNow to match business
priorities.
Step 8
Configure the Cisco DNA Center Automation events for ITSM (ServiceNow) bundle.
Access your ServiceNow instance and review the network and SWIM event data that has been posted using the Cisco DNA Center REST APIs in this procedure. Begin to review and utilize this data per your business or network needs.
Requirements
Review and ensure that the following networking and systems requirements are met for the Cisco DNA Center-to-ServiceNow integration:
Networking:
The Cisco DNA app is configured with the IP address and access information of the Cisco DNA Center installation that it is being integrated with.
Note
Contact your Cisco DNA Center administrator to obtain this information.
HTTPS network access between Cisco DNA Center and ServiceNow (including the MID server) is established.
Note
Contact and work with your network administrator to establish this.
Management, Instrumentation, and Discovery (MID) Server:
The MID server is up and running, as well as accessible from the ServiceNow instance.
The Cisco DNA Center platform is accessible from the MID server.
The Cisco DNA Center platform REST APIs are allowed from the MID server.
Note
The MID server is used to proxy the REST requests from the ServiceNow instance.
The Cisco DNA Center platform is enabled in Cisco DNA Center.
The requisite bundle or bundles in the Cisco DNA Center platform are configured and activated (as described in the following procedures).
Note
These bundles have the required APIs that integrate with the Cisco DNA app in ServiceNow.
Configure the Basic ITSM (ServiceNow) CMDB Synchronization Bundle
Perform this procedure to either trigger or schedule a synchronization between the Cisco DNA Center devices and your ServiceNow CMDB system. If devices have not been synchronized between Cisco DNA Center and the ServiceNow CMDB system, this bundle must be activated as a prerequisite, before activating any other bundles.
Note
The Cisco DNA Center CMDB synchronization cannot detect multiple instances of Cisco DNA Center:
To identify the attributes that were synchronized from a particular Cisco DNA Center instance, each attribute is tagged with a Cisco DNA Center IP address.
ServiceNow can now identify which Cisco DNA Center instance the attribute came from. An extra attribute for the Configuration Item (CI) has been added to retain the Cisco DNA Center IP address or hostname information.
Before you begin
Ensure that you have ServiceNow running on a system that you will integrate with Cisco DNA Center platform.
Run a successful Discovery job in Cisco DNA Center. You can check whether a Discovery job is successful in Device Inventory. In the Cisco DNA Center GUI, click the Menu icon () and choose Provision > Inventory to view the results.
You must have the appropriate permissions to perform the tasks as described in this procedure. For information about role-based
access control for the Cisco DNA Center platform, see the Cisco DNA Center Platform User Guide.
Procedure
Step 1
In the Cisco DNA Center GUI, click the Menu icon () and choose Platform > Manage > Bundles.
Review the displayed bundles and their current status.
Step 2
Click the Basic ITSM (ServiceNow) CMDB synchronization bundle link or icon (colored square with initial) for additional information about the bundle.
Additional information provided may include the following:
General information: Vendor, version, platform, tags displayed under the square icon.
Information: Tab that displays general information (purpose of bundle and how bundle works in the network), sample schemas, configuration
notes, and other data about the bundle.
Contents: Tab that accesses the integration flows and APIs that make up the bundle.
Release Notes: Tab that displays latest release information about the bundle, including its version.
Step 3
Click the Contents tab.
Step 4
Click the Integration Flows header.
An integration flow or list of integration flows appear underneath the header.
Step 5
Click the Enable button to activate the integration flow links.
An Information field appears in the window.
Step 6
In the Information field, click the Enable button to confirm enabling the bundle.
After clicking the Enable button to confirm, a success message appears.
Step 7
Click Okay in the success message.
Step 8
Click the integration flow link to perform the tasks listed below:
Review the Description, Tags, How to Use this Flow, and scheduler.
Click Run Now (to run the scheduler now), Run Later (to schedule for a later time), or Recurring (to set up a recurring schedule).
For Run Later, you need to select a date, time, and time zone. For Recurring, you need to set a repeating interval (daily or weekly), an interval duration (minutes or hours), and a start and end date.
Click Schedule to enable the scheduler.
Important
Only configure and enable an integration flow schedule, after you have finished configuring the bundle itself as described
in this procedure. You configure and enable an integration flow schedule by returning to this view and clicking Schedule, or by clicking the View Flows link in the Configure Basic ITSM (ServiceNow) CMDB synchronizationslide-in pane (see following steps), or by clicking the menu icon () > Platform > Developer Toolkit > Integration Flows > Schedule to Publish Inventory Details-ServiceNow Connector.
Step 9
Click the X icon to return to the previous bundle window.
Step 10
Click the Configure button to configure at the bundle level.
A configuration slide-in pane appears. Review the CMDB synchronization information.
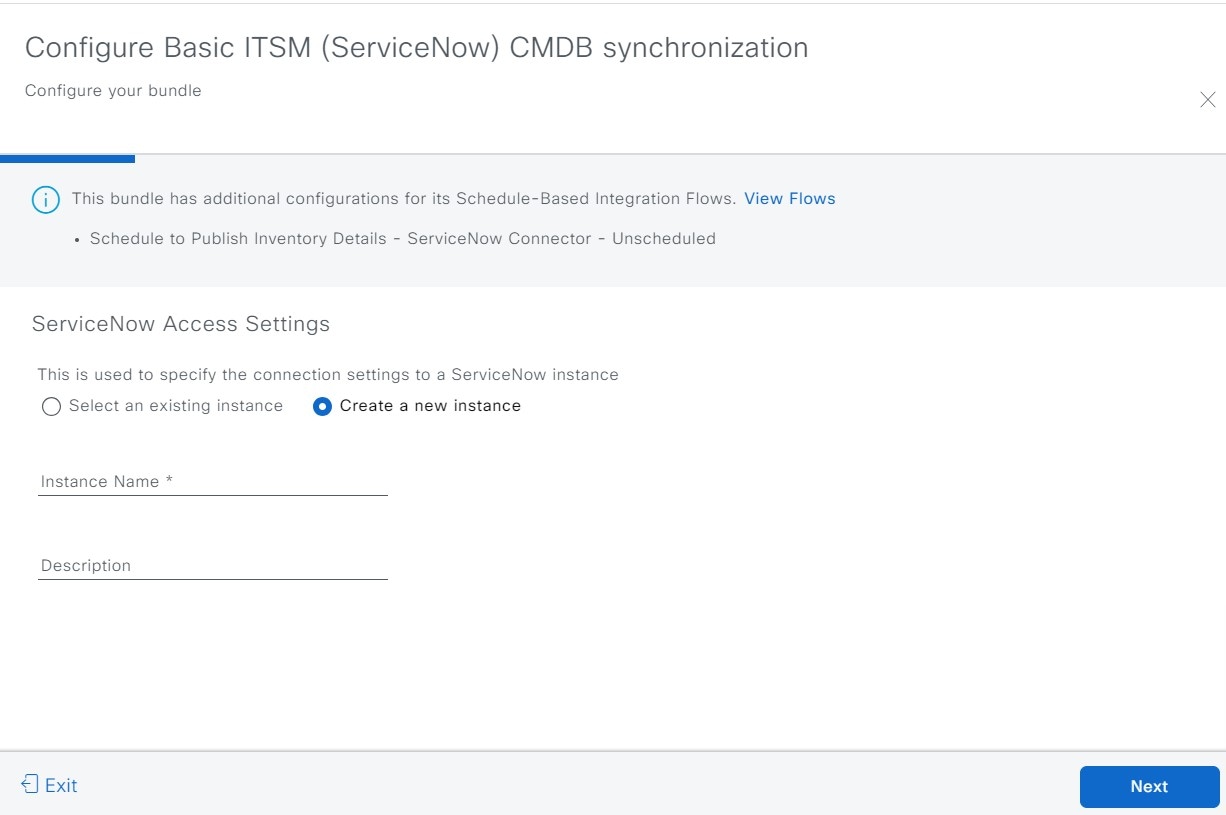
Step 11
Click the radio button to configure either existing or new ServiceNow access settings for the CMDB synchronization.
Figure 9. ServiceNow Access Settings
For configuring an existing setting, choose it from the drop-down menu in the window and click Next.
Step 12
For configuring a new access setting, the following instance information must be entered.
Instance Name: Name of the instance.
Description: Descriptive text of the instance.
Click Next.
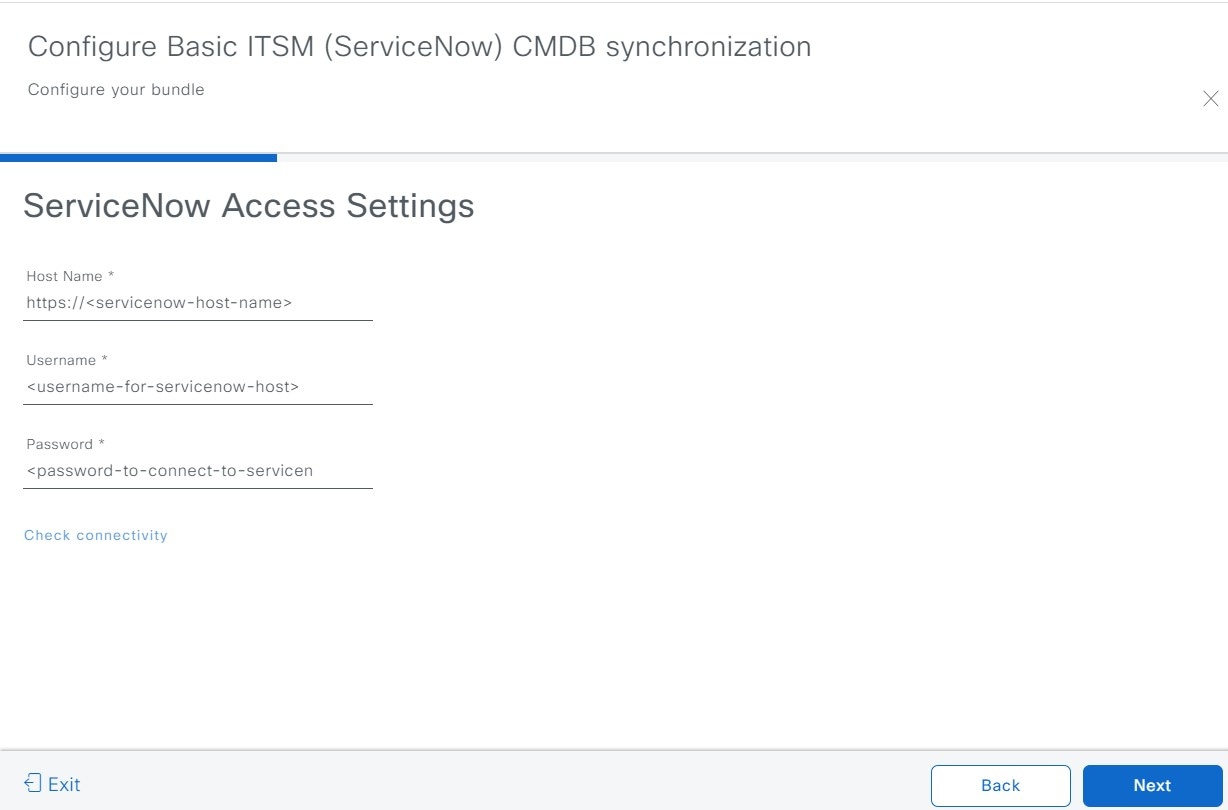
Step 13
For configuring a new access setting, the following additional settings information must be entered.
Figure 10. ServiceNow Access Settings
Hostname: Hostname or IP address of the ServiceNow server.
Username: Username for access to the ServiceNow server.
Password: Password for access to the ServiceNow server.
Click Check Connectivity to check access to the ServiceNow server.
Click Next.
Step 14
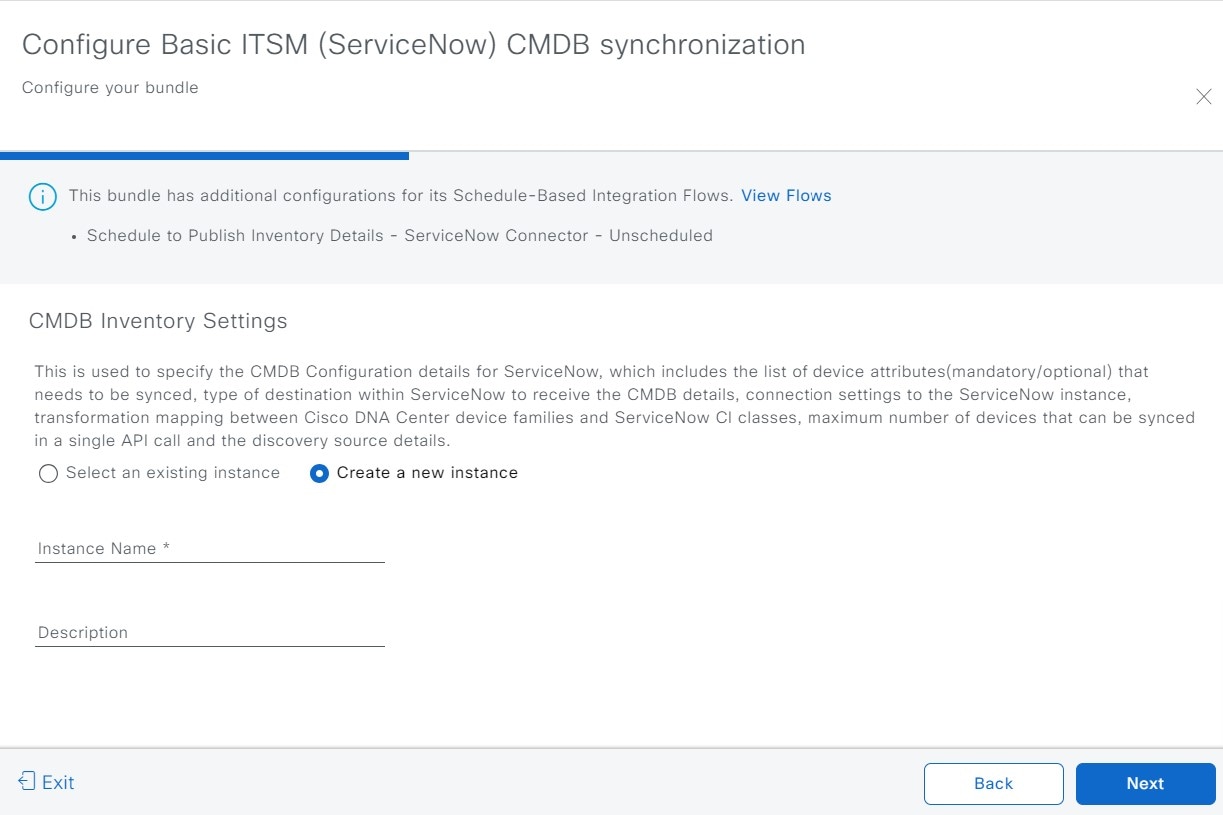
Click the radio button to configure either an existing instance or configure a new instance for the CMDB inventory settings.
Figure 11. CMDB Inventory Settings
For configuring an existing instance, choose it from the drop-down menu in the window and click Configure.
Step 15
For configuring a new instance, the following additional information must be entered.
Instance Name: Name of the instance.
Description: Descriptive text of the instance.
Click Next.
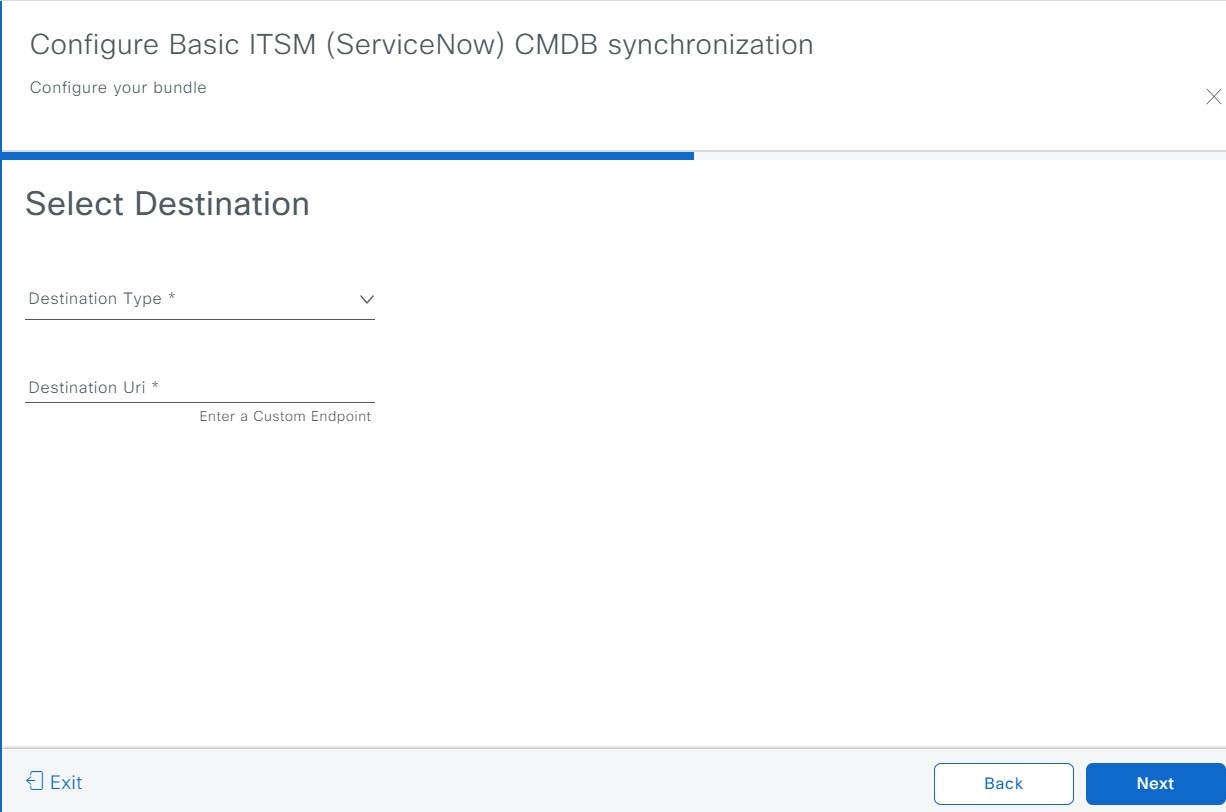
Step 16
In the Select Destination window, enter the following information:
Destination Type: There are two destination type options to choose from:
Synchronize device inventory directly with CMDB
Post device inventory details to a staging table
Note
Use the Synchronize device inventory directly with CMDB destination type to send data to a REST API endpoint within the Cisco DNA app. You should use this destination type, if you
are using the Cisco DNA app and do not have your own customized ServiceNow instance. Use the other destination type (Post device inventory details to a staging table) to send data to a REST API endpoint outside of the Cisco DNA app. Ensure that the created staging table has a field called
u_inventory_details. The inventory details from the Cisco DNA app are mapped to this field. With the Post device inventory details to a staging table destination type, after data transfer you must write custom code to take the data from the staging table and map it to the
ServiceNow CMDB.
Destination URI: Uniform Resource Indicator of the ServiceNow server (CMDB) or staging table.
Figure 12. Select Destination Window
Click Next.
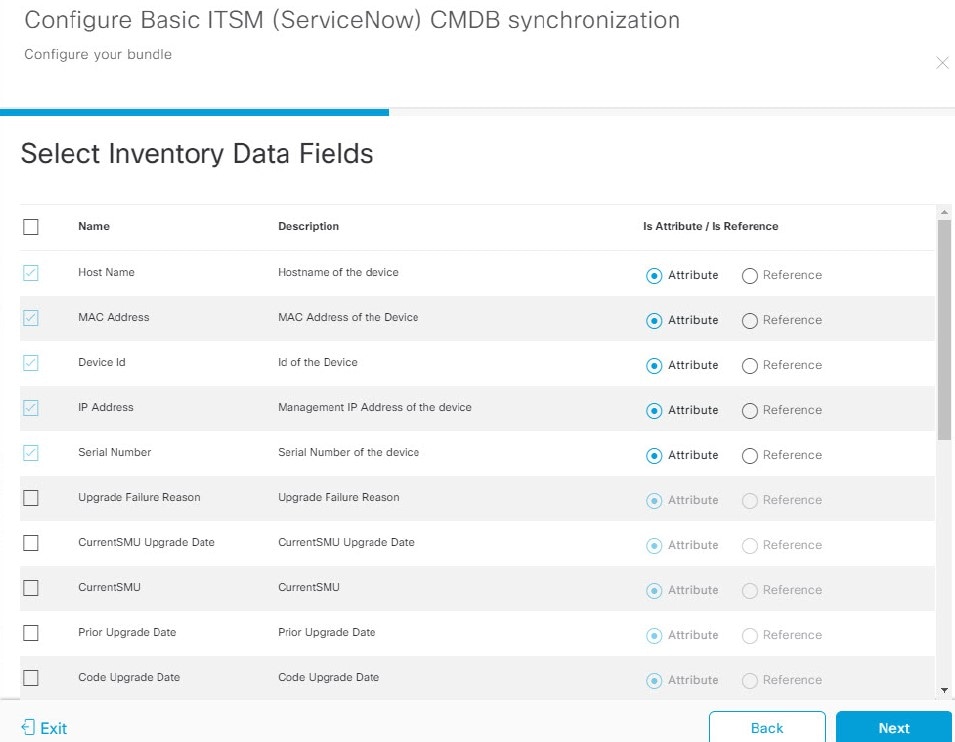
Step 17
In the Select Inventory Data Fields window, select the data fields to by synchronized.
Note
Inventory data fields are Cisco created data types that can be designated as an attribute or reference to be synchronized
into a CMDB or staging table.
Clicking the top check box in the Select Inventory Data Fields window will select all of the inventory data fields for synchronization. Click this top check box if you want to sync all
of the inventory data fields. Otherwise, review and click one check box at a time to create a smaller subset of inventory
data fields for synchronization.
Figure 13. Select Inventory Data Fields Window
The Select Inventory Data Fields window consists of the following columns:
Name: Name of the inventory data field.
Description: Brief description of the inventory data field.
Is Attribute/Is Reference: Whether the inventory data field is an attribute or a reference. A reference data field is used to create a relationship
between two tables in a database. This is used for querying purposes. An attribute data field is used to add more data to
a table in a database.
Step 18
For the data fields selected to be synchronized in the preceding step, review their designation as either attribute or reference.
To change a data field's default designation, just click the desired data field designation (Attribute or Reference).
Currently, the integration only supports 'location', 'building', and 'part number' as reference fields.
After selecting the data fields to be synchronized and whether the data field is an attribute or reference, click Next.
Step 19
In the Update Transforms window, either accept or update the ServiceNow transformation mapping between Cisco DNA Center device families and ServiceNow CI classes.
Figure 14. Update Transforms Window
Device families are the Cisco DNA Center device classifications (for example, Unified AP, Routers, Wireless Controller, Switches, and Hubs), where the inventory attributes/references
mapping to ServiceNow is already available in the existing Cisco DNA Center application in ServiceNow. The type and number of device families can vary depending upon the different Cisco devices in
the user's network.
Note
Cisco DNA Center platform is able to automatically retrieve all of the device families in the user's Cisco DNA Center network and display them in this GUI window.
CI classes are the database tables for ServiceNow (for example, cmdb_ci_wap_network, cmdb_ci_ip_router, cmdb_ci_ip_switch,
and x_caci_cisco_dna_wireless_lan_controller). The CI Class column in the GUI window is used to map the CI classes to their respective device families.
The following table displays the Cisco DNA Center default CI classes for each device family. The default CI classes can be modified by the user. In case of other device families
not listed below, Cisco will not have any default values specified in the CI Class column. The ServiceNow application user needs to either manually create the corresponding CI Classes and attributes/references
mapping or use a pre-existing CI class a 'parent' CI class. Ensure the pre-existing or newly created class is inherited from
the Network Gear (cmdb_ci_netgear) class.
Table 4. Default Device Family to CI Class Mapping List
Device Family
Corresponding CI Class
Unified AP
cmdb_ci_wap_network
Wireless Controller
x_caci_cisco_dna_wireless_lan_controller
Routers
cmdb_ci_ip_router
Switches and Hubs
cmdb_ci_ip_switch
Meraki Access Point
cmdb_ci_wap_network
Meraki Cameras
cmdb_ci_netgear
Meraki Dashboard
cmdb_ci_netgear
Meraki Security Appliances
cmdb_ci_netgear
Meraki Switches
cmdb_ci_ip_switch
After accepting or updating the information in this window, click Next.
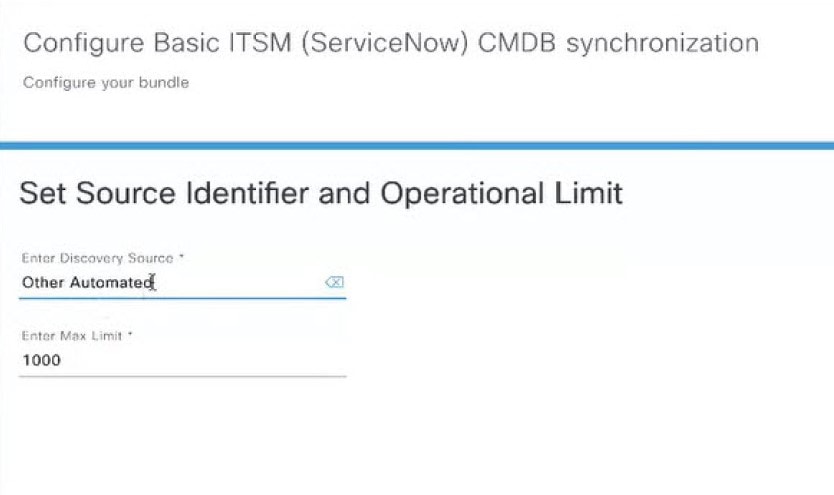
Step 20
In the Set Source Identifier and Operational Limit window, configure the data source and maximum limit.
Figure 15. Set Source Identifier and Operational Limit Window
Configure the following values:
Enter Destination Type: Enter the same value as previously selected or keep the value at its default, Other Automated.
Synchronize device inventory directly with CMDB
Post device inventory details to a staging table
Note
Other Automated is a preconfigured value for the discovery source attribute in an OOB ServiceNow instance. This is the value that indicates
the data source from where the ServiceNow CI was discovered. As a default, Cisco uses one of the existing preconfigured values
for the integration.
We recommend that the user creates their own discovery source, so as to uniquely identify the source from where the devices
were fetched to sync into the ServiceNow instance. The steps to create a new discovery source are described in the ServiceNow
App 'Installation and Configuration guide'.
Enter the Max Limit: Maximum number of devices that can be synchronized in an iteration (single API call).
After entering the above information, click Next.
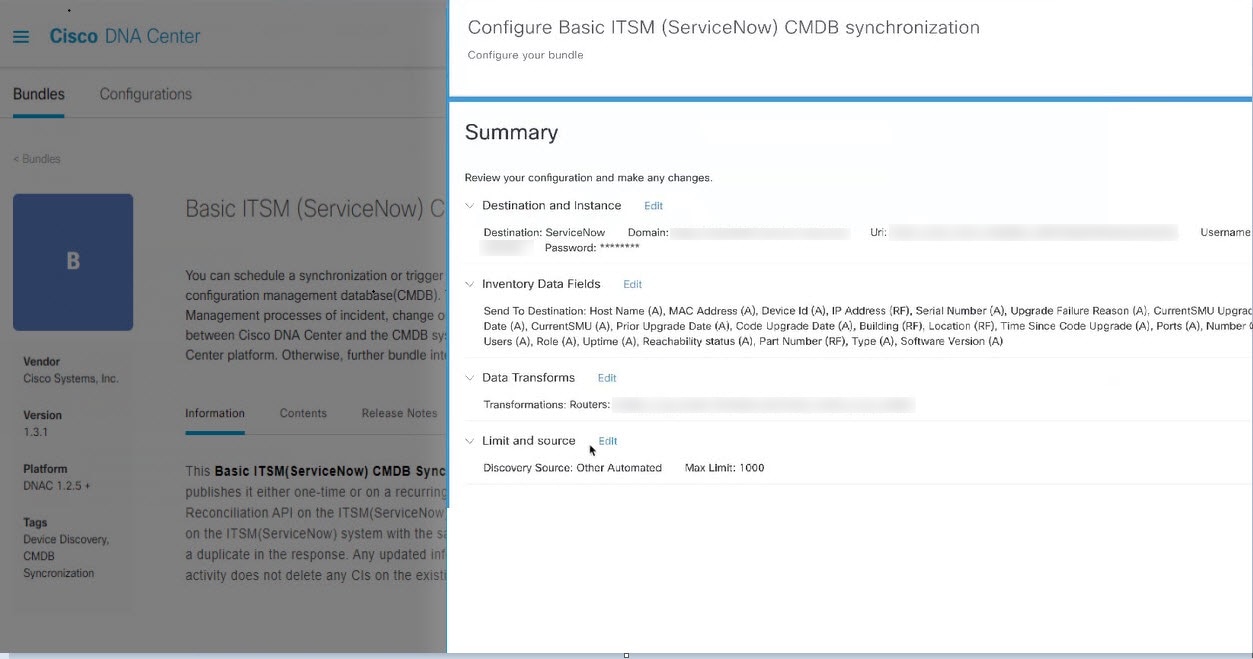
Step 21
In the Summary window, review the configuration summary.
Figure 16. Summary Window
After reviewing the information, click Configure.
For a successful configuration, you will receive a Done! Bundle Configured message.
What to do next
Configure the Integration Flow for this bundle (Schedule to Publish Inventory Details - ServiceNow Connector), using one of the methods described in Step 8.
You can also test the CMDB synchronization by performing the following tasks:
In the Cisco DNA Center GUI, click the Menu icon () and choose Platform > Runtime Dashboard > CMDB Synchronization Summary. Click Refresh to refresh the GUI view. Review the inventory device synchronization status to ServiceNow.
In the Cisco DNA Center GUI, click the Menu icon () and choose Platform > Runtime Dashboard > Event Summary. Click Refresh to refresh the GUI view. Click the individual events in the window to view the event data and access links to ServiceNow.
Go to ServiceNow and search for a synchronized device. Check the Configuration and Other Attributes tabs for synchronized data in that device's record.
Configure the Network Issue Monitor and Enrichment for ITSM (ServiceNow) Bundle
Perform this procedure to set up monitoring for network for assurance and maintenance issues, as well as publishing event
details to a ServiceNow system.
Note
Event data can be published to the Event table in ServiceNow. This requires that you have the Event Management plugin in your ServiceNow instance. If you do not have
the Event Management plugin in your ServiceNow instance, the bundle can be configured to send the data to a REST API endpoint
in the Cisco DNA App.
Before you begin
You must have the appropriate permissions to perform the tasks as described in this procedure. For information about Role-Based
Access Control for the Cisco DNA Center platform, see the Cisco DNA Center Platform User Guide.
Procedure
Step 1
In the Cisco DNA Center GUI, click the Menu icon () and choose Platform > Manage > Bundles.
Review the displayed bundles and their current status.
Step 2
Click the Network Issue Monitor and Enrichment for ITSM (ServiceNow) bundle link or icon (colored square with initial) for additional information about the bundle.
Additional information provided may include the following:
General information: Vendor, version, platform, tags displayed under the square icon.
Information: Tab that displays general information (purpose of bundle and how bundle works in the network), sample schemas, configuration
notes, and other data about the bundle.
Contents: Tab that accesses the APIs and integration flows that make up the bundle, or provides information about the integration
flows that make up the bundle.
Release Notes: Tab that displays latest release information about the bundle, including its version.
Step 3
Click each of the above tabs and review the information about the bundle.
Step 4
Click the Enable button to enable the bundle.
An Information field appears in the window.
Step 5
In the Information field, click the Enable button to confirm enabling the bundle.
After clicking the Enable button to confirm, a success message appears.
Step 6
Click OK in the success message.
Step 7
Click the Configure button to configure at the bundle level.
A configuration slide-in pane appears.
Step 8
In the configuration slide-in pane, click ServiceNow Access Settings to configure a ServiceNow Connection instance.
Step 9
Click the radio button to configure either an existing ServiceNow Connection instance or configure a new instance.
Figure 17. Example of ServiceNow Instance Configuration Fields
For configuring an existing ServiceNow Connection instance, choose it from the drop-down menu in the window and click Activate.
Step 10
For configuring a new ServiceNow Connection instance, the following additional information must be entered.
Instance Name: Name of the instance.
Description: Descriptive text of the instance.
Host name: Host name for the ServiceNow system.
Username: Username required to access the ServiceNow system.
Password: Password required to access the ServiceNow system.
Step 11
Click Check Connectivity to test whether you can connect to the server where the endpoint is located.
After a successful test of connectivity to the server, proceed to configure Destination to receive events.
Step 12
In the configuration slide-in pane, click Destination to receive events to configure a Destination Connection instance.
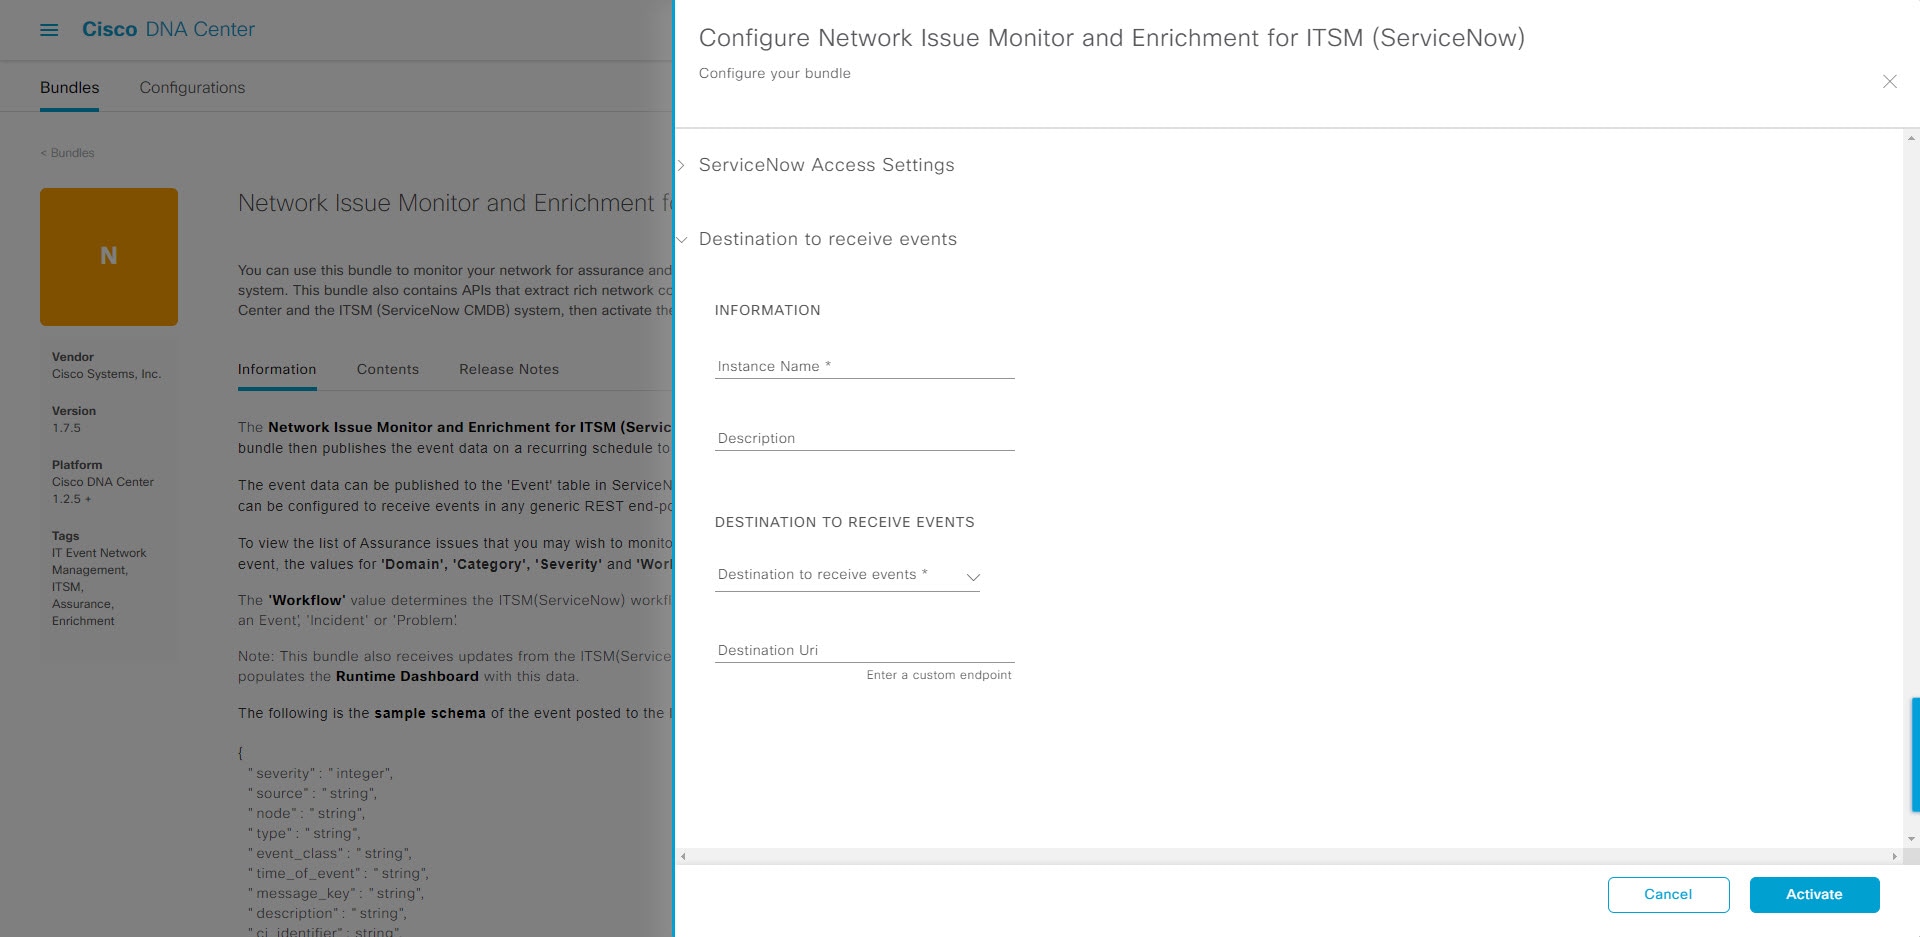
Step 13
Click the radio button to configure either an existing Destination Connection instance or configure a new instance.
Figure 18. Example of Destination to Receive Events Configuration Fields
For configuring an existing Destination Connection instance, choose it from the drop-down menu in the window and click Activate.
Step 14
For configuring a new Destination instance, the following additional information must be entered.
Instance Name: Name of the instance.
Description: Descriptive text of the instance.
Destination to receive events: Choose one of the following:
Event Management: When setting up Cisco DNA Center integration with ServiceNow without using the Cisco DNA App, choose the Event Management option. The Event Management option also requires that you have the Event Management plugin configured within the ServiceNow instance.
REST API Endpoint: The REST API Endpoint option can be used with the Cisco DNA App. Data is sent to a REST API endpoint within the Cisco DNA App with the REST API Endpoint option.
Generic REST Endpoint in ServiceNow: For the Generic REST Endpoint in ServiceNow option, you can send the data to a different staging table in ServiceNow.
Destination URI: Enter a destination URI (Uniform Resource Indicator) for the Generic REST Endpoint in ServiceNow option. This field is mandatory for this option.
After entering this information, proceed to the next step.
Step 15
Click Activate to save your changes and activate the bundle or click Cancel to cancel the configuration and close the slide-in pane.
The changes made to the bundle begin to take effect immediately. Additionally, the bundle status changes from ENABLED to ACTIVE.
Configure Event Settings
The Cisco DNA Center platform and ITSM integration permits you to choose from a list of possible issues to
create and modify the severity of events, incidents, or problems in ServiceNow to
match your business priorities. You perform these tasks in the Events
Settings window. The Events Settings window
is accessible from the Configurations menu option in the Cisco DNA Center platform.
Note
For this release, there are no SWIM event to configure in Event Settings, you only configure network assurance events.
Important
The Event Settings window and its functionality is only
applicable to events for an ITSM (ServiceNow) integration and not for events
configured to other destinations. For events being configured to a webhook or
other destination, click the link above the columns to access the
Events window. Use the Events
window to configure events for an email, webhook, or SNMP trap.
Figure 19. Events Settings Window
Before you begin
You must have the appropriate permissions to perform the tasks as described in this procedure. For information about Role-Based
Access Control for the Cisco DNA Center platform, see the Cisco DNA Center Platform User Guide.
Procedure
Step 1
In the Cisco DNA Center GUI, click the Menu icon () and choose Platform > Manage > Configurations.
A Configurations window opens that contains an Events Settings section.
Step 2
Review the Event Settings section that appears.
The following Event Settings information is displayed:
Severity: P1 (Severity 1) through P5 (Severity 5).
Note
Severity 1 is the most important or critical priority and should be assigned as such.
Workflow: Incident, Problem, Event, or RFC (Request for Change)
Actions: Edit
You can adjust what is displayed in the table by clicking the Filter icon and using the filter, or by typing a keyword in the Find field. For example, to display all access point notifications, type 'AP' in the Find field. To view all network notifications, type 'Network' in the Find field. To view all severity notifications, type '1' in the Find field.
Step 3
Click Edit in the Actions column to edit an event.
Choose a setting by clicking on the downward pointing angle and adjust the value. For example, click Network and adjust to App. This changes the event type from a network type to an application type. Click Severity and adjust to 1 from 5. This raises the severity level from 5 to 1.
Step 4
Click the box next to the Event name to enable notifications.
This enables notifications through Cisco DNA Center when the event occurs in the future.
Step 5
Click Save to save your configuration.
Configure the Cisco DNA Center Automation Events for ITSM (ServiceNow) Bundle
Perform this procedure to set up monitoring and publishing events requiring software image updates for compliance, security,
or other operational triggers to a ServiceNow system.
Note
Event data can be published to the Event table in ServiceNow. This requires that you have the Event Management plugin in your ServiceNow instance. If you do not have
the Event Management plugin in your ServiceNow instance, the bundle can be configured to send the data to a REST API endpoint
in the Cisco DNA App.
Before you begin
You must have the appropriate permissions to perform the tasks as described in this procedure. For information about Role-Based
Access Control for the Cisco DNA Center platform, see the Cisco DNA Center Platform User Guide.
Procedure
Step 1
In the Cisco DNA Center GUI, click the Menu icon () and choose Platform > Manage > Bundles.
Review the displayed bundles and their current status.
Step 2
Click the Cisco DNA Center Automation events for ITSM (ServiceNow) bundle link or icon (colored square with initial) for additional information about the bundle.
Additional information provided may include the following:
General information: Vendor, version, platform, tags displayed under the square icon.
Information: Tab that displays general information (purpose of bundle and how bundle works in the network), sample schemas, configuration
notes, and other data about the bundle.
Contents: Tab that accesses the APIs and integration flows that make up the bundle, or provides information about the integration
flows that make up the bundle.
Release Notes: Tab that displays latest release information about the bundle, including its version.
Step 3
Click each of the above tabs and review the information about the bundle.
Step 4
Click the Enable button to enable the bundle.
An Information field appears in the window.
Step 5
Click the Enable button in the Information field to confirm enabling the bundle.
After clicking the Enable button to confirm, a success message appears.
Step 6
Click OK in the success message.
Step 7
Click the Configure button to configure at the bundle level.
A configuration slide-in pane appears.
Step 8
In the configuration slide-in pane, click ServiceNow Access Settings to configure a ServiceNowConnection instance.
Step 9
Click the radio button to configure either an existing ServiceNow Connection instance or configure a new instance.
Figure 20. Example of ServiceNow Instance Configuration Fields
For configuring an existing ServiceNow Connection instance, choose it from the drop-down menu in the window and click Activate.
Step 10
For configuring a new ServiceNowConnection instance, the following additional information must be entered.
Instance Name: Name of the instance.
Description: Descriptive text of the instance.
Host name: Host name for the ServiceNow system.
Username: Username required to access the ServiceNow system.
Password: Password required to access the ServiceNow system.
Step 11
Click Check Connectivity to test whether you can connect to the server where the endpoint is located.
After a successful test of connectivity to the server, proceed to activate the bundle.
Step 12
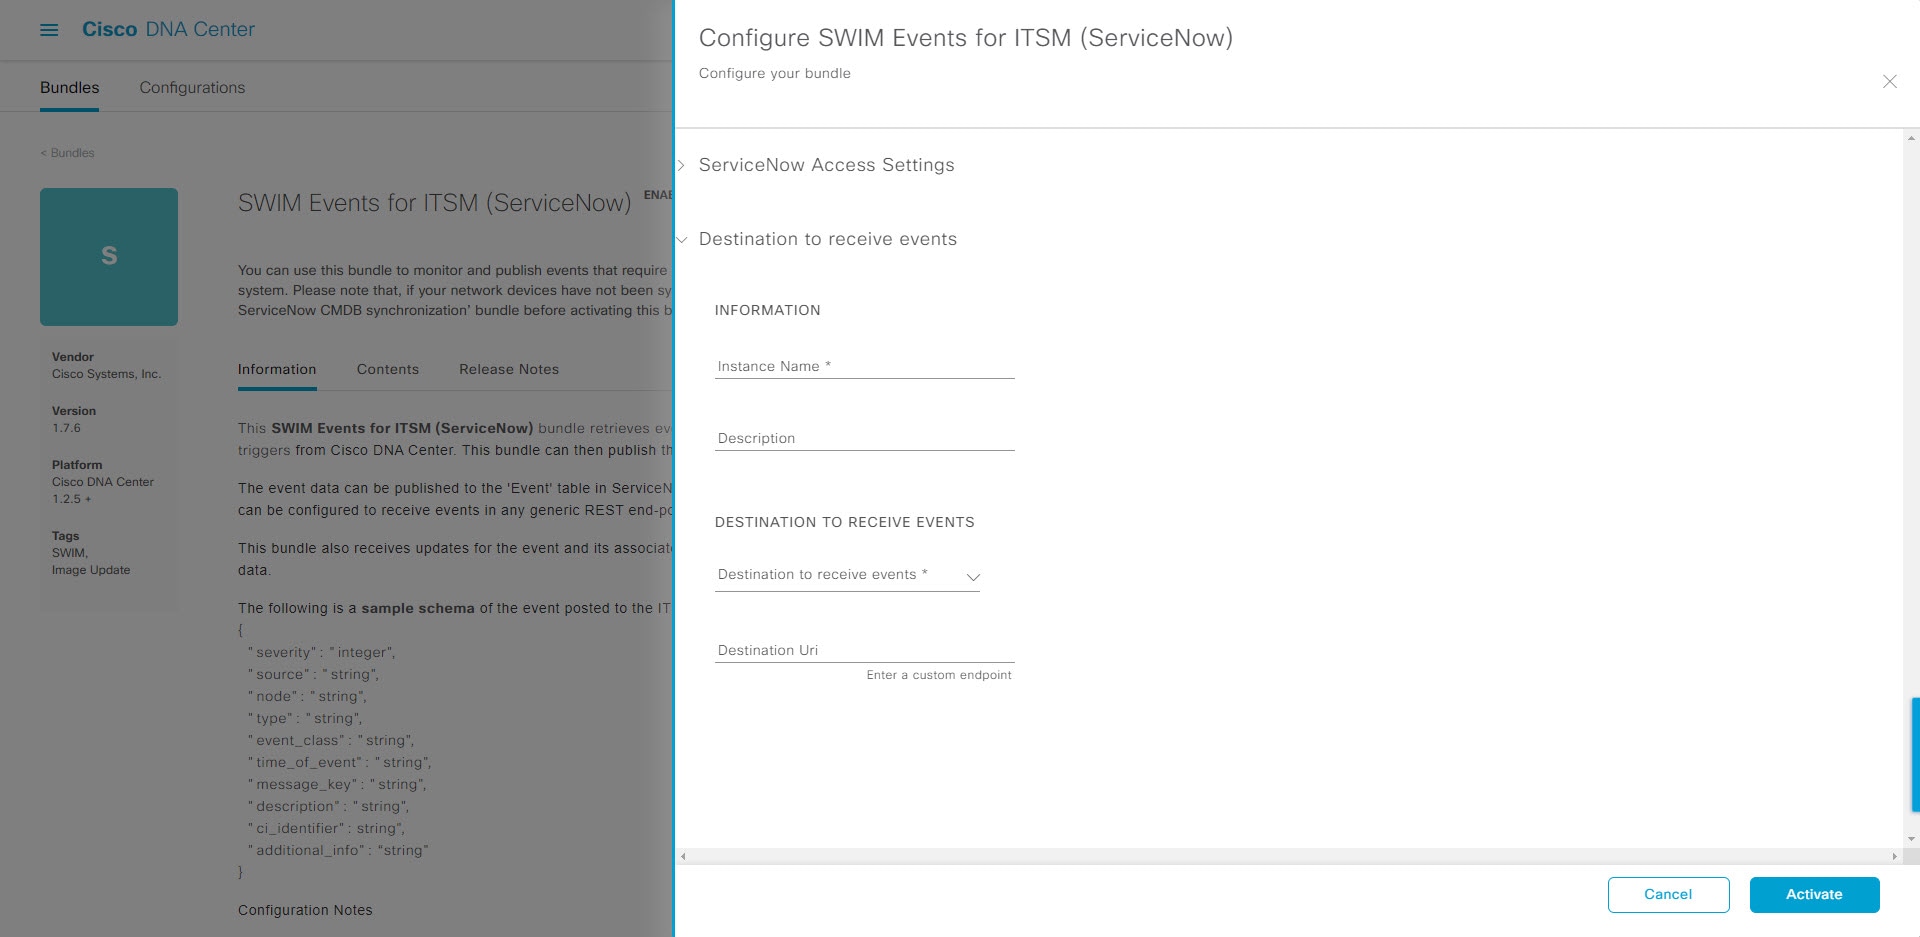
In the configuration slide-in pane, click Destination to receive events to configure an Destination Connection instance.
Step 13
Click the radio button to configure either an existing Destination Connection instance or configure a new instance.
Figure 21. Example of Destination to Receive Events Configuration Fields
For configuring an existing Destination Connection instance, choose it from the drop-down menu in the window and click Activate.
Step 14
For configuring a new Destination instance, the following additional information must be entered.
Instance Name: Name of the instance.
Description: Descriptive text of the instance.
Destination to receive events: Choose one of the following:
Event Management: When setting up Cisco DNA Center integration with ServiceNow without using the Cisco DNA App, choose the Event Management option. The Event Management option also requires that you have the Event Management plugin configured within the ServiceNow instance.
REST API Endpoint: The REST API Endpoint option can be used with the Cisco DNA App. Data is sent to a REST API endpoint within the Cisco DNA App with the REST API Endpoint option.
Generic REST Endpoint in ServiceNow: For the Generic REST Endpoint in ServiceNow option, you can send the data to a different staging table in ServiceNow.
Destination URI: Enter a destination Uniform Resource Indicator (URI) for the Generic REST Endpoint in ServiceNow option. This field is mandatory for this option.
After entering this information, proceed to the next step.
Step 15
Click Activate to save your changes and activate the bundle or click Cancel to cancel the configuration and close the slide-in pane.
Note
By clicking Activate, you enable the changes made to the bundle and the changes take effect immediately. Additionally, the bundle's status changes
from ENABLED to ACTIVE.
Cisco DNA Center Endpoint Attribute Retrieval with ServiceNow
With this Cisco DNA Center release, you can schedule a synchronization or trigger an update between the endpoint inventory and your ITSM (ServiceNow)
configuration management database (CMDB). Endpoint attribute information from ServiceNow can be used to help profile endpoints
in your network. ServiceNow appears in the endpoint profiling workspace as an additional probe. You may create custom profiling
rules leveraging the attributes sent by ServiceNow.
Mapping between the ServiceNow CMDB fields and endpoint attributes occur at the platform level and is accomplished using the
new Endpoint Attribute Retrieval with ITSM (ServiceNow) bundle. This bundle supports a new integration flow, Scheduler for ServiceNow Asset Sync. The Scheduler for ServiceNow Asset Sync integration flow can be configured to run on a set schedule to invoke an internal Cisco API to retrieve the endpoint attribute
information from ServiceNow.
The following table describes the procedure for configuring Cisco DNA Center endpoint attribute retrieval with ServiceNow.
Note
This procedure does not modify or delete any CIs on the existing ITSM (ServiceNow) tool.
Table 5. Cisco DNA Center Endpoint Attribute Retrieval with ServiceNow
Step
Description
Step 1
Install or upgrade to Cisco DNA Center, Release 2.2.2.
Install or upgrade to ServiceNow running the following version:
Paris
Orlando
New York Patch 1
Refer to your ServiceNow documentation for its installation and upgrade procedures.
Note
This procedure is to be performed by a ServiceNow administrator.
Step 3
Download and install the Cisco DNA app (version 2.0.0) into ServiceNow by following the documentation available at the ServiceNow website.
Note
Cisco DNA Center supports an application (Cisco DNA) that facilitates endpoint attribute retrieval with an ITSM
(ServiceNow). This application or app is designed to work with
ServiceNow without its Event Management plugin.
Click this link to access the ServiceNow Store website where the Cisco DNA app is located:
The Cisco DNA Center platform is enabled in Cisco DNA Center.
The requisite bundle or bundles in the Cisco DNA Center platform are configured and activated (as described in the following procedures).
Note
These bundles have the required APIs that integrate with the Cisco DNA app in ServiceNow.
Configure the Endpoint Attribute Retrieval Bundle with ITSM (ServiceNow)
Perform this procedure to configure the Cisco DNA Center endpoint attribute retrieval from the ServiceNow CMDB.
Before you begin
Ensure that you have ServiceNow running on a system that you will integrate
with Cisco DNA Center platform
You must have the appropriate permissions to perform the tasks as described in this procedure. For information about Role-Based
Access Control for the Cisco DNA Center platform, see the Cisco DNA Center Platform User Guide.
Procedure
Step 1
In the Cisco DNA Center GUI, click the Menu icon () and choose Platform > Manage > Bundles.
Review the displayed bundles and their current status.
Step 2
Click the Endpoint Attribute Retrieval with ITSM (ServiceNow) bundle link or icon (colored square with initial) for additional information about the bundle.
Additional information provided may include the following:
General information: Vendor, version, platform, tags displayed under the square icon.
Information: Tab that displays general information (purpose of bundle and how bundle works in the network), sample schemas, configuration
notes, and other data about the bundle.
Note
The specific endpoint attribute data that is retrieved is displayed in the Information tab. The following endpoint attribute data will be retrieved from ServiceNow (with the display name in Cisco DNA Center within
the parenthesis):
Asset Tag (CMDB asset tag)
Model Category (CMDB model category)
Model (CMDB model)
Managed by (CMDB managed by)
Serial Number (CMDB serial number)
Location (CMDB location)
Department (CMDB department)
MAC address (CMDB MAC address)
Display name (CMDB display name)
Contents: Tab that accesses the APIs and
integration flows that make up the bundle, or provides information
about the integration flows that make up the bundle.
Release Notes: Tab that displays latest release information about the bundle, including its version.
Step 3
Click the Contents tab.
Step 4
Click the Integration Flows header.
An integration flow or list of integration flows appear underneath the header.
Step 5
Click the Enable button to activate the integration flow links.
An Information field appears in the window.
Step 6
In the Information field, click the Enable button to confirm enabling the bundle.
After clicking the Enable button to confirm, a success message appears.
Step 7
Click Okay in the success message.
Step 8
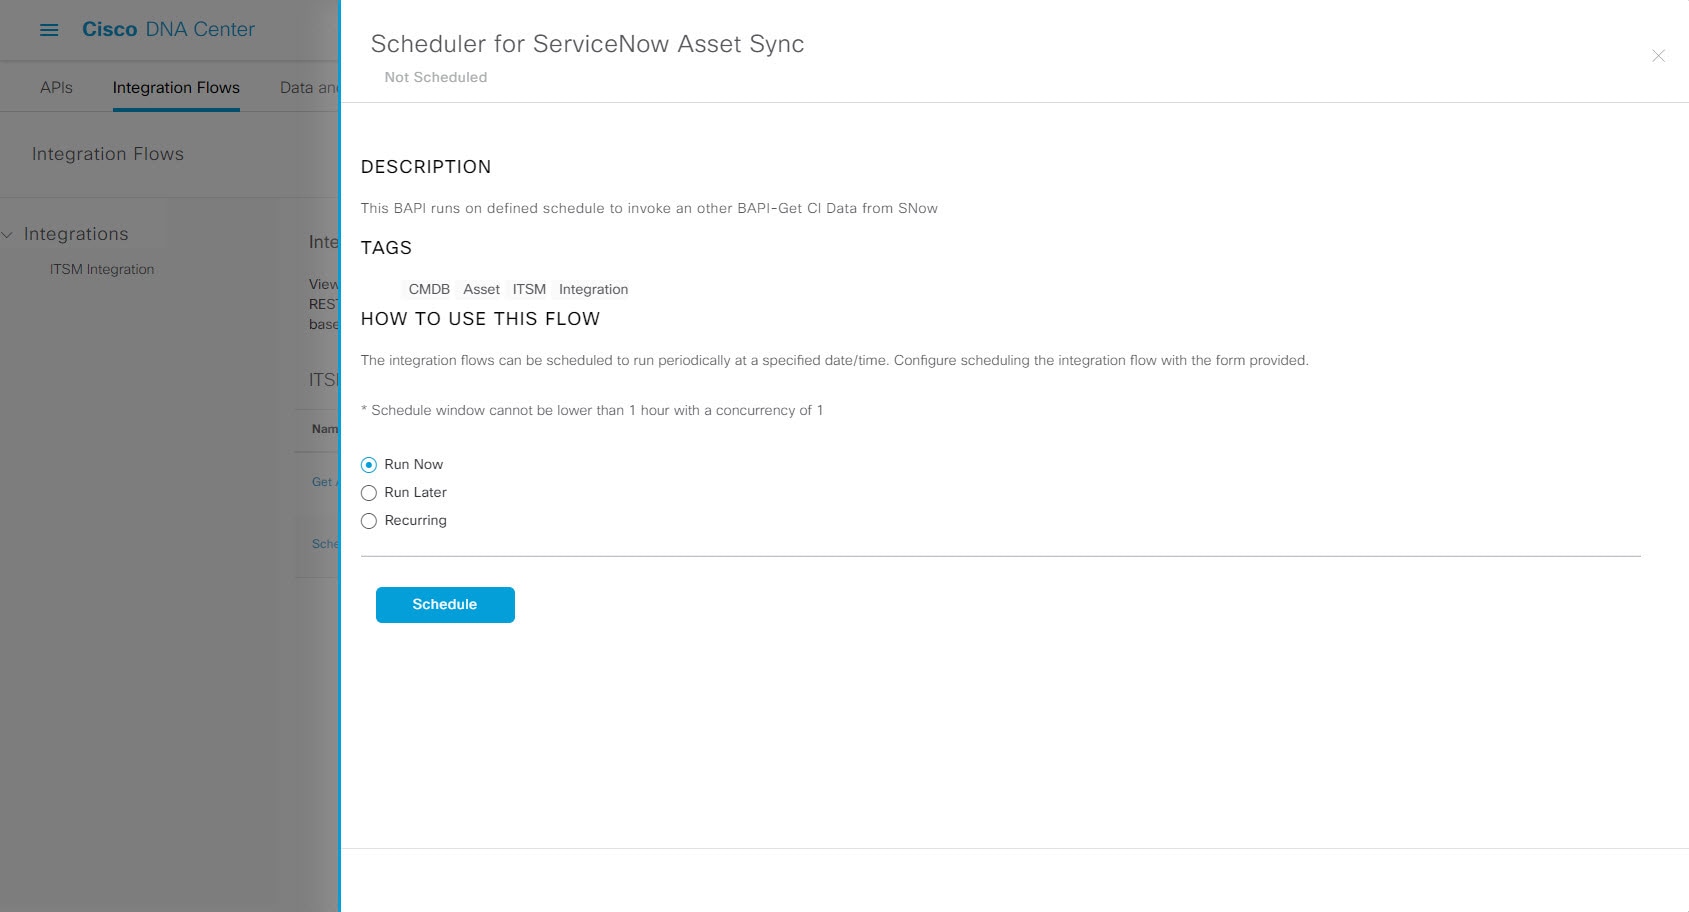
Click the link for the individual integration flow to perform the tasks listed below:
For Schedule-based integration flow (Scheduler for ServiceNow Asset Sync), perform the following tasks:
Review the Description,
Tags, How to Use this
Flow, and scheduler.
Click Run Now (to run the scheduler now), Run Later (to schedule for a later time), or Recurring (to set up a recurring schedule).
For Run Later, you need to select a date, time, and time zone. For Recurring, you need to set a repeating interval (daily or weekly), an interval duration (minutes or hours), and a start and end date.
Click Schedule to enable the scheduler.
Important
Only configure and enable an integration flow schedule, after you
have finished configuring the bundle itself as described in this
procedure. You can configure and enable an integration flow
schedule by returning to this view and clicking
Schedule, or by clicking the
View Flows link in the
Endpoint Attribute Retrieval with ITSM
(ServiceNow)slide-in pane (see following steps), or by clicking the
Menu icon () >
Platform > Developer
Toolkit > Integration
Flows > Scheduler for ServiceNow
Asset Sync.
Figure 22. Scheduler for ServiceNow Asset Sync
Step 9
Click the X icon at the upper right of the window to close it and return to the previous bundle window.
Step 10
Click the Configure button to configure at the bundle level.
A configuration slide-in pane appears. Proceed to review the Configure Endpoint Attribute Retrieval with ITSM (ServiceNow) information.
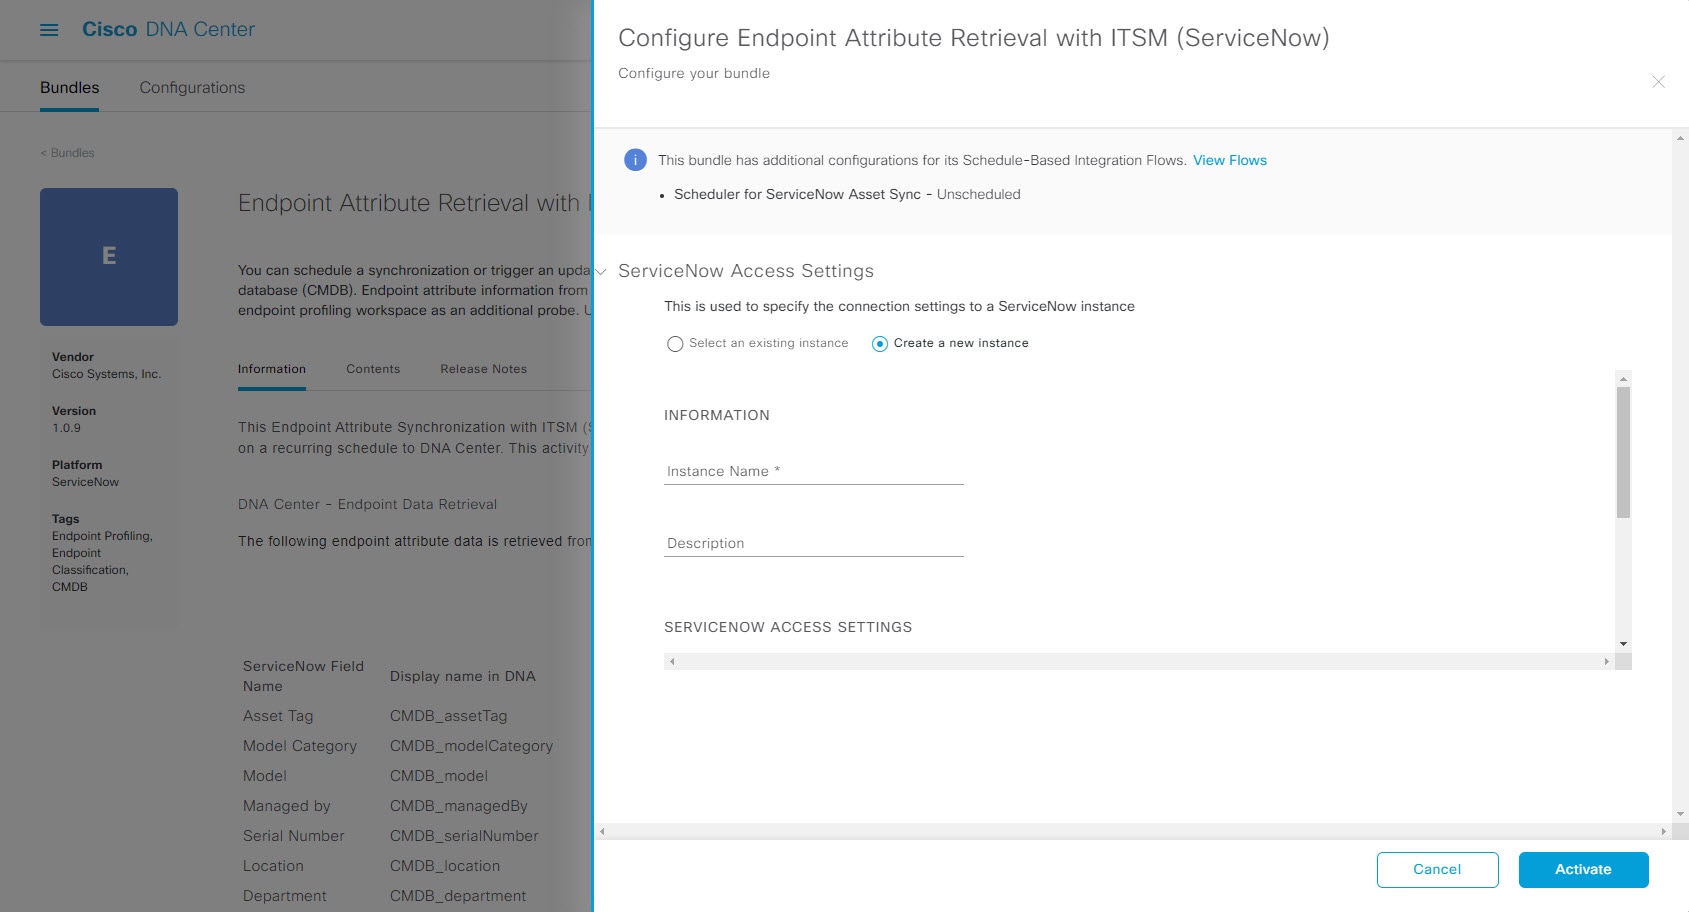
Step 11
Click the Configure button to configure at the bundle level.
A configuration slide-in pane appears.
Step 12
In the configuration slide-in pane, click ServiceNow Access Settings to configure a ServiceNow Connection instance.
Step 13
Click the radio button to configure either an existing ServiceNow Connection instance or configure a new instance.
Figure 23. Example of ServiceNow Instance Configuration Fields
For configuring an existing ServiceNow Connection instance, choose it from the drop-down menu in the window and click Activate.
Step 14
For configuring a new ServiceNow Connection instance, the following additional information must be entered.
Instance Name: Name of the instance.
Description: Descriptive text of the instance.
Host name: Host name for the ServiceNow system.
Username: Username required to access the ServiceNow system.
Password: Password required to access the ServiceNow system.
Step 15
Click Check Connectivity to test whether you can connect to the server where the endpoint is located.
Step 16
Click Activate to activate the bundle.
What to do next
Configure the integration flow (Scheduler for ServiceNow Asset
Sync) for this bundle, using one of the methods described in Step 8
above.


 Feedback