Cisco Crosswork Hierarchical Controller 8.0 Administration Guide
Available Languages
Bias-Free Language
The documentation set for this product strives to use bias-free language. For the purposes of this documentation set, bias-free is defined as language that does not imply discrimination based on age, disability, gender, racial identity, ethnic identity, sexual orientation, socioeconomic status, and intersectionality. Exceptions may be present in the documentation due to language that is hardcoded in the user interfaces of the product software, language used based on RFP documentation, or language that is used by a referenced third-party product. Learn more about how Cisco is using Inclusive Language.
- US/Canada 800-553-2447
- Worldwide Support Phone Numbers
- All Tools
 Feedback
 Feedback
Introduction
This document is an administration guide for configuration of the Cisco Crosswork Hierarchical Controller platform version 8.0. For details on installation, see the Cisco Crosswork Hierarchical Controller Installation Guide.
The document explains:
● Security Architecture
● User Security and Administration
● System Health
● Crosswork Hierarchical Controller Events
● Database Backup and Restore
● Kubernetes Management
● HA Cluster Management
● Device Manager (Credentials, Adapters, and Managed Devices)
● Model Settings (Tags, Regions, Sites, and Hyper Linker)
● Link Manager
This section provides information on the security architecture, feature set, configurations, and practices used by Cisco to ensure that Cisco Crosswork Hierarchical Controller is highly secured and can safely be deployed without any risk or vulnerability. Cisco continuously follows the developments and practices commonly accepted by the industry and keeps pace by updating Cisco Crosswork Hierarchical Controller.
This section details the feature set by category, configurations to reduce risks, supported standards, and development and deployment processes. Cisco Crosswork Hierarchical Controller security is based on a layered architecture, where each logical element provides different security, and each security step is a prerequisite for the next one. For instance, user authorization takes place only for users who are already authenticated.
Cisco Crosswork Hierarchical Controller Architecture Overview
Cisco Crosswork Hierarchical Controller is deployed with the NextFusion platform layer.
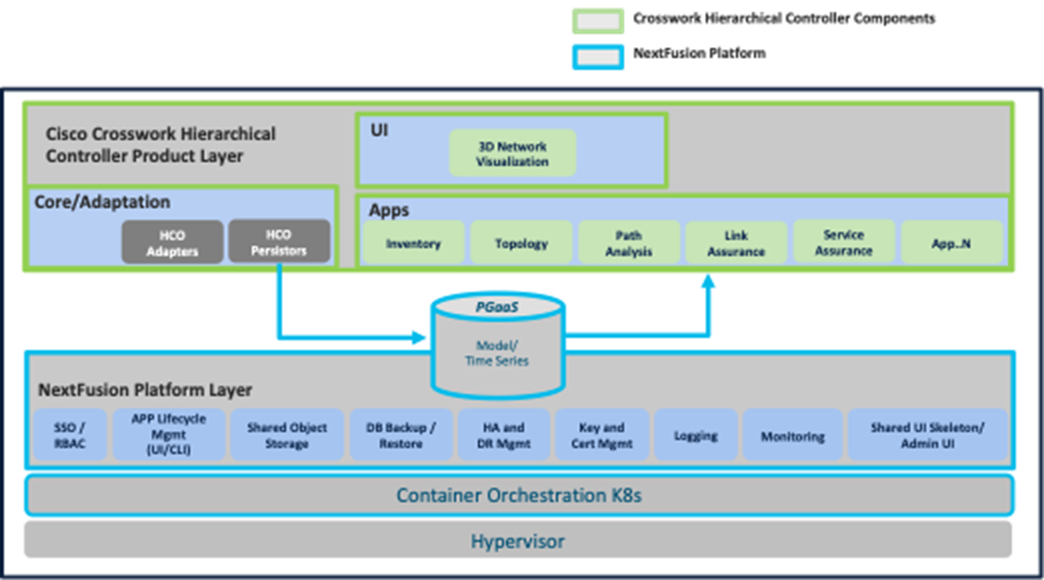
Cisco Crosswork Hierarchical Controller Architecture
The NextFusion platform layer comprises the following core services:
● Fully managed, Kubernetes-based runtime environment
● Highly available cluster
● HTTPs-only, auto cert management, mutual TLS validation
● Single authentication agent for all products, with SSO support
● Postgres-as-a-Service (with TimescaleDB), fully replicated across all nodes
● Highly available object storage, Amazon S3-compatible API
● Configuration UI
● Centralized logging infrastructure
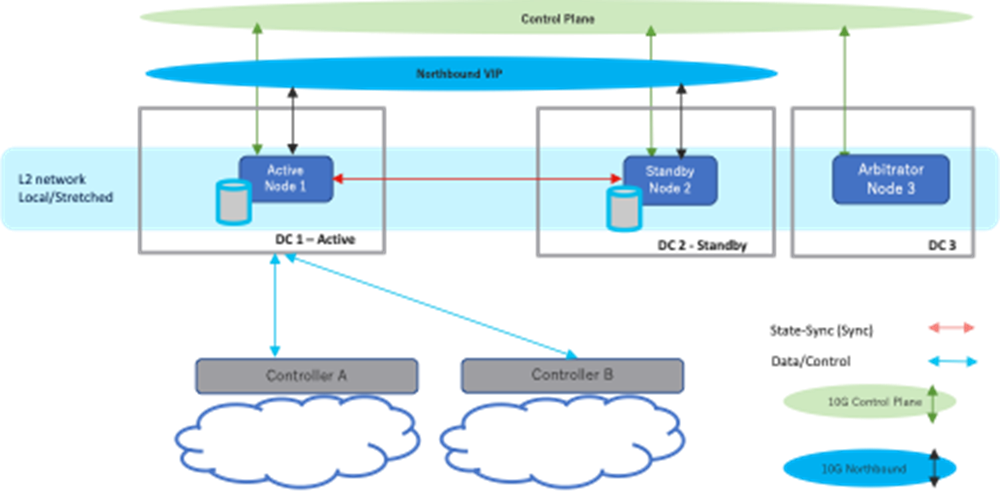
NextFusion High Availability
Three node Active/Standby HA with arbitrator node to vote on the active and avoid split brain. The cluster is only used for HA purposes and not for scaling.
Connectivity is based on TLS only, and no IPSEC is required between nodes.
Note: Crosswork Hierarchical Controller HA and embedded NSO integrate seamlessly. The NSO database exists on both the Crosswork Hierarchical Controller Active and Standby nodes, and the database is synchronized continuously. If the Crosswork Hierarchical Controller Active node fails, and the Standby node takes over and becomes the Active node, NSO is updated automatically and switches nodes too.
NextFusion HA
NextFusion Platform
The NextFusion Controller manages the lifecycle of all services and exposes all services using a CRD (custom resource definition), which defines in a DSL (domain specific language) all the platform needs – RBAC, networking, volumes, and so on.
● CSDL-compliant (Cisco Secure Development Lifecycle): Secure boot, code signing, no hardcoded passwords.
● Explicit RBAC support in CRD: All endpoints are blocked by default unless declared.
● HTTPs only throughout the cluster: The NextFusion service-proxy handles TLS termination and authorization.
● Database schemas: Confined per service, and not shared by default.
● Authentication: Supports local, LDAP, and SAML authentication.
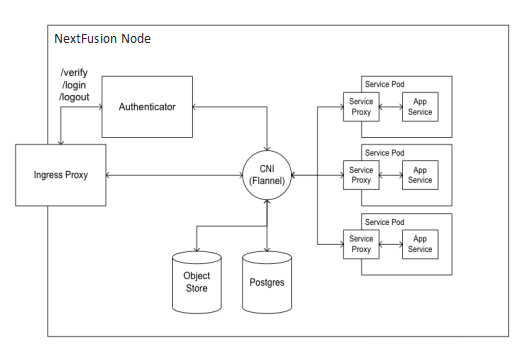
NextFusion Node Architecture
Authentication Flow
All HTTP(s) requests are authenticated throughout the system, both inside and outside the cluster.
|
|
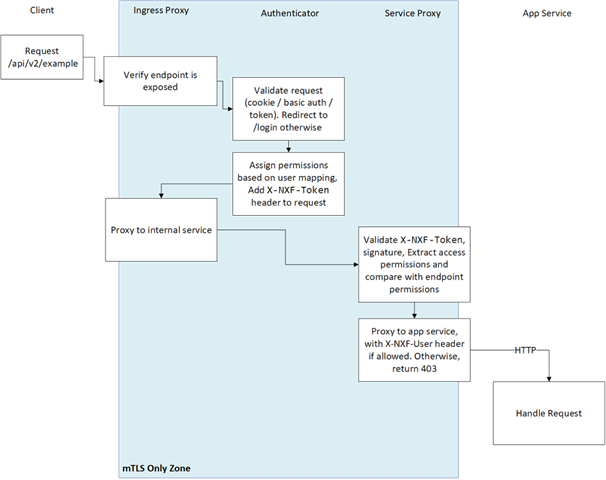
Cisco Crosswork Hierarchical Controller Authentication Flow
Every request MUST have an X-NXF-Token header, which is an ES256 signed JWT header issued by either Authenticator - for exposed endpoints, or NextFusion Controller - for internal endpoints.
Whenever a service starts, the NextFusion Controller issues a short-lived token which gets pushed to the service proxy. This token contains the permissions that were declared in the service access field in the CRD.
When trying to access some service endpoint, Service Proxy checks the X-NXF-Token of the request with the allowed permission field of this endpoint. If the user is authorized for this action, Service Proxy proxies the request to the app service, including an X-NXF-User header, which contains the decoded user profile.
The Ingress Proxy Server is configured as a reverse proxy server, intercepts all requests to the Cisco Crosswork Hierarchical Controller, and acts as the first line of defense against security attacks.
The Ingress Proxy Server only accepts HTTPS packets on port 8443.
The Ingress Proxy Server uses the NextFusion Authenticator to perform client authorization and authentication for Cisco Crosswork Hierarchical Controller.
The Ingress Proxy Server is the only component that is accessible from outside the device on which Cisco Crosswork Hierarchical Controller is installed. The HTTP and SQL connections are internal connections that are bound to local interfaces and are not accessible from outside.
For local authentication, passwords are stored in the database using secure, salted password hashing that is a one-way function. A salt is random data that is used as input to a function that hashes the password to prevent dictionary attacks. This greatly increases security because passwords are protected even if the password file is compromised.
The hashing function used is bcrypt, which is based on the Blowfish cipher. In addition to incorporating a salt to protect against rainbow table attacks, bcrypt is an adaptive function that ensures Cisco Crosswork Hierarchical Controller remains resistant to brute-force search attacks even with increasing computation power.
Cisco Crosswork Hierarchical uses containers to deploy and run processes of applications and the NextFusion Platform.
Cisco Crosswork Hierarchical Controller uses Postgres as the database. Access to the database is restricted per service by mutual TLS. Tables of sensitive data, such as network element details and user credentials, are all encrypted (encryption is by AES256 GCM).
User Access and Authentication
Cisco Crosswork Hierarchical Controller authenticates users by communicating with an external LDAP server or locally for users defined in Cisco Crosswork Hierarchical Controller.
Each user accessing the system is uniquely authenticated.
Each user can open multiple sessions concurrently.
Cisco Crosswork Hierarchical Controller users can only interact with the platform resources, the user is not able to gain underlying OS access from the platform.
Access management for the host OS and the Cisco Crosswork Hierarchical Controller platform are managed separately.
User groups can be defined in the LDAP server, which passes them to Cisco Crosswork Hierarchical Controller. These groups are mapped to user roles (see more in Authentication).
Cisco Crosswork Hierarchical Controller allows the creation of local users.
As a best practice, locally defined users should be limited to admin users only.
The password strength forced for local users can be enabled or disabled and can be set in scores of 1 to 5 (weak to strong). The password is checked against several dictionaries and common passwords lists, to ensure its complexity according to the selected score.
Cisco Crosswork Hierarchical Controller supports role-based access control (RBAC), which enables each user (either locally defined or an LDAP user) to be individually assigned to a role.
Each role has its own set of permissions and inherits the permissions of the lower level roles.
There are four pre-defined user roles: read-only, user, support, and admin.
| Crosswork Hierarchical Controller Role |
Permissions |
| read-only |
Read-only access to Crosswork Hierarchical Controller Explorer UI. |
| user |
Access to Crosswork Hierarchical Controller Explorer UI and all apps, some of which can change the network. |
| support |
Same permissions as the User role with the addition of access to Crosswork Hierarchical Controller diagnostic tools for the Cisco Support Team. |
| admin |
Full control over configuration and all users. Access to Configuration UI, Crosswork Hierarchical Controller Explorer UI, and all apps. |
Communication with LDAP Server
The LDAP application protocol is an open, vendor-neutral industry standard for accessing and maintaining distributed directory information services. LDAP authentication is similar except that its communication is over an encrypted transport connection. Local authentication is encrypted over HTTPS.
The administrator can set the login banner.
The administrator can lock users (preventing them from logging in) and unlock users.
The administrator can set the idle session expiration time.
If the same SSO server (SAML 2.0) is used for several of the Crosswork platform applications, a user only needs to log in once.
After a configurable number of unsuccessful login attempts, the IP is blocked. The blocking period starts with a low duration and grows with each failed login attempt.
The default number of login attempts is 8.
Login attempts from the IP address are not handled during this period. See Session Login Limiter.
A Cisco Crosswork Hierarchical Controller administrator provides Cisco Crosswork Hierarchical Controller a Bind DN and password that Cisco Crosswork Hierarchical Controller then uses to connect and query the LDAP server. The administrator also configures the search base, search filter, and mapping between LDAP groups and Cisco Crosswork Hierarchical Controller roles. This mapping policy identifies who can log in to the Cisco Crosswork Hierarchical Controller Explorer UI and which role they have. All users that meet both the search base and the search filter criteria are permitted to log in with the roles (access privileges) assigned to their group. If the user is not a member of any group that is mapped to a Cisco Crosswork Hierarchical Controller role, the login attempt is rejected.
The Cisco Crosswork Hierarchical Controller administrator also assigns roles to local users who are not handled by LDAP.
Both local users and access to the LDAP server can be disabled so that one or the other method can be used for authentication and authorization.
For further information on the control plane and Virtual Management networks installation requirements and ports, see the Cisco Crosswork Hierarchical Controller Installation Guide.
HTTP Access in Northbound Interface
The Cisco Crosswork Hierarchical Controller management interface uses secured interfaces. HTTPS/Secure WebSocket is used on the management interface for application-level management for both the GUI and NBI.
Web access to Cisco Crosswork Hierarchical Controller UI and to Web services (REST commands) is protected with TLS v1.2/1.3.
The URL does not include any user credentials or device-sensitive information.
Access in Southbound Interface
All control traffic between Cisco Crosswork Hierarchical Controller and NEs/NMSs is encrypted if the NE/NMS provides an encrypted interface. As a best practice policy, Cisco will choose the most secure interface/protocol the NE/NMS has to offer.
All user login/logout and operations activities in applications are audited, logged, and can be exported to external systems. The audit log contains the username, hostname, time, operation, specific information, and results.
System events are stored in Cisco Crosswork Hierarchical Controller DB and can be accessed via SHQL commands. This includes:
● Applications activities
● Updates in network inventory and topology
As a network controller, Cisco Crosswork Hierarchical Controller deals with network data, and does not deal with data associated with a ‘natural person’ as defined within GDPR, as outlined by the EU data protection directive. Moreover, Cisco is at most the data processor when addressing support tickets, the Service Provider customer remains the data controller, and data processor, utilizing Cisco Crosswork Hierarchical Controller. There is no personal data associated with a ‘natural person’.
Development Security Procedures
Cisco’s continuous integration build process runs a static check, including security checks. Static analysis does not allow the build to continue if there are high-severity warnings, such as security warnings. The continuous integration process also runs a Web Server scanner on an instance of Cisco Crosswork Hierarchical Controller that is automatically deployed for integration test purposes.
The security tools, which are referenced by OWASP[1], are FindBugs, Find Security Bugs plug-in and Test-ssl that verifies SSL configuration.
● FindBugs is an open-source tool that uses static analysis to detect bug patterns in Java code. Potential errors are ranked, enabling developers to readily understand the possible impact or severity. One of the main techniques FindBugs uses is to syntactically match source code to known suspicious programming practice.
● Find Security Bugs is a FindBugs plugin for security audits of Java Web applications. It can detect dozens of vulnerability types with over hundreds of unique signatures. Extensive references are given for each bug pattern with references to OWASP Top 10 and CWE[2]. The tool is constantly being updated to identify newly discovered vulnerabilities.
● Test-ssl is a command line tool which checks a server's service on any port for the support of TLS/SSL ciphers, protocols as well as recent cryptographic flaws and more.
Security Patches Update Policy
Cisco Crosswork Hierarchical Controller is compliant with Cisco’s security patch update policy.
Crosswork Hierarchical Controller follows the standard Cisco process for discovering, addressing, and reporting of security vulnerabilities. This process is well documented, and there is a customer portal with policies and documentation:
https://sec.cloudapps.cisco.com/security/center/home.x
For any issues, contact Cisco and open a support ticket.
User Security and Administration
Configure Web Client Authentication Certificate
Getting a valid certificate is a two-phase process. First, generate a Certificate Request (CSR), then, this file is used by the CA (Customer IT Team) to generate a trusted certificate (PEM/CRT) to be installed on the server.
Before generating the CSR, you will need the exact URL of the deployed system, e.g: cisco.corp.com. This is the certificate Common Name (CN).
The certificate is installed on one node (it will be replicated to the other node automatically).
To install a certificate:
1. Access the Cisco Crosswork Hierarchical Controller server's command line using SSH (using the nxf default user).
2. Run the following command to generate a new CSR using the existing ECDSA key (replacing <REQUESTED CN> with your company CN):
sudo openssl req -new -key /etc/nxf/pki/external.key -out /home/nxf/external.csr -subj '/C=US/ST=California/O=Cisco/CN=<REQUESTED CN>'
3. Upload the generated CSR file (/home/nxf/external.csr) to the CA and retrieve a signed certificate in a PEM format.
4. Save the PEM file to /home/nxf/external.crt.
5. Push the new external certificate to the NextFusion secret:
echo -en "{\"data\":{\"external.crt\":\"$(cat /home/nxf/external.crt | base64 -w 0)\"}}" | kubectl -n nxf-system patch secret/nxf-external-pki --patch-file /dev/stdin
6. Wait for the Ingress Proxy to reload the new external certificate. This may take up to a minute.
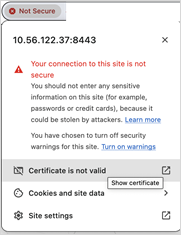
7. Connect to the cluster and navigate to the Cisco Cross Hierarchical Controller login page and verify that the site is secure and that the certificate is loaded in the browser.
The following is an example in Chrome of a connection to this site that is NOT secure:
Configure Local Users
Crosswork Hierarchical Controller supports the creation and maintenance of local users, as well as integration with an Active Directory (LDAP) or SSO server. Local users can be created and assigned permissions.
The administrator can also select password complexity rules (OWASP) on passwords of local users. By selecting a scoring level, the length and character composition of the password is enforced. See Password Policy, Session Timeout, and Session Login Limiter.
Each role has its own set of permissions and inherits the permissions of the lower level roles.
There are four pre-defined user roles: read-only, user, support, and admin.
Note: These user roles also cover the use of APIs and not only UI.
| Crosswork Hierarchical Controller Role |
Permissions |
| read-only |
Read-only access to Crosswork Hierarchical Controller Explorer UI and APIs. |
| user |
Access to Crosswork Hierarchical Controller Explorer UI, APIs and all apps, some of which can change the network. |
| support |
Same permissions as the User role with the addition of access to Crosswork Hierarchical Controller diagnostic tools for the Cisco Support Team. |
| admin |
Full control over configuration and all users. Access to Configuration UI, Crosswork Hierarchical Controller Explorer UI, all apps, and APIs. |
To add/edit a user:
1. In the applications bar in Crosswork Hierarchical Controller, select Settings.
2. Click Security > Local Users.
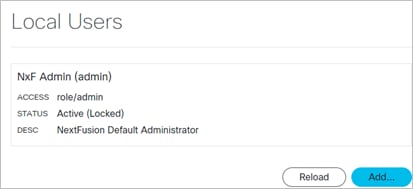
3. Click Add or click on an existing user.
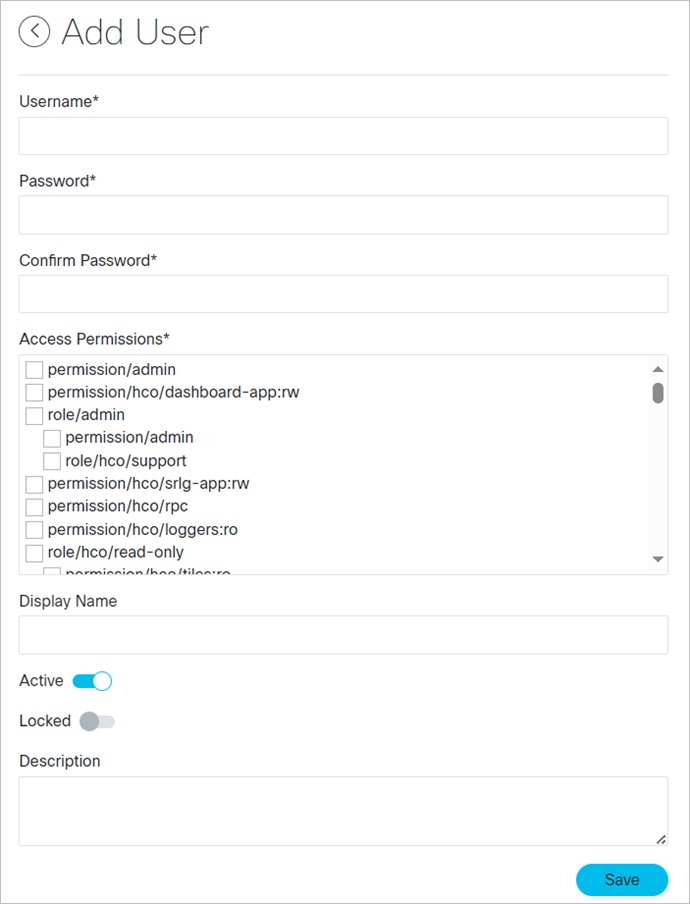
4. Complete the fields and assign any required permissions.
5. Click Save.
Configure Local Users Using Sedo
This topic describes how to configure local users using sedo.
security user Commands
sedo security user [command]
Available Commands:
add Add local user
delete Delete local user
list List local users
set Set local user properties
Add User
You can add a local user.
To add a local user:
● To create a local user, use the command:
sedo security user add [flags] USERNAME
Flags:
--access stringArray Access permissions (can be used multiple times)
--active Activate/Deactivate user, preventing it from logging in if deactivated (default true)
--description string Description
--display-name string Display Name
--expires-in-days int Mark password as expired after certain number of days. Set to 0 to disable password expiration (default 180)
-h, --help help for add
--locked Lock/Unlock user, preventing it from being deleted if locked
--must-change-password Forcing user to change password on next login (default true)
--password-stdin Take user password from stdin
For example:
sedo security user add --must-change-password=false --access 'role/hco/user' harelroleuser
Note: The access flag must use the format "role/hco/[ROLE_NAME]" and NOT "role/[ROLE_NAME]”.
Delete User
You can delete a local user. Use the GUID from the security user list command.
To delete a local user:
● To delete a local user, use the command:
sedo security user delete USERNAME|GUID [flags]
List Users
You can list all syslog servers present. This returns a list of servers with the following information:
GUID │ USERNAME │ DISPLAY NAME │ ACTIVE │ LOCKED │ DESCRIPTION│ ACCESS │ EXPIRES
To list all local users:
● To list all local user, use the command:
sedo security user list [flags]
Set User
You set user properties.
To set user properties:
● To set properties for local user, use the command:
sedo security user set [flags] USERNAME|GUID
Flags:
--access stringArray Access permissions (can be used multiple times)
--active Activate/Deactivate user, preventing it from logging in if deactivated (default true)
--description string Description
--display-name string Display Name
--expires-in-days int Mark password as expired after certain number of days. Set to 0 to disable password expiration (default 180)
-h, --help help for set
--locked Lock/Unlock user, preventing it from being deleted if locked
--must-change-password Forcing user to change password on next login (default true)
--password Update user password
--password-stdin Take user password from stdin
Configure LDAP
Crosswork Hierarchical Controller allows for authenticating users via an LDAP server.
To configure an LDAP Server:
1. In the applications bar in Crosswork Hierarchical Controller, select Settings.
2. Click Security > LDAP.
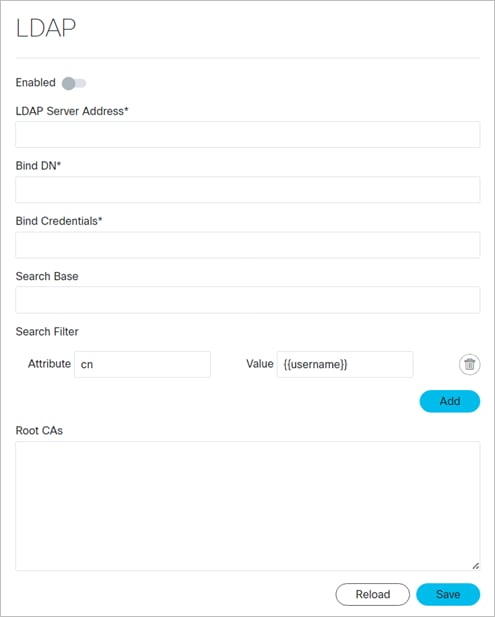
3. Configure the LDAP settings.
4. Click Save.
5. Specify the Permission Mapping for the LDAP Group and LDAP User.
Configure SAML SSO
Crosswork Hierarchical Controller allows for single sign on (SSO) using a SAML server in Service Provider mode.
When using SSO, if you log out of Crosswork Hierarchical Controller, you are not logged out from the SAML server. This means that you can continue to work in other applications that use the same SAML server login, and if you restart Cisco Crosswork Hierarchical Controller while the SAML session is active, you do not have to log in again.
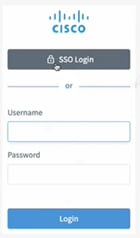
Cisco Crosswork Hierarchical Controller SSO Login or Crosswork Hierarchical Controller Login
To configure SAML:
1. In the applications bar in Cisco Crosswork Hierarchical Controller, select Settings.
2. Click Security > SAML SSO.
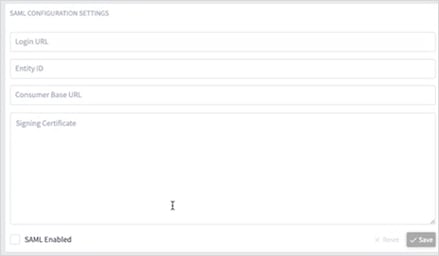
3. Configure the SAML CONFIGURATION SETTINGS:
◦ Login URL: The SAML server URL.
◦ Entity ID: The globally unique name for the SAML entity.
◦ Consumer Base URL: The URL to redirect the user to once they are logged in, that is, the Cisco Crosswork Hierarchical Controller instance.
◦ Signing Certificate: The certificate used to authenticate with the SAML server.
4. Select SAML Enabled.
5. Click Save.
6. In Permission Mapping, configure the SAML Group and SAML User.
Configure Permission Mapping
Configure the access permissions for the following mapping types:
● SAML User
● SAML Group
● LDAP User
● LDAP Group
To configure a Permission Mapping:
1. In the applications bar in Cisco Crosswork Hierarchical Controller, select Settings.
2. Click Security > Permission Mapping.
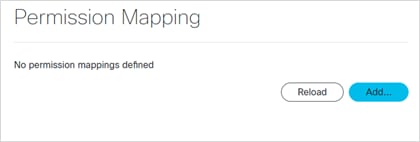
3. Click Add.
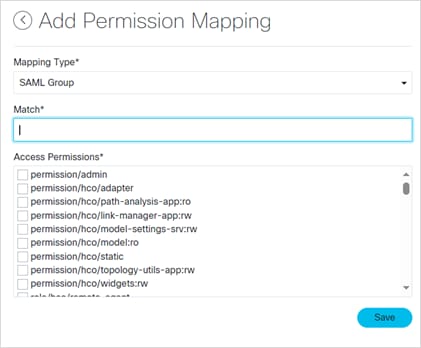
4. Select a Mapping Type.
5. Enter a Match.
6. Select the Access Permissions.
7. Click Save.
Login Banner
You can set a login banner.
Get Login Banner
You can get the login banner.
To get the login banner:
● Use the command:
sedo security login-banner get
┌───────────────────┐
│ Login Banner Prop │
│ erties │
├─────────┬─────────┤
│ Enabled │ false │
│ HTML │ <empty> │
└─────────┴─────────┘
Set Login Banner
You can set the login banner by setting it to a self-contained HTML file (stdin).
To set the login banner:
● Use the command:
sedo security login-banner set [flags]
Flags:
--enabled Enable login banner
--html-stdin Take HTML content from stdin
Get Password Policy
You can get the password policy.
To get the password policy:
● Use the command:
sedo security password-policy get [flags]
┌───────────────────────────────────────────────────────┐
│ Password Policy Properties │
├───────────────────────────────────┬───────────────────┤
│ Default Password Expiration │ 180 days │
│ Password Reuse Limit │ 12 last passwords │
│ Minimum Password Complexity Score │ 3 │
└───────────────────────────────────┴───────────────────┘
Set Password Policy
You can set the password policy. The minimum reuse-limit is 3 (as per Cisco security standards).
To set the password policy:
● Use the command:
sedo security password-policy set [flags]
Flags:
--expiration-days uint Default password expiration used when creating new users, in days (default 180)
--min-complexity-score uint Minimal password complexity score required [0 (disabled) - 5] (default 3)
--reuse-limit uint Number of historical passwords retain and blocked from reuse when changing password (default 12)
You can set the session timeout.
To set the session timeout:
● Use the command:
sedo security session set [flags]
Flags:
--domain string Cookie domain
--max-age duration Max cookie age (default 10m0s)
--rolling Enable rolling session (default true)
--same-site string Cookie same site policy
--secure Enable secure session cookie (default true)
Get Session Login Limiter
You can view the session login limiter information. Access to the system is logged and may be viewed via the syslog system message logging.
To get the session login limiter:
● Use the command:
sedo security login-limiter get
┌─────────────────────────────────────────────────┐
│ Login Limiter Properties │
├─────────────────────────────────────┬───────────┤
│ Limit Window │ 5 minutes │
│ Max attempts before blocking │ 8 │
│ Start delaying after attempt number │ 1 │
│ Base delay │ 250 ms │
└─────────────────────────────────────┴───────────┘
Set Session Login Limiter
You can set the session login limiter.
To set the session login limiter:
● Use the command:
sedo security login-limiter set [flags]
Flags:
--delay duration Delay added between attempts (default 250ms)
--delay-after-attempt uint Start delaying after attempt (default 1)
--limit-window duration Limit Window (default 5m0s)
--max-attempts uint Max attempts before being blocked (default 8)
System Health
There are various ways to check and monitor the system.
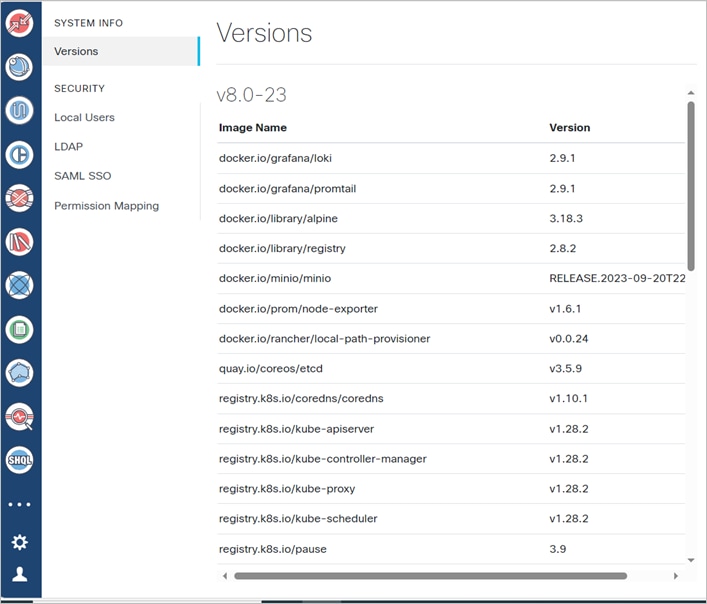
You can view a list of the installed packages and their build number.
To view system info:
1. In the applications bar in Crosswork Hierarchical Controller, select Settings.
2. In System Info, the Versions table displays the installed packages and their build number.
You can view a list of the various pods for the System (NextFusion) and Cisco Cross Hierarchical Controller.
To view the system status:
● To view the system status, use the command:
sedo system status
For example:
│ System Status (Thu, 28 Mar 2024 14:33:37 UTC) │
├────────┬──────────────────────────┬───────────┬─────────┬──────────┬────────────┤
│ OWNER │ NAME │ ZONE/NODE │ STATUS │ RESTARTS │ STARTED │
├────────┼──────────────────────────┼───────────┼─────────┼──────────┼────────────┤
│ system │ authenticator │ node1 │ Running │ 0 │ 1 day ago │
│ system │ controller │ node1 │ Running │ 0 │ 1 day ago │
│ system │ controller │ node2 │ Running │ 0 │ 1 day ago │
│ system │ ingress-proxy │ node1 │ Running │ 0 │ 1 day ago │
│ system │ ingress-proxy │ node2 │ Running │ 0 │ 1 day ago │
│ system │ kafka │ node3 │ Running │ 0 │ 1 day ago │
│ system │ kafka │ node2 │ Running │ 0 │ 1 day ago │
│ system │ kafka │ node1 │ Running │ 0 │ 1 day ago │
│ system │ loki │ node1 │ Running │ 0 │ 1 day ago │
│ system │ loki │ node2 │ Running │ 0 │ 1 day ago │
│ system │ metrics │ node2 │ Running │ 0 │ 1 day ago │
│ system │ metrics │ node1 │ Running │ 0 │ 1 day ago │
│ system │ metrics │ node3 │ Running │ 0 │ 1 day ago │
│ system │ minio │ node3 │ Running │ 0 │ 1 day ago │
│ system │ minio │ node2 │ Running │ 0 │ 1 day ago │
│ system │ minio │ node1 │ Running │ 0 │ 1 day ago │
│ system │ postgres │ node1 │ Running │ 0 │ 1 day ago │
│ system │ postgres │ node2 │ Running │ 0 │ 1 day ago │
│ system │ promtail-dw7x2 │ node3 │ Running │ 0 │ 1 day ago │
│ system │ promtail-lpdrn │ node2 │ Running │ 0 │ 1 day ago │
│ system │ promtail-qzqqn │ node1 │ Running │ 0 │ 1 day ago │
│ system │ registry │ node1 │ Running │ 0 │ 1 day ago │
│ system │ registry │ node2 │ Running │ 0 │ 1 day ago │
│ system │ vip-add │ node1 │ Running │ 0 │ 1 hour ago │
│ hco │ brain │ zone-a │ Running │ 0 │ 1 day ago │
│ hco │ dashboard-app │ zone-a │ Running │ 0 │ 1 day ago │
│ hco │ device-manager-srv │ zone-a │ Running │ 0 │ 1 day ago │
│ hco │ explorer-app │ zone-a │ Running │ 0 │ 1 day ago │
│ hco │ failure-impact-app │ zone-a │ Running │ 0 │ 1 day ago │
│ hco │ fibers-srlg-app │ zone-a │ Running │ 0 │ 1 day ago │
│ hco │ layer-relations-app │ zone-a │ Running │ 0 │ 1 day ago │
│ hco │ link-assurance-app │ zone-a │ Running │ 0 │ 1 day ago │
│ hco │ link-manager-app │ zone-a │ Running │ 0 │ 1 day ago │
│ hco │ model-settings-srv │ zone-a │ Running │ 0 │ 1 day ago │
│ hco │ network-history-app │ zone-a │ Running │ 0 │ 1 day ago │
│ hco │ network-inventory-app │ zone-a │ Running │ 0 │ 1 day ago │
│ hco │ notification-manager-app │ zone-a │ Running │ 0 │ 1 day ago │
│ hco │ nso-manager-srv │ zone-a │ Running │ 0 │ 1 day ago │
│ hco │ path-analysis-app │ zone-a │ Running │ 0 │ 1 day ago │
│ hco │ performance-app │ zone-a │ Running │ 0 │ 1 day ago │
│ hco │ rca-app │ zone-a │ Running │ 0 │ 1 day ago │
│ hco │ service-assurance-app │ zone-a │ Running │ 0 │ 1 day ago │
│ hco │ service-manager-app │ zone-a │ Running │ 0 │ 1 day ago │
│ hco │ shql-query-app │ zone-a │ Running │ 0 │ 1 day ago │
│ hco │ srlg-app │ zone-a │ Running │ 0 │ 1 day ago │
│ hco │ brain │ zone-b │ Running │ 0 │ 1 day ago │
│ hco │ dashboard-app │ zone-b │ Running │ 0 │ 1 day ago │
│ hco │ device-manager-srv │ zone-b │ Running │ 0 │ 1 day ago │
│ hco │ failure-impact-app │ zone-b │ Running │ 0 │ 1 day ago │
│ hco │ fibers-srlg-app │ zone-b │ Running │ 0 │ 1 day ago │
│ hco │ layer-relations-app │ zone-b │ Running │ 0 │ 1 day ago │
│ hco │ link-assurance-app │ zone-b │ Running │ 0 │ 1 day ago │
│ hco │ link-manager-app │ zone-b │ Running │ 0 │ 1 day ago │
│ hco │ model-settings-srv │ zone-b │ Running │ 0 │ 1 day ago │
│ hco │ network-history-app │ zone-b │ Running │ 0 │ 1 day ago │
│ hco │ network-inventory-app │ zone-b │ Running │ 0 │ 1 day ago │
│ hco │ notification-manager-app │ zone-b │ Running │ 0 │ 1 day ago │
│ hco │ nso-manager-srv │ zone-b │ Running │ 0 │ 1 day ago │
│ hco │ path-analysis-app │ zone-b │ Running │ 0 │ 1 day ago │
│ hco │ performance-app │ zone-b │ Running │ 0 │ 1 day ago │
│ hco │ rca-app │ zone-b │ Running │ 0 │ 1 day ago │
│ hco │ service-assurance-app │ zone-b │ Running │ 0 │ 1 day ago │
│ hco │ service-manager-app │ zone-b │ Running │ 0 │ 1 day ago │
│ hco │ shql-query-app │ zone-b │ Running │ 0 │ 1 day ago │
│ hco │ srlg-app │ zone-b │ Running │ 0 │ 1 day ago │
System Message Logging
You can configure NextFusion syslog system message logging using sedo.
NextFusion Loki is equipped with a syslog forwarder component which filters logs and forwards the matching logs to syslog server(s).
You can use sedo to create a server entry (essentially configure a connection to an existing syslog server for sending syslog messages over TCP or UDP) and then create queries to filter the system and services logs. The logs that match the filters are sent to the configured syslog server(s). The Severity, Facility and Label are added to the logs when they are forwarded.
Note: The syslog servers are provided by the customer and are not part of the NextFusion or Cisco Crosswork Hierarchical Controller deployment.
To setup system message logging:
1. Get the details for your syslog server(s). You need the PROTOCOL, HOST, and PORT.
2. Configure (create) the syslog server(s) in Cisco Crosswork Hierarchical Controller. See Create syslog Server.
3. Create the required syslog queries to filter the logs and label the messages (with a severity level, facility, and/or tag). See Create syslog Query.
syslog Server Commands
sedo syslog server [command]
Available Commands:
create Create server
delete Delete server
list List all syslog servers present
update Update server
syslog Query Commands
sedo syslog query [command]
Available Commands:
create Create query
delete Delete query
list List all loki queries present
update Update query
You can set the severity level of the messages to control the type of messages. There are different severity levels for logging information:
● Emergency: System is unusable (LOG_EMERG)
● Alert: Immediate action needed (LOG_ALERT)
● Critical: Critical conditions (LOG_CRIT)
● Error: Error conditions (LOG_ERR)
● Warning: Warning conditions (LOG_WARNING)
● Notice: Normal but significant conditions (LOG_NOTICE)
● Informational: Informational messages (LOG_INFO)
● Debug: Debugging messages (LOG_DEBUG)
syslog Facilities
There are different facilities for logging information:
● LOG_KERN: Kernel messages
● LOG_USER: User-level messages
● LOG_MAIL: Mail system
● LOG_DAEMON: System daemons
● LOG_AUTH: Security/authorization messages
● LOG_SYSLOG: Messages generated internally by syslog
● LOG_LPR: Line printer subsystem
● LOG_NEWS: Network news subsystem
● LOG_UUCP: UUCP subsystem
● LOG_CRON: Clock daemon
● LOG_AUTHPRIV: Security/authorization messages
● LOG_FTP: FTP daemon
● LOG_LOCAL0: Local user 0
● LOG_LOCAL1: Local user 1
● LOG_LOCAL2: Local user 2
● LOG_LOCAL3: Local user 3
● LOG_LOCAL4: Local user 4
● LOG_LOCAL5: Local user 5
● LOG_LOCAL6: Local user 6
● LOG_LOCAL7: Local user 7
You can access logged system messages by sending them to a properly configured syslog server.
The default protocol for sending syslog messages is UDP with a default port of 514. For TCP, the default port is 601.
By default, the logging severity of syslog messages is informational which means that all syslog messages at informational severity and higher will be logged.
To create a syslog server:
● To create a syslog server, use the command:
sedo syslog server create NAME PROTOCOL HOST PORT [flags]
For example:
sedo syslog server create server1 tcp test-env2.abc.ciscolabs.com 601
sedo syslog server create server2 udp test-env2.abc.ciscolabs.com 514
Delete syslog Server
You can delete a syslog server.
To delete a syslog server:
● To delete a syslog server, use the command:
sedo syslog server delete NAME [flags]
List syslog Servers
You can list all syslog servers present. This returns a list of servers with the following information:
NAME │ PROTOCOL │ HOST │ PORT │
To list all syslog servers:
● To list all syslog servers, use the command:
sedo syslog server list [flags]
Update syslog Server
You can update an existing syslog server.
To update a syslog server:
● To update a syslog server, use the command:
sedo syslog server update NAME PROTOCOL HOST PORT [flags]
You can create a syslog server query that filters the logs and labels them (with severity, facility, and tags).
The filtered logs (that match the query) are then forwarded to the specified syslog server. When the query is created it may take a few seconds until it takes effect.
Note: There is no automatic assignment of severity or facility to logs.
To query syslog:
● To query syslog, use the command:
sedo syslog query create QUERY SEVERITY FACILITY TAG SERVER [SERVER ...] [flags]
The QUERY is composed of:
● A log stream selector which includes the pod/application name, for example:
{app=\"authenticator\"}
{app=\"network-inventory-app\"}
● A log pipeline which filters out the logs. This can include exact matches (to one or more options) or a match to a regex expression, for example:
|= \"failing over pods|vip|SuperclusterController\"
|~ \".*User logged in successfully.*\"
And then also specify the:
● SEVERITY: For example, LOG_WARNING. See syslog Severity Levels.
● FACILITY: For example, LOG_USER. See syslog Facilities.
● TAG: The tag for the syslog.
● SERVER: The name(s) of the syslog server(s). See Create syslog Server.
Example: NextFusion syslog Query
Sample query:
sedo syslog query create "{app=\"authenticator\"} |~ \".*User logged in successfully.*\"" "LOG_NOTICE" "LOG_NEWS" "user-login" server2
Output on syslog (configured to output the severity and facility):
Facility: news, Severity: notice {"ip":"209.165.200.225","level":"audit","message":"User logged in successfully","origin":"local","timestamp":"2024-09-26T14:14:18.077Z","type":"USER_LOGGED_IN","username":"admin"}
syslog Severity Levels
In syslog, the severity level represents the importance or criticality of a logged message. It helps administrators quickly identify the most urgent issues that require attention. You can label the filtered syslog messages with a severity level.
Note: The severity level is not derived from the log message but is added to the syslog message when it is forwarded to the specified syslog server.
For example, you can create a filter that sets the logging severity level label to LOG_ALERT and the facility to LOG_USER when a node in the HA cluster is failing over:
sedo syslog query create {"app=\"controller\"} |= \"failing over pods|vip|SuperclusterController\"" LOG_ALERT LOG_USER "track-ha-behavior" server2
There are different severity levels:
● Emergency: System is unusable (LOG_EMERG)
● Alert: Immediate action needed (LOG_ALERT)
● Critical: Critical conditions (LOG_CRIT)
● Error: Error conditions (LOG_ERR)
● Warning: Warning conditions (LOG_WARNING)
● Notice: Normal but significant conditions (LOG_NOTICE)
● Informational: Informational messages (LOG_INFO)
● Debug: Debugging messages (LOG_DEBUG)
In syslog, the facility identifies the system component of the NextFusion system.
Note: The facility level is not derived from the log message but is added to the syslog message when it is forwarded to the specified syslog server.
There are different facilities:
● LOG_KERN: Kernel messages
● LOG_USER: User-level messages
● LOG_MAIL: Mail system
● LOG_DAEMON: System daemons
● LOG_AUTH: Security/authorization messages
● LOG_SYSLOG: Messages generated internally by syslog
● LOG_LPR: Line printer subsystem
● LOG_NEWS: Network news subsystem
● LOG_UUCP: UUCP subsystem
● LOG_CRON: Clock daemon
● LOG_AUTHPRIV: Security/authorization messages
● LOG_FTP: FTP daemon
● LOG_LOCAL0: Local user 0
● LOG_LOCAL1: Local user 1
● LOG_LOCAL2: Local user 2
● LOG_LOCAL3: Local user 3
● LOG_LOCAL4: Local user 4
● LOG_LOCAL5: Local user 5
● LOG_LOCAL6: Local user 6
● LOG_LOCAL7: Local user 7
Delete syslog Query
You can delete a syslog query.
To delete a syslog query:
● To delete a syslog query, use the command:
sedo syslog query delete ID [flags]
List syslog Queries
You can list all syslog queries present. This returns a list of queries with the following information:
ID │ QUERY │ FACILITY │ SEVERITY │ TAG │ FORWARD TO
To list all syslog queries:
● To list all syslog queries, use the command:
sedo syslog query list [flags]
Update syslog Query
You can update a syslog query.
To update a syslog query:
● To update a syslog query, use the command:
sedo syslog query update QUERY SEVERITY FACILITY TAG SERVER [SERVER ...] [flags]
Retrieve Container Logs
You can retrieve the container logs and view the logs of the brain and various applications.
For example:
sedo logs zone-b/brain/Active
sedo logs zone-b/failure-impact-app/Active
To retrieve container logs:
● To retrieve container logs, use the command:
sedo logs [flags] NAME|NAMESPEC
Flags:
-c, --container string Show specific container logs
-f, --follow Stream logs to output
-h, --help help for logs
-q, --quiet don't show pod details
You should periodically check the disk space.
To check the disk space:
● Use the command:
$ df -h
View Time Machine Cleaner Threshold
The Time Machine cleaner threshold is set to 365 days by default.
To check the time machine threshold:
● Use the command:
sedo hco history cleaner-threshold get
Cleaner Threshold: P365D
Get Diagnostic Logs
Diagnostic logs for containers and pods are retained for 7 days.
The Loki diagnostic logs may also be forwarded to syslog (by configuring a syslog server and creating a LogQL query to forward matching messages to the sever). See System Message Logging.
To get the log dump (all nodes together):
● Use the command:
sedo diagnostics archive-logs [flags] DIRNAME
In the event of failure, copy the logs folder (all nodes in the cluster).
To get the logs (one node at a time):
● Use the command:
$ tar -czf logs.tar.gz /var/log/pods
Examples:
archive-logs /data
Flags:
--before string Only save logs before this time. Time format should be one of the standard formats.
--from string Only save logs after this time. Time format should be one of the standard formats.
Metrics
NextFusion runs a metrics server on each node of the cluster and exports node-exporter and Kubernetes cAdvisor metrics:
● https://github.com/prometheus/node_exporter
● https://kubernetes.io/docs/concepts/cluster-administration/system-metrics/
The metrics are presented in a Prometheus text format:
● https://prometheus.io/docs/instrumenting/exposition_formats/
You can access these metrics from the host or from services running inside NextFusion (provided they have the correct permission).
To collect the metrics:
1. Get the IP of the metrics server:
nxf@nxfos1:~$ kubectl get pods -A -o wide -l app=metrics
NAMESPACE NAME READY STATUS RESTARTS AGE IP NODE NOMINATED NODE READINESS GATES
nxf-system metrics-pfw7h 2/2 Running 0 25h <IP> nxfos1 <none> <none>
2. Collect the node metrics:
$ sedo-curl -k https://<IP>:8443/metrics/node
# HELP go_gc_duration_seconds A summary of the pause duration of garbage collection cycles.
# TYPE go_gc_duration_seconds summary
go_gc_duration_seconds{quantile="0"} 6.008e-05
go_gc_duration_seconds{quantile="0.25"} 0.000630274
go_gc_duration_seconds{quantile="0.5"} 0.000699291
go_gc_duration_seconds{quantile="0.75"} 0.001166118
go_gc_duration_seconds{quantile="1"} 0.001455142
go_gc_duration_seconds_sum 0.005704291
go_gc_duration_seconds_count 8
# HELP go_goroutines Number of goroutines that currently exist.
# TYPE go_goroutines gauge
go_goroutines 7
# HELP go_info Information about the Go environment.
# TYPE go_info gauge
go_info{version="go1.21.4"} 1
# HELP go_memstats_alloc_bytes Number of bytes allocated and still in use.
# TYPE go_memstats_alloc_bytes gauge
go_memstats_alloc_bytes 1.655704e+06
# HELP go_memstats_alloc_bytes_total Total number of bytes allocated, even if freed.
# TYPE go_memstats_alloc_bytes_total counter
...
3. Collect cAdvisor metrics:
$ sedo-curl -k https://10.244.0.13:8443/metrics/cadvisor
# HELP cadvisor\_version\_info A metric with a constant '1' value labeled by kernel version, OS version, docker version, cadvisor version & cadvisor revision.
# TYPE cadvisor\_version\_info gauge
cadvisor\_version\_info{cadvisorRevision="",cadvisorVersion="",dockerVersion="",kernelVersion="6.1.0-18-arm64",osVersion="NxFOS 3.0 (495962188a16d2ef916afb74989715f6e10b97d1)"} 1
# HELP container\_blkio\_device\_usage\_total Blkio Device bytes usage
# TYPE container\_blkio\_device\_usage\_total counter
container\_blkio\_device\_usage\_total{container="",device="",id="/",image="",major="7",minor="1",name="",namespace="",operation="Async",pod=""} 0 1708647334118
container\_blkio\_device\_usage\_total{container="",device="",id="/",image="",major="7",minor="1",name="",namespace="",operation="Discard",pod=""} 0 1708647334118
container\_blkio\_device\_usage\_total{container="",device="",id="/",image="",major="7",minor="1",name="",namespace="",operation="Read",pod=""} 0 1708647334118
container\_blkio\_device\_usage\_total{container="",device="",id="/",image="",major="7",minor="1",name="",namespace="",operation="Sync",pod=""} 0 1708647334118
...
Crosswork Hierarchical Controller Events
The Notification Manager, which is installed automatically as part of Crosswork Hierarchical Controller, generates:
● Crosswork Hierarchical Controller application events
● Brain-related events of type archive, persistor, cross-mapper, visual-model, brain, and taggables
● Adapter events
Notification Manager Configuration
The notification_manager_configuration.json includes the Syslog configuration:
● pollIntervalSec: The interval (in seconds) for polling or checking for events.
● upstreams: The configuration of the channels to which notifications will be pushed (SMTP, SYSLOG and Pulsar). For each upstream you need to define slightly different properties.
● type: The type of the upstream, specifying that it is configured for Syslog communication.
● type: syslog
◦ host: The hostname or IP address of the Syslog server to which notifications will be sent.
◦ port: The port number on which the Syslog server is configured to receive messages.
◦ protocol: The communication protocol used, and in this case, it is set to UDP (User Datagram Protocol).
◦ appName: The application name that will be included in the Syslog messages.
◦ template: A template for the Syslog message content, where {{ event.subType }} is a placeholder that will be replaced with the actual subtype of the event being processed.
● type: smtp
◦ host: The hostname or IP address of the SMTP server to which the email notifications will be sent.
◦ port: The port number on which the SMTP server is configured to receive email messages.
◦ username: The authentication username used to connect to the SMTP server.
◦ password: The authentication password used to connect to the SMTP server.
◦ from: The sender's email address for outgoing emails.
◦ to: A list of recipient email addresses to whom the email notifications will be sent.
◦ subject: The subject of the email, which may include information related to the event.
◦ template: A template for the email body content, where {{ event.subType }} is a placeholder that will be replaced with the actual subtype of the event being processed.
● type: pulsar
◦ server: The hostname or IP address of the Pulsar server to which notifications will be sent.
◦ topic: The Pulsar topic where notifications will be published.
◦ template: A template for the Pulsar message content. The placeholders {{ event.type }} and {{ event.subType }} will be replaced with the actual type and subtype of the event being processed.
◦ publicKey: (Optional) The public key used for secure communication with Pulsar.
◦ privateKey: (Optional) The private key used for secure communication with Pulsar.
◦ ca: (Optional) The Certificate Authority (CA) certificate for establishing trust in secure communication.
● rules: The configuration for event-specific rules, defining filters and corresponding actions.
◦ maxRequestsPerInterval: The maximum number of requests processed in each interval for a rule.
◦ intervalSec: The interval (in seconds) for processing rules.
◦ filter: Criteria to match events for a specific rule. key-value pairs represent the Event obj values. Being translated to SHQL query.
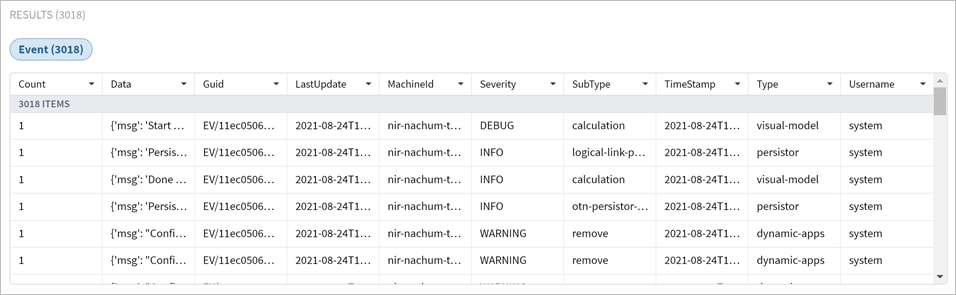
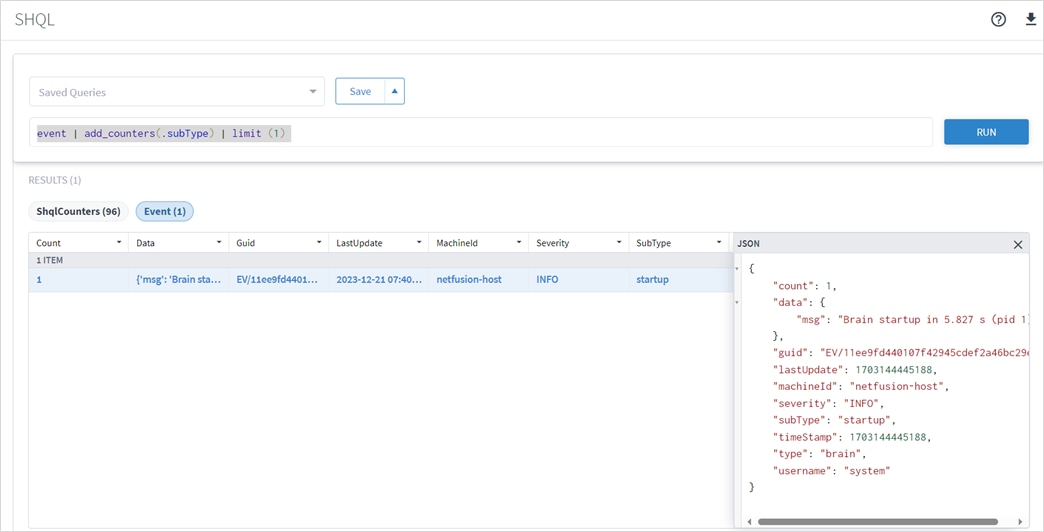
Event Structure
All events are saved in the event table and can be queried and viewed via the SHQL application.
The events are structured as follows:
● count: The count of events.
● data: An object that stores specific details about the event. For applications, the following information appears (each application may include additional details):
◦ app_name: The name of the application where the event occurred.
◦ category: The category of the event.
● guid: The unique identifier of the event, which always starts with EV/ followed by a hash number.
● lastUpdate: The time of the last update made to the event in milliseconds.
● machineId: The ID of the machine where the event occurred.
● severity: Indicates the severity of the event and can be one of AUDIT, ERROR, WARNING, INFO, DEBUG, or USAGE.
● subType: The sub-type of the event.
● timeStamp: The timestamp of when the event occurred in milliseconds.
● type: The type of the event. For application events, it will be the application name.
● username: The username of the user associated with the event. For application events, it is the application name.
View Adapter Events
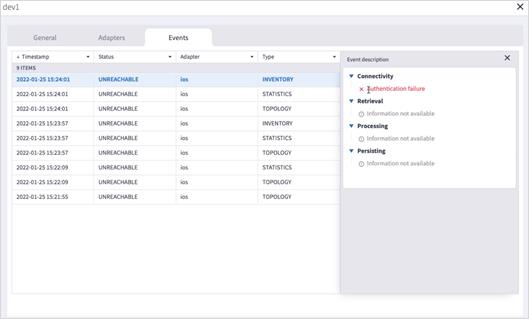
Crosswork Hierarchical Controller sends syslog events when the:
● Device reachability state changes.
● Adapter fails to parse files.
● Adapter fails to connect to the controller, for example, Authentication failure or TCP Connection failed.
View Managed Device Events
You can view the events by clicking on a device in the Managed Devices tab in Device Manager.
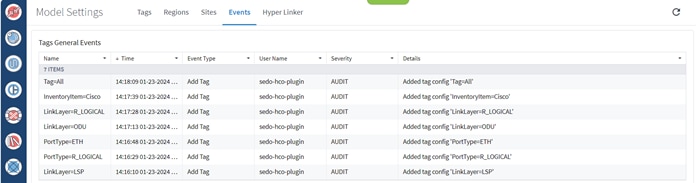
View Tags General Events
You can view the tags general events in Model Settings.
View Crosswork Hierarchical Controller Events
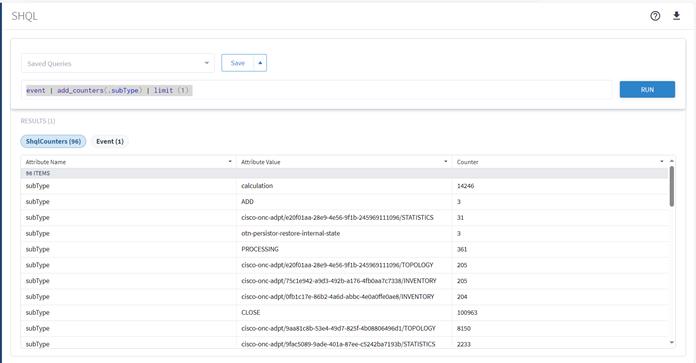
You can use the SHQL application to filter, categorize, and view Crosswork Hierarchical Controller events. For more information on how to use SHQL, see the Crosswork Hierarchical Controller NBI and SHQL Reference Guide.
For example, you can retrieve the events captured the day before yesterday (>-2d and <-1d). The .timeStamp property can be used with d (days), h (hours), m (months), M (minutes). S (seconds), y (years) or w (weeks).

For example, you can filter the events according to their severity.
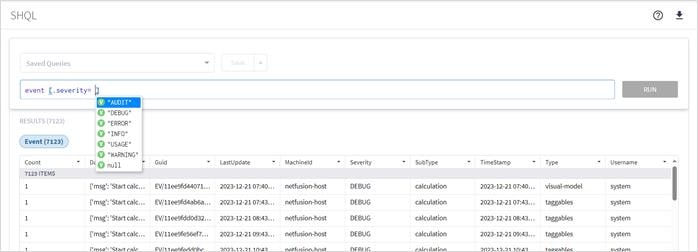
For example, you can count the events by subType.
Alarms
External alarms are valuable for understanding the state of a network. In preparation for the future, the infrastructure for alarms was added in version 8.0 by adding an alarm table to the model schema.
The alarm functionality itself will be developed in future releases. The different controllers and devices produce alarms that will be streamed upwards, and Crosswork Hierarchical Controller will display these in the context of the relevant model object. As the alarm mechanism is based on database representation in the model schema, it will benefit from the history mechanism and SHQL support will allow for cross- referencing between model objects and alarm objects for easy navigation and querying.
Database Backup and Restore
Backups are created as follows for the Crosswork Hierarchical Controller DB:
● A full backup is done once a week (on Sundays) automatically. The full backup expires after a period, which by default is set to a year.
● A delta backup is created daily (except for Sunday) automatically. So, typically, you will see six delta backups between full backups.
● Daily backups only include the gap from the previous day. These delta backups expire after two weeks (not configurable).
● In addition, full backups are created when the machine is first installed or if Crosswork Hierarchical Controller or the entire machine is rebooted (Monday to Saturday).
sedo backup [COMMAND]
positional arguments:
COMMAND
create create backup
delete delete backup
download download backup bundle to current folder
list list backups
restore restore backup
upload upload backup archive to cluster
You can manually back up a delta or full copy of the database. You can use this full backup file to restore the Crosswork Hierarchical Controller database or copy it to a new instance.
To back up the DB:
● To back up the database, use the command:
sedo backup create[command] [flags]
positional arguments:
COMMAND
delta create delta backup
full create full backup
Flags:
--timeout duration timeout for creating the backup (default 1h0m0s)
Delete Backup
You can delete backups in a specific time frame. To delete a single backup, set the FROM_ID to the same value as the TO_ID.
Deleting a full backup also deletes the successive delta backups.
To delete a backup:
● Use the command:
sedo backup delete BACKUP-NAME
You can download a backup file to the current folder.
Important: To make a complete backup, ensure that you use a password to download an encrypted backup. Ensure that you keep the password safe as it will be required to upload the encrypted backup. This flag is highly recommended as not using it may impact the restore process.
To download a backup:
● Use the command:
sedo backup download [flags] BACKUP-NAME
Flags:
-p, --password string Encrypt config values using this password
List the Backups
You can list the backup files.
To list the backups:
● Use the command:
sedo backup list
────────────────────────────────────────────────────────┬─────────────────────────────────────────┬──────────────────────────────┬───────┬──────────────┬──────────────────┐
│ NAME │ TIME │ SIZE │ TYPE │ HOSTNAME │ POSTGRES VERSION │
├──────────────────────────────────────────────────────────┼─────────────────────────────────────────┼──────────────────────────────┼───────┼──────────────┼──────────────────┤
│ base_000000010000000000000052 │ 2023-11-14 18:47:37.917000055 +0000 UTC │ 101 kB (326 kB Uncompressed) │ full │ 0bd46169f03f │ 150004 │
│ base_000000040000000000000081_D_000000010000000000000052 │ 2023-11-15 02:00:12.346999883 +0000 UTC │ 23 kB (44 kB Uncompressed) │ delta │ postgres-0 │ 150004 │
│ base_000000050000000100000004_D_000000040000000000000081 │ 2023-11-16 02:00:20.686000108 +0000 UTC │ 124 kB (509 kB Uncompressed) │ delta │ postgres-1 │ 150004 │
└──────────────────────────────────────────────────────────┴─────────────────────────────────────────┴──────────────────────────────┴───────┴──────────────┴──────────────────┘
Restore the Crosswork Hierarchical Controller DB
When you restore, Crosswork Hierarchical Controller uses the last full backup plus the delta backups to restore. This is done automatically for you when you use the restore command.
To restore the DB:
● To restore the database, use the command:
sedo backup restore BACKUP-NAME
Upload Backup
You can upload a backup file to the cluster.
To upload a backup:
● Use the command:
sedo backup upload [flags] BACKUP-NAME
Flags:
-p, --password string Encrypt config values using this password
NSO backups can be listed, created, uploaded, exported, and restored from a specific backup. Backups are made daily and retained for 7 days.
sedo nso backup [COMMAND]
positional arguments:
COMMAND
create Create backup
delete Delete backup(s)
export Export backup
list Lists backups
restore Restore NSO
upload Upload backup
Kubernetes Management
List Running Services
To list running services:
● Run the command:
kubectl get pods
Flags:
-A: The -A (or --all-namespaces) option is used to retrieve information about pods from all namespaces in your cluster. A Kubernetes cluster can have multiple namespaces, which are virtual clusters within the physical cluster, allowing you to isolate and manage resources more effectively.
-n: The -n option allows you to specify a specific namespace when using kubectl get pods.
-w: The -w (or --watch) option is used to watch for changes to resources in real-time. When you add -w to a kubectl get command, it will continuously display updates as resources change. This is particularly useful for monitoring the status of pods or other resources as they are created, updated, or deleted.
-o [OUTPUT_TYPE]: Output format. One of: (json, yaml, name, go-template, go-template-file, template, templatefile, jsonpath, jsonpath-as-json, jsonpath-file, custom-columns, custom-columns-file, wide).
See custom columns [https://kubernetes.io/docs/reference/kubectl/#custom-columns]
Example: # List all pods with more information (such as node name)
kubectl get pods -o wide
Enable/Disable Services
Services can be enabled/disabled from kubectl.
To enable/disable services:
1. Open the configuration for editing with:
kubectl edit prj/hco
2. Adjust the replicas by searching for the "replicas" field under each service:
◦ To disable a service or set it to an inactive state, set the "replicas" value to 0. This means no instances of the service will run.
◦ To enable a service or activate it, set the "replicas" value to 1. This will ensure one instance of the service runs.
3. Save the configuration file and exit the editor.
4. To monitor the changes:
kubectl get pods -A -w
HA Cluster Management
The switchover command switches roles between the active and standby nodes. Switchovers may be performed for a variety of reasons, such as to test the HA solution, or for a planned outage of the primary node, scheduled system maintenance, or so on.
Note: Crosswork Hierarchical Controller HA and embedded NSO integrate seamlessly. The NSO database exists on both the Crosswork Hierarchical Controller Active and Standby nodes, and the database is synchronized continuously. If the Crosswork Hierarchical Controller Active node fails, and the Standby node takes over and becomes the Active node, NSO is updated automatically and switches nodes too.
To switchover the HA cluster:
1. Run the following command:
sedo ha switchover
2. To confirm that you want to continue, type:
Are you sure you want to initiate node switchover?
Y
Device Manager
About Device Manager
A key need for operators is network discovery and the monitoring and management of network devices. This is achieved by configuring network adapters to monitor groups of network devices, either directly or by using their management systems (EMS, NMS, or SDN Controller), using various technologies, such as CLI, SNMP or REST.
The Device Manager is a crucial Crosswork Hierarchical Controller application that manages Crosswork Hierarchical Controller southbound adapters, enabling you to add and manage devices, manage the assignment of devices to an adapter and monitor the adapter’s health as well as the devices reachability and discovery states.
Device Manager enables you to start discovering the network, monitor the connectivity and troubleshoot when a connectivity failure occurs.
The Device Manager service is available both in the UI and as an API.
To accurately reflect reachability and discovery, the Device Manager application provides the device discovery status per adapter and per information type (inventory, topology, and statistics). In 3D Explorer, the device Reachability Status is an aggregated state that reflects the state of all information types.
Crosswork Hierarchical Controller sends SYSLOG events when the:
● Device reachability state changes.
● Adapter fails to parse files.
● Adapter fails to connect to the controller, for example, Authentication failure or TCP Connection failed.
| Term |
Definition |
| Adapter |
The software used by Crosswork Hierarchical Controller to connect to a device or to the manager, to collect information required by the network model and configure the device. |
| Device |
Optical network element, router, or microwave device. |
| Device Manager |
The Crosswork Hierarchical Controller application that manages the deployed adapters. |
| NMS |
Network Management System. Manages multiple optical network elements or routers. |
| SDN Controller |
Software that manages multiple routers or optical network elements. |
When you work with adapters you are required to use credentials. These are used for authentication when a device is assigned to an adapter. The same credentials may be shared by multiple adapters. You can therefore create “template” credentials for reuse. For ease of use, ensure that you enter a meaningful name.
You can add, edit, and delete credentials.
A credential can be one of the following:
● SSH User and Password
● SSH Public Key
● HTTP
● SNMP Community
● SFTP
You can add a credential.
To add a credential:
1. In the applications bar in Crosswork Hierarchical Controller, select Services > Device Manager.
2. Select the Credentials tab.
3. Click Add new credentials.
4. Enter the Name and select a Type.
5. Enter the required credentials.
6. Click Add Credentials.
You can delete a credential.
To delete a credential:
1. In the applications bar in Crosswork Hierarchical Controller, select Services > Device Manager.
2. Select the Credentials tab.
3. Select the required credential.
4. Click Delete selected credentials. A confirmation message appears.
5. Click Confirm.
Adapter types are installed by Cisco. Each adapter instance is deployed with its own service pack even if the same adapter image is used. An adapter instance is created immediately after the corresponding service pack is installed. The installed adapter appears in Device Manager without additional user interactions.
An adapter type uses a specific protocol to manage a specific scope of information to be retrieved or configured on a group of devices or network manager. An adapter type connects to one manager only, for example, an EPN-M instance.
An adapter is an instance of an adapter type and is used by Crosswork Hierarchical Controller to connect to a device or to the manager, to collect information required by the network model and configure the device.
The Device Manager manages the deployed adapters, the assignment of devices to adapters and managers and the status of both adapters and devices throughout the lifecycle of operations. An adapter once configured to connect to devices and/or a manager, polls periodically to make sure that the devices and/or the NMS are reachable and discovered.
Note: The discovery state of the links is reported in Explorer and in the Network Inventory application (not in the Device Manager).
A device or manager may be associated with one or more adapters. This means that you can monitor the same device for different types of information by associating the device with multiple adapters.
All adapters accessing a device or manager, use the same IP address or host name, but the credentials may be different.
Crosswork Hierarchical Controller sends SYSLOG events when the:
● Adapter fails to parse files.
● Adapter fails to connect to the controller, for example, Authentication failure or TCP Connection failed.
The following statuses are available for the devices assigned to an adapter (and as a total for all the devices assigned to the adapter) in the Adapters table in Device Manager.
|
|
Information Types |
||
| Possible values |
Inventory |
Topology |
Statistics |
| OK |
When the adapter collecting the specific info type successfully reached the device NMS system or device itself and discovered the device data. |
||
| ERROR |
When the adapter collecting the info type reached the device but could not collect the required information, for example, wrong credentials, command type error, or no data. |
||
| UNREACHABLE |
When the adapter collecting the info type failed to reach the device, typically because of a problem with connectivity. |
||
| WARNING |
N/A |
N/A |
When the adapter that collects statistics failed to get the data of some device ports. |
| UNKNOWN |
When no status was reported by the adapter. This occurs when there is an internal communication error. Refer this to support. |
||
You can view a list of the adapters and see a list of the devices assigned to each adapter and the device status for inventory, topology, and statistics, as well as the events raised by the adapter.
To view adapters:
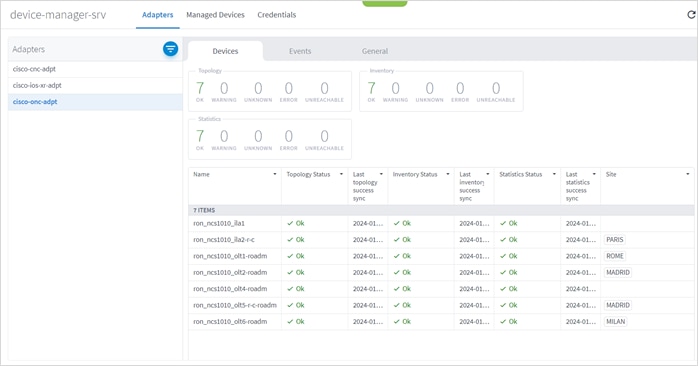
1. In the applications bar, select Services > Device Manager > Adapters. A list of the adapters appears in the Adapters pane.
2. Select the required adapter. A summary of how many devices are OK, ERROR, UNREACHABLE or UNKNOWN for Topology, Inventory and Statistics appear, as well as a list of the assigned devices with the following information per device:
◦ Name
◦ Topology Status
◦ Last topology success sync
◦ Inventory Status
◦ Last inventory success sync
◦ Statistics Status
◦ Last statistics success sync
◦ Site
◦ Host
◦ Port
3. Hover over a device name to view the device in the map and click Open in Explorer to open the device in Explorer (or click on the device directly to view the device in Explorer).
4. To view the device details, click on any of the columns (except the Name column).
5. To view the device adapters, select the Adapters tab.
6. To view the device events, select the Events tab.
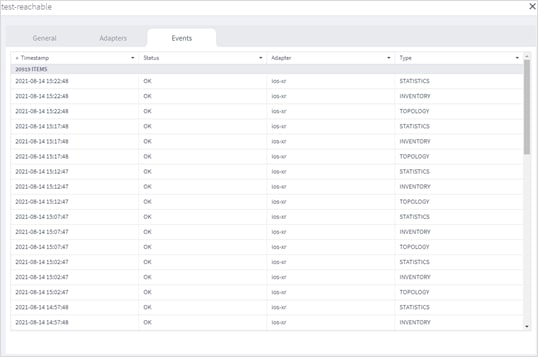
7. To view further details, click on an event.
8. Click to filter by event Status.
You can edit a device and select the network element in Explorer, assign the device to an adapter or unassign the device from an adapter.
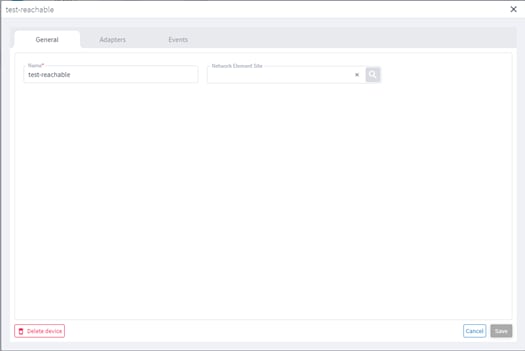
To edit a device:
1. In the applications bar in Crosswork Hierarchical Controller, select Services > Device Manager.
2. Select the required adapter.
3. Select the Managed Devices tab.
4. Click on the required device row (not on the link in the Name column).
5. In the General tab, in Network Element Site click to select the network element in Explorer.
You can edit the adapter configuration and enable or disable the adapter, set the logging level and polling cycle, specify the number of concurrent routers to poll in each polling cycle, and select the required collection parameters. You can also edit any adapter-specific parameters. To add or remove devices from an adapter, see Managed Devices.
To edit adapters:
1. In the applications bar in Crosswork Hierarchical Controller, select Services > Device Manager. A list of the adapters appears in the Adapters pane.
2. Select the required adapter.
3. Click the General tab.
4. Configure the following options:
◦ Enabled: Whether the adapter is enabled or disabled.
◦ Logging Level: The logging level (Info, Critical, Error, Warning, Debug). Info by default.
◦ Polling Cycle (sec): The polling interval in seconds.
◦ Number of concurrent routers collected: The number of network elements that can be concurrently polled in a polling cycle.
◦ Timeout for data persisting: The timeout for data persisting.
◦ Enable provisioning support: Whether to enable provisioning support. For example, if provisioning is enabled, creating a new tunnel or service.
5. Configure the SSH CONFIGURATION PARAMETERS (for adapters that are configured to work with SSH):
◦ Enable Tunnel: This enables the tunnel.
◦ Tunnel Host: The tunnel host.
◦ Tunnel Port: The tunnel port.
◦ Tunnel Credentials Key: The tunnel
◦ Router Connect timeout: The router connect timeout.
◦ Router Command timeout: The router command timeout.
6. Configure the FILE BRINGER PARAMETERS:
◦ Enable File Bringer: This enables the module in the adapter to transfer the files from the remote file server to Crosswork Hierarchical Controller.
◦ File Server Location: The file server location In the format http/sftp://<ip>:port/<path>.
◦ File Type: For example, CSV, JSON.
◦ Authentication
◦ Backup File Server Location: The backup file server location In the format http/sftp://<ip>:port/<path>.
◦ Backup_server_authentication
7. Configure the NETFUSION COLLECTION CYCLES FILES:
◦ Enable NetFusion Cycles mode: Whether to get the files periodically or not.
◦ Cycle Directories Location: Where to store the files received in Crosswork Hierarchical Controller.
8. Configure any other adapter-specific parameters, if any.
9. Configure the COLLECTION PARAMETERS (common to all IP adapters):
◦ Use host_name_domain_name device ID format
◦ Enable Topology Collection
◦ Enable IGP IS-IS Collection
◦ Enable IGP OSPF Collection
◦ Enable Interface Stats Collection
◦ Enable VRF Collection
◦ Enable LLDP Collection
◦ Enable MLPS Tunnels Collection
◦ Enable LSP Stats Collection
◦ Enable SNMP Collection
◦ IGP IS-IS Priority
◦ Collect only IGP IS-IS seed routers
◦ Allow to use loopback IP as management IP
◦ Enable RSVP Collection
◦ Enable collection of optics and coherent DSP
◦ Enable Segment Routing Collection
◦ Enable collection of optics and coherent DSP statistics
10. Click Save.
Adapter types are installed by Cisco. An adapter is an instance of an adapter type. Each adapter instance is deployed with its own service pack even if the same adapter image is used. An adapter instance is created immediately after the corresponding service pack is installed. The installed adapter appears in Device Manager without additional user interactions.
To add additional adapters of the same type:
● Use the command:
sedo service install <adapter-service-pack-file> --inject DYNAMIC_APP_GUID=<other name>
To add or remove devices from an adapter, see Managed Devices.
Limitation:
● In Cisco Crosswork Hierarchical Controller 8.0, when adding an adapter, the adapter will be added using the ‘sedo service install <adapter-service-pack-file>’ command. At times it may be required to run more instances per adapter. In such a case it is required to manually input the DYNAMIC_APP_GUID and make sure it is different than the default. In Cisco Crosswork Hierarchical Controller 8.0, there is no validation of the param used, hence there is a potential for the param used to be an illegal param which could lead to adapter not loading properly until removed and re-added correctly. If an additional adapter instance is required use the following command:
sedo service install <adapter-service-pack-file> --param DYNAMIC_APP_GUID=<adapter guid>
Where the adapter guid must be validated prior to running the command.
Service names constraints:
● contain no more than 253 characters
● contain only lowercase alphanumeric characters, '-' or '.'
● must start and end with an alphanumeric character
For more information see Kubernetes Object Names and IDs and DNS subdomain name
The list of adapters in Device Manager includes all created adapter instances regardless of what services have been removed or are non-operational. An adapter is not removed from the list during an adapter service pack upgrade and the previous configuration is not lost. To manually remove an adapter, contact Cisco Support.
View Adapter Events
You can view the user-driven and system-driven events for a specific adapter. The adapter events vary according to the adapter type.
To view adapter events:
1. In the applications bar in Crosswork Hierarchical Controller, select Services > Device Manager. A list of the adapters appears in the Adapters pane.
2. Click to select the required adapter.
3. Select the Events tab.
4. The event table details:
◦ Timestamp
◦ Status
◦ Status Description
There are different sets of CNC adapters for each use case:
| Use Case |
Required Adapters |
| RON Automation |
CNC adapter - Inventory, physical & IGP topology, SR, service discovery CDG adapter - PM collection iOS-XR adapter - RON inventory and topology NSO NED+FP - RON link provisioning. |
| RON Automation Starter |
iOS-XR adapter - RON inventory and topology NSO NED+FP - RON link provisioning |
| IP/Optical Multi-layer Visualization |
CNC adapter - Inventory, physical & IGP topology, SR, service discovery CDG adapter - PM collection |
| IP/Optical Multi-layer Visualization + LxVPN Provisioning |
CNC adapter - Inventory, physical & IGP topology, SR, service discovery CDG adapter - PM collection NSO NED+FP - RON link provisioning |
Cisco Crosswork Hierarchical Controller Adapters Architecture
CNC Adapters Important Information
Never have IOS-XR (cisco‑ios‑xr‑adpt) and CNC adapter (cisco-cnc-adpt) running with both collecting topology or inventory.
If you want CNC to run alongside IOS-XR the topology/inventory discovery of CNC needs to be disabled.
● Combined provisioning use case:Manually add the devices in Device Manager and assign them to both IOS-XR (with management IP and credentials) and CNC (with discovery marked as false). CNC needs to have provisioning enabled.
When you try to provision in Service Manager it will automatically use the CNC adapter.
● Pure CNC use case:Do not install IOS-XR adapter, install CNC, and enable topology/inventory and any other configuration you're interested in.
Do note that while CNC does collect most of what IOS-XR collects, it's not a complete replacement (most notably is ZRs, which CNC does not collect).
● Pure IOS-XR use case/RON Starter Kit:Do not install CNC adapter, install IOS-XR, and enable all options. Install NSO adapter and select Use internal nso. Add devices manually and assign to both IOS-XR and NSO. When you try to provision in Service Manager it automatically uses the internal NSO.
Adapter Prerequisites for RON Solution
The following prerequisite is applicable for the full RON solution when both the cisco-cnc-adpt and cisco‑ios‑xr‑adpt adapters are used.
The following attributes (mainly topology collection) under COLLECTION PARAMETERS must be enabled/disabled on the adapters before modelling the devices in Crosswork Hierarchical Controller.
cisco-cnc-adpt
Configure the following options on the adapter before modelling the devices in Crosswork Hierarchical Controller.
Disable the following on the adapter:
● Enable Topology Collection
● Enable L3VPN Collection
Enable the following on the adapter:
● Enable L1 IGP IS-IS Collection
● Enable L2 IGP IS-IS Collection
● Enable Sr-Policy Collection
● Enable Rsvp-Te Collection
cisco-ios-xr-adpt
Configure the following options on the adapter before modelling the devices in Crosswork Hierarchical Controller.
Disable the following on the adapter:
● Use host_name_domain_name device ID format
● Enable IGP IS-IS Collection
● Enable IGP OSPF Collection
● Enable Interface Stats Collection
● Enable VRF Collection
● Enable MLPS Tunnels Collection
● Enable LSP Stats Collection
● Enable SNMP Collection
● IGP IS-IS Priority
● Collect only IGP IS-IS seed routers
● Enable RSVP Collection
● Enable Segment Routing Collection
Enable the following on the adapter:
● Enable Topology Collection
● Enable LLDP Collection
● Allow to use loopback IP as management IP
● Enable collection of optics and coherent DSP
● Enable collection of optics and coherent DSP statistics
Managed Devices
The following statuses are available per device (and as a total for all the devices) in the Managed Devices table in Device Manager.
|
|
Information Types |
||
| Possible values |
Inventory |
Topology |
Statistics |
| OK |
When the adapter collecting the specific info type successfully reached the device NMS system or device itself and discovered the device data. |
||
| ERROR |
When the adapter collecting the info type reached the device but could not collect the required information, for example, wrong credentials, command type error, or no data. |
||
| UNREACHABLE |
When the adapter collecting the info type failed to reach the device, typically because of a problem with connectivity. |
||
| WARNING |
N/A |
N/A |
When the adapter that collects statistics failed to get the data of some device ports. |
| UNKNOWN |
When no status was reported by the adapter. This occurs when there is an internal communication error. Refer this to support. |
||
Crosswork Hierarchical Controller sends SYSLOG events when the device reachability state changes.
Add Device and Assign to Adapters
You can add a device, and then assign it to one or more adapters.
Ensure that you have added the required credential before assigning the device to an adapter. See Credentials.
To add a device:
1. In the applications bar in Crosswork Hierarchical Controller, select Services > Device Manager. A list of the adapters appears in the Adapters pane.
2. Select the Managed Devices tab.
3. Click Add Device.
4. In the General tab, enter the Name.
5. In Network Element Site, click to select a site where the device is located.

6. Select the network element from the list or select the 3D Explorer tab to select the network element on the map.
7. Click OK.
8. Select the Adapters tab.
9. Click Assign device to a new adapter.
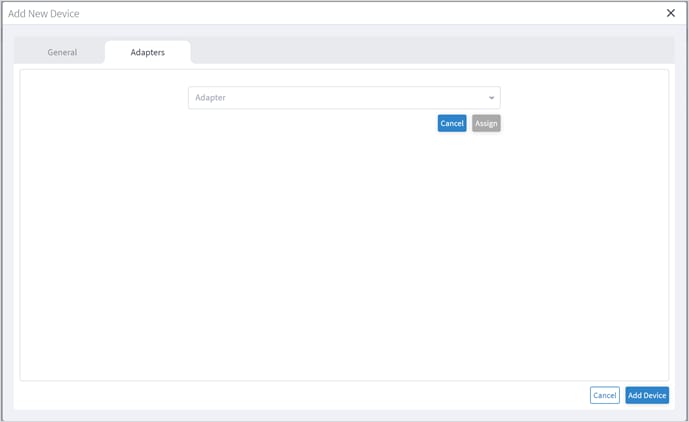
10. Select the adapter to assign the device to and click Assign.
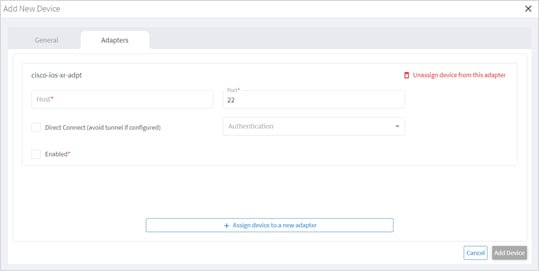
11. Complete the details for the adapter (these will vary according to the adapter type). For example:
◦ Host
◦ Port
◦ Direct Connect (avoid tunnel if configured)
◦ Authentication (this is the credential)
◦ Enabled
12. Repeat for as many adapters as required.
13. Click Add Device.
Assign Device to an Adapter
You can assign a device to one or more adapters.
To assign a device:
1. In the applications bar in Crosswork Hierarchical Controller, select Services > Device Manager.
2. Select the Managed Devices tab.
3. Click on the required device row (not on the link in the Name column).
4. Select the Adapters tab.
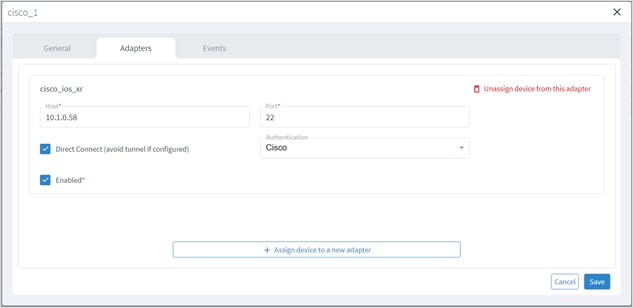
5. Click Assign device to a new adapter.
6. Select an Adapter and click Assign.
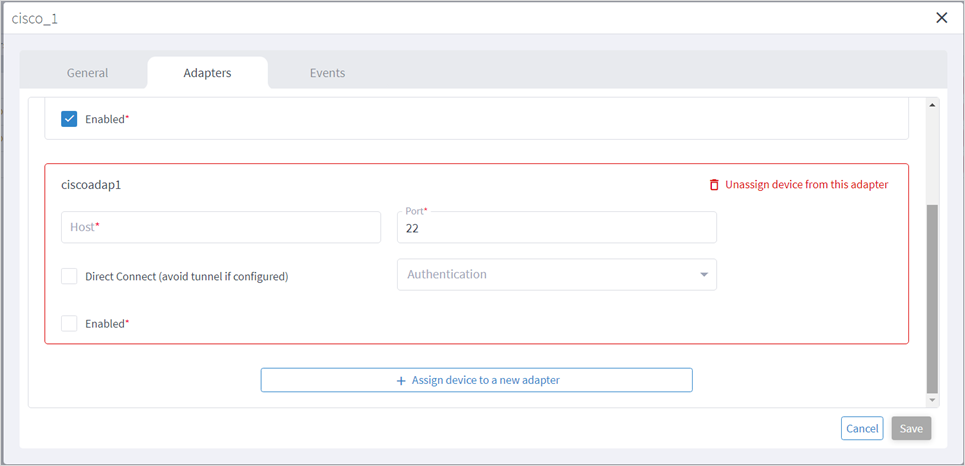
7. Complete the following:
◦ Host
◦ Port
◦ Direct Connect (avoid tunnel if configured)
◦ Authentication (this is the credential)
◦ Enabled
8. Click Save.
You can unassign a device from an adapter. The device is removed from the adapter but remains in the model.
To unassign a device from an adapter (from the device):
1. In the applications bar in Crosswork Hierarchical Controller, select Services > Device Manager.
2. Select the Managed Devices tab.
3. Click on the required device row (not on the link in the Name column).
4. Select the Adapters tab.

5. Click Unassign device from this adapter.
6. Click Save.
You can view the events for a device. The adapters poll the devices periodically.
To view device events:
1. In the applications bar in Crosswork Hierarchical Controller, select Services > Device Manager.
2. Select the Managed Devices tab.
3. Click on the required device row (not on the link in the Name column).
4. Select the Events tab.

5. Click on an event to see the details.
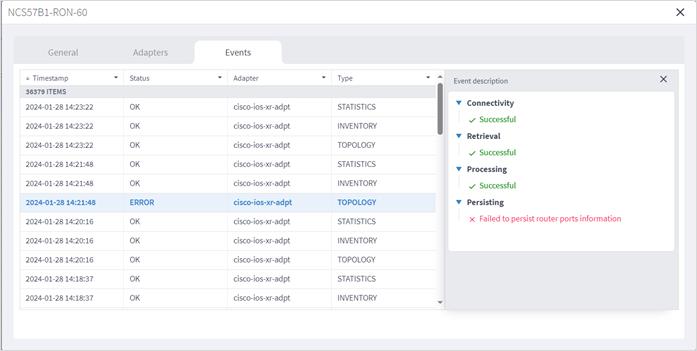
You can edit a device and select the network element in Explorer, assign the device to an adapter or unassign the device from an adapter.
To edit a device:
1. In the applications bar in Crosswork Hierarchical Controller, select Services > Device Manager.
2. Select the required adapter.
3. Select the Managed Devices tab.
4. Click on the required device row (not on the link in the Name column).
5. In the General tab, in Network Element Site click to select the network element.
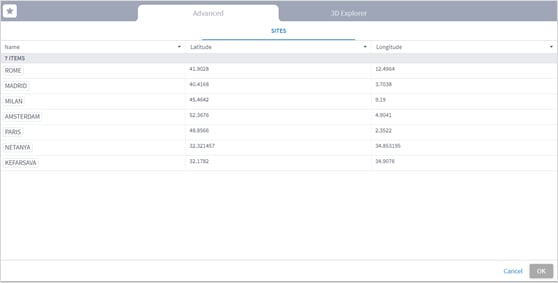
6. Select the network element from the list or select the 3D Explorer tab to select the network element on the map.
7. Click OK.
8. Select the Adapters tab.
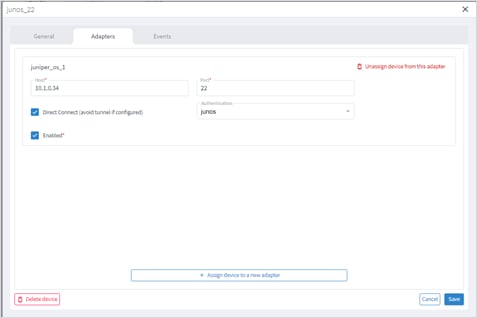
9. To unassign the device from an adapter, click Unassign device from the adapter.
10. To assign the device to an adapter, click Assign device to a new adapter.
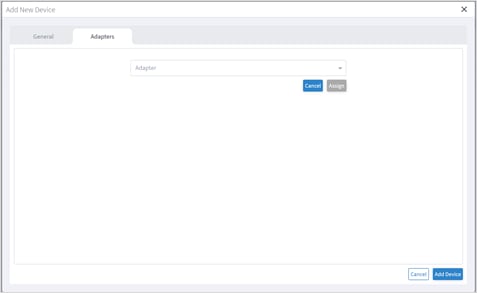
11. Select the adapter to assign the device to and click Assign.

12. Complete the details for the adapter (these will vary according to the adapter type). For example:
◦ Host
◦ Port
◦ Direct Connect (avoid tunnel if configured)
◦ Authentication (this is the credential)
◦ Enabled
13. Click Save.
You can delete a device and unassign it from its adapters. The device is deleted from the model.
Alternatively, if you want to keep the device in the model, and only unassign the device, see Unassign Device.
To delete a device:
1. In the applications bar in Crosswork Hierarchical Controller, select Services > Device Manager.
2. Select the required adapter.
3. Select the Managed Devices tab.
4. Click on the required device row (not on the link in the Name column).
5. Click Delete device. A confirmation message appears.
6. Click Confirm to delete the device, unassign it from all adapters and delete the device from the model.
The network model includes regions (the geographical areas where network sites are located) and sites (the logical groupings in the network). In addition, resources can be tagged with a text label which then can be used to filter in various applications.
For more on regions and sites, see the Cisco Crosswork Hierarchical Controller Network Visualization Guide.
Grouping Sites
You may group sites in Model Settings. This is especially useful when sites are physically close to each other. For example, create a parent site A that includes child sites B, C, and D.
Now consider the scenario where a link connects site B to site Z , and that site Z is not grouped and does not have a parent site. When you zoom out in 3D Explorer you will see site A, and as this is not connected to site Z, the link between site B and site Z is not visible.
To resolve this issue, you must have the same depth/number of levels for all sites. If a site does not have a physical parent site, you should add a placeholder site to the model. In this way, when you zoom out, the links will be visible.
For example, if you have 4 levels in your site hierarchy, 4 levels must be applied across the entire model. This requires the creation of placeholder sites to complete the necessary structure.
Note: It is recommended that this be done using scripts and JSON instead of manually adding this. For assistance with this, contact Cisco Support.
Important: Be consistent with site depths and maintain the same number of levels across the entire model.
Resources can be tagged with a text label (using key:value pair). You can view, add, or delete tags in the Model Settings application (or using the Tags API).
Tags can be used as follows:
● In Explorer, for example, you can filter the 3D map by links tags – this applies to the links that are visible in the map (logical, OMS), and you can select which tags to use as a map filter.
● In the Network Inventory application, you can show tags as columns.
● In the Path Optimization application, you can run a test on tagged links, and exclude tagged links from the path.
● In the Network Vulnerability application, you can run a test on tagged routers.
● In the Root Cause Analysis application, you can filter results by tag.
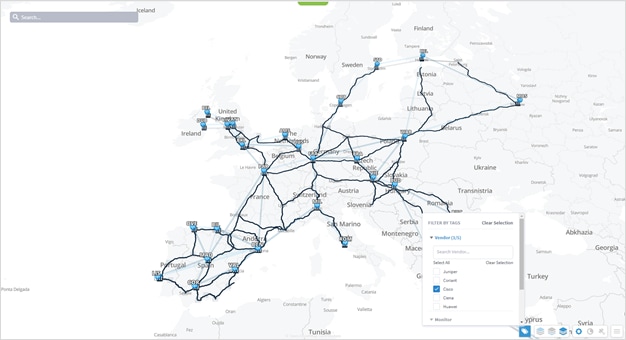
To view the tags in Model Settings:
1. In the applications bar in Crosswork Hierarchical Controller, select Model Settings.
2. Select the Tags tab.
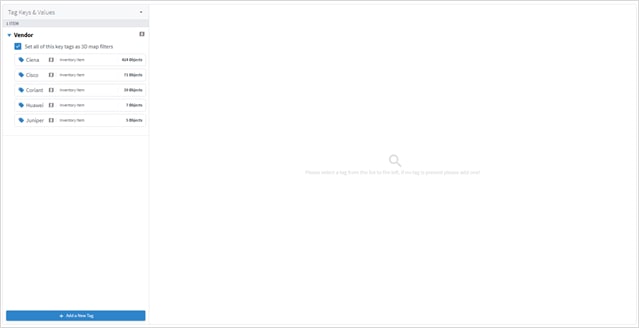
3. To view the tags, expand the tag key and select the value, for example, expand Vendor.
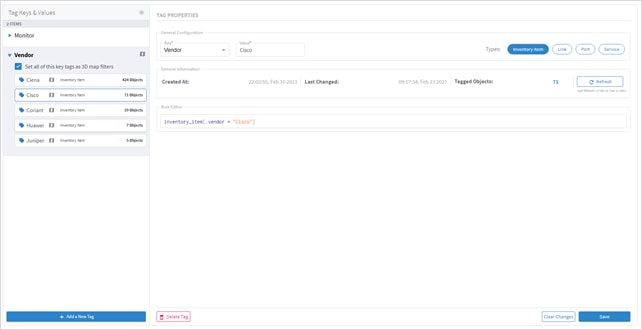
You can add a new value to an existing tag or add a new tag.
To add tags in Model Settings:
1. In the applications bar in Crosswork Hierarchical Controller, select Model Settings.
2. Select the Tags tab.
3. Click Add a New Tag.
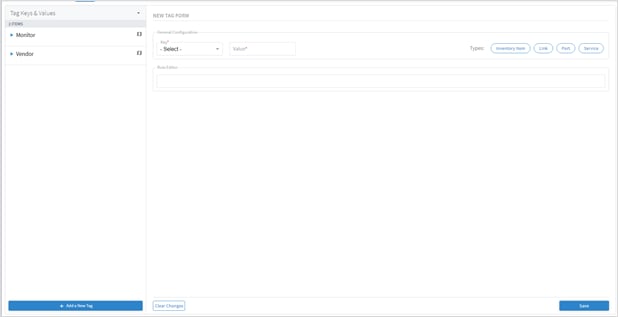
4. To add a new key, from the Key dropdown, select Add New Key.
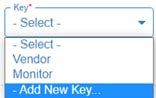
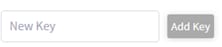
5. Enter a key name and click Add Key.
6. To add a new value to an existing key, from the Key dropdown select an existing key, and then enter a new Value.

7. In the Rule Editor, select the required resources to apply the key and value to, for example, inventory_item | port and then click Save. The key entry is added, and you can see how many objects are tagged.
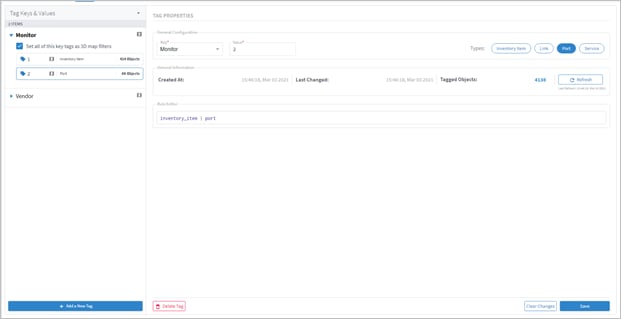
To delete tags in Model Settings:
1. In the applications bar in Crosswork Hierarchical Controller, select Model Settings.
2. Select the Tags tab.
3. Expand the required tag key and select a tag value.
4. Click Delete Tag.
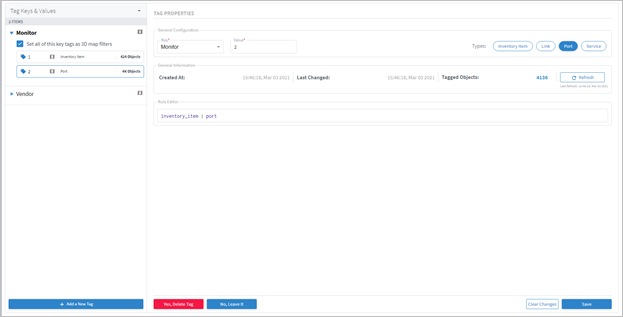
5. Click Yes, Delete Tag.
You can view a list add, update, and delete tag events.
To view tag events in Model Settings:
1. In the applications bar in Crosswork Hierarchical Controller, select Model Settings.
2. Select the Events tab.
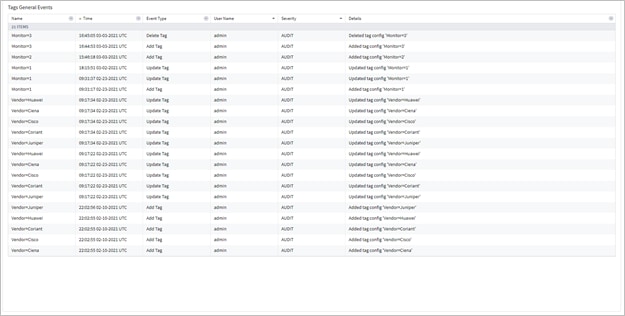
Tags can also be added or changed by API or SHQL.
Get Devices by Tags
You can get devices by tags using the SHQL app.
● To return all devices that are tagged with the Vendor tag set to Ciena (using SHQL):
inventory[.tags.Vendor has ("Ciena")]
Add Tag to Device
You can create a tag and assign the tag with a value to a device (or several devices) using the tags API. This API uses an SHQL rule as a parameter. All devices returned by the SHQL rule are tagged with the specified value. For example, this creates a Vendor tag and assigns the value Ciena to all the inventory items with vendor equal to Ciena.
| POST "https://$SERVER/api/v2/config/tags" -H 'Content-Type: application/json' -d "{ \"category\": \"Vendor\", \"value\": \"Ciena\", \"rules\": [ \"inventory_item[.vendor = Ciena" }" |
| Parameter |
Description |
| category |
The tag category, for example, Vendor. |
| value |
The value to tag the device with, for example, Ciena. |
| rules |
The SHQL rule to apply. The rule MUST return items. Use the following in the rules: regions, tags, site, inventory. |
For example, you can add tags to devices by using a query that returns all devices in a specific region:
| POST "https://$SERVER/api/v2/config/tags" -H 'Content-Type: application/json' -d "{ \"category\": \"Region\", \"value\": \"RG_2\", \"rules\": [ \"region[.guid = \\\"RG/2\\\"] | site | inventory\" ] }" |
You can delete a tag.
| DELETE "https://$SERVER/api/v2/config/tags/Vendor=Ciena" |
Regions
Regions are the geographical areas where network sites are located. The Model Settings application enables you to view and filter regions, delete regions, export regions, and import regions. Cisco will usually collaborate with you to set up the regions in your model.
You can view a region in Model Settings.
To view a region in Model Settings:
1. In the applications bar in Crosswork Hierarchical Controller, select Model Settings.
2. Select the Regions tab.
3. To view a region, in Regions, click next to the required region, for example, Connecticut. The map moves to the selected region. The region is outlined.
You can filter the regions.
To filter a region:
1. In the applications bar in Crosswork Hierarchical Controller, select Model Settings.
2. Select the Regions tab.
3. To filter the regions, click ![]() and enter the filter criteria (case insensitive).
and enter the filter criteria (case insensitive).
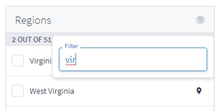
You can delete regions in Regions Manager.
To delete regions in Regions Manager:
1. In the applications bar in Crosswork Hierarchical Controller, select Model Settings.
2. Select the Regions tab.

3. In Regions, select one or more regions.
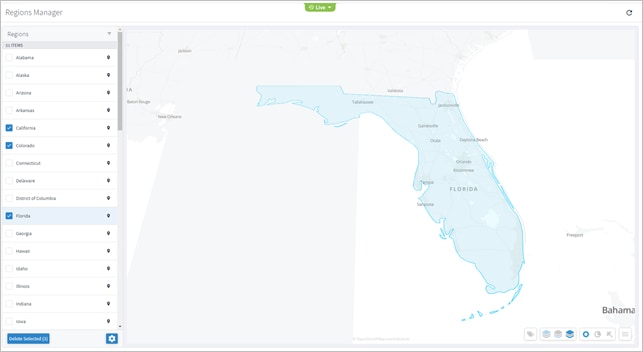
4. Click Delete Selected.

5. To delete the regions, click Yes, delete regions.
Cisco will usually collaborate with you to set up the regions in your model. The regions are set up according to the standards published by http://geojson.io/ and can be exported or imported in GeoJSON or Region POJOs.
You can import (and export) regions in the following formats:
● GeoJSON
● Region POJOs
Valid geometry types for regions are:
● Point
● LineString
● Polygon
● MultiPoint
● MultiLineString
● MultiPolygon
To export regions:
1. In the applications bar in Crosswork Hierarchical Controller, select Model Settings.
2. Select the Regions tab.
3. In Regions, click ![]() .
.
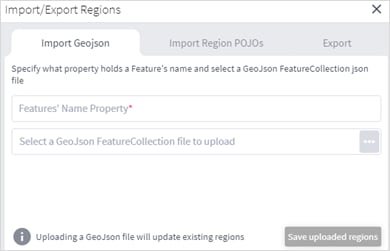
4. To export In Regions, select the Export tab.
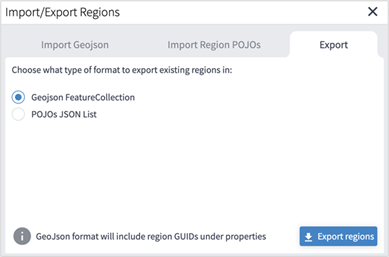
5. Select the required format, and then click Export regions ![]() . The JSON file is downloaded.
. The JSON file is downloaded.
6. (Optional) Use a JSON formatter to review the content.
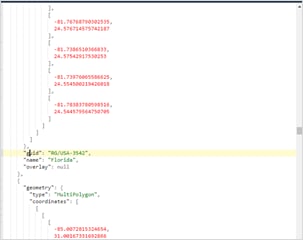
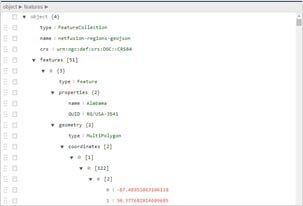
To import regions:
1. (Option 1) Prepare the import file in GeoJSON format:
◦ A quick way to create the file in the correct format is to export the current regions in the required format and then edit the file.
◦ The GeoJSON import file must be a FeatureCollection GeoJSON file and not a single Feature GeoJSON file.
◦ The GeoJSON import file MUST have a region name property that will be specified when you import the file.
◦ The GeoJSON import file may include a GUID for each region. If a GUID is not provided, Regions Manager, generates a GUID for the GeoJSON feature. If a GUID is provided, Regions Manager uses it, and if a region with that GUID already exists it is updated.
◦ Each region name (and GUID if included) must only appear once.
◦ Region names are case insensitive.
◦ If a region already exists either by GUID or with an identical name, when you import the file, a message appears informing you that the region will be updated if you proceed.
2. (Option 2) Prepare the import file in Region POJOs format:
◦ A quick way to create the file in the correct format is to export the current regions in the required format and then edit the file.
◦ The RegionPOJO import file has a fixed format and the region name property is name. This property does not have to be specified when you import the file.
◦ The RegionPOJO import file must include the region GUID as a property.
◦ Each region name and GUID must only appear once.
◦ Region names are case insensitive.
◦ If a region already exists (by name or GUID), when you import the file, a message appears informing you that the region will be updated if you proceed.
3. In the applications bar in Crosswork Hierarchical Controller, select Services > Model Settings.
4. Select the Regions tab.
5. In Regions, click ![]() .
.
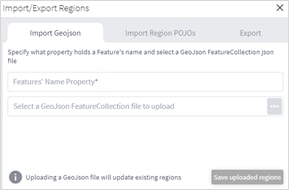
6. To import regions in GeoJSON format:
◦ Enter the property that includes the region name. Typically, this would be name.
◦ Select a file to upload.
7. To import regions in Region POJOs format:
◦ Select the Import Region POJOs tab.
◦ Select a file to upload.
8. Click Save uploaded regions. The JSON file is processed.
9. If there are updates to existing regions, a list of the regions that will be updated appears. To proceed, click Upload and update regions.
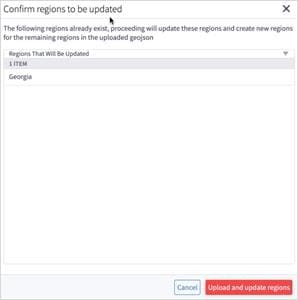
Cisco Sales Engineers will usually set up the regions and overlays in your model. The regions are set up according to the standards published by http://geojson.io/. You can query the model to return the region definition. This returns the region GUID, name, coordinates, and geometry type. Valid geometry types for regions are Point, LineString, Polygon, MultiPoint, MultiLineString, and MultiPolygon.
In Crosswork Hierarchical Controller, devices are attached to sites. Sites have geographical coordinates (latitude, longitude). A site may be in one or more regions.
Overlaps are used to group several regions, for example, the countries in Africa.
There are several APIs that can be used to:
● Get the region definition.
● Get the sites in one or more regions.
● Add regions to an overlay.
● Get the sites in an overlay.
Several samples are listed below:
● To return the RG/1 region definition, run the following GET command:
curl -skL -u admin:admin -H 'Content-Type: application/json' https://$SERVER/api/v2/config/regions/RG/1 | jq
● To return the sites in the Estonia and Greece regions:
● To return the sites in the Estonia and Greece regions:
curl -skL -u admin:admin -H 'Content-Type: text/plain' -d 'region[.name in ("Estonia", "Greece")] | site' https://$server/api/v2/shql
● To add the Estonia and Greece regions to the overlay_europe overlap:
curl -X PUT -skL -u admin:admin -H 'Content-Type: application/json' -d '{"guid": "RG/116", "overlay": "overlay_europe"}' https://$SERVER/api/v2/config/regions/RG/116
curl -X PUT -skL -u admin:admin -H 'Content-Type: application/json' -d '{"guid": "RG/154", "overlay": "overlay_europe"}' https://$SERVER/api/v2/config/regions/RG/154
● To return the sites in the overlay_europe overlay:
https://$SERVER/api/v2/config/regions/RG/154
curl -skL -u admin:admin -H 'Content-Type: text/plain' -d 'region[.overlay = "overlay_europe"] | site' https://$SERVER/api/v2/shql | jq | grep -c name
The regions and overlays can be used in SHQL to query the model. You can transition down the model using link or site.
To return all the links in a specific region (using SHQL):
region[.name = "France"] | link
Sites are the logical groupings in the network. The Model Settings application enables you to view and filter sites, delete sites, export sites, and import sites. Cisco will usually collaborate with you to set up the sites in your model.
The physical objects in the site can be grouped by parent object, which in turn can be grouped by the next level of parent object, and so on. The only limitation is that all sites must have the same number of levels.
You can view a site in Model Settings.
To view a site in Model Settings:
1. In the applications bar in Crosswork Hierarchical Controller, select Model Settings.
2. Select the Sites tab.
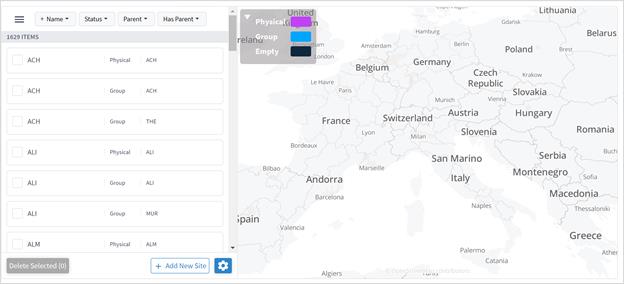
3. To view a site item, in Sites, click the required site item. The map moves to the selected site item.

You can filter the sites, by name, status, parent or has parent.
To filter a site:
1. In the applications bar in Crosswork Hierarchical Controller, select Model Settings.
2. Select the Sites tab.
3. To filter the sites, click and select or enter the filter criteria (case insensitive).
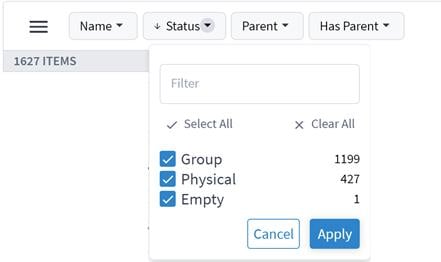
You can delete sites in Sites Manager.
To delete sites in Sites Manager:
1. In the applications bar in Crosswork Hierarchical Controller, select Model Settings.
2. Select the Sites tab.
3. In Sites, select one or more sites.
4. Click Delete selected. A confirmation appears.
5. To delete, click Delete selected.

You can add sites in Sites Manager.
To add sites in Sites Manager:
1. In the applications bar in Crosswork Hierarchical Controller, select Model Settings.
2. Select the Sites tab.
3. Click Add New Site.
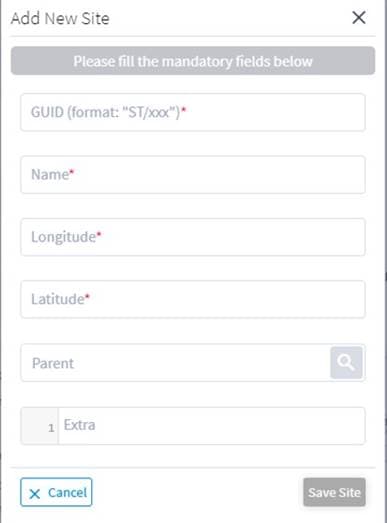
4. Enter the site details. For example, ST/London.
5. Click Save Site.
Cisco will usually collaborate with you to set up the sites in your model. The sites are set up according to the standards published by http://geojson.io/ and can be exported or imported in GeoJSON or Site POJOs.
You can import (and export) sites in the following formats:
● GeoJSON
● Site POJOs
To export sites:
1. In the applications bar in Crosswork Hierarchical Controller, select Model Settings.
2. Select the Sites tab.
3. In Sites, click ![]() .
.
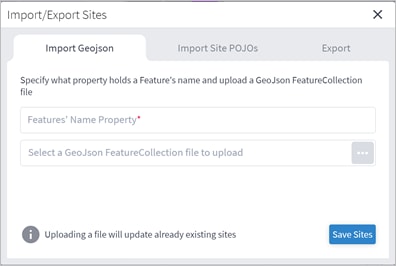
4. To export In Sites, select the Export tab.
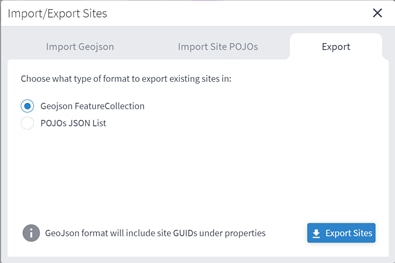
5. Select the required format, and then click Export sites ![]() . The netfusion-sites-geojson.json file is downloaded.
. The netfusion-sites-geojson.json file is downloaded.
6. (Optional) Use a JSON formatter to review the content.
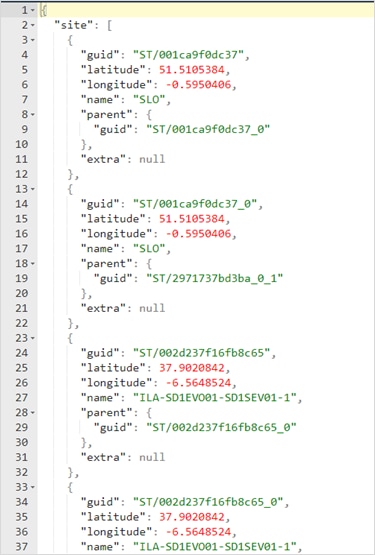
To import sites:
1. (Option 1) Prepare the import file in GeoJSON format:
◦ A quick way to create the file in the correct format is to export the current sites in the required format and then edit the file.
◦ The GeoJSON import file must be a FeatureCollection GeoJSON file and not a single Feature GeoJSON file.
◦ The GeoJSON import file MUST have a site name property that will be specified when you import the file.
◦ The GeoJSON import file may include a GUID for each site. If a GUID is not provided, Sites Manager, generates a GUID for the GeoJSON feature. If a GUID is provided, Sites Manager uses it, and if a site with that GUID already exists it is updated.
◦ Each site name (and GUID if included) must only appear once.
◦ Site names are case insensitive.
◦ If a site already exists either by GUID or with an identical name, when you import the file, a message appears informing you that the site will be updated if you proceed.
2. (Option 2) Prepare the import file in Site POJOs format:
◦ A quick way to create the file in the correct format is to export the current sites in the required format and then edit the file.
◦ The SitePOJO import file has a fixed format and the site name property is name. This property does not have to be specified when you import the file.
◦ The SitePOJO import file must include the site GUID as a property.
◦ Each site name and GUID must only appear once.
◦ Site names are case insensitive.
◦ If a site already exists (by name or GUID), when you import the file, a message appears informing you that the site will be updated if you proceed.
3. In the applications bar in Crosswork Hierarchical Controller, select Services > Model Settings.
4. Select the Sites tab.
5. In Sites, click ![]() .
.
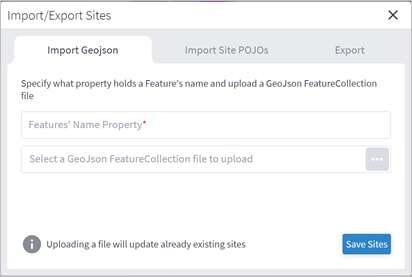
6. To import sites in GeoJSON format:
◦ Enter the property that includes the site name. Typically, this would be name.
◦ Select a file to upload.
7. To import sites in Site POJOs format:
◦ Select the Import Site POJOs tab.
◦ Select a file to upload.
8. Click Save uploaded sites. The JSON file is processed.
9. If there are updates to existing sites, a list of the sites that will be updated appears. To proceed, click Upload and Update Sites.
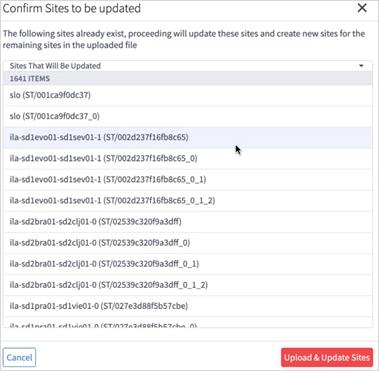
The Hyper Linker enables you to make vendor/controller-specific systems accessible directly from the object in the Crosswork Hierarchical Controller applications such as the Network Inventory application. The user selects the objects in the Crosswork Hierarchical Controller UI (Device, Link, SR Policy) and opens a menu with direct links to view the object in the underlay controller.
The Hyper Linker supports by default rules for CNC and ONC controllers.
To enable this feature, it must follow these rules:
● IP or Optical controllers must provide a direct, contextual URL to the managed objects. For example: https://<controller_dns>/<device name-ip>/faults/
● The Rule Editor allows you to create the hyper linker rules, specifying the URL to link to and the criteria used to apply the link (specified in the predicate field).
The hyperlinks are added as links in the “…” menu of the object and enable opening contextual UI pages in the CO web UI for a specific port, link, device, or SR policy. Users can then easily navigate to further details on the object, saving time and efforts.
The Rule Editor allows you to create the hyper linker rules, specifying the URL to link to and the criteria used to apply the link (specified in the predicate field).
The predicate is serialized JSON, composed of regex string matchers per object field identifier.
● The JSON object is a generic conditional statement that can access the model object’s fields.
● All conditions between fields are evaluated using AND.
● The root keys are the field names. For example: provider
● The values are a regex string or a bool object. For example: ^Adapter1|Adapter2$
● The predicate can access the objects immediate fields, for example: object.json.extra.xxx.yyy
● The predicate can’t access related objects (this is to avoid roundtrip queries to backend getting related object data), for example: object.port_a.speed_bps
● A minimum of one property filter is required. For example:
{
"name": "^Port-\\d$",
"provider": "^Adapter1|Adapter2$"
}
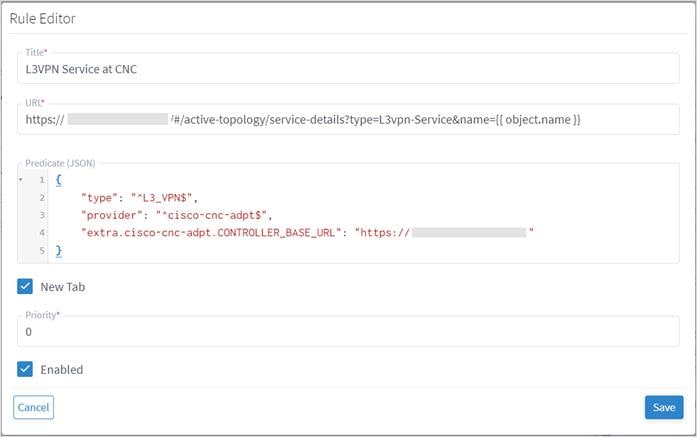
Once you have created a link for an object type, you can then drill-through in the Network Inventory application to the specified link for the selected object.
For example, you can drill-down through a Cisco optical node, to the Cisco Optical Site Manager.
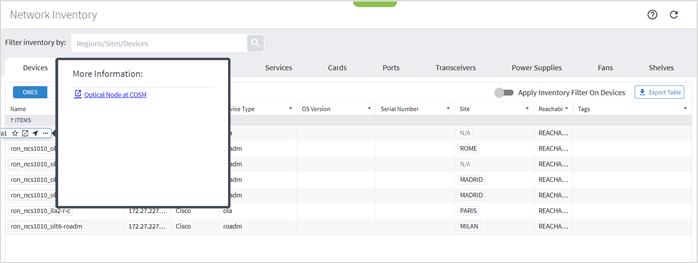
Hyper Linker Adapter Configuration
For the cisco-onc-adpt and cisco-cnc-adpt adapters, you can enable or disable the hyper linker rules.
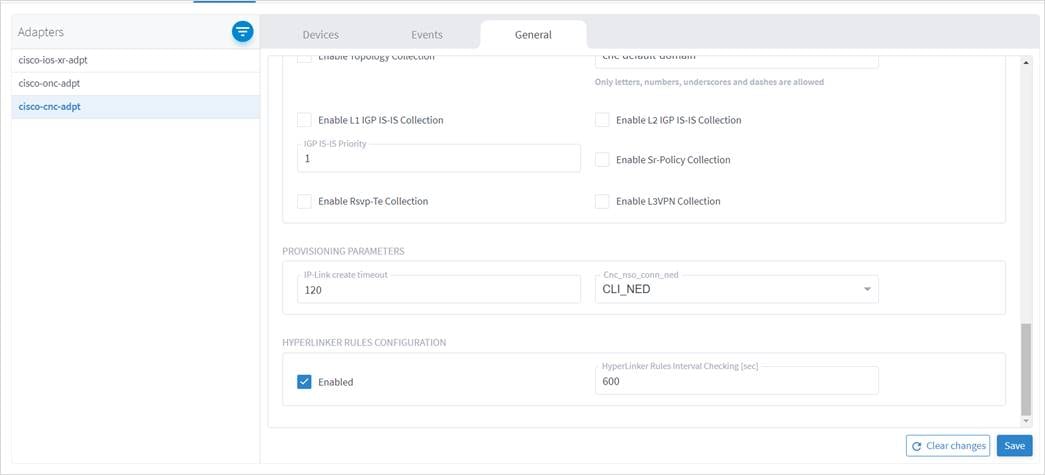
To configure the hyper linker rules for adapters:
1. In the applications bar in Crosswork Hierarchical Controller, select Services > Device Manager. A list of the adapters appears in the Adapters pane.
2. Select the required adapter.
3. Click the General tab.
4. Configure the following options:
◦ Enabled: Whether the hyper linker rules are enabled or disabled for the selected adapter.
◦ HyperLinker Rules Interval Checking (sec): The time between hyper linker rules checks.
Add Rule
You can add a rule for a particular type of object, for example, for an IGO device or L2VPN service.
Note: There are default rules that are installed when the CNC adapter is installed. If these rules are deleted and the CNC adapter is disabled and then enabled, the default rules will appear after a period (there may be a delay).
To add a rule:
1. In the applications bar in Crosswork Hierarchical Controller, select Model Settings.

2. Select the Hyper Linker tab.
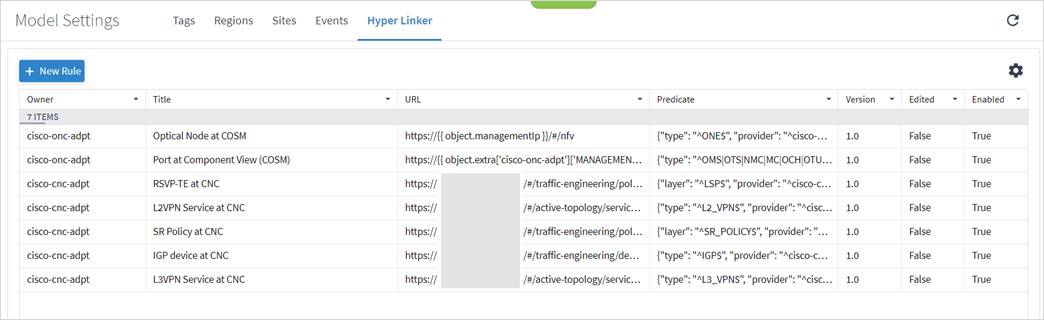
3. Click New Rule.
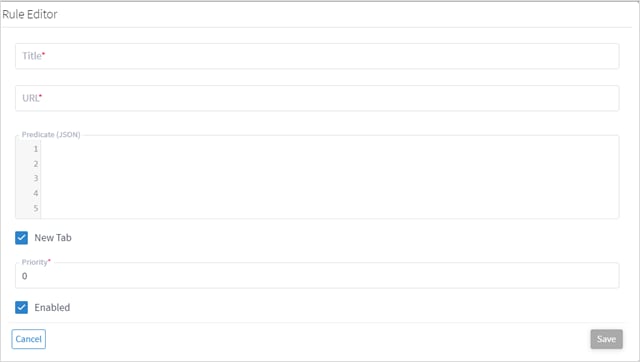
4. Enter the Title.
5. Enter the URL. The URL is based upon a URL construction template, that is, a template using the object fields to construct the controllers URL to reach the relevant page for that object.
For example : https://{{ object.managementIp }}/#/nfv
6. Enter the Predicate (JSON). For example:
{
"type": "^ONE$",
"provider": "^cisco-onc-adpt$"
}
7. Select whether to open in a New Tab.
8. Enter the Priority.
9. Select whether the rule is Enabled.
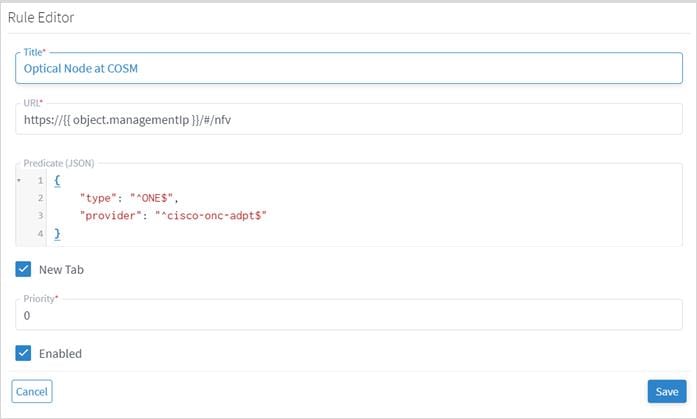
10. Click Save.

Delete Rule
You can delete a rule.
To delete a rule:
1. In the applications bar in Crosswork Hierarchical Controller, select Model Settings.
2. Select the Hyper Linker tab.
3. Select one of the rules.
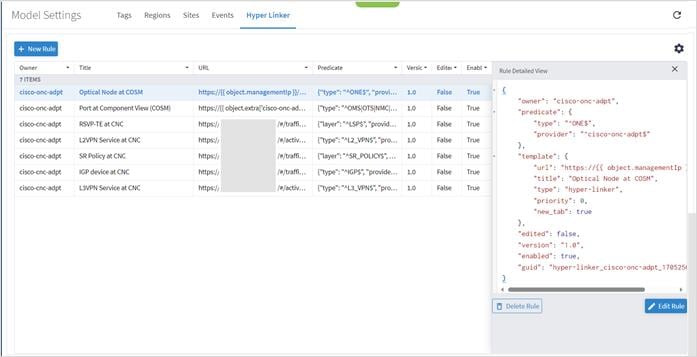
4. Click Delete Rule.
Edit Rule
You can edit a rule.
To edit a rule:
1. In the applications bar in Crosswork Hierarchical Controller, select Model Settings.
2. Select the Hyper Linker tab.
3. Select one of the rules.
4. Click Edit Rule.
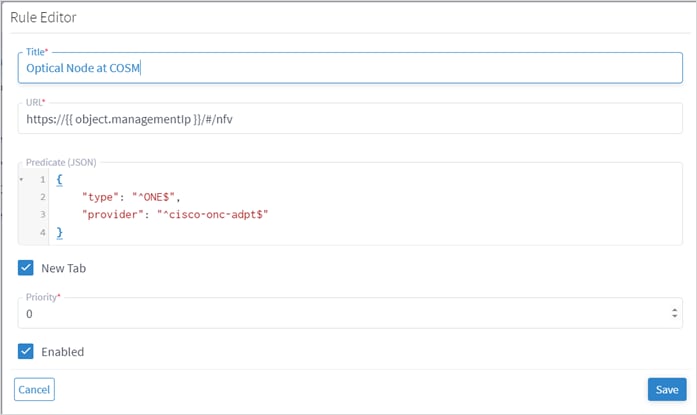
5. Make the required changes.
6. Click Save.
Specify Maximum Number of Hyper Links
You can specify the maximum number of hyper links.
To specify the maximum number of hyper links:
1. In the applications bar in Crosswork Hierarchical Controller, select Model Settings.
2. Select the Hyper Linker tab.
3. Click Configure.

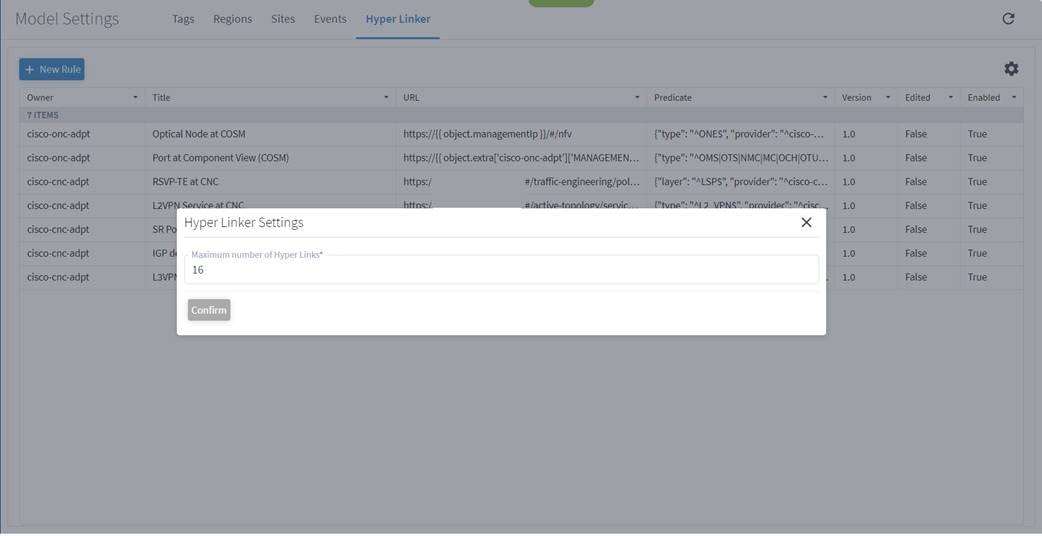
4. Specify the maximum number of hyper links.
5. Click Confirm.
View the Link
You can click to drill-down to the associated link in the Crosswork Hierarchical Controller applications such as the Network Inventory application.
To view the link:
1. In the applications bar in Crosswork Hierarchical Controller, select Network Inventory.
2. Select the required tab.
3. Click … next to the required object.
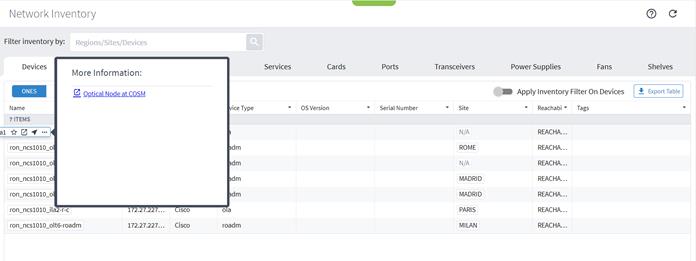
4. Click on the link.
The Link Manager application enables you to manually add and validate inter-links (or cross-links) from IP to optical networks.
You can add Ethernet and NMC cross links manually:
● Ethernet link - Any combination of L1 ETH (port type ETH) and L2 ETH (port type R_PHYSICAL)
● NMC link - Muxponder or Transponder to ROADM add-drop ports
The IP links are validated:
● Periodically (per the configured cycle time)
● Manually by the user
Note: Link validation for Ethernet links is achieved by analyzing PM counters received on the link ports.
Link validation occurs as follows:
● Ethernet link validation is achieved by analyzing PM counters or discovered adjacencies by LLDP or domain controller.
● NMC link validation toggles the Optical Controller power status and correlates it to the live optical power gathered from the ONC controller for the corresponding add/drop port.
View Cross Link Info
You can select a cross link and view the summary information. The Provider column indicates whether the cross link was manually added or detected by the network (this is true for NMC cross links only).
The following statuses apply to ETH cross links:
| Status |
Description |
| Unknown |
If there are no statistics or no clear result from the available statistics, this is the expected state. |
| Deduced |
Created by CROSS_MAPPER when the opposite-side cross-link is discovered and a path is present. Note: This type is deprecated from this table. |
| Conflict |
If one of the selected endpoints of the cross link is already in use by another signaled adjacency link. |
| Not Correlated |
The cross-link ports were found to be 'not connected' by the statistics. |
| Inconclusive |
The statistical outcome of the correlation was close, but not sufficient to determine correlation. |
| Never Validated |
A full cycle of validation was never completed. |
| Validated [By <Method>] |
Cross link has been validated successfully either by signaled adjacency (Port Adjacency) or statistics (Correlation). |
The following statuses apply to NMC (optical) cross links:
| Status |
Description |
| Unknown |
The cross-link ports are not available physically. |
| Validated By Shut No Shut |
Cross link has been validated successfully. |
| Validated By Shut No Shut Failed |
Cross link validation by Shut No Shut failed. |
| Never Validated |
Validation was initiated, but a full cycle of validation was never completed. |
To view the cross link info:
1. In the applications bar in Crosswork Hierarchical Controller, select Link Manager.
2. Click on a cross link.
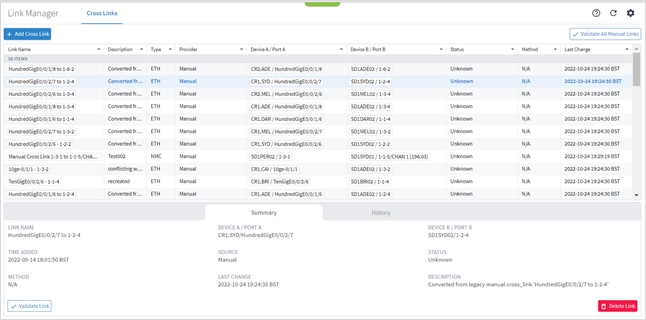
You can add an Ethernet or NMC cross link.
To add a cross link:
1. In the applications bar in Crosswork Hierarchical Controller, select Link Manager.
2. Click Add Cross Link.
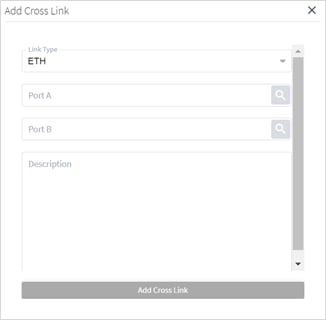
3. To add link, in the Link Type, select ETH or NMC.
4. For Port A and Port B, click ![]() . In the Ports tab, select a port, or click on the 3D Explorer tab to select a port. Click OK. For NMC cross links
. In the Ports tab, select a port, or click on the 3D Explorer tab to select a port. Click OK. For NMC cross links
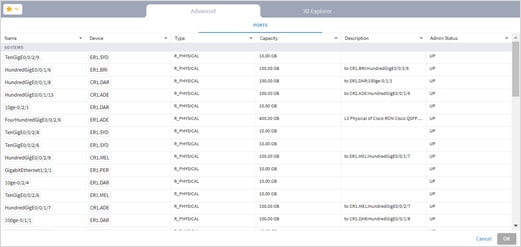
Note: For more information on 3D Explorer, see the Cisco Crosswork Hierarchical Controller Network Visualization Guide.
5. Add a Description.
6. Click Add Cross Link.
Validate All Manual Cross Links
You can validate all manual cross links. For an Ethernet link, if there is a conflict between a manually added cross link and a cross link detected from the network, the manually added link is removed from Cisco Crosswork Hierarchical Controller network model. Such links remain in a separate table, and you can view them in the Link Manager application. This also removes all cross links that are marked as deleted.
Note: Validating all manual links applies to Ethernet links only.
To validate manual cross links:
1. In the applications bar in Crosswork Hierarchical Controller, select Link Manager.
2. Click Validate all Manual Links. The Status is updated.
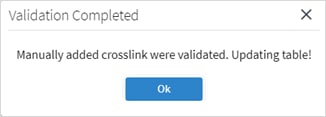
3. Click OK.
You can validate a manual cross link.
To validate a manual cross link:
1. In the applications bar in Crosswork Hierarchical Controller, select Link Manager.
2. Select the required manual link.
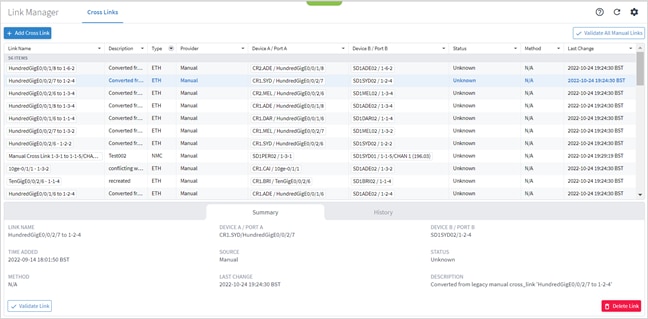
3. In the lower pane, click Validate Link.
4. Click Ok.
From version 7.0, you can validate an NMC link, that is, a link from a Transponder/Muxponder to a ROADM. This validation toggles the Optical Controller power status and correlates it to the live optical power gathered from the ONC controller for the corresponding add/drop port.
Note: This may take several minutes and may disrupt traffic during that period.
To validate an NMC link:
1. In the applications bar in Crosswork Hierarchical Controller, select Link Manager.
2. Click on an NMC cross link.
3. In the Summary tab, click Validate Link. This may impact on traffic.
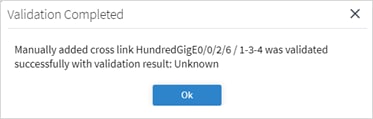
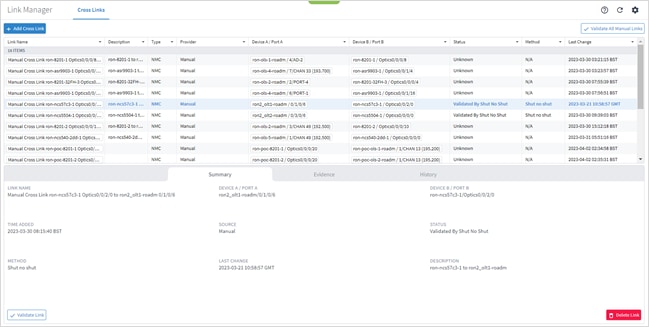
4. Click Confirm.
5. To view the link validation results, click the Evidence tab. The blue line represents the configured ZR Port value over time, and the red line shows the readings from the optical port. You can hover over any of the points in the graph to see the actual values, where -50 dBm indicates zero power. There is an initial wait period after the shutdown before the readings start. This is indicated in the flat line once the validation is initiated. The Status of the link changes from Unknown to Validated By Shut No Shut.

6. To view the history of the link, select the History tab. The Action Type indicates when the link was inserted, deleted, or updated.
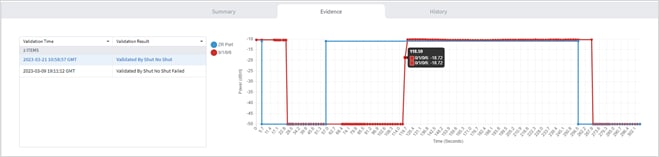
You can delete a manual cross link. The cross link is marked as deleted and is removed when the next validation runs.
To delete a manual cross link:
1. In the applications bar in Crosswork Hierarchical Controller, select Link Manager.
2. Select the required manual link.
3. In the lower pane, click Delete Link.
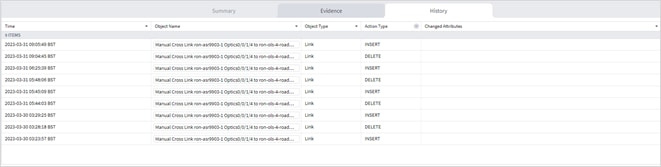
4. Click Confirm.
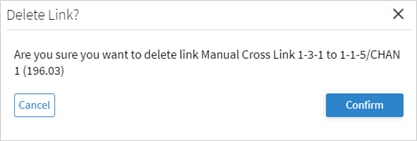
5. Click Ok.
6. Select the deleted cross link and click on the History tab to view the DELETE action.
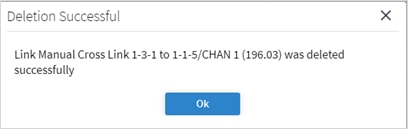
The link is removed when the next validation runs.
You can set the validation cycle time.
To set the validation cycle time:
1. In the applications bar in Crosswork Hierarchical Controller, select Link Manager.
2. Click ![]() .
.

3. In the ETH validation tab, select the Validation Cycle Time.
4. Click Confirm.
You can set the validation settings.
The following settings apply to NMC cross links:
| Status |
Description |
| Power on [dbm] |
Expected power [dbm] when port is up. |
| Power off [dbm] |
Expected power [dbm] when port is off. |
| Timestamp precision [sec] |
The time between the shut/no-shut and the change in the power. |
| Number of cycles |
The number of times to perform the shut/no-shut. |
| Wait periods to receive samples while on [sec] |
The time to wait for samples from the device for the on check. |
| Wait periods to receive samples while off [sec] |
The time to wait for samples from the device for the off check. |
| Sample Interval [sec] |
The interval between samples of the optical power, which are compared to the configured power of the router port/laser/DCO (Digital Coherent Optics). |
| Buffer for power off/on [dbm] |
The permitted difference between the expected power and the power read. For example, if the router power is set to -10 and the optical power reading is -15, this is acceptable. A power reading of -21 would not be acceptable. Similarly, for power off: the max allowed read value for off is expected + buffer, the min allowed read value for off is configured - buffer. |
To set the validation settings:
1. In the applications bar in Crosswork Hierarchical Controller, select Link Manager.
2. Click ![]() .
.
3. Select the NMC Validation tab.
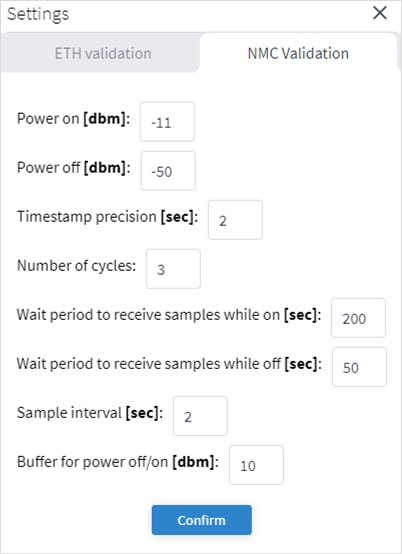
4. Specify the settings.
5. Click Confirm.
[1] OWASP (Open Web Application Security Project) is an organization that focuses on Web application security. One of its endeavors is to publish a list of the top 10 vulnerabilities.
[2] CWE (Common Weakness Enumeration) is an international organization that provides a unified, measurable set of software weaknesses.