Cisco Crosswork Hierarchical Controller 7.0 Installation Guide
Available Languages
Bias-Free Language
The documentation set for this product strives to use bias-free language. For the purposes of this documentation set, bias-free is defined as language that does not imply discrimination based on age, disability, gender, racial identity, ethnic identity, sexual orientation, socioeconomic status, and intersectionality. Exceptions may be present in the documentation due to language that is hardcoded in the user interfaces of the product software, language used based on RFP documentation, or language that is used by a referenced third-party product. Learn more about how Cisco is using Inclusive Language.
- US/Canada 800-553-2447
- Worldwide Support Phone Numbers
- All Tools
 Feedback
 Feedback
This document is an installation guide for Cisco Crosswork Hierarchical Controller with High Availability. Cisco Crosswork Hierarchical Controller implements intra-node resiliency and a three-node cluster for inter-node resiliency and geo-redundancy.
The document explains:
● Crosswork Hierarchical Controller Intra-Node Resiliency
● Crosswork Hierarchical Controller Installation Prerequisites
● Install Crosswork Hierarchical Controller
● Install Cisco Network Services Orchestrator Crosswork Hierarchical Controller Function Pack
● Crosswork Hierarchical Controller Three-node Cluster
● Configure HA Cluster
Note: For more details on managing the HA cluster, see the Cisco Crosswork Hierarchical Controller Administration Guide.
Cisco Crosswork Hierarchical Controller Intra-Node Resiliency
The Cisco Crosswork Hierarchical Controller workload is comprised of plug-in and core containers:
● Plug-in containers are applications and adapters.
● Core containers are the core manager module (Brain), the database, the Web server and more.
Both plug-in and core containers are protected against failure:
● Plug-in containers are monitored and checked for their health status by Brain. In the event of a failure, Brain restarts the container. Plug-in containers are state-less, the new instance starts after connecting to Brain and starts accepting calls.
● Core containers are monitored by docker-daemon and docker-compose. They are automatically restarted by docker in the event of a failure. These containers are state-full and use persistent volumes.
If docker stops responding, the OS level system utility restarts it.
|
|
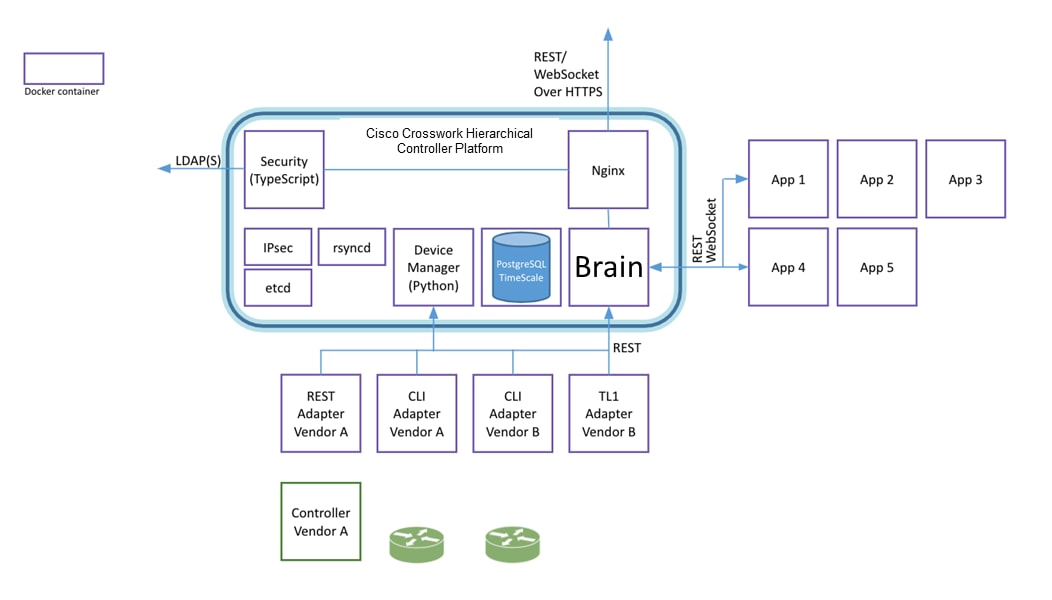
Cisco Crosswork Hierarchical Controller Architecture
Cisco Crosswork Hierarchical Controller Prerequisites
This spec is for active and standby or standalone instances of Crosswork Hierarchical Controller.
| Hardware |
Requirement |
| CPU |
10 Cores |
| Memory |
96 GB |
| Storage – for lab |
400 GB SSD |
| Storage – for production (Only for Crosswork Hierarchical Controller storage, not including OS needs) |
3 TB disk. These partitions are recommended: OS partitions – 500 GB Data partition for Crosswork Hierarchical Controller – 2000 GB For expansion – 500 GB The data partitions (as a minimum) must use SSD. For more details on the calculated storage, see Solution Dimensions. |
| VMs |
1 |
The witness node is the third node in the ‘three-node-cluster’ high availability solution of Crosswork Hierarchical Controller.
| Hardware |
Requirement |
| CPU |
8 Cores |
| Memory |
16 GB |
| Storage |
256 GB SSD |
| VMs |
1 |
The Crosswork Hierarchical Controller application can be installed on the following supported Operating Systems:
● RedHat 7.6 EE or 5.9
● Oracle Linux 8.4
● CentOS 7.6
The OS can be installed on bare-metal or VM (Virtual Machine) servers.
The client machine requirements are:
● PC or MAC
● GPU
● Web browser with GPU hardware acceleration support
● Recommended
◦ Screen resolution 1920x1080
◦ Google Chrome web browser
Note: GP U is mandatory to properly get all the benefits of the network 3D map
Crosswork Hierarchical Controller is designed to model, analyze, and perform provisioning operations in very large networks with hundreds of thousands of network elements, and millions of sub-NE and topology elements such as shelves, ports, links, tunnels, connections, and services. This document provides an analysis of the scale of the solution.
Before going into an in-depth analysis of the capabilities and limitations of Crosswork Hierarchical Controller, it is worth mentioning that the system has been successfully deployed for a few years over a network with about 12,000 optical NEs and 1,500 core and edge routers and growing to 19,000 NEs. This deployment uses direct access to the equipment, which is the most demanding case as explained below.
When designing a network controller like Crosswork Hierarchical Controller, one needs to consider the following potential scalability bottlenecks:
● Communicating with the NEs
● Storing the network model in the database
● Rendering the data in the UI
● Processing network data in applications
Crosswork Hierarchical Controller model capacity is currently specified as following:
| Components |
Model Capacity |
| NEs |
20,000 |
| Links |
150,000 |
| Ports |
500,000 |
| LSPs |
10,000 |
| L3VPNs |
100,000 |
| SDN Controllers |
4 |
Note the above model capacity is based on our deployment experience. However the actual number is larger as the footprint can be increased (scaled up) to handle larger network capacity. Further assessment is possible on demand.
The Crosswork Hierarchical Controller GUI can manage the following number of concurrent users with a typical distribution of roles:
| Role |
Number of Users |
|
| Read-only |
Access to Crosswork Hierarchical Controller Explorer UI. |
100 (All) |
| Operational |
Access to Crosswork Hierarchical Controller Explorer UI and all applications, some of which can change the network. |
Less than 50 |
| Administrator |
Full control over configuration and all users. |
Can be 100 (All) |
The storage volume required for Crosswork Hierarchical Controller production depends on the amount of storage needed for performance counters and for daily DB backups.
The performance monitoring storage is calculated based on the number of client ports and the amount of time the counters are stored. The ballpark figure is 700 MB for 1000 ports.
The detailed formula to calculate the storage is:
<uncompressed data>=<number of ports>*<samples per day>*<number of days>*60
Storage = (<uncompressed data>*0.1)+<daily backup size>*<number of days>*<number of months>
Taking the following assumptions into account:
● Samples – samples per day
● Sample size per port – 60 bytes
● Days – number of days the PM data is stored
● Compression ratio – data is compressed in DB, at a ratio of ~10%
● Daily backup – ~60 MB per day
● Number of backup day – default is for last 7 days
● Number of backup months – default is 3 months
● Use NTP to synchronize all clocks between the network elements.
● Ensure that the required ports are available and that the relevant ports are open to communicate with the network, managers and controllers (e.g. SNMP, CLI SSH, NETCONF). See the Ports section.
● Download the installation files (one image for the platform and one for the applications) to a directory of your choice.
● Ensure that no firewalls prevent access between the Crosswork Hierarchical Controller platform and the remote hosts.
● Run a ‘yum’ update to make sure that any recent OS patches are installed (see recommendations here when no internet access is available: https://access.redhat.com/solutions/29269).
The following are the default port requirements if the items listed in the Description column are used. You can configure these ports differently.
| User |
Role |
Description |
| Inbound |
TCP 22 |
SSH remote management |
| TCP 80 |
HTTP for UI access |
|
| TCP 443 |
HTTPS for UI access |
|
| Outbound |
TCP 22 |
NETCONF to routers |
| UDP 161 |
SNMP to routers and/or ONEs |
|
| TCP 389 |
LDAP if using Active Directory |
|
| TCP 636 |
LDAPS if using Active Directory |
|
| Customer Specific |
HTTP for access to an SDN controller |
|
| Customer Specific |
HTTPS for access to an SDN controller |
|
| TCP 3082, 3083, 2361, 6251 |
TL1 to optical devices |
Install Crosswork Hierarchical Controller
Install the Crosswork Hierarchical Controller Platform
The platform installation installs the Crosswork Hierarchical Controller platform and the 3D Explorer application.
To install Crosswork Hierarchical Controller:
1. Go to the directory where the .sh installation file is downloaded.
2. Execute the installation command as root:
sudo su -
bash ./<file name>.sh
The installation procedure requires no input from you during the installation. The installation procedure checks the HW resources and if there are insufficient resources, an error is raised, and you can either abort or resume the installation. In the event of other failures, contact your local Cisco support team.
After the installation is complete, type sedo -h to enter the Crosswork Hierarchical Controller command line tool. Type the command version to check that the version was installed properly.
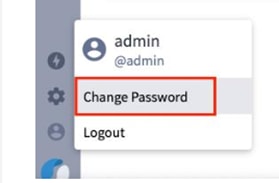
3. Log in to the Crosswork Hierarchical Controller user interface – https://server-name or IP with the user admin and password admin.
4. In the applications bar in Crosswork Hierarchical Controller, select User Profile > Change Password. The default admin password must be changed.
Install Crosswork Hierarchical Controller Applications
To install an application:
1. Obtain the netfusion-apps.tar.gz file which contains the application that needs to be installed or upgraded, and copy it to the Crosswork Hierarchical Controller server.
2. Run the command:
sedo import apps [netfusion-apps.tar.gz file]
View Installed Crosswork Hierarchical Controller Applications
To view the installed Crosswork Hierarchical Controller applications:
1. After the installation is complete, ensure that you have root access to the OS where Crosswork Hierarchical Controller is installed, and type sedo -h to open the sedo utility by Sedona.
2. Run the following command to see which applications are installed:
sedo apps list
The output displays the installed applications with their ID, name and if they are enabled or not. All applications, except system applications (e.g. Device Manager) are disabled by default.
Enable or Disable Applications
Installed applications can be enabled and disabled using a sedo command.
To enable or disable applications:
1. To enable an application, run the command:
sedo apps enable [application ID]
The application only appears in Crosswork Hierarchical Controller explorer after the application is enabled. If Crosswork Hierarchical Controller Explorer is already open, refresh the page. The application icon appears in the applications bar on the left.
2. To disable an active application, run the command:
sedo apps disable [application ID]
After disabling the application, the icon is no longer visible in the applications bar.
Upgrade Crosswork Hierarchical Controller Applications
It is possible to upgrade an application without re-installing the Crosswork Hierarchical Controller platform.
To upgrade an application:
1. Obtain the netfusion-apps.tar.gz file which contains the application that needs to be installed or upgraded, and copy it to the NetFusion server
2. Run the command:
sedo import apps [netfusion-apps.tar.gz file]
Note: If the upgraded application was enabled before upgrading the Crosswork Hierarchical Controller platform, the existing instance is automatically shut down and a new upgraded instance is started
Add Network Adapters and Discover Network Devices
For instructions on how to add network adapters and discover network devices, refer to the Cisco Crosswork Hierarchical Controller Administration Guide.
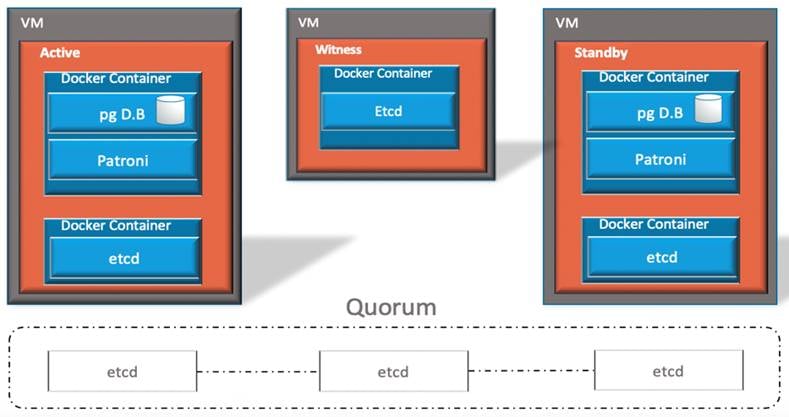
Cisco Crosswork Hierarchical Controller Three-node Cluster
Cisco Crosswork Hierarchical Controller implements a high availability architecture using a three-node, active-standby-witness cluster.
The three-node cluster guarantees continuous operation with a quorum of at least two nodes. In the event of a failure, a decision to take control is automatically taken by the quorum.
The advantage of the quorum is that it avoids having the risk of two active nodes unaware of each other. Such risk is high for system that makes changes in the network.
In this architecture, two nodes function as the active and standby systems and the third node acts as a witness which, together with either one of the other nodes, creates the quorum.
All nodes are connected via a full mesh of IPsec tunnels and have distributed datastore for persistent cluster configuration using the etcd tool.
Users (and REST APIs) access the front end using a separate Virtual IP (VIP). The IPsec tunnel is used for the HA replication.
The architecture makes use of features in PostgresSQL and two components for the distributed datastore and DB cluster.
The number of nodes in the cluster must be three.
PostgresSQL
PostgresSQL is the Cisco Crosswork Hierarchical Controller DB. It stores the network model, operational and configuration tables.
When two instances of the DB are installed, they can be configured as a primary and standby with replication to keep the DBs synced.
etcd
etcd is a strongly consistent, distributed key-value store that provides a reliable way to store data that needs to be accessed by a distributed system or cluster of machines. It gracefully handles leader elections during network partitions and can tolerate machine failure, even in the leader node.
Cisco Crosswork Hierarchical Controller uses etcd to maintain the quorum and the cluster configuration. etcd is installed on each node in the cluster and Patroni uses it to get indication on its accessibility to the quorum.
Patroni
Patroni is the HA solution for PostgreSQL with cloud-native features and advanced options for failover and failback.
PostgreSQL takes care of its own process, and Patroni monitors the PostgreSQL service and its replication status in distributed systems such as etcd, zookeeper or Consul. If PostgreSQL goes down, then Patroni, serving as a bot, starts electing a new primary PostgreSQL. If the old PostgreSQL comes back up, then Patroni adds them back to the cluster.
Patroni runs in the same container with PostgreSQL.
|
|

Patroni Acting as a Bot
All three nodes are installed with Cisco Crosswork Hierarchical Controller, the third node, the witness, does not run the adapters and the applications.
The nodes communicate via an IPsec tunnel with IKEv2 and IP50 ESP.
All nodes should be in the same network with IP reachability. They can be deployed in the same datacenter or in remote datacenters if there is a good quality bandwidth (at least 1Gbps) and low latency (no more than 100ms) between them.
Cisco Crosswork Hierarchical Controller does not come with a load balancer. It is recommended to connect the integrated systems (Cisco Crosswork Hierarchical Controller, controllers, network, Orchestrator) to a load balancer to guarantee continuous service in the event of a failure.
The two instances are synced with regards to the network model, configuration, and network statistics data, and these are immediately replicated to the DB running on the secondary Crosswork Hierarchical Controller node.
New applications and adapter images, as well as the 3D maps and certificates, are synced with the rsync tool on a fixed interval and can also be triggered by the dedicated sedo command (sedo ha sync).
Cisco Crosswork Hierarchical Controller Operations
Normal State
Under normal conditions, all nodes are connected and the first node that manages to write its status to the cluster configuration datastore (etcd) takes control and becomes the active node. This is done by Patroni in PostgreSQL.
Discovery (adapters) and applications run on the active node only.
Adapters and applications on the standby system run in Monitoring mode, and depending on the implementation potentially could test connectivity to controllers or from OSSs to applications that export an NBI.
In this normal state, all nodes are in the quorum and Patroni in both nodes reads the cluster configuration continuously.
The other node becomes the standby and the third node, the witness, continues monitoring the configuration.
|
|
Normal Operation
Active Node Connectivity Failed
If the active node loses connectivity to other nodes, its etcd locks itself to reading once it identifies it is in minority. Patroni automatically demotes itself once it fails to read the datastore of etcd. Brain identifies that the active node connectivity failed and moves itself and all containers to standby mode.
The other two nodes are now in quorum and they vote to switch the standby node to become the active.
|
|
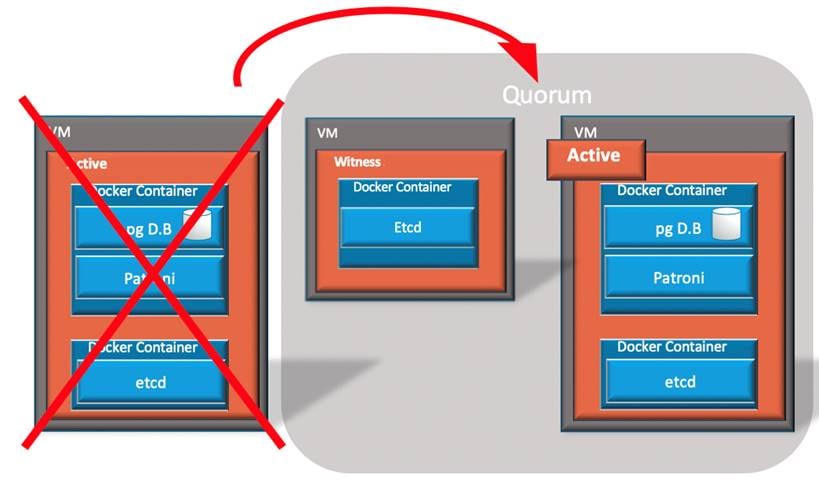
Active Node Failed
All Nodes Lose Connectivity
If all nodes lose connectivity to each other, there is no quorum and the active and standby nodes lock themselves down and demote all their containers.
Witness Node Loses Connectivity
When the witness node loses connectivity, the two nodes still have quorum and can vote for a primary and secondary. The active node remains active if no other changes occur.
Reversion
The cluster failover is non-revertive, and it can operate continuously with any of the nodes as Active. Manual switchover is supported.
Configure HA Cluster
To configure a HA cluster, you need a virtual IP (VIP). This is used by the front end to connect to the applications running on the leader node. The IT administrator determines the VIP and interfaces.
Note: While the VIP is typically used to connect to the front-end container, the VIP interface is configured at the OS level and can be used to reach any container.
Note: For more details on managing the HA cluster, see the Cisco Crosswork Hierarchical Controller Administration Guide.
To configure the HA cluster:
1. Ensure that the clocks on all the nodes are synchronized before configuring HA.
2. Ensure that the nodes meet the requirements. See Cisco Crosswork Hierarchical Controller Prerequisites.
3. To create a new cluster on the active node, run the following command:
sedo ha new-cluster ––ipsec-address HOST [--subnet SUBNET] [--dns-server HOST]
--vip-address VIP --vip-intf INTF
where
––ipsec-address is the public name of this host (DNS label or IPv4)
--subnet is the internal IPsec tunnel subnet (default: 172.16.237.0/24)
--dns-server is the DNS server to resolve hostnames (optional)
--vip-address is the virtual IPv4 address with netmask in CIDR format
--vip-intf is the interface to which the virtual IP will be added, for example, eth0
4. Add the standby node to the cluster. This action erases the data on the current (standby) node. Run the following command on the standby node:
sedo ha add-cluster --remote-api-address REMOTE --remote-api-username USERNAME
--ipsec-address HOST [--no-verify] --vip-intf INTF [-f]
where
--remote-api-address is the public name of the remote cluster (DNS label or IPv4)
--remote-api-username is the cluster administrator username, used to access the front end
--ipsec-address is the public name of this host (DNS label or IPv4)
--no-verify means ignore verifying the SSL certificate on remote API calls
--vip-intf is the interface to which the virtual ip will be added
-f means do not prompt for confirmation
5. To confirm that you want to continue, type:
Y
6. When prompted, enter the password.
The database is replicated (if you check the status while it is being replicated, the Role is Replica).
7. Once the database is replicated, its Role is Sync Standby. See Check HA State.
8. Add the witness node to the cluster. This action erases the data on the current (witness) node. Run the following command on the witness node:
sedo ha add-cluster --remote-api-address REMOTE --remote-api-username USERNAME
––ipsec-address HOST [--no-verify]--witness [-f]
where
--remote-api-address is the public name of the remote cluster (DNS label or IPv4)
-–remote-api-username is the cluster administrator username, used to access the front end
–-ipsec-address is the public name of this host (DNS label or IPv4)
–-no-verify means ignore verifying the SSL certificate on remote API calls
--witness sets this node as a witness
-f means do not prompt for confirmation
9. To confirm that you want to continue, type:
Y
10. To check the state, run the following command:
sedo ha state
IPsec Tunnels
+---+-------------+-------------------+-------------------+---------------+---------------+
| | State | From | To | From Subnet | To Subnet |
+---+-------------+-------------------+-------------------+---------------+---------------+
| 1 | ESTABLISHED | 10.56.118.102 | 10.56.118.82 | 172.18.2.0/24 | 172.18.1.0/24 |
| 2 | ESTABLISHED | 10.56.118.110 (*) | 10.56.118.82 | 172.18.3.0/24 | 172.18.1.0/24 |
| 3 | ESTABLISHED | 10.56.118.102 | 10.56.118.110 (*) | 172.18.2.0/24 | 172.18.3.0/24 |
+---+-------------+-------------------+-------------------+---------------+---------------+
etcd Nodes
+---+----------------+---------+--------+
| | Endpoint | Status | Errors |
+---+----------------+---------+--------+
| 1 | 172.18.2.1 | started | |
| 2 | 172.18.3.1 (*) | started | |
| 3 | 172.18.1.1 | started | |
+---+----------------+---------+--------+
Database Nodes
+---+------------+----------------+--------------+---------+----+-----------+
| | Member | Host | Role | State | TL | Lag in MB |
+---+------------+----------------+--------------+---------+----+-----------+
| 1 | 172.18.1.1 | 172.18.1.1 | sync_standby | running | 22 | 0 |
| 2 | 172.18.3.1 | 172.18.3.1 (*) | leader | running | 22 | |
+---+------------+----------------+--------------+---------+----+-----------+
NetFusion Nodes
+---+-------------------+-------------+---------+
| | Public Address | Internal IP | Role |
+---+-------------------+-------------+---------+
| 1 | 10.56.118.82 | 172.18.1.1 | Standby |
| 2 | 10.56.118.102 | 172.18.2.1 | Witness |
| 3 | 10.56.118.110 (*) | 172.18.3.1 | Active |
+---+-------------------+-------------+---------+
The IPsec tunnels are created between all nodes, the etcd daemon is running on all nodes, the database is running on the active and standby nodes, and there is an indication of the role of each of the nodes.![]()
