Release 2.1: Cisco StadiumVision Mobile SDK Programmer's Guide
Bias-Free Language
The documentation set for this product strives to use bias-free language. For the purposes of this documentation set, bias-free is defined as language that does not imply discrimination based on age, disability, gender, racial identity, ethnic identity, sexual orientation, socioeconomic status, and intersectionality. Exceptions may be present in the documentation due to language that is hardcoded in the user interfaces of the product software, language used based on RFP documentation, or language that is used by a referenced third-party product. Learn more about how Cisco is using Inclusive Language.
- Updated:
- May 26, 2015
Chapter: Cisco StadiumVision Mobile API for Windows Phone
- Introduction to Cisco StadiumVision Mobile SDK for Windows Phone
- Cisco StadiumVision Mobile and Windows Developer Tools
- Download and Unpack the SDK
- Getting Started with the Windows Demo App
- Starting the SDK
- Cisco StadiumVision Mobile Service Up or Down Indicator
- In-Venue Detection
- Set the SDK Configuration at Run-Time
- Get the SDK Configuration
- setConfigWithString API Method
- Get the Available Streamer Servers
- Additional Statistics
- Video Player State Notifications
- Video Player "Channel Inactive" Event
Cisco StadiumVision Mobile API for Windows Phone
First Published: May 26, 2015
Revised: June 12, 2015
This module describes the Cisco StadiumVision Mobile SDK Release 2.1 for Windows Phone and contains the following sections:
- Introduction to Cisco StadiumVision Mobile SDK for Windows Phone
- Cisco StadiumVision Mobile and Windows Developer Tools
- Download and Unpack the SDK
- Getting Started with the Windows Demo App
–![]() Embed the Cisco StadiumVision Mobile SDK in an Existing App
Embed the Cisco StadiumVision Mobile SDK in an Existing App
- How Cisco StadiumVision Mobile Fits into a Windows Phone App
- Cisco StadiumVision Mobile Methods and Functions for Windows
- Adding Cisco StadiumVision Mobile Services to a Windows App—Code Structure and Samples
Introduction to Cisco StadiumVision Mobile SDK for
Windows Phone
The Cisco StadiumVision Mobile Windows SDK contains the following components bundled together:
- .NET components, configuration files, player and layout XML files
- Windows Demo app with SDK video player
- API documentation (Doxygen build)

Note![]() Cisco StadiumVision Mobile client application is designed for Windows Phones 8.1 and later, it is also supported on ARM processor-powered devices. It is not supported on Windows Phones 8.0 and earlier, all tablets, and x86 phone platforms. This means that the Windows Phone Emulator in Visual Studio is not supported because the emulator operates in x86 mode.
Cisco StadiumVision Mobile client application is designed for Windows Phones 8.1 and later, it is also supported on ARM processor-powered devices. It is not supported on Windows Phones 8.0 and earlier, all tablets, and x86 phone platforms. This means that the Windows Phone Emulator in Visual Studio is not supported because the emulator operates in x86 mode.
The API uses.NET classes on Windows to access the Cisco StadiumVision Mobile data distribution and video playback functionality within the Cisco StadiumVision Mobile Windows SDK library. DirectX is used to display video in a SwapChainPanel XAML element. Due to the.NET interface, the Cisco StadiumVision Mobile API can be called by C#/XAML client applications.
Note![]() HTML/Javascript is not supported.
HTML/Javascript is not supported.
Table 4-1 describes the mobile operating system versions supported by the Cisco StadiumVision Mobile SDK.
|
|
|
|
|---|---|---|
|
|
|
|
For additional information, refer to the Cisco StadiumVision Mobile Release Notes available from Cisco.com at:
http://www.cisco.com/c/en/us/support/video/stadiumvision/products-release-notes-list.html
Cisco StadiumVision Mobile and Windows Developer Tools
Table 4-2 lists the various build environment requirements.
|
|
|
|
|
|---|---|---|---|
Development tools: Visual Studio 2013, Professional or Express. |
Complete the following steps below in the same order to enable a successful setup:
Step 1![]() Run Microsoft Windows 8.1, check for and install any additional security patch updates.
Run Microsoft Windows 8.1, check for and install any additional security patch updates.
Note![]() Windows version 8.1 is required if using a Mac. We recommend using BootCamp, however there are multiple ways to emulate a Windows environment (such as virtual machine window or VMWare Fusion) that haven’t been tested.
Windows version 8.1 is required if using a Mac. We recommend using BootCamp, however there are multiple ways to emulate a Windows environment (such as virtual machine window or VMWare Fusion) that haven’t been tested.
Step 2![]() Sign in to or create a Microsoft account at:
Sign in to or create a Microsoft account at:
https://signup.live.com/signup.aspx?lic=1
Step 3![]() Install Visual Studio 2013 Update 4 (or later) Professional or Express.
Install Visual Studio 2013 Update 4 (or later) Professional or Express.
Step 4![]() Plug in your Windows Phone to your workstation using a USB cable.
Plug in your Windows Phone to your workstation using a USB cable.
Step 5![]() Register your open/unlocked device for development at:
Register your open/unlocked device for development at:
https://msdn.microsoft.com/en-us/library/windows/apps/dn614128.aspx
Step 6![]() Obtain the latest StadiumVisionMobileSample-Windows Phone 8-xxxx.zip file, contact your Cisco account team for details as to how to become part of the Cisco StadiumVision Mobile SDK partner program.
Obtain the latest StadiumVisionMobileSample-Windows Phone 8-xxxx.zip file, contact your Cisco account team for details as to how to become part of the Cisco StadiumVision Mobile SDK partner program.
Download and Unpack the SDK
Step 1![]() Download StadiumVisionMobileSample-Windows Phone 8-xxxx.zip. If you do not have this file, contact your Cisco account team for details as to how to become part of the Cisco StadiumVision Mobile SDK partner program.
Download StadiumVisionMobileSample-Windows Phone 8-xxxx.zip. If you do not have this file, contact your Cisco account team for details as to how to become part of the Cisco StadiumVision Mobile SDK partner program.
Step 2![]() Extract the downloaded package into a directory. Table 4-3 lists the extracted content and includes a brief description.
Extract the downloaded package into a directory. Table 4-3 lists the extracted content and includes a brief description.
|
|
|
|---|---|
Contains the SVM header files, static library, and demo app source code. |
Step 3![]() Open the API documentation available in the Doxygen build that is downloaded with the SDK. Navigate to the extracted folder contents, open the SV Mobile for WP81 folder > StadiumVisionMobile > Doxygen > html. Double-click index.html to launch the documentation in a web browser.
Open the API documentation available in the Doxygen build that is downloaded with the SDK. Navigate to the extracted folder contents, open the SV Mobile for WP81 folder > StadiumVisionMobile > Doxygen > html. Double-click index.html to launch the documentation in a web browser.
Getting Started with the Windows Demo App
The Cisco StadiumVision Mobile SDK provided to app developers includes the source code for a Windows Demo app. The purpose of the Demo app is to demonstrate what is possible and to enable a new app developer to quickly get a working app up and running.
Note![]() Before creating a new app, review the Cisco StadiumVision Mobile SDK Best Practices.
Before creating a new app, review the Cisco StadiumVision Mobile SDK Best Practices.
Compile the Demo App
Step 1![]() Launch Visual Studio to import the Demo app.
Launch Visual Studio to import the Demo app.
Step 2![]() Under File > Open > Project/Solution, locate and select CiscoSvmDemo.sln from the extracted folder contents, click Open. You can also launch Visual Studio by double-clicking the CiscoSvmDemo.sln file.
Under File > Open > Project/Solution, locate and select CiscoSvmDemo.sln from the extracted folder contents, click Open. You can also launch Visual Studio by double-clicking the CiscoSvmDemo.sln file.
Step 3![]() Select the applicable device from the center of the icon bar located near the top of the Visual Studio window. If the bar does not show the Device selection, change it to the ARM selection in the Build | Configuration Manager. The Device selection will then be visible.
Select the applicable device from the center of the icon bar located near the top of the Visual Studio window. If the bar does not show the Device selection, change it to the ARM selection in the Build | Configuration Manager. The Device selection will then be visible.
Note![]() It is not possible to operate the Demo app using the Windows Phone emulator, however it is possible to operate the Demo app on a device because the emulator requires x86 support which is not currently available with the Cisco StadiumVision Mobile SDK.
It is not possible to operate the Demo app using the Windows Phone emulator, however it is possible to operate the Demo app on a device because the emulator requires x86 support which is not currently available with the Cisco StadiumVision Mobile SDK.
Although you can manually select a different target, in order for the change to work you must make the change in the Build | Configuration Manager.
- A selection of ARM will change the target to the Device.
- A selection of Win32 will change the target to one of the emulator versions.
Even if you change the target drop-down from the center of the icon bar, Visual Studio will still build for the last platform selected in the Configuration Manager. In order to prevent compatibility issues, you must make the change in the Configuration Manager and not just the target drop-down.
Step 4![]() Click the Build | Rebuild menu bar selection. The build output can be seen in the window at the bottom of the screen made visible by the View | Output menu bar selection.
Click the Build | Rebuild menu bar selection. The build output can be seen in the window at the bottom of the screen made visible by the View | Output menu bar selection.
Step 5![]() Click the device selected above, start the build and run.
Click the device selected above, start the build and run.
Note![]() A device must be registered for development on a Microsoft account and be open (unlocked) in order to function.
A device must be registered for development on a Microsoft account and be open (unlocked) in order to function.
Customize the Demo App
There are many ways to customize the Cisco StadiumVision Mobile Windows demo app including the following:
Step 1![]() Create a copy of the CiscoSvmDemo folder.
Create a copy of the CiscoSvmDemo folder.
Step 2![]() Open the copied CiscoSvmDemo.sln file from the CiscoSvmDemo folder.
Open the copied CiscoSvmDemo.sln file from the CiscoSvmDemo folder.
Step 3![]() Right-click the View Designer link from the VideoPage.xaml entry (located under the SVM Demo project in Solutions Explorer) to open the XAML designer.
Right-click the View Designer link from the VideoPage.xaml entry (located under the SVM Demo project in Solutions Explorer) to open the XAML designer.
Step 4![]() Use the XAML Designer or Blend to make changes as appropriate for the name of the application, additional buttons, and so on. The SwapChainPanel element can contain sizing information and also can be placed in other elements, such as Grid.
Use the XAML Designer or Blend to make changes as appropriate for the name of the application, additional buttons, and so on. The SwapChainPanel element can contain sizing information and also can be placed in other elements, such as Grid.
Note![]() Results are not always predictable and some experimentation is required as the SwapChainPanel element does not give expected results if placed in certain elements such as ViewBox.
Results are not always predictable and some experimentation is required as the SwapChainPanel element does not give expected results if placed in certain elements such as ViewBox.
Step 5![]() After changes are made to the XAML file, build, and then run the changed file as described in Compile the Demo App.
After changes are made to the XAML file, build, and then run the changed file as described in Compile the Demo App.
Embed the Cisco StadiumVision Mobile SDK in an Existing App
Integration Checklist
To embed the Cisco StadiumVision Mobile SDK into an existing app, follow the integration list below:
1.![]() Supported Windows OS and Visual Studio Versions
Supported Windows OS and Visual Studio Versions
–![]() You must be running Windows 8.1 or later with all of the current updates.
You must be running Windows 8.1 or later with all of the current updates.
–![]() Select one of the project templates from Store Apps | Windows Phone Apps.
Select one of the project templates from Store Apps | Windows Phone Apps.
–![]() Add any required permissions to "Package.appxmanifest" using the UI display.
Add any required permissions to "Package.appxmanifest" using the UI display.
–![]() Add a reference to Microsoft Visual C++ 2013 Runtime Package for Windows Phone from the Windows 8.1 Extensions category.
Add a reference to Microsoft Visual C++ 2013 Runtime Package for Windows Phone from the Windows 8.1 Extensions category.
–![]() Add a reference to the StadiumVisionMobile by browsing to "…\SV Mobile for WP81\StadiumVisionMobile\bin\ARM\Debug\StadiumVisionMobile.dll".
Add a reference to the StadiumVisionMobile by browsing to "…\SV Mobile for WP81\StadiumVisionMobile\bin\ARM\Debug\StadiumVisionMobile.dll".
5.![]() Set a Video "SwapChainPanel"
Set a Video "SwapChainPanel"
–![]() Add a "SwapChainPanel" to the player Window’s layout XAML file. SwapChainPanel is not in the Designer Toolbox, but it is derived from the "Grid" component and is manually entered into the XAML text. The SwapChainPanel element can contain sizing information and also can be placed in other elements, such as Grid.
Add a "SwapChainPanel" to the player Window’s layout XAML file. SwapChainPanel is not in the Designer Toolbox, but it is derived from the "Grid" component and is manually entered into the XAML text. The SwapChainPanel element can contain sizing information and also can be placed in other elements, such as Grid.
Note![]() Results are not always predictable and some experimentation is required as the SwapChainPanel element does not give expected results if placed in certain elements such as ViewBox.
Results are not always predictable and some experimentation is required as the SwapChainPanel element does not give expected results if placed in certain elements such as ViewBox.
–![]() The app requires reference to the NuGet package "Newtonsoft.Json" version 6.0.8 or later for the platform "wp81".
The app requires reference to the NuGet package "Newtonsoft.Json" version 6.0.8 or later for the platform "wp81".
–![]() Forward life-cycle notifications to the Cisco StadiumVision Mobile SDK, which is similar to how it’s done the CiscoSvmDemo app sample.
Forward life-cycle notifications to the Cisco StadiumVision Mobile SDK, which is similar to how it’s done the CiscoSvmDemo app sample.
Channel ListBox Window Example
The function "doInBackground" in the CiscoSvmDemo program "VideoPage.xaml.cs" illustrates the following actions:
- Periodically obtains the list of available video channels
- Update the Window’s ListBox with the channel list
Video Channel Selection Example
The following example illustrates the following actions:
Window Life-Cycle Notifications
The client app needs to notify the StadiumVision Mobile SDK of its life-cycle notifications. This allows the StadiumVision Mobile SDK to automatically shut down and restart as needed. Each client Window needs to forward its life-cycle notifications, as shown in the following example:
Configuration
There is one configuration file that must be bundled with any Windows app using the StadiumVision Mobile SDK (shown in Table 4-4 ).
An example set of fields in the "cisco_svm.cfg" file is shown below. These fields must match the channel settings in the Cisco "Streaming Server" for the channels to be accessible by the application.
Wi-Fi AP Info Configuration (Optional)
The "cisco_svm.cfg" config file can optionally include an array of Wi-Fi AP information that will be used by the StadiumVision Mobile SDK for statistics reporting if available. Below is an example Wi-Fi AP info entry in the "cisco_svm.cfg" config file:
How Cisco StadiumVision Mobile Fits into a Windows Phone App
Cisco StadiumVision Mobile Class Overview
Figure 4-1 describes the StadiumVision Mobile classes.
The SVMVideoPlayerPage class is a class within StadiumVisionMobile rather than an inherited class for the app's video page. A connection from the Windows Phone app to the SVMVideoPlayerPage class includes a reference to the "Windows DirectX SwapChainPanel" when the StadiumVisionMobile class is instantiated.
Figure 4-1 StadiumVision Mobile Class
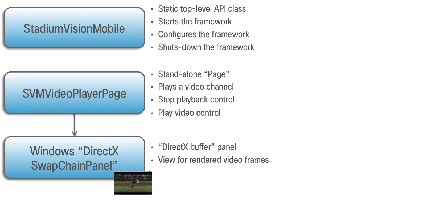
Figure 4-2 depicts the Windows OS with regard to Pages. A Page represents both the screen layout and controller code or Code Behind. A new Page is launched by sending an Event to the Windows OS. An Event is a message to Windows OS to launch a particular page. Extra parameters contained in an Event and are passed to a Page. The back button is typically a hard (sometimes soft) device button used to generically display the previous Page, and moves back down the Page stack.
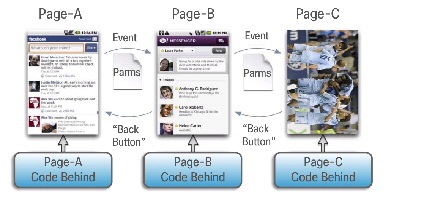
Figure 4-3 depicts the Window inheritance between the Windows OS, Cisco StadiumVision Mobile, and the Customer App.
Figure 4-3 Windows Video Player Window Inheritance
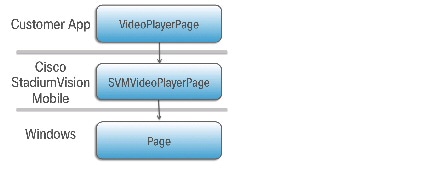
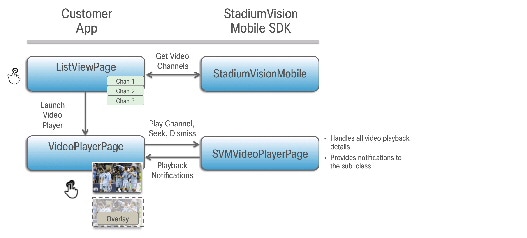
Figure 4-4 Cisco StadiumVision Mobile Integration Overview
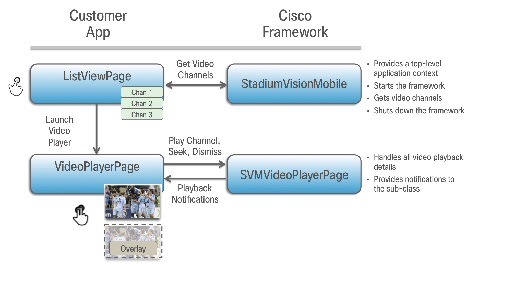
Customer Application Roles
Figure 4-5 illustrates the roles of the customer application. The application must specify:
- Getting the list of video channels
- Displaying the list of video channels
- Handling user gestures for selecting video channels
- Adding video overlays and layouts
- Handling user gestures to control video overlay
Figure 4-5 Customer Application Responsibilities
Cisco StadiumVision Mobile Methods and Functions for Windows
Cisco StadiumVision Mobile Windows API Summary
Table 4-5 summarizes the Windows API library. Detailed API information is available in documentation Doxygen build that is downloaded with the SDK. Navigate to the S V Mobile for WP81 folder > StadiumVisionMobile > Doxygen > html. Double-click index.html to launch the documentation in a web browser.
Return Status Object
Each API call returns an ‘SVMStatus’ object whenever applicable. Table 4-6 lists the SVMStatus object fields.
Table 4-7 lists the dictionary keys and stats description for the getStats API.
Video Player Window API Summary
The SVMVideoPlayerPage class can be extended and customized. Table 4-8 lists the SVMVideoPlayerPage API methods and descriptions.
Adding Cisco StadiumVision Mobile Services to a Windows App—Code Structure and Samples
This section describes the SDK workflow, and contains the following sections:
- Starting the SDK
- Cisco StadiumVision Mobile Service Up or Down Indicator
- In-Venue Detection
- Set the SDK Configuration at Run-Time
- Get the SDK Configuration
- setConfigWithString API Method
- Get the Available Streamer Servers
- Additional Statistics
- Video Player State Notifications
- Video Player "Channel Inactive" Event
Starting the SDK
Start the StadiumVision Mobile SDK from the application’s main Windows launch Page, as shown in the following example.
Cisco StadiumVision Mobile Service Up or Down Indicator
The Cisco StadiumVision Mobile SDK includes an indicator to the application indicating if the SVM service is up or down. This indication should be used by the application to indicate to the user whether the SVM service is available or not. Service is declared 'down' by the SDK when any of the following are true:
- The SDK detects that the video quality is poor.
- The SDK detects that no valid, licensed channel are available.
- The mobile device's Wi-Fi interface is disabled.
Poor video quality can occur when the user is receiving a weak Wi-Fi signal; causing data loss. There are two different ways that the Windows app can get the "Service State" from the SDK:
- Register to receive the "Service Up/Down" notifications.
- Fetch the current service state from the SDK on-demand.
When the app receives the "Service Down" notification, the SDK will supply a bitmap containing the reasons why the service was declared as 'down' by the SDK. The 'reasons' bitmap is given in Table 4-9.
Note![]() For additional Service Down Notification details, refer to “Cisco StadiumVision Mobile SDK Best Practices” section.
For additional Service Down Notification details, refer to “Cisco StadiumVision Mobile SDK Best Practices” section.
Receiving "Service Up/Down" Notifications
The following example shows how to register and handle the "Service Up/Down" notifications from the SDK:
objVpa = new SVMVideoPlayerPage(currentChannel);
Get the Current "Service Up / Down" State On-Demand
The "getServiceState" API method can be used to fetch the current service state from the SDK. The following example shows how to fetch the current service state from the SDK using the "getServiceState" API call:
In-Venue Detection
The StadiumVision Mobile Release 2.1 SDK provides a mechanism to detect whether the mobile device is connected within the SVM-enabled venue or not.
There are two different ways that the Windows app can get this "In-Venue Detection" state from the SDK:
Receiving "In-Venue Detection" Notifications
The following example shows how to register and handle the "In Venue Up/Down" notifications from the SDK:
Get the Current "In-Venue" State On-Demand
The "isConnectedToVenue" API method can be used to fetch the current in-venue state from the SDK. The following example shows how to fetch the current service state from the SDK using the "isConnectedToVenue" API call:
Set the SDK Configuration at Run-Time
The application can set the SDK configuration at run-time through an API method. This allows the application to dynamically configure the SDK. For example, the application can fetch the SDK configuration information from a network connection and then pass that configuration to the SDK.
Two different ways to set the SDK configuration at run-time:
The signature of the "setConfig" API method is given below:
// configure the SDK using an nsdictionary containing the configuration settings
The signature of the "setConfigWithString" API method is given below:
The following example shows how to set the SDK configuration using the "setConfigWithString" API method:
Get the SDK Configuration
The signature of the "getConfig" API method is given below:
The example below fetches the current configuration from the SDK, and then accesses the configuration values in the configuration JSON object:
The following example shows how to set the SDK configuration using the "setConfig" API method:
setConfigWithString API Method
The signature of the "setConfigWithString" API method is given below:
The following example shows how to set the SDK configuration using the "setConfigWithString" API method:
"}";
Get the Available Streamer Servers
The Windows SDK detects the available Streamer servers and provides an API to get the list of servers. A venue will typically only have a single Streamer server. The list is presented as an array of "SVMStreamer" objects.
Each "SVMStreamer" object contains the following properties listed in Table 4-10 .
|
|
|
|
|---|---|---|
Whether this StadiumVision Mobile Streamer server is allowed by the user of this SDK. |
||
The following example shows how to get the list of StadiumVision Mobile Streamer servers detected by the SDK:
Additional Statistics
Beginning with the Cisco StadiumVision Mobile Release 2.0 SDK, the existing "stats" API call returns the following additional categories of stats information:
The signature of the existing "getStats" API method is given below:
Note![]() For a detailed table of the hash keys and stats description for the getStats API refer to Table 4-7.
For a detailed table of the hash keys and stats description for the getStats API refer to Table 4-7.
Table 4-11 details the StatsManager dictionary keys and descriptions.
|
|
|
|---|---|
Number of Reporter stat manager errors other than upload issues (for example, stat generation failures). |
|
Video Player State Notifications
The SDK generates event notifications for each of the video player state transitions (listed in Table 4-12 . The application can listen to these notifications and take action based on the video player's state transitions.
|
|
|
Occurs when the video player closes the video channel session. |
|
Occurs when the video player starts playing the video channel. |
|
The following example shows how to subscribe to receive the video player event messages, and then parse the messages for the (1) channel name and (2) video player state:
SVMChannelListener.objSVMChannelListener.channelChangeEvent
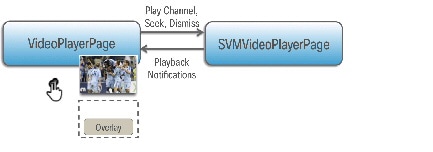
Video Player "Channel Inactive" Event
To detect that a currently playing video channel has become invalid (due to Streamer server admin changes), the SVM video player ("SVMVideoPlayerPage") provides an event to tell the video player sub-class (ie: "VideoPlayerPage") that the currently playing channel is no longer valid.
When a channel becomes invalid, playback of the video channel is automatically stopped.
To receive these callbacks, the "onCurrentChannelInvalid" method must be overridden by the 'SVMVideoPlayerPage' sub-class (ie: "MyVideoPlayerPage"). The following example shows the method signature and implementation of this event method:
Customizing the Default Video Player
This section describes customizing the video player. The default Cisco video player has the following features:
- Implements as a separate Windows "Page."
- Supports fullscreen video views or partial screen views inside the "SwapChainPanel" XAML control.
- Renders video frames using Window "SwapChainPanel."
- Uses a customized video player.
Figure 4-6 Default Cisco Video Player

Figure 4-7 SVMVideoPlayerPage API
Cisco Demo Video Player
- Implemented as "VideoPlayerPage."
- Extends the "SVMVideoPlayerPage" class.
- Handles all video overlays and gestures.
- Uses standard Windows XAML layout files.
The video player’s XAML layout file defines:
- The "SwapChainPanel" video rendering area.
- Any transparent video overlays.
- Play/Pause/Rewind button graphic files.
- Animations used to show/hide the transport controller (splash screen).
The customized video play extends the "SVMVideoPlayerPage" base class, as shown below:
Video Channels
This section describes the Cisco StadiumVision Mobile SDK video channels and contains the following sections:
Getting the Video Channel List
The StadiumVision Mobile SDK dynamically receives all of the available channels (via Wi-Fi multicast). The client application gets an array of channel objects (SVMChannel[]) through the "getVideoChannelArray" API call, as shown in the following example:
Presenting the Video Channel List
Each "SVMChannel" video channel object contains all of the information needed to display the channel list to the user. The SVMChannelObject properties and descriptions are shown in Table 4-13 .
|
|
|
Playing a Video Channel
The following example shows playing a video channel, and performs the following actions:
Seeking Within the Video Buffer
The last 30 seconds of played video is stored in device RAM. The following example shows jumping backwards 20 seconds in the video buffer (instant replay):
The following example shows jumping back to the top of the video buffer ("live" video playback):
Setting the Video Dimensions
The video region is rendered within a SwapChainPanel. The video region is configured using standard Windows layout XAML techniques.
Data Channels
This section describes the Cisco StadiumVision Mobile SDK data channels and contains the following sections:
Getting the Data Channel List
The StadiumVision Mobile SDK dynamically receives all of the available data channels (via Wi-Fi multicast). The client application gets an array of channel objects (SVMChannel[]) through the "getDataChannelArray" API call, as shown in the following example:
Observing a Data Channel
Any data channel can be observed by registering an event to receive callbacks for all data received on that channel. The registered event needs to implement the "ISVMDataObserver" interface, as shown in the following example:
The "onData" method is called to push the received data to the registered class, as shown in the following example:
EVS C-Cast Integration
Note![]() Cisco StadiumVision Mobile is supported with EVS C-Cast version 2.x only. EVS C-Cast version 3.x is not supported.
Cisco StadiumVision Mobile is supported with EVS C-Cast version 2.x only. EVS C-Cast version 3.x is not supported.
The steps below describe a high level workflow of how a Cisco StadiumVision Mobile powered C-Cast app gains access to the XML timeline and media files. Variations are possible, for instance the file list can be polled every few seconds via StadiumVisionMobile.objSVM.getFileChannelArray instead of getting an event as described in Step 2 below.
1.![]() Register an event to be notified when a C-Cast file channel becomes available. For example:
Register an event to be notified when a C-Cast file channel becomes available. For example:
StadiumVisionMobile.objSVM.nativeAPI.fileAvailableEvent += onFileHandler;
2.![]() Register an event to be notified when the media data file becomes available. For example: StadiumVisionMobile.objSVM.nativeAPI.dataAvailableEvent += onDataHandler;
Register an event to be notified when the media data file becomes available. For example: StadiumVisionMobile.objSVM.nativeAPI.dataAvailableEvent += onDataHandler;
3.![]() Handle the file reception (movies/thumbnails/timeline).
Handle the file reception (movies/thumbnails/timeline).
4.![]() Check to see if a file channel is already available using StadiumVisionMobile.objSVM.getFileChannelArray
Check to see if a file channel is already available using StadiumVisionMobile.objSVM.getFileChannelArray
5.![]() If a channel is already available or when a callback notification is received, register a file channel event handler.
If a channel is already available or when a callback notification is received, register a file channel event handler.
6.![]() Wait for the timeline to arrive via multicast on the data channel. At the same time, other files may arrive on the file channel.
Wait for the timeline to arrive via multicast on the data channel. At the same time, other files may arrive on the file channel.
–![]() Each time a new file arrives, perform a corresponding check to see if the new file is in the timeline.
Each time a new file arrives, perform a corresponding check to see if the new file is in the timeline.
–![]() If the timeline is not yet available, wait for additional files to arrive.
If the timeline is not yet available, wait for additional files to arrive.
7.![]() Once the timeline data has been received, parse it using the steps in chapter 5 (How to build the media path) of the C-Cast API spec, and then build the media path for all media files. Contact James Stellphlug ( j.stellpflug@evs.com) to obtain the C-Cast API documentation.
Once the timeline data has been received, parse it using the steps in chapter 5 (How to build the media path) of the C-Cast API spec, and then build the media path for all media files. Contact James Stellphlug ( j.stellpflug@evs.com) to obtain the C-Cast API documentation.
8.![]() For each file media path, remove the path prefix so that only the filename remains. For example: http://www.mydomain.com/videos/abc/def/ghi/abcdefghijklmnopqrstuvwxyz123456_hls-ipad.m3u8
For each file media path, remove the path prefix so that only the filename remains. For example: http://www.mydomain.com/videos/abc/def/ghi/abcdefghijklmnopqrstuvwxyz123456_hls-ipad.m3u8
becomes
abcdefghijklmnopqrstuvwxyz123456_hls-ipad.m3u8
9.![]() For each filename, cycle through until all files have been received.
For each filename, cycle through until all files have been received.
10.![]() Be prepared for the ccast-timeline.xml file to change at any time and repeat steps 6-8 whenever it changes.
Be prepared for the ccast-timeline.xml file to change at any time and repeat steps 6-8 whenever it changes.
 Feedback