- Cisco StadiumVision Director Remote Installation and Upgrade Guide
- Preface
- Getting Started Installing or Upgrading a Cisco StadiumVision Director Remote Server
- Installing Cisco StadiumVision Director Remote Software on a Server for the First Time
- Upgrading Cisco StadiumVision Director Remote Software
- Appendix A: Cisco UCS C22 Hardware Installation Guidelines
Cisco StadiumVision Director Remote Installation and Upgrade Guide, Release 3.1
Bias-Free Language
The documentation set for this product strives to use bias-free language. For the purposes of this documentation set, bias-free is defined as language that does not imply discrimination based on age, disability, gender, racial identity, ethnic identity, sexual orientation, socioeconomic status, and intersectionality. Exceptions may be present in the documentation due to language that is hardcoded in the user interfaces of the product software, language used based on RFP documentation, or language that is used by a referenced third-party product. Learn more about how Cisco is using Inclusive Language.
Chapter: Upgrading Cisco StadiumVision Director Remote Software
Upgrading Cisco StadiumVision Director Remote Software
First Published: March 19, 2013
This module describes how to upgrade an existing server already running Cisco StadiumVision Director Remote software. This procedure is also referred to generally as an ISO upgrade and is similar to the ISO upgrade on Cisco StadiumVision Director using the Text Utility Interface (TUI).
Best Practices
Before you begin upgrading an existing Cisco StadiumVision Director Remote server, consider the following best practices:
- Choose an appropriate down time to perform the upgrade on the Cisco StadiumVision Director Remote server when there is adequate time to complete and verify the upgrade before any scheduled events and to allow time to resolve any unexpected issues that might occur.
- Refer to the Release Notes for Cisco StadiumVision Director Release 3.1 for the latest information about hardware and software requirements, changes, important notes, and caveats for your software release.
- Pay particular attention to the required hardware and software versions for other devices supporting your Cisco StadiumVision solution and be sure that you upgrade those devices as needed. For example, generally only certain firmware versions are supported for the DMP hardware, or a new firmware version is needed to provide additional functionality supported by the Cisco StadiumVision Director software.
- Shut down the Cisco StadiumVision Director Remote server and take a snapshot of the VMware system. Restart the Cisco StadiumVision Director Remote server to prepare for upgrade.
Prerequisites
Be sure that the following requirements are met before you upgrade your server:
- Your server is running a minimum of Cisco StadiumVision Director Remote Release 3.1.0-193 or higher.
- You have the IP address for the Cisco StadiumVision Director Remote server where you want to upload the ISO upgrade image. You will need to use this information as part of the URL to access the ISO upload utility.
- You have an installer account on the Cisco StadiumVision Director server.
- You have a laptop computer connected to the same network as the Cisco StadiumVision Director Remote server with an SSH client (such as PuTTY) to upgrade an existing server.

Note You also can use a monitor and keyboard that are directly connected to the Cisco StadiumVision Director Remote UCS C22 server to log into the TUI.
Information About Using the TUI Upgrade Utility to Update an Existing Cisco StadiumVision Director Remote Server
The ISO upgrade procedure for Cisco StadiumVision Director Remote includes the following tasks:
1.![]() Downloading an ISO upgrade file from the software download site on Cisco.com.
Downloading an ISO upgrade file from the software download site on Cisco.com.
2.![]() Uploading the ISO file from your laptop to the Cisco StadiumVision Director Remote server using the upload utility through your browser.
Uploading the ISO file from your laptop to the Cisco StadiumVision Director Remote server using the upload utility through your browser.
3.![]() Installing the ISO image using the upgrade utility in the Text Utility Interface (TUI).
Installing the ISO image using the upgrade utility in the Text Utility Interface (TUI).
ISO Upgrade Files
You can store multiple ISO upgrade files on a Cisco StadiumVision Director Remote server. The files will be displayed with a sequence number and the ISO filename in the TUI upgrade utility for you to select which file to install.
Disk Maintenance
There is no automatic aging of ISO upgrade files, but Cisco StadiumVision Director Release 3.1 introduces a utility to delete ISO upgrade files in the TUI.
You can see disk utilization for remote servers from the Management Dashboard on the centralized Cisco StadiumVision Director server, or you can use the TUI to get file system usage.
Figure 1 shows an example of disk utilization reporting available for a Cisco StadiumVision Director Remote server from the Management Dashboard.
Figure 1 Disk Utilization for Remote Server in Cisco StadiumVision Director Management Dashboard

Upgrade Tasks
To upgrade your Cisco StadiumVision Director server, complete the following tasks:
- Downloading ISO Upgrade Files from Cisco.com (required)
- Uploading an ISO Upgrade File to the Cisco StadiumVision Director Remote Server (required)
- Installing the ISO Upgrade Image on the Cisco StadiumVision Director Remote Server (required)
Downloading ISO Upgrade Files from Cisco.com
Be sure to download the upgrade files to a location, such as a laptop computer, where you can access them for installation onto the Cisco StadiumVision Director Remote server.
To download an ISO upgrade file, complete the following steps:
Step 1![]() Go to the Cisco StadiumVision Director software download site at:
Go to the Cisco StadiumVision Director software download site at:
http://software.cisco.com/download/release.html?mdfid=283489263&flowid=31962&softwareid=283866237&release=3.1.0&relind=AVAILABLE&rellifecycle=&reltype=latest
Note This site page is also available from the Cisco StadiumVision Director product support page by clicking Download Software > Cisco StadiumVision Director.
Step 2![]() Select the ISO upgrade, and optionally the companion MD5 checksum file, and download them.
Select the ISO upgrade, and optionally the companion MD5 checksum file, and download them.
Table 1 shows the filename conventions used for ISO upgrades.
Note Be sure that you choose the ISO for SVD-REMOTE and not for SV-DIRECTOR.
SVD-REMOTE_UPGRADE_3.1.0- nnn .x86_64.iso1 |
You can download the files using one of the following methods:
Step 3![]() (Optional) To verify the integrity of your upgrade file from the download, you can use a command-line or GUI utility on your laptop to calculate the checksum on the .iso file. Open the .md5sum file to compare the value that you calculated with the expected value provided in the .md5sum file.
(Optional) To verify the integrity of your upgrade file from the download, you can use a command-line or GUI utility on your laptop to calculate the checksum on the .iso file. Open the .md5sum file to compare the value that you calculated with the expected value provided in the .md5sum file.
The values should match. If they do not, retry the download.
Uploading an ISO Upgrade File to the Cisco StadiumVision Director Remote Server
After you have downloaded the ISO upgrade file from Cisco.com, you need to upload the file to the Cisco StadiumVision Director Remote server using a URL from a browser to access the ISO uploader utility. Once you have uploaded the software to the server, then you will use the TUI to install the upgrade image.
Prerequisites
Be sure that you know the IP address of the Cisco StadiumVision Director Remote server where you want to upload the file, and you have a supported browser version for Cisco StadiumVision Director.
To upload an ISO upgrade file to the Cisco StadiumVision Director Remote server, complete the following steps:
Step 1![]() Open your browser, and to go the following URL, where
x.x.x.x
is replaced by the IP address of the server where you want to upload the upgrade software (Figure 2):
Open your browser, and to go the following URL, where
x.x.x.x
is replaced by the IP address of the server where you want to upload the upgrade software (Figure 2):
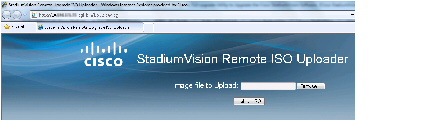
Step 2![]() Click
Browse
(Figure 2).
Click
Browse
(Figure 2).
Step 3![]() From the File Upload dialog box, navigate to the location of the ISO upgrade file that you downloaded from Cisco.com. Select the file that you want to upload and click
Open
.
From the File Upload dialog box, navigate to the location of the ISO upgrade file that you downloaded from Cisco.com. Select the file that you want to upload and click
Open
.
Step 4![]() Click
Upload ISO
. The file is sent to the server.
Click
Upload ISO
. The file is sent to the server.

Caution The upload might take several minutes. Do not refresh or reload the ISO Updater page while the upload process is running. Any interruption will corrupt the ISO image being uploaded.
When the ISO upload is complete, one of the following occurs:
- When the image is validated and uploaded successfully, a message is displayed stating that the ISO image has been uploaded.
- The image upload failed for some reason and you will need to retry the upload again.
Installing the ISO Upgrade Image on the Cisco StadiumVision Director Remote Server
To install the ISO upgrade image on the Cisco StadiumVision Director server, complete the following steps:
Step 1![]() From a laptop computer that is connected to the Cisco StadiumVision Server Remote network, use an SSH client to run a secure login to the Cisco StadiumVision Director Remote server using the IP address for your server.
From a laptop computer that is connected to the Cisco StadiumVision Server Remote network, use an SSH client to run a secure login to the Cisco StadiumVision Director Remote server using the IP address for your server.
Step 2![]() When the login prompt appears, enter the
installer
userid followed by the installer password at the password prompt.
When the login prompt appears, enter the
installer
userid followed by the installer password at the password prompt.
Step 3![]() From the TUI Main Menu, go to the StadiumVision Remote Server Administration menu. Select the Upgrade Server option (type
b
and press
Enter
) (Figure 3):
From the TUI Main Menu, go to the StadiumVision Remote Server Administration menu. Select the Upgrade Server option (type
b
and press
Enter
) (Figure 3):
Figure 3 TUI StadiumVision Remote Server Administration Menu Option for Server Upgrade

Step 4![]() All of the ISO upgrade files that you have uploaded are displayed with a sequence number and the image name (Figure 4). Type the sequence number that corresponds to the image that you want to install, and press
Enter
.
All of the ISO upgrade files that you have uploaded are displayed with a sequence number and the image name (Figure 4). Type the sequence number that corresponds to the image that you want to install, and press
Enter
.
Figure 4 ISO Upgrade Image File List

Step 5![]() When the upgrade configuration confirmation prompt appears, type
c
to continue (Figure 5):
When the upgrade configuration confirmation prompt appears, type
c
to continue (Figure 5):
Figure 5 TUI Upgrade Configuration Confirmation

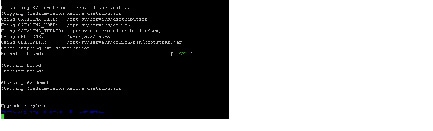
The upgrade process begins (Figure 6).
Figure 6 Start of Upgrade Process

Caution Wait until the upgrade process completes, which should only take a few minutes. Do not close the terminal while the upgrade is in progress. You will get notification once the installation is complete.
Step 6![]() When the “Upgrade complete” message appears, press any key. (Figure 7):
When the “Upgrade complete” message appears, press any key. (Figure 7):
Figure 7 End of ISO Upgrade Process
Verifying the Upgrade
To verify the upgrade, completing the following steps:
Step 1![]() Log into the TUI as installer on the Cisco StadiumVision Director Remote server.
Log into the TUI as installer on the Cisco StadiumVision Director Remote server.
Step 2![]() Go to
Services Control
>
StadiumVision Remote Services
>
All
.
Go to
Services Control
>
StadiumVision Remote Services
>
All
.
Step 3![]() Select
Show Status
and confirm that the distribution service is reported as running normally (Figure 8):
Select
Show Status
and confirm that the distribution service is reported as running normally (Figure 8):
Figure 8 Verifying Distribution Service Status

Step 4![]() Press any key to return to the All menu.
Press any key to return to the All menu.
Step 5![]() Continue to return to the Main Menu and exit the TUI.
Continue to return to the Main Menu and exit the TUI.
 Feedback