Configure CWA with FlexConnect APs on a WLC with ISE
Available Languages
Download Options
Bias-Free Language
The documentation set for this product strives to use bias-free language. For the purposes of this documentation set, bias-free is defined as language that does not imply discrimination based on age, disability, gender, racial identity, ethnic identity, sexual orientation, socioeconomic status, and intersectionality. Exceptions may be present in the documentation due to language that is hardcoded in the user interfaces of the product software, language used based on RFP documentation, or language that is used by a referenced third-party product. Learn more about how Cisco is using Inclusive Language.
Introduction
This document describes how to configure central web authentication with FlexConnect APs on a WLC ISE in local switching mode.
Prerequisites
Requirements
There are no specific requirements for this document.
Components Used
The information in this document is based on these software and hardware versions:
- Cisco Identity Services Engine (ISE), Release 1.2.1
- Wireless LAN Controller (WLC) Software, Release Version - 7.4.100.0
- Access Points (AP)
The information in this document was created from the devices in a specific lab environment. All of the devices used in this document started with a cleared (default) configuration. If your network is live, ensure that you understand the potential impact of any command.
Background Information

Note: At this time, local authentication on the FlexAPs is not supported for this scenario.
Other Documents in this Series
- Central Web Authentication with a Switch and Identity Services Engine Configuration Example
- Central Web Authentication on the WLC and ISE Configuration Example
Configure
There are multiple methods to configure central web authentication on the Wireless LAN Controller (WLC). The first method is local web authentication in which the WLC redirects the HTTP traffic to an internal or external server where the user is prompted to authenticate. The WLC then fetches the credentials (sent back via an HTTP GET request in the case of an external server) and makes a RADIUS authentication. In the case of a guest user, an external server (such as Identity Service Engine (ISE) or NAC Guest Server (NGS)) is required as the portal provides features such as device registering and self-provisioning. This process includes these steps:
- The user associates to the web authentication SSID.
- The user opens their browser.
- The WLC redirects to the guest portal (such as ISE or NGS) as soon as a URL is entered.
- The user authenticates on the portal.
- The guest portal redirects back to the WLC with the credentials entered.
- The WLC authenticates the guest user via RADIUS.
- The WLC redirects back to the original URL.
This process includes a lot of redirection. The new approach is to use central web authentication which works with ISE (versions later than 1.1) and WLC (versions later than 7.2). This process includes these steps:
- The user associates to the web authentication SSID.
- The user opens their browser.
- The WLC redirects to the guest portal.
- The user authenticates on the portal.
- The ISE sends a RADIUS Change of Authorization (CoA - UDP Port 1700) to indicate to the controller that the user is valid and eventually pushes RADIUS attributes such as the Access Control List (ACL).
- The user is prompted to retry the original URL.
This section describes the steps necessary to configure central web authentication on WLC and ISE.
Network Diagram
This configuration uses this network setup:
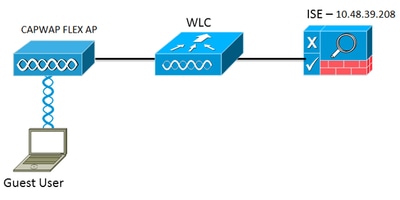 Network Setup
WLC Configuration
The WLC configuration is fairly straightforward. A trick is used (same as on switches) to obtain the dynamic authentication URL from the ISE. (Since it uses CoA, a session needs to be created as the session ID is part of the URL.) The SSID is configured to use MAC filtering, and the ISE is configured to return an Access-Accept message even if the MAC address is not found so that it sends the redirection URL for all users.
In addition, RADIUS Network Admission Control (NAC) and AAA Override must be enabled. The RADIUS NAC allows the ISE to send a CoA request that indicates the user is now authenticated and is able to access the network. It is also used for posture assessment in which the ISE changes the user profile based on posture result.
- Ensure that the RADIUS server has RFC3576 (CoA) enabled, which is the default.
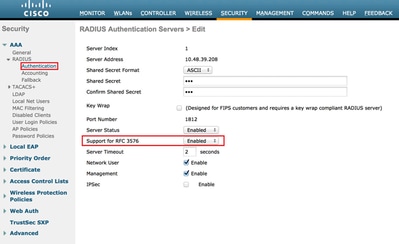 RADIUS Server has RFC3576
- Create a new WLAN. This example creates a new WLAN named CWAFlex and assigns it to vlan33. (Note that it will not have much effect since the access point is in local switching mode.)
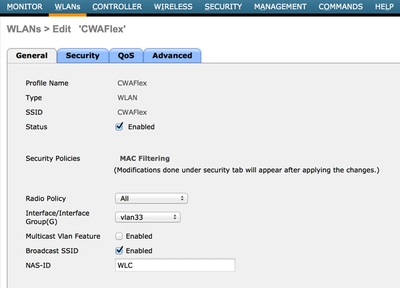 Create a New WLAN
- On the Security tab, enable MAC Filtering as Layer 2 Security.
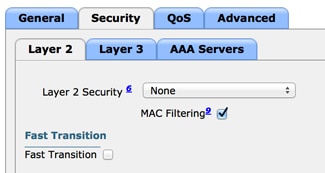 Enable MAC Filtering
- On the Layer 3 tab, ensure security is disabled. (If web authentication is enabled on Layer 3, local web authentication is enabled, not central web authentication.)
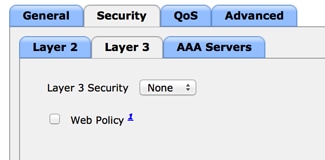 Ensure Security is Disabled
- On the AAA Servers tab, select the ISE server as radius server for the WLAN. Optionally, you can select it for accounting in order to have more detailed information on ISE.
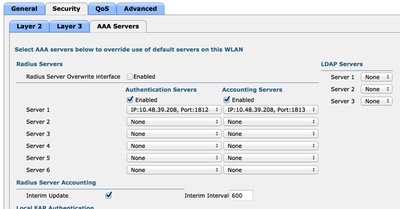 Select ISE Server
- On the Advanced tab, ensure Allow AAA Override is checked and Radius NAC is selected for NAC State.
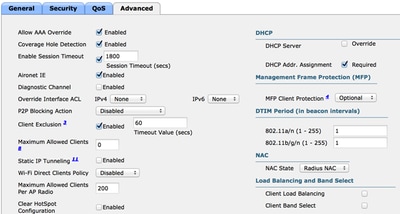 Ensure Allow AAA Override is Checked
- Create a redirect ACL.
This ACL is referenced in the Access-Accept message of the ISE and defines what traffic must be redirected (denied by the ACL) as well as what traffic must not be redirected (permitted by the ACL). Basically, DNS and traffic to/from the ISE needs to be permitted
Caution: An issue with FlexConnect APs is that you must create a FlexConnect ACL separate from your normal ACL. This issue is documented in Cisco bug ID CSCue68065 and is fixed in Release 7.5. In WLC 7.5 and later, only a FlexACL is required, and no standard ACL is needed. The WLC expects that the redirect ACL returned by ISE is a normal ACL. However, to ensure it works, you need the same ACL applied as the FlexConnect ACL. (Only registered Cisco users can access internal Cisco tools and information.)
This example shows how to create a FlexConnect ACL named flexred: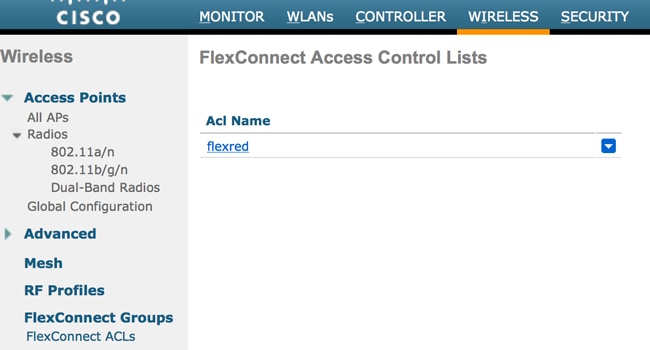 Create a FlexConnect ACL Named Flexred
- Create rules to permit DNS traffic as well as traffic towards ISE and deny the rest.
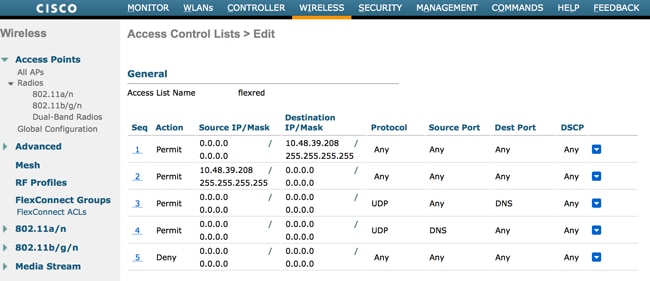 Permit DNS Traffic
If you want the maximum security, you can allow only port 8443 towards ISE. (If posturing, you must add typical posture ports, such as 8905,8906,8909,8910.) - (Only on code before Version 7.5 due to Cisco bug IDCSCue68065) Choose Security > Access Control Liststo create an identical ACL with the same name.
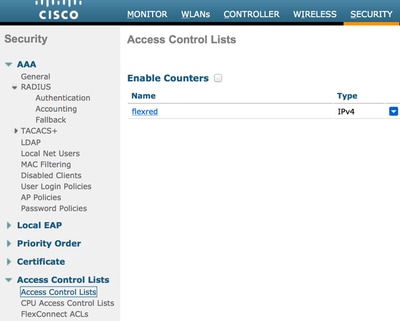 Create Identical ACL
- Prepare the specific FlexConnect AP. Note that for a larger deployment, you would typically use FlexConnect groups and not perform these items on a per-AP basis for scalability reasons.
- Click Wireless , and select the specific access point.
- Click the FlexConnect tab, and click External Webauthentication ACLs . (Prior to version 7.4, this option was named web policies .)
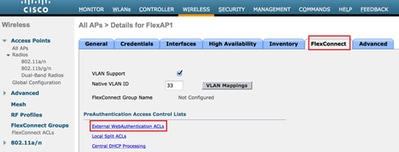 Click FlexConnect Tab
- Add the ACL (named flexred in this example) to the web policies area. This pre-pushes the ACL to the access point. It is not applied yet, but the ACL content is given to the AP so that it can apply when needed.
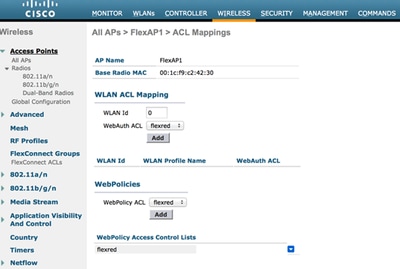 Add ACL to Web Policies Area
- Create rules to permit DNS traffic as well as traffic towards ISE and deny the rest.
WLC configuration is now complete.
ISE Configuration
Create the Authorization Profile
Complete these steps in order to create the authorization profile:
-
Click Policy , and then click Policy Elements.
-
Click Results.
-
Expand Authorization , and then click Authorization profile.
-
Click the Add button in order to create a new authorization profile for central webauth.
-
In the Name field, enter a name for the profile. This example uses CentralWebauth.
-
Choose ACCESS_ACCEPT from the Access Type drop-down list.
-
Check the Web Authentication check box, and choose Centralized Web Auth from the drop-down list.
-
In the ACL field, enter the name of the ACL on the WLC that defines the traffic that will be redirected. This examples uses flexred.
-
Choose Default from the Redirect drop-down list.
The Redirect attribute defines whether the ISE sees the default web portal or a custom web portal that the ISE admin created. For example, the flexred ACL in this example triggers a redirection on HTTP traffic from the client to anywhere.
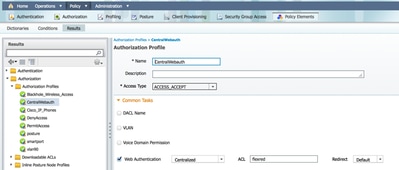 ACL Triggers a Redirection on HTTP Traffic from the Client to Anywhere
Create an Authentication Rule
Complete these steps in order to use the authentication profile to create the authentication rule:
- Under the Policy menu, click Authentication.
This image shows an example of how to configure the authentication policy rule. In this example, a rule is configured that will trigger when MAC filtering is detected.
 How to Configure Policy Rule
- Enter a name for your authentication rule. This example uses Wireless mab .
- Select the plus ( + ) icon in the If condition field.
- Choose Compound condition , and then choose Wireless_MAB .
- Choose Default network access as allowed protocol.
- Click the arrow located next to and ... in order to expand the rule further.
- Click the + icon in the Identity Source field, and choose Internal endpoints.
- Choose Continue from the If user not found drop-down list.
 Click Continue
This option allows a device to be authenticated (through webauth) even if its MAC address is not known. Dot1x clients can still authenticate with their credentials and must not be concerned with this configuration.
Create an Authorization Rule
There are now several rules to configure in the authorization policy. When the PC is associated, it will go through mac filtering; it is assumed that the MAC address is not known, so the webauth and ACL are returned. This MAC not known rule is shown in the next image and is configured in this section.
 MAC not Known
Complete these steps in order to create the authorization rule:
-
Create a new rule, and enter a name. This example usesMAC not known.
-
Click the plus (+) icon in the condition field, and choose to create a new condition.
-
Expand the expression drop-down list.
-
Choose Network access , and expand it.
-
Click AuthenticationStatus , and choose the Equals operator.
-
Choose UnknownUser in the right-hand field.
-
On the General Authorization page, choose CentralWebauth (Authorization Profile) in the field to the right of the word then .
This step allows the ISE to continue even though the user (or the MAC) is not known.
Unknown users are now presented with the Log in page. However, once they enter their credentials, they are presented again with an authentication request on the ISE; therefore, another rule must be configured with a condition that is met if the user is a guest user. In this example,If UseridentityGroup equals Guestis used, and it is assumed that all guests belong to this group.
-
Click the actions button located at the end of the MAC not known rule, and choose to insert a new rule above.

Note: It is very important that this new rule comes before the MAC not known rule.
-
Enter 2nd AUTH in the name field.
- Select an identity group as condition. This example chose Guest.
- In the condition field, click the plus ( + ) icon, and choose to create a new condition.
- Choose Network Access , and click UseCase .
- Choose Equals as the operator.
- Choose GuestFlow as the right operand. This means that you will catch users who just logged in on the webpage and come back after a Change of Authorization (the guest flow part of the rule) and only if they belong to the guest identity group.
- On the authorization page, click the plus ( + ) icon (located next tothen) in order to choose a result for your rule.
In this example, a preconfigured profile (vlan34) is assigned; this configuration is not shown in this document.
You can choose a Permit Access option or create a custom profile in order to return the VLAN or attributes that you like.

Caution: In ISE Version1.3, depending on the type of web authentication, the Guest Flow use case cannot be encountered anymore. The authorization rule would then have to contain the guest user group as the only possible condition.
Enable the IP Renewal (Optional)
If you assign a VLAN, the final step is for the client PC to renew its IP address. This step is achieved by the guest portal for Windows clients. If you did not set a VLAN for the 2nd AUTH rule earlier, you can skip this step.
Note that on FlexConnect APs, the VLAN needs to pre-exist on the AP itself. Therefore, if it does not, you can create a VLAN-ACL mapping on the AP itself or on the flex group where you do not apply any ACL for the new VLAN you want to create. That actually creates a VLAN (with no ACL on it).
If you assigned a VLAN, complete these steps in order to enable IP renewal:
-
Click Administration , and then click Guest Management.
-
Click Settings.
-
Expand Guest , and then expand Multi-Portal Configuration.
-
Click DefaultGuestPortal or the name of a custom portal you have created.
-
Click the Vlan DHCP Release check box.

Note: This option works only for Windows clients.
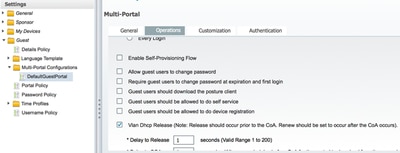 Click Vlan DHCP Release Check Box
Traffic Flow
It can seem difficult to understand which traffic is sent where in this scenario. Here is a quick review:
- The client sends association request over the air for the SSID.
- The WLC handles the MAC filtering authentication with ISE (where it receives the redirection attributes).
- The client only receives an assoc response after MAC filtering is complete.
- The client submits a DHCP request and that is LOCALLY switched by the access point in order to obtain an IP address of the remote site.
- In the Central_webauth state, the traffic marked for deny on the redirect ACL (so HTTP typically) is CENTRALLY switched. So it is not the AP that does the redirection but the WLC; for example, when the client asks for any website, the AP sends this to the WLC encapsulated in CAPWAP and the WLC spoofs that website IP address and redirects towards ISE.
- The client is redirected to the ISE redirect URL. This is LOCALLY switched again (because it hits on permit on the flex redirect ACL).
- Once in the RUN state, traffic is locally switched.
Verify
Once the user is associated to the SSID, the authorization is displayed in the ISE page.
 Authorization is Displayed
From bottom up, you can see the MAC address filtering authentication that returns the CWA attributes. Next is the portal log in with user name. The ISE then sends a CoA to the WLC and last authentication is a layer 2 mac filtering authentication on the WLC side, but ISE remembers the client and the username and applies the necessary VLAN we configured in this example.
When any address is opened on the client, the browser is redirected to the ISE. Ensure Domain Name System (DNS) is configured correctly.
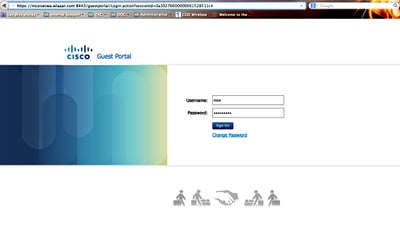 Redirected to ISE
Network access is granted after the user accepts the policies.
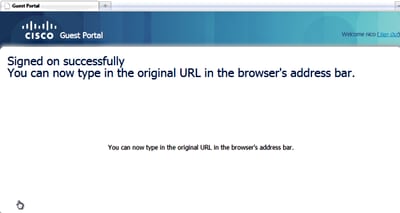 Network Access Granted
On the controller, the Policy Manager state and RADIUS NAC state changes from POSTURE_REQD to RUN.
Related Information
Revision History
| Revision | Publish Date | Comments |
|---|---|---|
1.0 |
08-Dec-2023
|
Initial Release |
Contributed by Cisco Engineers
Contact Cisco
- Open a Support Case

- (Requires a Cisco Service Contract)
 Feedback