Introduction
This document describes the configuration of RADIUS authentication and Large Network Optimization (LNO) on IW9165 and IW9167 radios in URWB mode.
Prerequisites
Requirements
Cisco recommends that you have knowledge of these topics:
- Basic CLI navigation and commands
- Understanding of IW URWB mode radios
Components Used
The information in this document is based on these software and hardware versions:
The information in this document was created from the devices in a specific lab environment. All of the devices used in this document started with a cleared (default) configuration. If your network is live, ensure that you understand the potential impact of any command.
Background Information
RADIUS - Remote Authentication Dial-In User Service is a networking protocol used to provide centralized authentication, authorization, and accounting (AAA) management for users or devices who connect and use a network service. For Industrial Wireless devices under URWB mode Radius can be used to authenticate devices before they can join a network.
Parameters for Radius configuration can be configured on the IW devices either from GUI or from CLI access or from IoT OD as well.
CLI configuration of Radius parameters:
These parameters can be configured from enable mode on the CLI of the devices.
1. Enabling Radius authentication:
This parameter allows to enable Radius authentication on the devices. This must be executed after adding other mandatory parameters required for radius authentication.
Radio1#configure radius enabled

2. Disabling Radius authentication:
This parameter allows to disable Radius authentication on the devices.
Radio1#configure radius disabled

3. Passthrough:
This parameter is only to be configured on the infrastructure radios. Configuring Infrastructure radios with passthrough parameter allows the Vehicle radios to authenticate themselves via the infrastructure radios, also allowing for communication between the authenticated vehicle radios and the unauthenticated Infrastructure radios.
Radio1#configure radius passthrough

4. Adding Radius Server:
This parameter is used to specify the IP address of the Radius server for the device to communicate with.
Radio1#configure radius server <IP address>

5. Radius port:
This parameter is used to specify the port of the Radius server for the device to communicate with. The default port for Radius authentication is 1812.
Radio1#configure radius server <port number>

6. Radius Secret:
This parameter is used to specify the pre-shared key to be used with the Radius server.
Radio1#configure radius secret <secret key>

7. Secondary server IP and port:
These parameters are used to specify the IP address and port number of a second Radius server, to be used in case the device is unable to reach the Primary server.
Radio1#configure radius secondary server <IP address>
Radio1#configure radius secondary port <port>

8. Radius timeout:
This parameter is used to specify the amount of time in seconds the client will wait for a response from the primary Radius server, before attempting to connect to the secondary server. The default value is set to 10 seconds.
Radio1#configure radius timeout <time in seconds>

9. Authentication parameters:
This parameter is used to specify the Radius authentication method and the corresponding parameters to be passed. There are several options to use.
Radio1#configure radius authentication <method>

If using these methods : GTC (Generic token card), MD5 (Message-Digest Algorithm 5) or MSCHAPV2 (Microsoft Challenge Handshake Authentication Protocol version 2) both username and password can be added with these commands:
Radio1#configure radius authentication gtc <username> <password>

Radio1#configure radius authentication md5 <username> <password>

Radio1#configure radius authentication mschapv2 <username> <password>
If using these methods : PEAP (Protected Extensible Authentication Protocol) or EAP-TTLS (Extensible Authentication Protocol-Tunneled Transport Layer Security) for authentication then another inner authentication method also must be provided. It can be either gtc, md5 or mschapv2.
Radio1#configure radius authentication peap <username> <password> inner-auth-method <method>

Radio1#configure radius authentication ttls <username> <password> inner-auth-method <method>
10. Switch attempts:
This parameter specifies the number of radius authentication attempts allowed towards the primary server before the client switches to the secondary server. The default value is 3.
Radio1#configure radius switch <1-6>

11. Backoff time:
This parameter specifies the value of time in seconds for the client to wait for, after exceeding the maximum number of tries for authenticating.
Radio1#configure radius backoff-time <time in seconds>

12. Expiration time:
This parameter specifies the value of time in seconds if during which the Radius authentication is not complete, the authentication attempt will be abandoned.
Radio1#configure radius expiration <time in seconds>

13. Send request:
This parameter is used to initiate a radius authentication request to either the primary or the secondary Radius server configured.
Radio1#configure radius send-request <primary/secondary>


The same parameters can be configured on the Industrial Wireless radios in URWB mode via GUI as well under the ‘Radius’ tab on the webpage.

Show commands:
The current Radius configuration can be verified via CLI with show commands.
1.
#show radius
This show command tells if Radius is enabled or disabled on the device.

2.
#show radius accounting
#show radius auth-method-tls
#show radius authentication
These show commands will show the current configuration of radius accounting server, authentication server and the authentication method tls parameters configured.

Radius Authentication sequence with LNO
LNO or Large Network Optimization is a feature suggested to be enabled on large networks with 50 or more Infrastructure radios to optimize the pseudowire formation between all the devices in the network. It is used in both Layer 2 and Layer 3 networks.
In networks where both LNO and Radius are enabled, the infrastructure radios authenticate themselves sequentially (from lowest Mesh ID to highest Mesh ID). Enabling LNO will force all the infrastructure radios to build pseudowires ONLY to the Mesh End and will disable BPDU forwarding as well.
This article will describe the sequence of Radius authentication on a Fluidity setup with one Mesh End and 4 Mesh Point Infrastructure radios.
The Mesh End radio is the default “wired coordinator” of the Fluidity network. That means, it has it’s autotap open and acts as the ingress/egress point of the network.
All the other Infrastructure radios are setup as Mesh points and they all have physical connection to the Mesh End via switches that are connected to each other.
The Mesh End radio is connected to the backbone network usually via fiber connection and via the backbone network, it can reach the Radius Server of the network.
Any device can reach the Radius server only if :
- It’s a wired coordinator.
- It has a pseudowire built with the wired master i.e Mesh End.
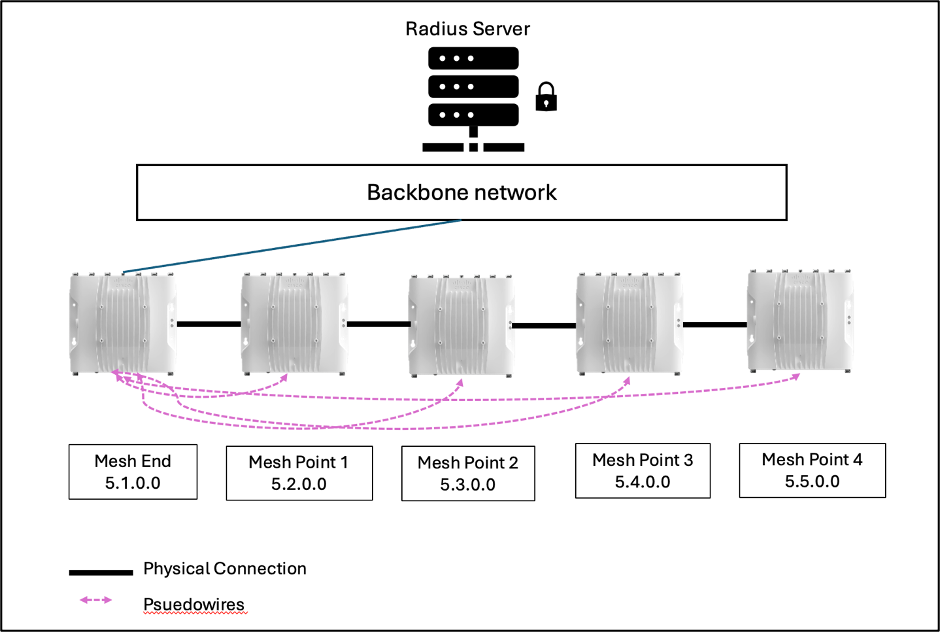
Step 1: All units are unauthenticated.

At the beginning, all units including the Mesh End will be unauthenticated. The autotap will open only on the Mesh End radio which is the Ingress/Egress point of the entire network. For any Infrastructure device to reach the Radius server to authenticate itself, it must either be a Mesh End or have a pseudowire to the Mesh End.
Now, the Mesh End radio 5.1.0.0 will send out an authentication request to the Radius server via the Backbone network. Once it receives communication back, it gets authenticated and then becomes ‘invisible’ to the rest of the unauthenticated Infrastructure mesh points as is the requirement for AAA with Radius.
Step 2 : Mesh End 5.1.0.0. is authenticated, rest are unauthenticated.

Now that the Mesh End 5.1.0.0 is authenticated and invisible to the rest of the network, the remaining Mesh Points will run an election and pick the device with lowest Mesh ID to be the next wired coordinator. In this example, that would be Mesh Point 1 with Mesh ID 5.2.0.0. Autotap will then be open on Mesh Point 1.
Because of LNO being enabled, no Pseudowires will form to Mesh Point 1. All the remaining radios will have to authenticate sequentially when their Autotap is open.
Now Mesh Point 1 can send out an authentication request to Radius Server and authenticate itself.
Step 3 : Mesh End, Mesh Point 1 is authenticated and others are unauthenticated.

Now that Mesh Point 1 is also authenticated, it will form a psuedowire with the authenticated Mesh End, and also becomes invisible to the rest of the unauthenticated Infrastructure radios.
The rest of the unauthenticated radios rerun the election and pick Mesh Point 2 with the lowest Mesh ID 5.3.0.0 as the new wired coordinator and that radio sends out an authentication request to the Radius server as its Autotap is now open.
Step 4 : Mesh End, MP 1 and MP 2 are authenticated.

The process then repeats with Mesh Point 2 becoming authenticated and forming Pseudowire with the Mesh End device.
The rest of the Infrastructure radios take turns to authenticate themselves, in the order of lowest to highest Mesh IDs, as and when their own autotap is opened.
Step 5 : All radios are authenticated.

Misconfiguration or problem cases:
If any of the Infrastructure Mesh points have wrong credentials on them or have Radius disabled by mistake, then this will affect other radios from authenticating. Always make sure to check the credentials and settings before deploying radios to production.

In this example, if Mesh Point 2 has wrong creds, it will remain unauthenticated and in turn Mesh Point 3 and Mesh Point 4 will never get a chance to authenticate themselves as there is no Pseudowire formed from them to Mesh Point 2 because of LNO being enabled.
The radios that remain unauthenticated depend on the wrongly configured radio’s Mesh ID. Any radio with Mesh ID higher than the current wired coordinator will remain unauthenticated and will cause issues.
 Feedback