Introduction
This document describes the use of a Comma Separated Value (CSV) file to import Wireless LAN Controller (WLC) into Connected Mobile Experiences (CMX).
Prerequisites
Requirements
Cisco recommends to have knowledge of these topics:
- AireOS WLC concepts and configuration
- 9800 WLC concepts and configuration
- CMX concepts and configuration
- Simple Network Management Protocol (SNMP) concepts and configuration
- Network Mobility Services Protocol (NMSP) concepts and configuration
Components Used
The information in this document is based on these software and hardware versions:
- Catalyst 9800 Wireless Controller Series (Catalyst 9800-CL), Cisco IOS® XE Cupertino 17.9.4
- AIR-CTVM Wireless Controller Series (AireOS Cloud), version 8.10.196
- CMX, version 10.6.3
The information in this document was created from the devices in a specific lab environment. All of the devices used in this document started with a cleared (default) configuration. If your network is live, ensure that you understand the potential impact of any command.
Configure
Network Diagram
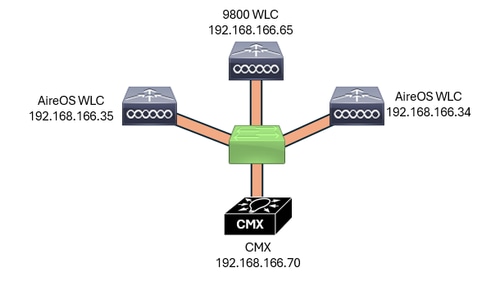 Network Diagram
Configurations
SNMP Configuration on AireOS WLC
CMX communicates over SNMP with the WLC to gather WLC details and information. Hence, the WLC must be configured with SNMP.
SNMP Version 2
WLC GUI:
Navigate to Management > SNMP > Communities > New as shown in the image.
 SNMP Version 2 Configuration
Enter the SNMP details:
 SNMP Version 2 Configuration Details

Note: SNMP Access Mode must be set as Read/Write. SNMP Status must be set to Enable.
WLC CLI:
(Cisco Controller) >config snmp community create CMXc0mmunity
(Cisco Controller) >config snmp community ipaddr 192.168.166.70 255.255.255.255 CMXc0mmunity
(Cisco Controller) >config snmp community accessmode rw CMXc0mmunity
(Cisco Controller) >config snmp community mode enable CMXc0mmunity
SNMP Version 3
WLC GUI:
Navigate to Management > SNMP > SNMP V3 Users > New as shown in the image.
 SNMP Version 3 Configuration
Enter SNMP details:
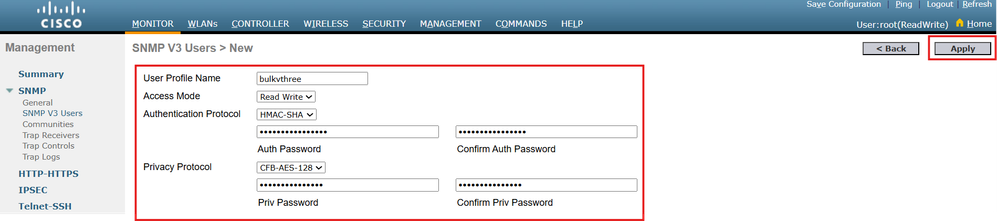 SNMP Version 3 Configuration Details
Note: SNMP Access Mode must be configured as Read/Write. SNMP Authentication Protocol can be SHA or MD5. SNMP Privacy Protocol can be AES or DES.
WLC CLI:
(Cisco Controller) >config snmp v3user create bulkvthree rw hmacsha aescfb128 makEsnmpw0rkbulk version3workinG
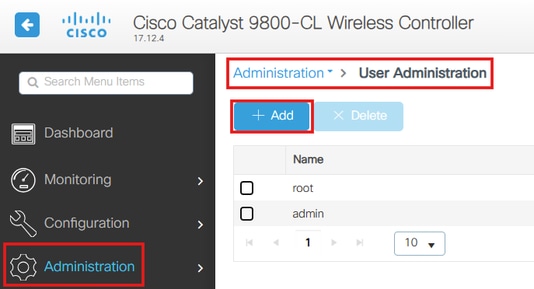
SSH Access Configuration on 9800 WLC
Configure a User Administration the CMX can use to access the WLC.
WLC GUI:
Navigate to Administration > User Administration > Add as shown in the image.
 WLC User Config
Enter the user details and click Update & Apply to Device:
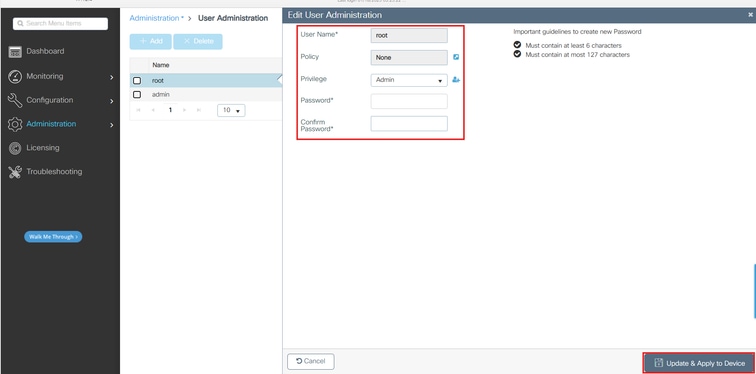 WLC User Information Configuration
WLC CLI:
#conf t
(config)#username root privilege 15 password 0 RtpW2121!
(config)#end
Configure privilege access to the WLC with a password the CMX can use to access. This configuration can only be done via CLI as follows:
#conf t
(config)#enable password 0 RtpW2121!
(config)#end
Note: Configure the level of security of the passwords of your preference.
Enter the WLC Information in the TXT Editor
The CSV file can be created directly in a Excel sheet, however, most network administrators are comfortable working with Notepad++ or any text editor. In this document, the creation of the WLCs entries are first done in Notepad++, and once created the document is saved as a CSV file.
The information to be added to the text editor depends on the type of WLC, it is as follows:
AireOS:
- WLC,WLC IP Address,WLC Version,SNMP Version,SNMP Information
SNMP versions:
- SNMP Version 2
- WLC, WLC IP Address, WLC Version, SNMP Version, Community Name
- SNMP Version 3
- WLC, WLC IP Address, WLC Version, SNMP Version, SNMP Username, SNMP Authentication Protocol, SNMP Authentication Password, SNMP Privacy Protocol, SNMP Privacy Password
9800 WLC:
- Catalyst (IOS XE) WLC, WLC IP Address, WLC Version, SSH Username, SSH Password, Enable Password
Based on the prior information, three WLCs are used in this document to exemplify AireOS SNMP Version 2, SNMP Version 3, and 9800 WLC configuration to cover all the possible configurations for his process. The configuration of the WLCs to use in this document is as follows:
AireOS:
- SNMP Version 2
- WLC, 192.168.166.33, 8.10.196.0, v2c,CMXc0mmunity
- SNMP Version 3
- WLC, 192.168.166.34, 8.10.196.0, v3,bulkvthree, hmacsha,makEsnmpw0rkbulk, aescfb128, version3workinG
Note: The authentication types supported are hmacmd5 or hmacsha. The private types supported are des or aescfb128. These parameters are case sensitive.
9800 WLC:
- Catalyst (IOS XE) WLC,192.168.166.65,17.09.04,root, RtpW2121!, RtpW2121!
CMX is capable to understand if the WLC type is AireOS or 9800 WLC by the first column of the CSV entry. If the first column shows WLC the CMX understands the WLC is an AireOS, however, if the first column shows Catalyst (IOS XE) WLC CMX understands it is a 9800 WLC.
Notepad++ Configuration:
 Wireless LAN Controllers
Save the File as CSV
Ensure the extension of the file is .csv, that way the file is not saved as txt but with the correct extension CMX supports.
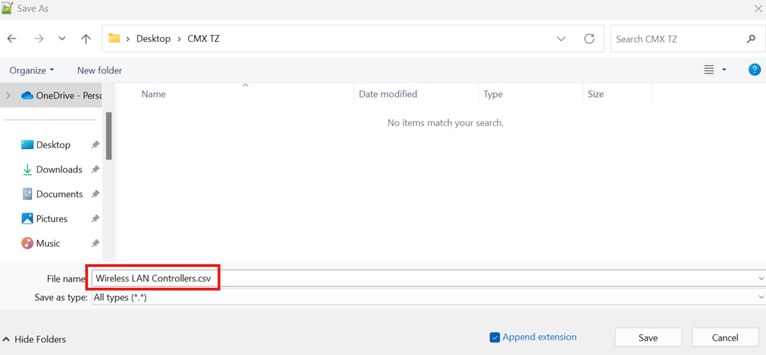 Save File as CSV
The file shows saved as a CSV file.
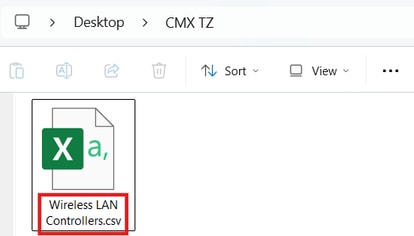 File shows saved as CSV
If the file is open it shows the proper information.
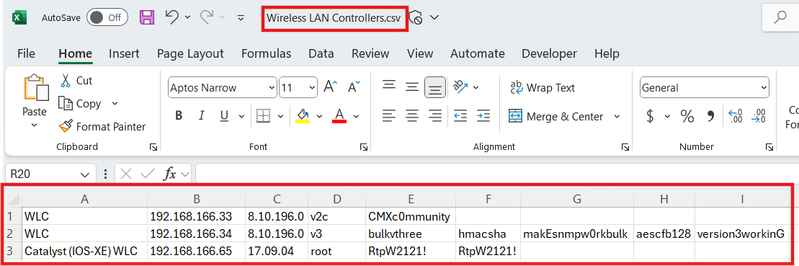 CSV File Open Shows the Information of the WLCs
Import the CSV File into CMX
A transfer method such as Secure File transfer Protocol (SFTP) or Secure Copy Protocol (SCP) is needed to move the file from the current server to the CMX. Programs such as MobaXterm or WinSCP can offer drag and drop options to move the file easily. The Wireless LAN Controllers.csv file is in the server which runs SFTP, a connection from the CMX to the server via SFTP is performed and the file is transferred as follows:
[cmxadmin@cmx1063 ~]$ sftp tac@192.168.166.91
tac@192.168.166.91's password:
Connected to 192.168.166.91.
sftp> cd Desktop/CMX TZ
sftp> dir
Wireless LAN Controllers.csv
sftp> get "Wireless LAN Controllers.csv"
Fetching /cygdrive/c/Users/tac/Desktop/CMX/Wireless LAN Controllers.csv to Wireless LAN Controllers.csv
/cygdrive/c/Users/tac/Desktop/CMX/Wireless LAN Controllers.csv                  100% 224 2.3KB/s 00:00
sftp> exit
[cmxadmin@cmx1063 ~]$ ls -lh
total 28K
dr-xr-xr-x. 2 cmxadmin cmxadmin 4.0K Aug 29 2022 bin
-rw-r--r--. 1 cmxadmin cmxadmin 224 Jan 22 14:29 Wireless LAN Controllers.csv
[cmxadmin@cmx1063 ~]$
Note: If the name of the file has spaces, ensure to use quotes to pull the file using SFTP, this way the SFTP considers the name of the file with spaces as a single string.
Execute the File in CMX
Make a SSH connection to the CMX, and run the commands as follows:
[cmxadmin@cmx1063 ~]$ cmxctl config controllers import
Please specify import type [PI/FILE] [FILE]: FILE
Please enter CSV file path: /home/cmxadmin/Wireless LAN Controllers.csv
Controller Added 192.168.166.33
Controller Added 192.168.166.34
Controller Added 192.168.166.65
[cmxadmin@cmx1063 ~]$
Note: The file path always starts with /home/cmxadmin/.
Verify
Verify from CMX
From the CMX GUI and CLI, the WLCs added can be checked to confirm they are working the correct way.
CMX GUI:
Navigate to SYSTEM, scroll down to find the WLCs, they must show the IP Address in green as shown in the image, any other color means there is a problem.
 CMX GUI
CMX CLI:
[cmxadmin@cmx1063 ~]$ cmxctl config controllers show
+----------------+-----------------------+------------+------+--------+
| IP Address     | Type                  | Version    | SHA2 | Status |
+----------------+-----------------------+------------+------+--------+
| 192.168.166.65 | Catalyst (IOS XE) WLC | 17.09.04   | Yes  | ACTIVE |
+----------------+-----------------------+------------+------+--------+
| 192.168.166.33 | AireOS WLC            | 8.10.196.0 | Yes  | ACTIVE |
+----------------+-----------------------+------------+------+--------+
| 192.168.166.34 | AireOS WLC            | 8.10.196.0 | Yes  | ACTIVE |
+----------------+-----------------------+------------+------+--------+
[cmxadmin@cmx1063 ~]$
Verify from WLC
From the WLC the connectivity with CMX can be verified via GUI and CLI.
AireOS GUI:
Navigate to Monitor > Cloud Services > CMX as shown in the image.
 AireOS Verify CMX Connection
AireOS WLC CLI:
(Cisco Controller) >show nmsp status
Number of Nmsp TLS Connections supported......... 5
Number of Nmsp HTTPS Connections supported....... 1
 CMX Server           Echo Resp   Echo Req   Tx Data  Rx Data
----------------    ------------ ----------- -------  -------
192.168.166.70           847         847       861      17
(Cisco Controller) >
9800 WLC GUI:
Navigate to Monitor > Wireless > NMSP > DNA Spaces Information as shown in the image.
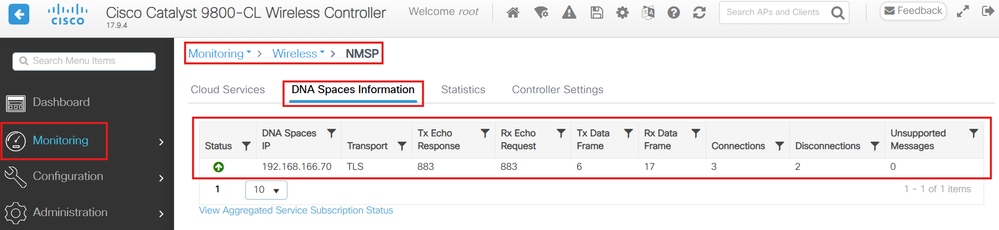 CMX Check from 9800 WLC GUI
9800 WLC CLI:
#show nmsp status
NMSP Status
-----------

DNA Spaces/CMX IP Address   Active   Tx Echo Resp  Rx Echo Req   Tx Data   Rx Data   Transport
--------------------------------------------------------------------------------------------------------------------------
192.168.166.70              Active      877           877          6         17        TLS
Troubleshoot
It is recommended to troubleshoot simultaneously from CMX and WLC, protocols such as SNMP and NMSP are considered a two way conversation protocols, troubleshoot from both devices to understand the conversation while SNMP and NMSP is negotiated is vital for a successful troubleshot.
AireOS WLC Troubleshoot
SNMP debugs can be enabled as follows:
(Cisco Controller) >debug snmp all enable
NMSP Debugs can be enabled as follows:
(Cisco Controller) >debug nmsp all enable
To disable the debugs the command goes as follows:
(Cisco Controller) >debug disable-all
9800 WLC Troubleshoot
NMSP debugs can be enabled as follows:
#set platform software trace nmspd chassis active R0 all-modules verbose
Packet capture, filter with CMX IP Address as follows:
#config t
(config)#ip access-list extended NMSP
(config-ext-nacl)#permit ip host <CMX IP Address> any
(config-ext-nacl)#permit ip any host <CMX IP Address>
#monitor capture NMSP interface <Interface - port> both access-list NMSP buffer size 100
#monitor capture NMSP start
To collect the debugs and monitor capture the commands as follows:
#request platform software trace archive last 1 days target bootflash:NMSPArchive
#monitor capture NMSP stop
#monitor capture NMSP export bootflash:NMSP.pcap
To disable the debugs and packet capture as follows:
#no monitor capture NMSP
#set platform software trace nmspd chassis active R0 all-modules notice
CMX Troubleshoot
Collect CMX logs as follows:
[cmxadmin@cmx1063 ~]$ cmxos techsupport dump
 Feedback