Introduction
This document describes how to deploy Yang Suite in Python environment and test XPath on Cisco Catalyst 9800 WLC.
Prerequisites
Requirements
Cisco recommends that you have knowledge of these topics:
- Catalyst 9800 WLC configuration
- Basic knowledge of Python and virtual environments
Components Used
The information in this document is based on these software and hardware versions:
The information in this document was created from the devices in a specific lab environment. All of the devices used in this document started with a cleared (default) configuration. If your network is live, ensure that you understand the potential impact of any command.
Configure
Step 1. Install Python on Windows PC.
Download and install Python 3.8.2 for Windows.
Download Link: Python Releases for Windows
Explanation:
Python is required to run YANG Suite. Version 3.8.2 is used here for compatibility.
Step 2. Verify Python and PIP Installation.
After installation, confirm that Python and PIP are working correctly.
Commands:
C:\Users\Administrator>python --version
C:\Users\Administrator>pip --version
Expected Result (example):
C:\Users\Administrator>python --version
Python 3.8.2

C:\Users\Administrator>pip --version
pip 25.0.1 from c:\users\administrator\appdata\local\programs\python\python38-32\lib\site-packages\pip (python 3.8)
Step 3. Upgrade PIP to the latest version to ensure compatibility with YANG Suite.
Command:
C:\Users\Administrator>python -m pip install --upgrade pip
Explanation:
This command uninstalls the old version of PIP and installs the latest one to ensure compatibility with YANG Suite.
Expected Result (example):
- Old version (for example, pip 19.2.3) is uninstalled.
- New version (for example, pip 25.0.1) is successfully installed.
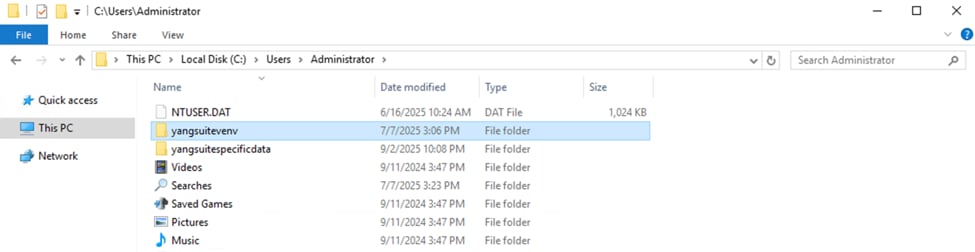
Step 4. Create a Virtual Environment to keep dependencies isolated from the system Python.
Command:
C:\Users\Administrator>python -m venv yangsuitevenv
Expected Result:
A new folder named yangsuitevenv is created on your PC C:\Users\Administrator.
Step 5. Activate the Virtual Environment.
Activate the environment before installing packages.
Command:
C:\Users\Administrator>.\yangsuitevenv\Scripts\activate
Expected Result:
The command prompt changes to show the active environment, for example:
(yangsuitevenv) C:\Users\Administrator>

Step 6. Install YANG Suite.
Install YANG Suite and its required modules to ensure YANG Suite and its dependencies are installed without errors.
Command:
(yangsuitevenv) C:\Users\Administrator>pip install yangsuite[core]
If you encounter proxy errors:
WARNING: Retrying (Retry(total=4, connect=None, read=None, redirect=None, status=None)) after connection broken by 'ProxyError('Your proxy appears to only use HTTP and not HTTPS, try changing your proxy URL to be HTTP. See: https://xxx.xxx.xx/en/1.26.x/advanced-usage.html#https-proxy-error-http-proxy', SSLError(SSLError(1, '[SSL: WRONG_VERSION_NUMBER] wrong version number (_ssl.c:1108)')))': /simple/yangsuite/Please check the network connectivity or proxy. If your environment requires the use of a proxy, please use this command instead:
Command:
(yangsuitevenv) C:\Users\Administrator>pip install yangsuite[core] --proxy http://x.x.x.x:port
Step 7. Upgrade YANG Suite Modules.
Update all YANG Suite modules to ensure the full functionality.
Command:
pip3 install --upgrade yangsuite yangsuite-devices yangsuite-filemanager yangsuite-yangtree yangsuite-coverage yangsuite-gnmi yangsuite-grpc-telemetry yangsuite-netconf yangsuite-restconf
Explanation:
This step ensures that YANG Suite has the latest plugins for NETCONF, RESTCONF, gNMI, and telemetry.
Step 8. Initialize YANG Suite.
Run the initialization process to enter interactive configuration mode.
Command:
(yangsuitevenv) C:\Users\Administrator>yangsuite
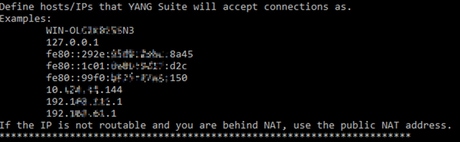
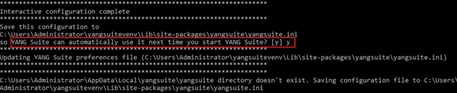
Step 9. Configure YANG Suite Settings.
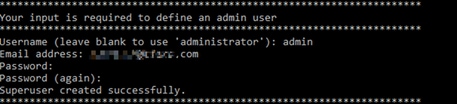
During initialization, you are prompted to configure the service port, hostname, username and password :
Create a folder named yangsuitespecificdata to store the user specific data (YANG modules,device profiles and so on).

Service port number: default is 8480.

Host name: recommended to use localhost or 127.0.0.1.
Save settings: confirm with y.
Create username and password: for accessing the YANG Suite web UI.
Expected Result:
Configuration is saved, and services can be started with the command yangsuite:
(yangsuitevenv) C:\Users\Administrator>yangsuite
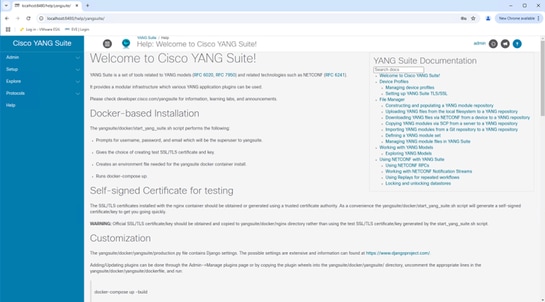
Step 10. Log in to Yang Suite via the browser: http://localhost:8480/ to access Cisco Yang Suite:
Verify
Step 1. Configure the Catalyst 9800 WLC.
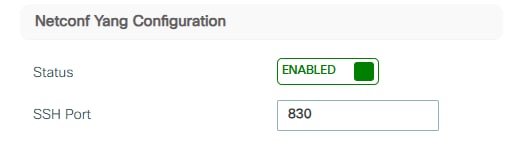
Ensure the Netconf Yang Status and SSH Port are enabled on the WLC.
Navigate to WLC > Administration > Management > HTTP/HTTPS/Netconf/VTY to enable the Netconf Yang Configuration Status and enable SSH Port 830.
CLI configuration:
9800(config)#netconf-yang
Configure AAA Settings.
CLI configuration:
9800(config)#aaa authentication login default local
9800(config)#aaa authorization exec default local
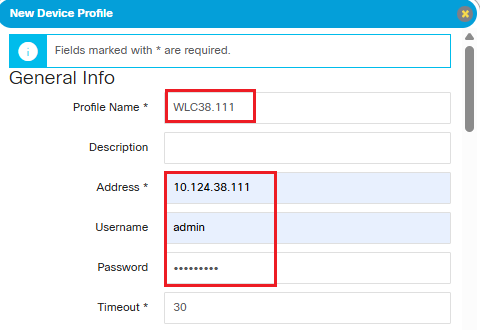
Step 2. Add the WLC to YANG Suite.
In YANG Suite, navigate to Setup > Device Profiles > Create New Device.

Input the Profile Name, WLC IP address, username and password.
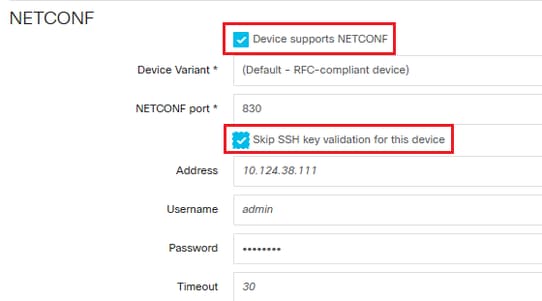
Activate netconf by clicking Device supports NETCONF and clicking Skip SSH key validation for this device.
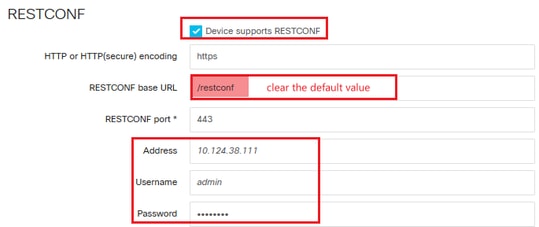
Activate Restconf by clicking Device supports RESTCONF and clear the default RESTCONF base URL to empty.
Activate SSH by clicking Device allows SSH login and verify the WLC info.

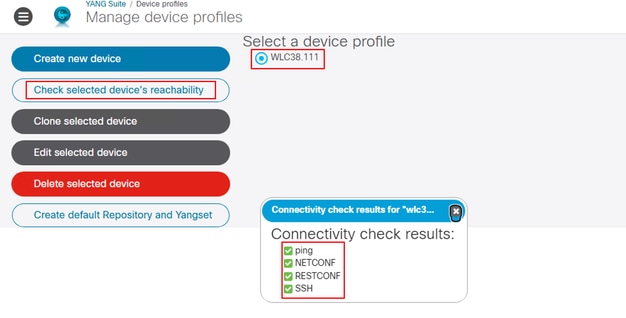
Step 3. Verify the Device Reachability.
Click the Check selected device’s reachability and selected the device profile to check whether the WLC can be reached from YANG Suite.
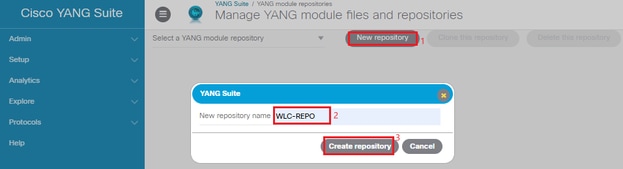
Step 4. Create a YANG Suite Repository.
Create a repository to store the needed WLC YANG models.
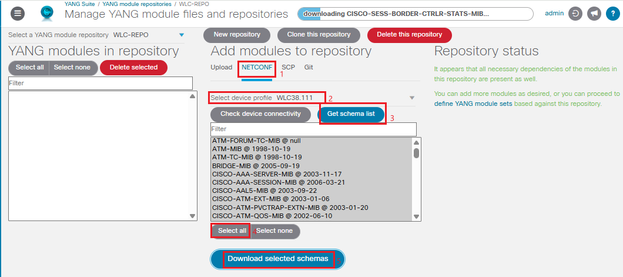
Select NETCONF and Select device profile to Get schema List in order to download all schema from WLC
Step 5. Create a New YANG module set to associated YANG file repository.

For example, if the wireless info of Catalyst 9800-specific YANG models is required, input wireless to choose all modules and click Add selected.
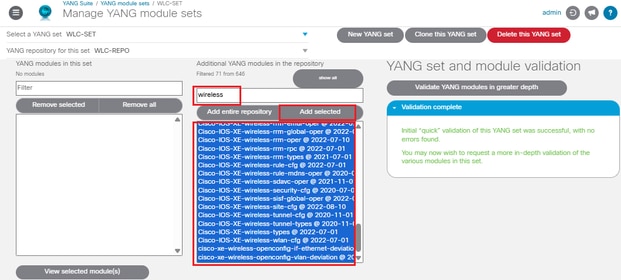
If you need more than just the wireless components, you can simply click Add entire repository at this step.
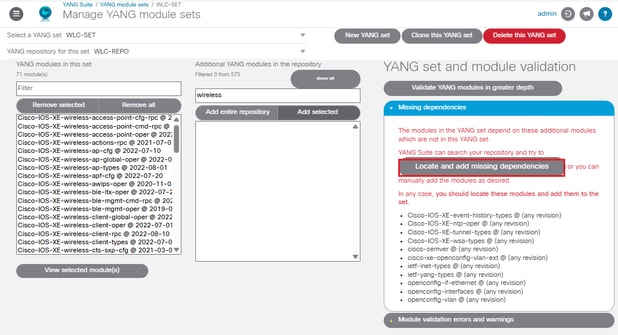
If you only add the wireless modules, there is also a button called Locate and add missing dependencies. Clicking it automatically pulls in any additional modules required by the wireless module.
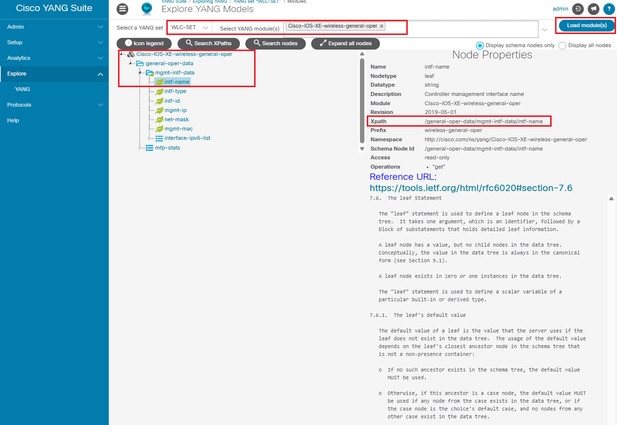
Step 6. Test XPath Queries.
Use the XPath provided by YANG Suite to obtain data from WLC.
Get the needed XPath in YANG Suite.
Here you take controller management interface name as an example.
Configure telemetry ietf on WLC CLI
C9800(config)#telemetry ietf subscription <subscription-id>
C9800(config-mdt-subs)#encoding encode-kvgpb
C9800(config-mdt-subs)#filter xpath <xpath-expression>
C9800(config-mdt-subs)#source-address <wlc-ip>
C9800(config-mdt-subs)#stream yang-push
C9800(config-mdt-subs)#update-policy periodic <interval-in-centiseconds>
C9800(config-mdt-subs)#receiver ip address <collector-ip> <collector-port> protocol grpc-tcp
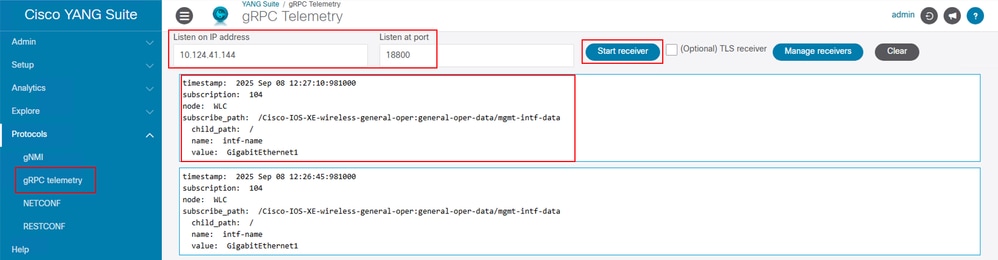
For example:
C9800(config)#telemetry ietf subscription 104
C9800(config-mdt-subs)#encoding encode-kvgpb
C9800(config-mdt-subs)#filter xpath /general-oper-data/mgmt-intf-data/intf-name
C9800(config-mdt-subs)#source-address 10.124.38.111
C9800(config-mdt-subs)#stream yang-push
C9800(config-mdt-subs)#update-policy periodic 2500
C9800(config-mdt-subs)#receiver ip address 10.124.41.144 18800 protocol grpc-tcp
Enable monitoring in gRPC telemetry to get the needed data sent by WLC.
Related Information
 Feedback