Implement Access Restrictions for Computers Behind a Small Business VOIP Router
Available Languages
Contents
Introduction
This article is one in a series to assist in the setup, troubleshooting, and maintenance of Cisco Small Business products (formerly Linksys Business Series).
Refer to Cisco Technical Tips Conventions for more information on document conventions.
Q. How do I implement Access Restrictions for computers behind my router?
A. Access Restrictions allow you to limit Internet access on your network. You can deny certain computers Internet access, block certain applications, for example, DNS, Ping, HTTP, HTTPS, FTP, POP3, IMAO, SMTP, NNTP, Telnet, SNMP, TFTP and IKE, and services, and block certain websites by the use of keywords or by the URL at a given time. This feature allows you to customize up to ten different Internet Access Policies for particular PCs, which are identified by their IP or MAC Addresses.
Enable Access Restrictions on a Linksys Router
Complete these steps:
- Access the web-based setup page of the router. Refer to Accessing the VOIP Router's Web-Based Setup Page for more information and instructions.
- When the web-based setup page of the router appears, choose Access Restrictions > Internet Access.

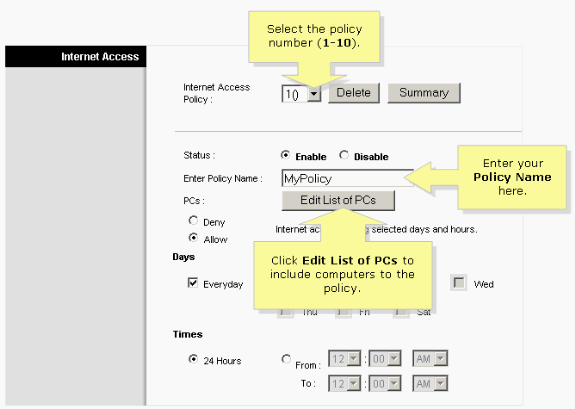
- Choose the policy number from 1 to 10 in the Internet Access Policy drop-down menu.
- Enter the name of the policy in the Enter Policy Name field such as MyPolicy, and click Edit List of PCs in order to add PCs to the policy. A window similar to step 7 appears.

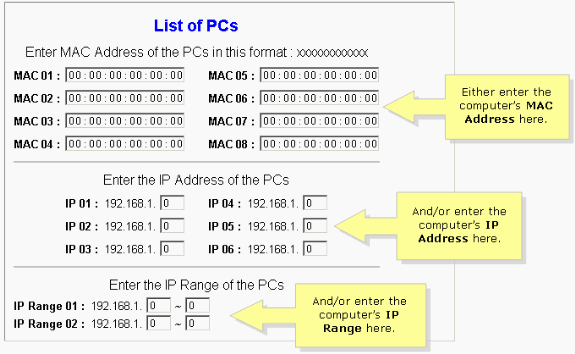
- When the List of PCs screen appears, specify PCs by IP Address or MAC Address. Enter the appropriate IP Addresses into the IP fields. If you have a range of IP Addresses to filter, complete the appropriate IP Range fields. Enter the appropriate MAC Addresses into the MAC fields.

Note: The reason Linksys provides three columns (MAC Address, IP Address and IP Range) is to let you key-in based on the address. For example, if a customer has MAC Addresses to be restricted, then you need to key-in the particular MAC Addresses in the MAC Address column; it is the same for IP Address. For IP Range, if you want to restrict a group of IP Addresses, for example 192.168.1.20 to 192.168.1.40, then you need to key-in the range of IP Addresses in IP Range column.
- Click Save Settings, and then close the window in order to return to the Internet Access screen.
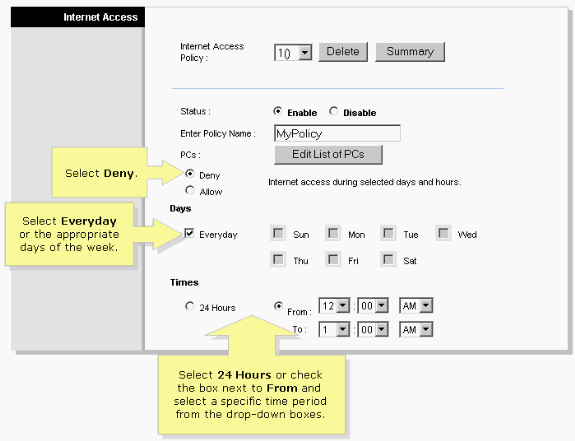
- If you want to block the listed PCs from Internet access during the designated days and time, choose Deny.
- Set the days when access is filtered. Choose Everyday or the appropriate day/s of the week.
- Set the time when access is filtered. Choose 24 Hours or choose the box next to From and choose a specific time period from the drop-down boxes.

- Click Save Settings.
- Repeat steps 3-10 in order to create or edit additional policies.
Related Information
Revision History
| Revision | Publish Date | Comments |
|---|---|---|
1.0 |
12-Dec-2008
|
Initial Release |


 Feedback