Introduction
This document describes how to integrate Cisco Emergency Responder with Cisco Unified Communications Manager (CUCM) using switchport phone tracking.
Prerequisites
Requirements
Cisco recommends that you have knowledge of these topics:
- Cisco Emergency Responder (CER)
- CUCM
- Call routing
- Basic Simple Network Managment Protocol (SNMP) Knowledge
Components Used
The information in this document is based on these software versions:
- CER verrsion 11.5
- CUCM version 11.5
The information in this document was created from the devices in a specific lab environment. All of the devices used in this document started with a cleared (default) configuration. If your network is live, ensure that you understand the potential impact of any command.
Background Information
This document was written by a Cisco TAC engineer and it does not replace the need to reference the configuration and design guides.
Sections with examples represent a possible setup with sample values included for reference only. The configuration of private networks depends on the needs of the private entity and their internal design guidlines.
It is important to coordinate testing of emergency calls with the local Public Safety Answering Point (PSAP) after the integration of CER with CUCM is deemed complete.
If PSAP testing is successful, but more changes to the configuration are made after testing, it is important that you coordinate with your local PSAP to schedule testing of emergency calls once the additional changes are complete. In short, test emergency calls whenever changes are made that can impact call routing.
Basics of CER
911
A simple, easy to remember number to contact public emergency agencies such as police, fire, and medical for certain countries. Not all countries use 911 for emergency calls so please be aware of the proper emergency number to use. For simplicity, this document can only reference 911 as the emergency phone number.
PSAP
Publicly funded facility where emergency calls are routed and dispatched. This organization is comprised of live operators that answer the 911 calls and determine which emergency agency (police, fire, and so on) needs to be dispatched.
Automatic Location Identification (ALI)
The automatic display at a PSAP of the calling party and an address/location. The operator can use this info to locate the person that made the 911 call.
ALI Database (ALI-DB)
The phone company has a subscriber database that matches phone numbers to names and addresses. When a call arrives at the 911 network this database is used to pull up the address that matches the calling phone number and makes it easier for the PSAP operator to locate you.
Automatic Number Identification (ANI)
This is another term for the calling party number. The ALI is different from the ANI in that the ALI contains more information about the location of the caller.
Emergency Response Location (ERL)
The area from which an emergency call is placed. This is not necessarily the location of the emergency. If an emergency caller reports a general emergency, the actual emergency can be in a different area. In CER, you assign switch ports and phones to ERLs, and ERL definitions include ALI data. The ALI data is used by PSAP to determine the location of the caller that places the 911 call.
Emergency location identification number (ELIN)
A phone number which the PSAP can use to call back the emergency caller. The PSAP can need to call the ELIN if the emergency call is abrubtly disconnected, or if the PSAP needs additional information after intentionally ending the emergency call. The ELIN is part of the ERL configuration.
Call Flows
These are the different call flows that you can have with CER:
911 call

PSAP Callback

Onsite Alert
Configuration
Configure the Cisco Unified Communications Manager
- Create Partitions
- Create Calling Search Spaces
- Assign Partitions and CSS to phones
- Create CTI Route Points (CTI RP)
- Create CTI Ports
- Create Route Patterns
- Create Translation Patterns
- Configure PSAP Callback
- Create JTAPI User
- Configure SNMP Service
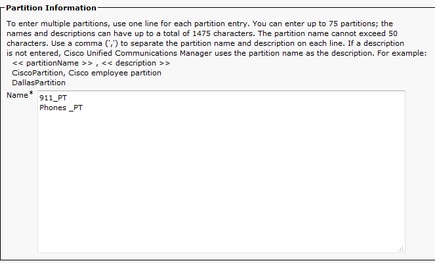
Create Partitions
Create two partitions. Navigate to Call Routing > Class of Control > Partition:
Note:
911_PT is the partition that houses your emergency numbers. If you already have a partition for emergency numbers, you can continue to use your previously configured partition. Simply substitute the name of your preconfigured partition wherever 911_PT is mentioned in this document.
Phones_PT is the partition associated with all the internal Directory Numbers (DN). If you already have a partition for internal DNs, you can continue to use your previously configured partition. Simply substitute the name of your preconfigured partition wherever Phones_PT is mentioned in this document.
Create Calling Search Space
Create two Calling Search Spaces. Navigate to Call Routing > Class of Control > Calling Search Space:
- 911_CSS: can include the 911_PT and Phones_PT
- Phones_CSS: can include just the Phones_PT

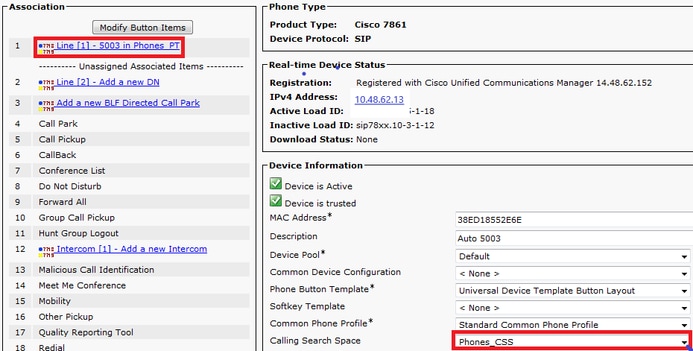
Assign Partitions and CSS to IP Phones
- The DNs on the IP Phones need to be associated with the Phones_PT partition.
- The phone need to use the Phones_CSS in order to call the translation patterns (9.911 and 911).
Warning: If you have a more complicated setup, the IP Phones need to be able to dial the 911 and/or 9.911 Translation Patterns (configured later) and the CTI Route Point and CTI Ports need to be able to call the IP Phones.
Create CTI Route Points
- The 911 and 912 CTI RP need to be associated with the 911_PT partition and uses the 911_CSS.
- The 911 and 9.911 Translation Patterns need to be able to reach the 911 CTI RP.
- The 911 CTI RP needs to be able to call the Route Patterns configured for CER.
- The 913 CTI RP also needs to be associated with the 911_PT partition and uses the 911_CSS.
- The PSAP Callback Translation Patterns need to be able to reach the 913 CTI RP.

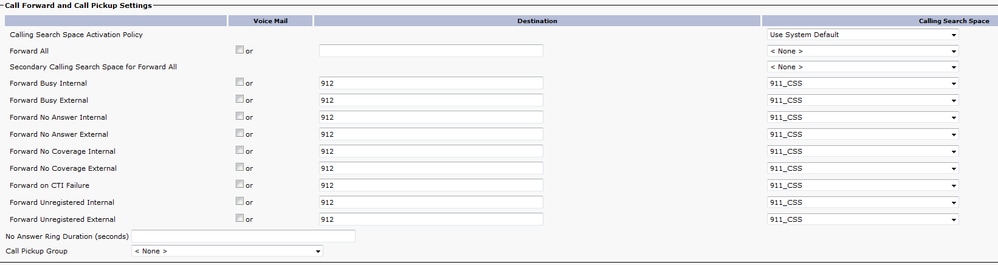
CTI Route Point - 911
- For internal and external calls the Forward Busy, Forward No Answer, Forward No Coverage, Forward Unregistered, and Forward on Failure need to have a destination of 912 (if you have a secondary CER Server), an onsite security number, or a route pattern so the 911 call can still go out to the PSAP.
- For examples in this document the 911 CTI RP forwards calls to 912 when needed. Make sure the Calling Search Space for the Call Forward and Call Pickup Settings use the 911_CSS so forwarded calls can reach the 912 CTI RP.
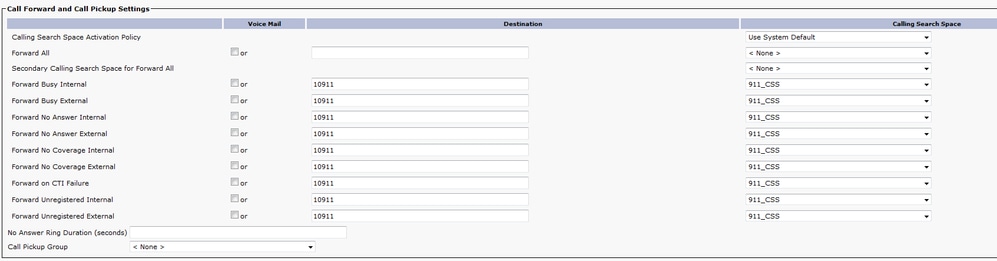
CTI Route Point - 912
- For internal and external calls the Forward Busy, Forward No Answer, Forward No Coverage, Forward Unregistered, and Forward on Failure need to route calls to an onsite security number or a route pattern so the 911 call can still go out to the PSAP.
- For examples in this document the 912 CTI RP forwards calls to the route pattern used for the Default ERL when needed. Make sure the Calling Search Space for the Call Forward and Call Pickup Settings use the 911_CSS so forwarded calls can reach the route pattern.
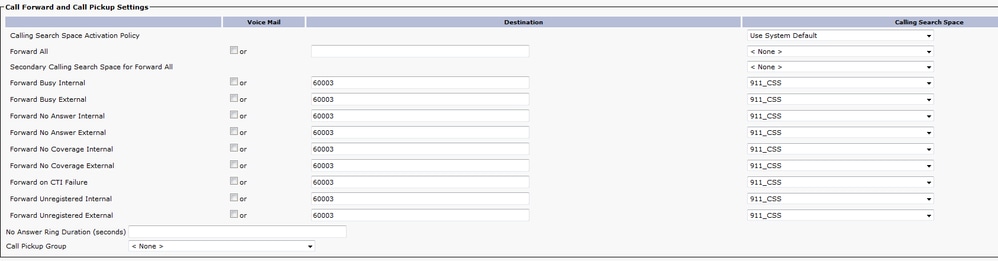
CTI Route Point - 913
- For internal and external calls the Forward Busy, Forward No Answer, Forward No Coverage, Forward Unregistered, and Forward on Failure need to route calls to an onsite security number.
- For examples in this document the 913 CTI RP forwards calls to 60003 which is the onsite security number. Make sure the Calling Search Space for the Call Forward and Call Pickup Settings use a CSS that can reach the onsite security number.
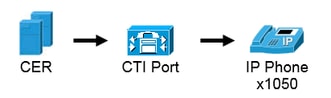
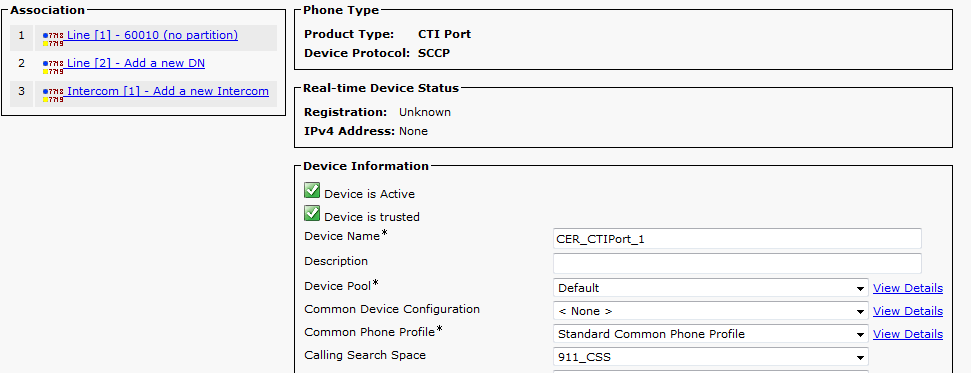
Create CTI Ports
- CTI Ports are only used for phone onsite alerts.
- CTI Ports need to be able to call the onsite alert number (can be an internal or external number so long as calls reach the onsite security personel).
- CTI Port DNs must be in consecutive order.
- CER only supports G.711 so the region relationship between the CTI ports and phones for onsite security must not be set under 64 kbps.
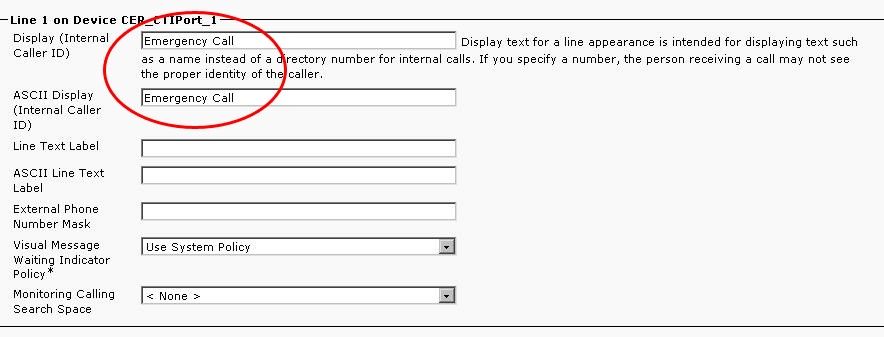
Tip: For internal calls you can display on the screen Emergency Call or something else if you like. This way people understand the urgency of the call before they answer it. For external calls you can configure the External Phone Number Mask to a number that everyone can recognize.
Create Route Patterns
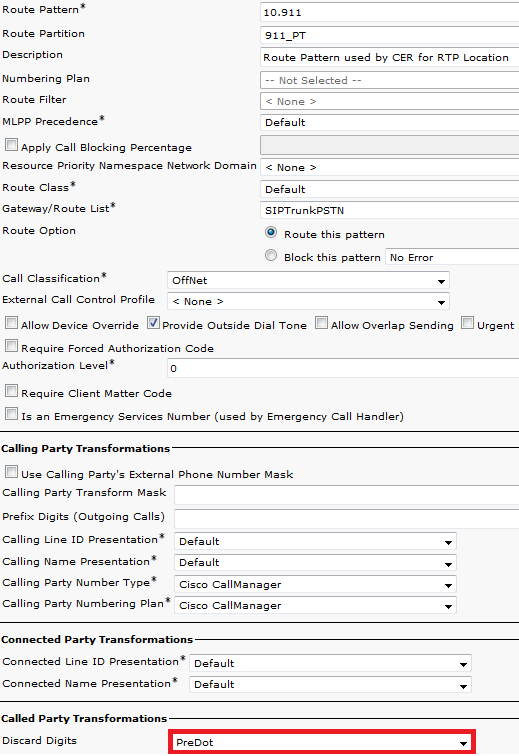
Default ERL Route Pattern
- Needs to be in the 911_PT.
- You can set the Calling Party Transform Mask to be the number of the ELIN in the ERL. Regardless, CER can change it to the ELIN.
- Set the Discard Digits to PreDot.
In this example, the Default ERL is the same one for the RTP Location
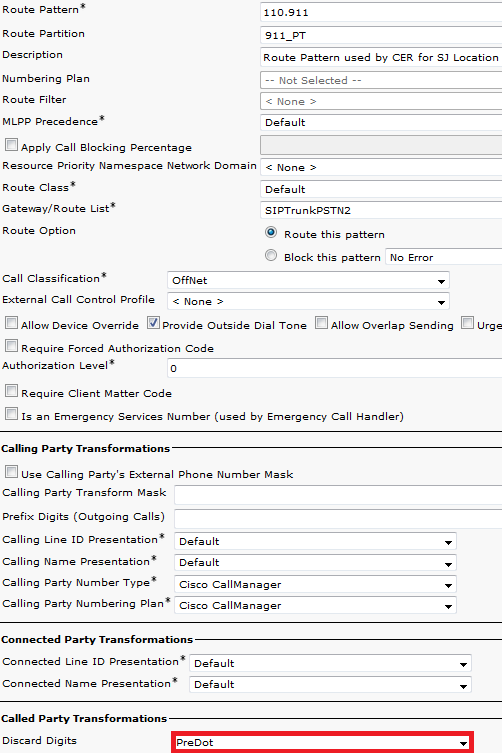
ALL other ERLs Route Patterns
- Needs to be in the 911_PT.
- You can set the Calling Party Transform Mask to be the number of the ELIN in the ERL. Regardless, CER can change it to the ELIN.
- Set the Discard Digits to PreDot.
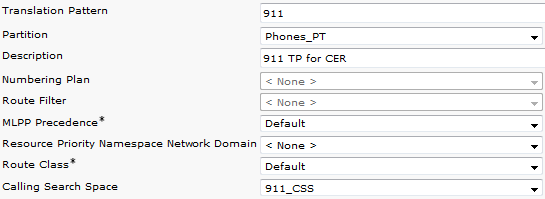
Create Translation Patterns
- 911 and 9.911 translation pattern in the Phones_PT (so the phones can call them) with the 911_CSS (so it can reach the 911 CTI RP).
- Translation patterns for the PSAP Callback in the 911_PT (so the gateway can call them) with the 911_CSS (so it can reach the 913 CTI RP).

Create Translation Patterns 911 and 9.911
The only difference between the 911 and 9.911 Translation Patterns is the Discard PreDot on the 9.911 Translation Pattern.

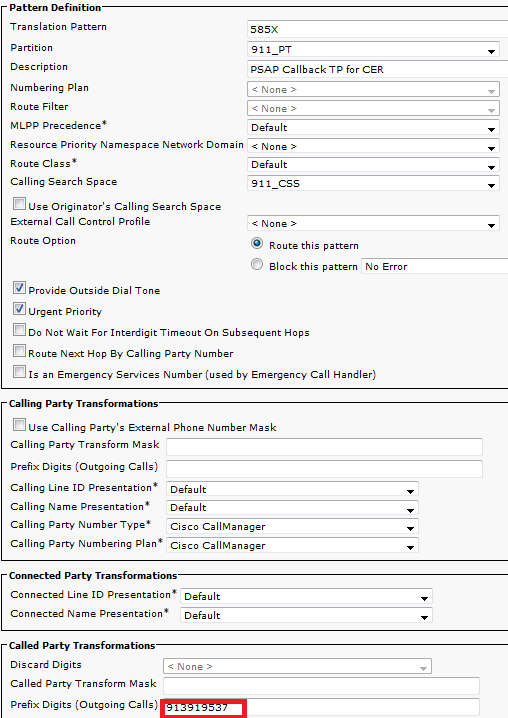
Configure PSAP Callback
To configure PSAP callback we need to assign a CSS to the inbound gateway and create a translation pattern.
- For Inbound calls usually people only send 4 digits into Callmanager; therefore, the translation patterns for PSAP Callback are only 4 digits. The pattern of the translation patterns can be configured accordingly for the dial plan in use.
- The CSS for the gateway needs to be the 911_CSS (so it can reach PSAP Callback Translation Patterns).
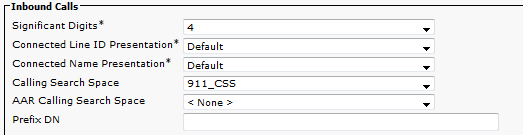
In the examples here, since only 4 digits are passed in from the gateway/trunk, in order for it to hit the 913 CTI RP we need to prefix digits (for this example prefix: 913919537). This way the pattern 913XXXXXXXXXX that is configured in both CCM and CER can be matched.
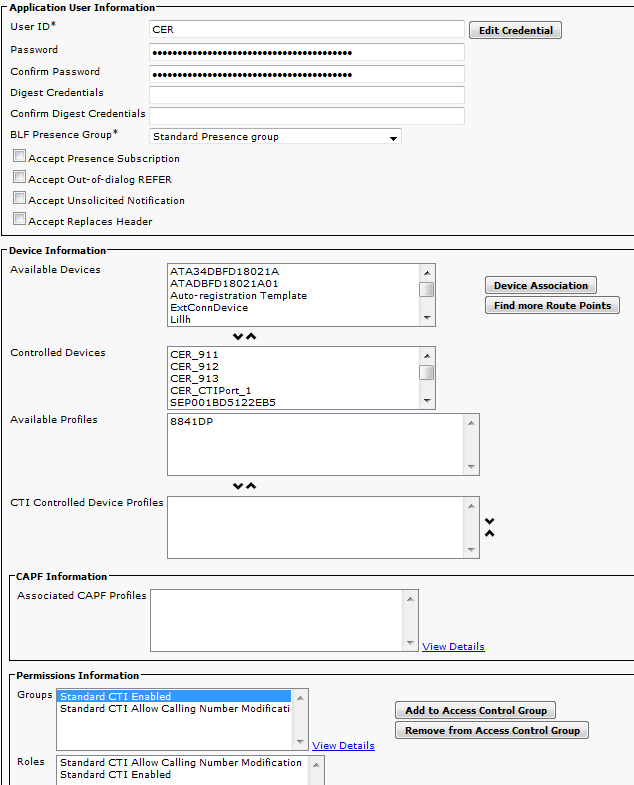
Create JTAPI User
- The JTAPI User needs to be an Application User (not an End User).
- The JTAPI User needs to have the CTI Route Points and CTI Ports associated with it. If not, these CTI devices cannot register and calls cannot work.
- The JTAPI User needs to be added to the the Standard CTI Allow Calling Number Modification and Standard CTI Enabled Groups.
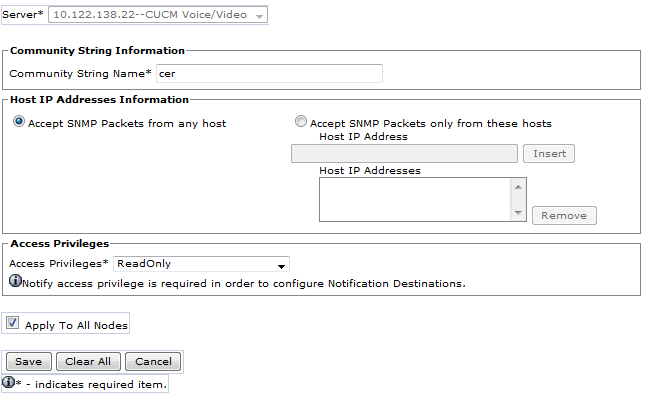
Configure SNMP Configuration
- Make sure the SNMP Service is activated and started on all Callmanagers (Cisco Unified Serviceability > Tools > Control Center - Feature Services).
- The SNMP Community String Name configured on CUCM needs to be the same string configured on CER
- Ensure the Community String Name is set to ReadOnly
Configuring Cisco Emergency Responder
- Create CER Web Users (optional)
- Configure Group Settings
- Configure Telephony Settings
- Configure Server Settings
- Entering Licenses
- Identify Cisco Unified Communications Manager Clusters
- Create Onsite Alerts (optional)
- Create Emergency Response Locations (ERLs)
- Configure SNMP
- Identify LAN Switches
- Phone Tracking via Switch Ports
- Phone Tracking Schedules
- Phone Tracking (switch ports, unallocated phones, manually configured phones and IP subnet-based)
- Upgrading CCM (opt.)
Create CER Web Users (optional)
- If you want to limit the access someone has to the CER Webpage, you can create users via User Management and add the users to a User Group with specific roles
- Different security levels/groups are:
User
ERL Administrator
Admin Utility
Network Administrator Serviceability
System Administrator
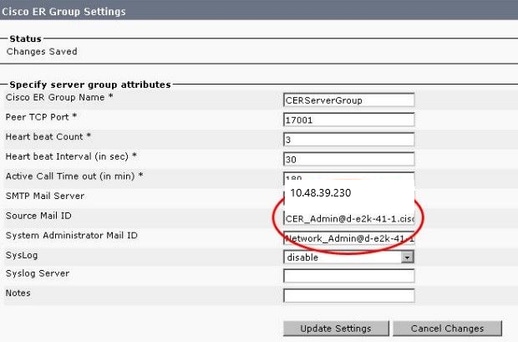
Configure Group Settings
System > Cisco ER Group Setting
- Setting the SMTP Mail Server, Source Mail ID, and System Administrator Mail ID is optional.
- If you want onsite email alerts, then you need to configure SMTP Mail Server and Source Mail ID.
- If you want to receive emails about critical system alerts, configure the SMTP Mail Server and Administrator Mail ID. Onsite email alerts and emails about critical system alerts can be configured at the same time and run in parallel.
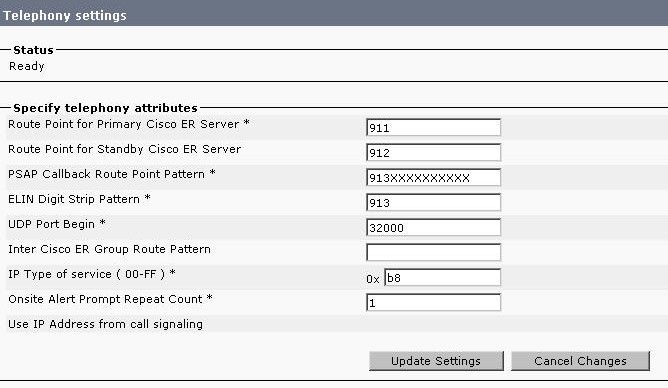
Configure Telephony Settings
System > Telephony Settings
You cannot change anything on this page; however, changes made here must match the CTI Route Points configured on CUCM.
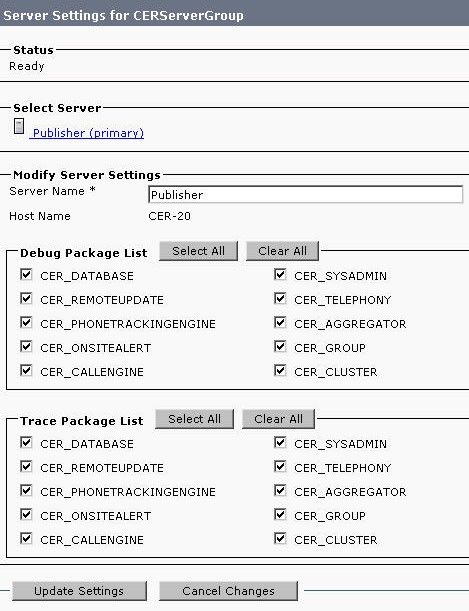
Configure Server Settings
System > Server Settings
It is best to put a check in all the boxes for the Debug Package List and Trace Package List. This increases the chances to identify the root cause if the system experiences problems. Enabling all of these debugs and traces have minimal impact on server performance as CER is the only thing on the server.
Identify Cisco Unified Communications Manager Clusters
Phone Tracking > Cisco Unified Communications Manager
- Every CUCM node running the CallManager service must also be running SNMP services.
- The Callmanager that is specified as the Cisco Unified Communications Manager must be running the CallManager service.
- If everything is configured correctly, and SNMP works, you can see all your Callmanager nodes if you click the hyperlink Cisco Unified Communications Managers List which is displayed in the top right of the image shown next.
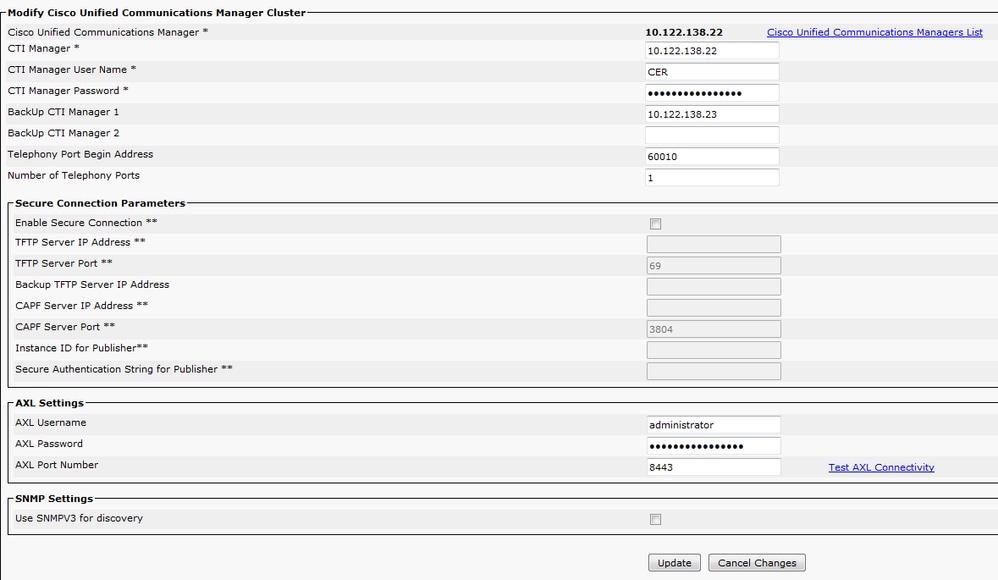
Note: Once this step is performed, CTI Route Points and CTI Ports can show as registered on CUCM.
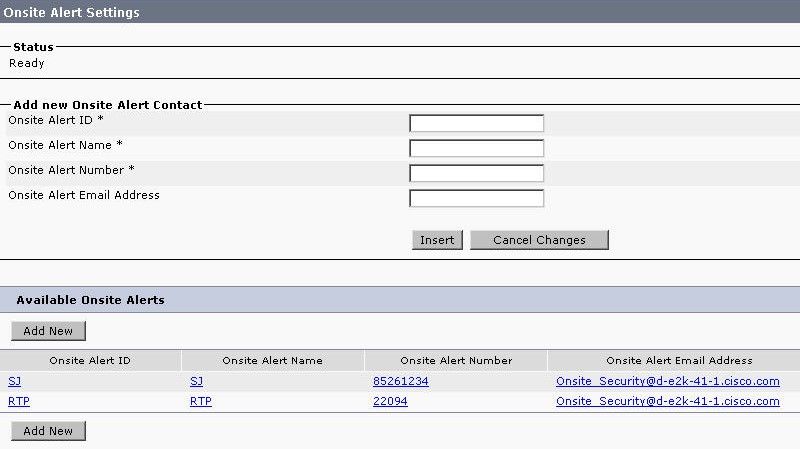
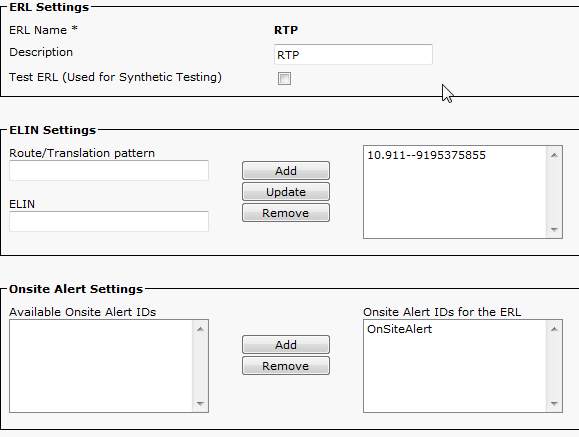
Create Onsite Alerts (optional)
ERL > Onsite Alert Settings
- An external number such as a cell phone can be used for the onsite alerts as long as the CTI Ports on CUCM are able to place external calls.
- For email alerts to work, the SMTP Mail Server must be configured under Group Settings.
Note: The email address field is optional. All others are required.
Tip: It is possible to specify an email alias so multiple people get the email. This can be useful if your security team has an email alias.
Create Emergency Response Locations (ERLs)
ERL > Conventional ERL
- ERLs can be as granular as you want (building, floor, quadrant, room, workstation, and so on).
- If a call is placed through CER, and there is no ERL associated with that phone, the Default ERL be used so it’s best to configure the Default ERL.
- The same Route Pattern (ie, 10.911) can be used for multiple ERLs if they use the same Gateway/RouteList. In CER 1.x, the Calling Party Modification must be enabled under Group Settings for use the same Route Pattern. In CER 2.0, the option is not there as it is enabled by default.
- The Route Pattern become the called number and the ELIN become the calling number when the call is routed back to CUCM.

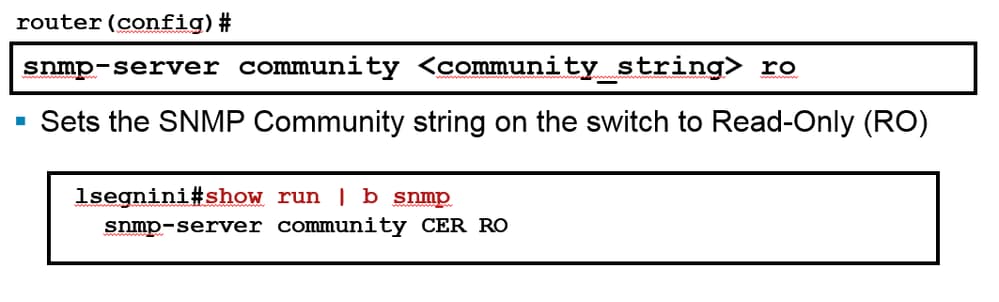
Configure SNMP
Phone Tracking > SNMP V2
All switches and CallManager servers must be configured here for SNMP phone tracking to work
Tip: You can specify *.*.*.* or other wildcards/ranges. You can also configure specific IP Addresses if you please.

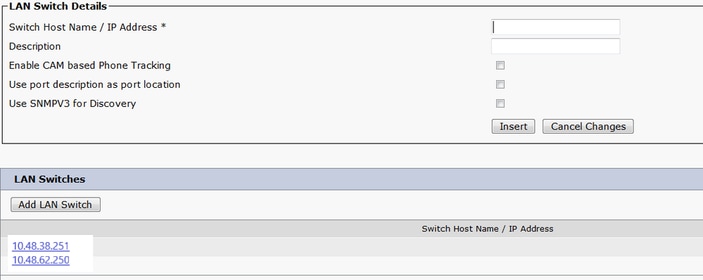
Identify LAN Switches
Phone Tracking > LAN Switch
- All switches that have Phones connected to them need to be configured here
- If it is a non-Cisco switch, or CDP is disabled, check the Enable CAM based Phone Tracking checkbox.
Phone Tracking via Switch Ports
ERL Membership > Switch Ports
- Assign the ERLS to the switch ports once phone tracking is complete
- A location can be specified; however, it is not required
- In the example shown next, Phone 60002 is tracked via IP Phone Subnet, but the switch is running SNMP so the phone still shows up here.

SNMP Configuration on Switch
Verify
- CTI Route Points and CTI Ports can be registered.
- IP Phones connected to the switches must be auto-discovered by CER.
- IP Phones are able to call 911 and have the call route through CER.
- PSAP call back can be routed to the last phone to call the PSAP.
Troubleshoot
911 call
- Verify the calling phone’s CSS is associated with the partition of the 911 / 9.911 translation patterns.
- Confirm the 911 / 9.911 translation patterns have urgent priority checked and their CSS is associated with the partition of the 911 CTI RP.
- Ensure pre-dot strip is configured for the 9.911 translation pattern.
- Validate the registration status of the 911 CTI RP and be sure it is registered to the primary CER.
- Call Forward settings configured on the 911 CTI RP can point to the 912 CTI RP for failover scenarios.
- Verify the ERL configured in CER makes proper RP / ELIN modifications based on the origin of the 911 call.
- Make sure the 911 / 912 CTI RP’s CSS is associated with the partition of the route pattern for the redirected call from CER.
PSAP Callback
- Gateway’s incoming CSS can reach the partition of the translation pattern configured for callback call.
- Translation pattern configured with correct number of digits, based on significant digits sent in GW with/without any prefixes.
- Translation pattern prefixes 913, along with the rest of the most significant digits. TP’s CSS can reach the partition of the 913 CTI RP.
- CER strips 913 (ELIN Digit Strip field). Callback is within the time specified in Active Call Time out (in min).
- 913 CTI RP’s CSS can be able to reach the partition of the original calling party phone DN.
On Site Alert
- Onsite alert contacts are configured correctly for each ERL.
- CTI Ports are registered, and their CSS can reach the partition of the Onsite alert personnels’ phone DNs.
- Ensure there are enough CTI Ports to handle simultaneous calls to the onsite alerts.
911 Operator not Getting the Correct ELIN Value
- Ensure System > Cisco ER Group Settings > Calling Party Modification value is set to enable.
- Application user used for interaction between CUCM and CER has Standard CTI Enabled and Standard CTI Allow Calling Number Modification user groups.
- Use Calling Party’s External Phone Number Mask checkbox is unchecked, on the Route Pattern for the 911 call.
- No Calling Party modifications at the RP/RL/RG/Gateway levels.
- If all the previous settings look correct, run debug on the gateway to check the calling party number for the 911 call (Example: ‘debug isdn q931’ for a PRI gateway).
Switch Ports not Showing up after Phone Tracking is Complete
- Check SNMP configuration on CER, SNMP configuration on switches and that the switches are configured in CER.
- Ensure that the switches are supported to be tracked on that version of CER. If the switch is not supported, you can see “This device is not supported <ip address>” Error message in phone tracking logs.
- The list of devices supported by CER is listed in cisco.com Switch ports are showing up but phones are not.
- Check SNMP configuration on CER and CCMs.
- On each CUCM, Cisco Unified Serviceability > Tools > Control Center – Feature Services >Cisco CallManager SNMP Service needs to be Activated and Started.
- On each CUCM, ensure that the network service SNMP Primary Agent is Running.
- Ensure all CUCM servers have phones that need to be tracked in CER, show up in the M List. The list can be checked by going to Phone Tracking > Cisco Unified Communications Manager > Click Cluster > Then click Cisco Unified Communications Managers List. This can show all nodes in CUCM cluster that run CCM service.
- You can run SNMP walks to confirm CER is able to pull IP Phone information from CUCM and switch:
Enter the community string:: cer
Enter the ip address of the Server, use 127.0.0.1 for localhost.Note that you need to provide the IP address, not the hostname.:: 10.48.62.250
The Object ID (OID):: 1.3.6.1.4.1.9.9.23.1.2.1.1.6
Enter parameter as "file" to log the output to a file. [nofile]::
This command can temporarily impact CPU performance.
Continue (y/n)?y
iso.3.6.1.4.1.9.9.23.1.2.1.1.6.10101.1 = STRING: "rtp12-calo-363-gw.cisco.com"
iso.3.6.1.4.1.9.9.23.1.2.1.1.6.10102.6 = STRING: "SEPF09E636EE825"
iso.3.6.1.4.1.9.9.23.1.2.1.1.6.10104.8 = STRING: "SEP74A02FC0AD11"
iso.3.6.1.4.1.9.9.23.1.2.1.1.6.10107.7 = STRING: "SEP6C416A369525"
iso.3.6.1.4.1.9.9.23.1.2.1.1.6.10108.12 = STRING: "SEP1C1D862F3EDF"
iso.3.6.1.4.1.9.9.23.1.2.1.1.6.10109.9 = STRING: "SEP6899CD85AE21"
iso.3.6.1.4.1.9.9.23.1.2.1.1.6.10111.10 = STRING: "SEP84B5170993E8"
iso.3.6.1.4.1.9.9.23.1.2.1.1.6.10113.11 = STRING: "SEP88908D737AC7"
iso.3.6.1.4.1.9.9.23.1.2.1.1.6.10115.2 = STRING: "SEP00235EB7A757"
 Feedback