Configure the LED Display on the WAP125 and WAP581
Available Languages
Objective
Light-emitting Diodes (LEDs) are useful for indicating activity and connection status on a Wireless Access Point (WAP). A WAP has two LED systems: System LED, which is the single LED on the front side of the WAP and the Ethernet LED which can be found on Ethernet ports of the WAP. The LED display configuration settings allow you to enable, disable, and associate a configured scheduler profile.
This document aims to show you how to enable, disable, and associate configured scheduler profiler on the WAP125 and WAP581.
Applicable Devices
- WAP125
- WAP581
Software Version
- 1.0.0.4
Configure LED Display
Note: The LED Display is enabled by default. When LED Display is disabled, all the LEDs are turned off. When LED Display value is Associate Scheduler, it will provide a drop-down box for each individual LED as well as for all the LEDs together to select a scheduler profile. When enabled, the LEDs indicate corresponding status and activity of the WAP device.
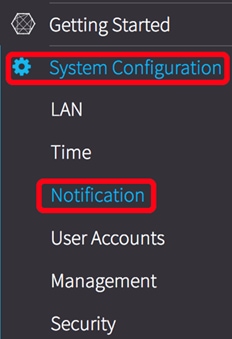
Step 1. Log in to the web-based utility of the WAP and choose System Configuration > Notification.

Step 2. In the LED Display area, click the drop-down menu to choose from the list:
- Enable — Enabled by default, enables all LEDs, Ethernet and System LED.
- Disable — Disables all LEDs.
- Associate Scheduler — LED display settings appears.

Note: In this example, Associate Scheduler is chosen. If you chose Disable or Enable, skip to Step 4.
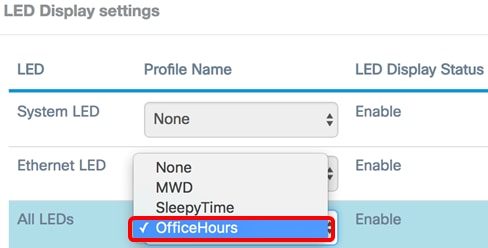
Step 3. In the LED Display settings area, you may choose to configure System LED only, Ethernet LED only, or All LEDs. Choose a profile from the Profile Name drop-down list.

Note: In this example, a pre-configured schedule named OfficeHours is chosen under All LEDs. By default, there is no profile associated to the LEDs. The drop-down selection will show the Scheduler Profile Names you have configured. If you have not yet set up one and want to learn how, click here. When the LED is associated to a Scheduler Profile, this column shows the status depending on the presence or absence of an active profile rule at that time of the day.
Step 4. Click  .
.
You now have successfully configured the LED Display on the WAP125 and WAP581.
 Feedback