Advanced Wireless Radio Settings on WAP121 and WAP321 Access Points
Available Languages
Objective
Radio settings directly control the behavior of the radio on a wireless access point (WAP) and its interaction with the physical medium. With the use of this setup, you can configure different radio frequency channels to reduce interference with the other access points nearby. This configuration is useful if the WAP is in close proximity to other wireless sources and the frequency needs to be changed so it will not interfere with the other source.
This article explains how to configure the advanced radio settings on WAP121 and WAP321 access points (AP)
Note: If you want to view the basic radio settings, refer to the article, Configuration of Basic Radio Settings on the WAP121 and the WAP321 Access Points.
Applicable Devices
• WAP121
• WAP321
Software Version
• 1.0.3.4
Advanced Settings Configuration
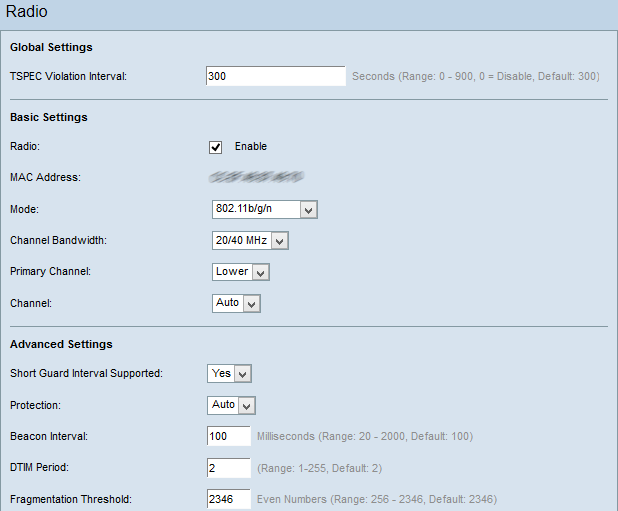
Step 1. Log in to the Access Point Configuration Utility and choose Wireless > Radio. The Radio page opens:

Note: Scroll down to the Advanced Settings area. Step 2 is only available if you choose a radio mode that supports 802.11n.
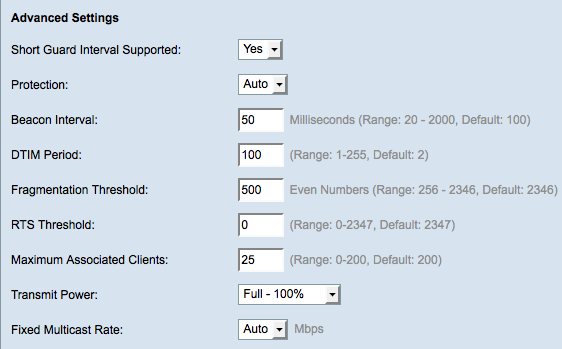
Step 2. Choose an option from the Short Guard Interval Supported drop-down list. The guard interval is the amount of time that the WAP waits between symbol transmission. This prevents Inter-Symbol and Inter-Carrier Interference (ISI, ICI). The guard interval can be shortened to increase throughput by up to 10 percent.
• Yes — When the WAP communicates with clients, it transmits data at a guard interval of 400 nanoseconds.
• No — When the WAP communicates with clients, it transmits data at a guard interval of 800 nanoseconds.

Step 3. Choose a protection setting from the Protection drop-down list. The protection settings protects other devices within range of your WAP.
• Auto — Prevents interference when legacy stations or applications are within the range of the WAP device.
• Off — Legacy clients may be affected by 802.11n transmissions.
Step 4. In the Beacon Interval field, enter the time in milliseconds between the beacon frame transmissions. Beacon frames are transmitted periodically to announce the presence of a wireless network.
Step 5. In the DTIM Period field, enter an integer from 1 to 255. Some beacon frames include Delivery Traffic Indication Messages (DTIM) which indicate if a client has buffered data on the WAP. A beacon count of 1 checks every beacon for DTIM messages while a count of 50 checks every 50th beacon.
Step 6. In the Fragmentation Threshold field, enter the maximum size of packets in bytes that can be transmitted over the network. Packets larger than the maximum size are fragmented and sent as several smaller packets. Fragmentation is not recommended unless you experience radio interference.
Step 7. In the RTS Threshold field, enter the Request to Send (RTS) threshold value which indicates the number of octets in a MAC Protocol Data Unit (MPDU), below which an RTS/CTS handshake is not performed. A low threshold value sends packets more frequently, which consumes more bandwidth. The more packets that are sent, however, the faster a network can recover from interference or collisions that occur on busy networks.
Step 8. In the Maximum Associated Clients field, enter the maximum number of devices allowed to access the WAP at any given time.
Step 9. From the Transmit Power drop-down list, choose the percentage value of the transmit power level for the WAP. If you use the full transmit power, then the device is more cost efficient and gives more broadcast range, hence reducing the number of access points required. If you use low transmit power then the WAP, devices need to be kept close to each other. This reduces the overlap and interference among APs.
Step 10. From the Fixed Multicast Rate drop-down list, choose the multicast traffic transmission rate (Mbps) that the WAP supports. If Auto is chosen, the WAP determines the best rate based on the wireless clients. The range of possible values is determined by the radio mode that is chosen in the Basic Radio Settings section.

Step 11. For each rate, check the desired transmission rate check boxes in the Legacy Rate Sets table.
• Supported — Rates that the WAP device supports.
• Basic — Rates that the WAP device advertises to the network in order to find other APs for communication. The more efficient way is to have the WAP device broadcast a subset of its supported rate sets.
Note: Step 12 is only available if a radio that supports 802.11n is chosen.
Step 12. Check the Enable check boxes in the MCS (Data Rate) Settings table for the desired modulation and coding scheme (MCS) index values that the WAP device advertises. The higher the MCS index that is enabled, the higher the maximum transmission rate is. For example, MCS index 15 has a maximum transmission rate of 300 Mbps while MCS index 0 has a maximum transmission rate of 15 Mbps.
Step 13. (Optional) To limit the number of multicast and broadcast packets transmitted across the network, check the Broadcast/Multicast Rate Limiting check box and then enter the following information:
• Rate Limit — Enter the rate limit of multicast and broadcast traffic in packets per second. The traffic within the rate limit will always be conformed and transmitted to the destination.
• Rate Limit Burst — Enter the limit of traffic that can be sent in a burst in packets per second. This is the traffic that is allowed to transmit temporarily even if it is above the maximum rate.

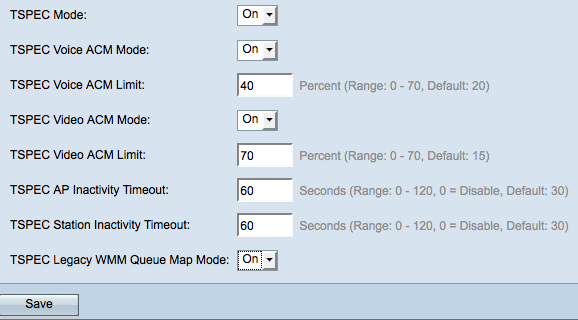
Step 14. Choose the traffic specification (TSPEC) mode from the TSPEC Mode drop-down list. TSPEC is sent from a QoS capable client and requests a certain amount of network traffic from the WAP.
• On — Enables TSPEC on the WAP. It is used if you want the device to handle traffic from the QoS capable devices.
• Off — TSPEC is not enabled on the WAP and the QoS capable devices are not given priority.
Step 15. Choose a mode that regulates the admission control mandatory (ACM) for the voice access category from the TSPEC Voice ACM Mode drop-down list.
• On — A station must send a TSPEC request for bandwidth to the WAP before it can send or receive a voice traffic stream.
• Off — Stations can send and receive voice traffic without a TSPEC request.
Step 16. Enter the maximum amount of traffic the WAP tries to transmit through wireless with a voice AC to gain access in the TSPEC Voice ACM Limit field.
Step 17. Choose a mode that regulates the admission control mandatory (ACM) for the video access category from the TSPEC Video ACM Mode drop-down list.
• On — A station must send a TSPEC request for bandwidth to the WAP before it can send or receive a video traffic stream.
• Off — Stations can send and receive voice traffic without a TSPEC request.
Step 18. Enter the maximum amount of traffic that the WAP device tries to transmit through wireless with a video AC to gain access in the TSPEC Video ACM Limit field.
Step 19. Enter the amount of time in seconds for the WAP device to detect a downlink traffic speculation as idle before the WAP deletes it in the TSPEC AP Inactivity Timeout field.
Step 20. Enter the amount of time in seconds for the WAP device to detect an uplink traffic speculation as idle before the WAP deletes it in the TSPEC Station Inactivity Timeout field.
Step 21. Choose the desired mode from the TSPEC Legacy WMM Queue Map Mode drop-down list.
• On — Enables legacy traffic to intermix on queues that operate as ACM.
• Off — Disables intermixed legacy traffic on queues that operate as ACM.
Step 22. Click Save to save the settings.
Revision History
| Revision | Publish Date | Comments |
|---|---|---|
1.0 |
11-Dec-2018 |
Initial Release |
 Feedback