Troubleshoot Static Internet Protocol (IP) Address Configuration Settings on FindIT Network Probe
Available Languages
Objective
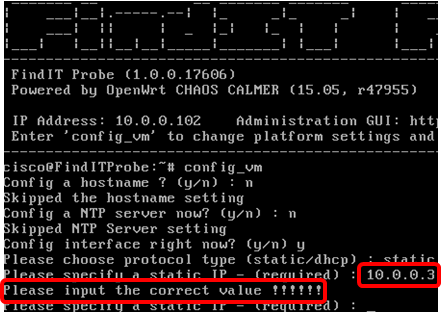
A recent error has been encountered where upon configuring the FindIT Network Probe to have a static IP address with a single zero value in at least one of the octets (such as 192.168.0.123 or 10.0.0.3) through the virtual machine console, a Please input the correct value!!!!!! error message appears.
Scenario:
The scenario below highlights the error when trying to configure a static IP address with a zero value in the IP address octets. Upon using the config_vm command to configure the static IP address of the FindIT Network Probe, the error message appears.
Solution #1:
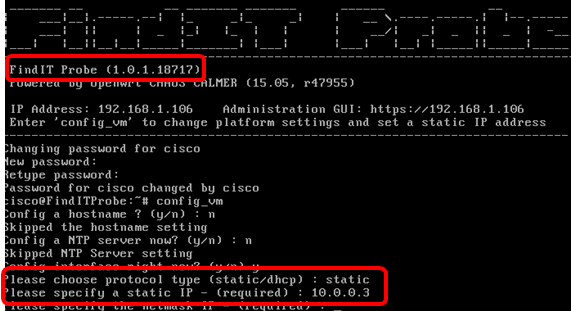
Solution #2:
Alternatively, you can assign a static IP on the Probe through its Administrative GUI instead. This article will provide you with instructions on how to troubleshoot, set, and verify the static IP configuration settings on your FindIT Network Probe.
Troubleshoot Static IP Configuration Settings on FindIT Network Probe
Configure Static IP Address on the Probe
Step 1. Access the console of the FindIT Network Probe virtual machine (VM).
Step 2. Log in to the VM console then enter the username and password. The default username and password is: cisco/cisco.

Note: If you have changed the password, enter the new password instead.
The DHCP IP Address and Administration GUI address will be displayed.

Note: In this example, the IP address of FindIT Network Probe is 10.0.0.102 and the Administration GUI address is https://10.0.0.102.
Step 3. On your web browser, enter the Administration GUI address of the Probe then press Enter.

Note: In this example, Google Chrome is used.
Step 4. Log in to the Administration GUI using your username and password. The default username and password is cisco/cisco.
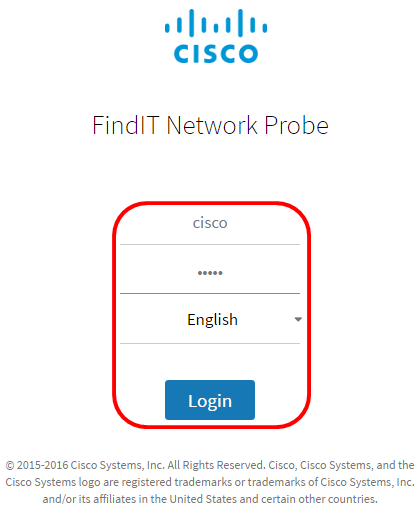
Note: If you already have changed the password or created a new account, enter your credentials instead.
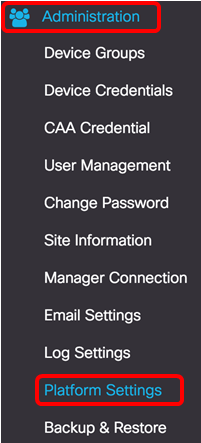
Step 5. Choose Administration > Platform Settings.
Step 6. (Optional) If you want to change the hostname of your Probe, enter the new hostname in the Hostname field. The hostname is used to identify the Probe when generating Bonjour advertisements and sending mail.

Note: In this example, FindITNetworkProbe is used.
Step 7. In the IP Settings area, click the Static IP radio button.
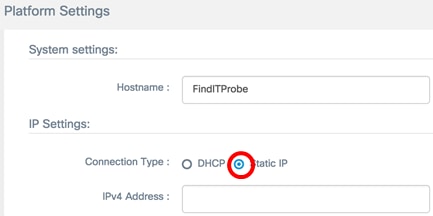
The options are:
- DHCP — The Probe will automatically get its IP address from the router. This is the default setting.
- Static IP — You can manually configure the IP address, subnet mask, default gateways and DNS servers.
Step 8. Enter the static IP address for the FindIT Network Probe in the IPv4 Address field.

Note: In this example, 10.0.03 is used.
Step 9. Enter the subnet mask of your network in the IPv4 Netmask field.

Note: In this example, 255.255.255.0 is used.
Step 10. Enter the default gateway address in the IPv4 Default Gateway field.

Note: In this example, 10.0.0.1 is used.
Step 11. Enter the static DNS address in the Static DNS 1 field.
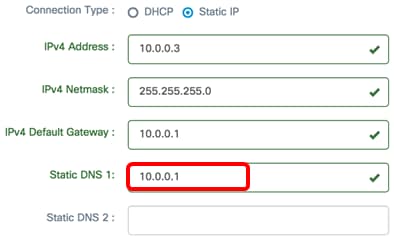
Note: In this example, 10.0.0.1 is used.
Step 12. (Optional) Enter another static DNS address in the Static DNS 2 field.
Step 13. (Optional) Enter the static IPv6 address in the IPv6 Address field. If you do not wish to configure the IPv6 settings of the Probe, skip to Step 18.
Step 14. (Optional) Enter the IPv6 prefix length in the IPv6 Prefix Length field. The range is 0 to 128.
Step 15. (Optional) Enter the IPv6 default gateway address in the IPv6 Default Gateway field.
Step 16. (Optional) If you want to configure the Time Settings of the Probe, choose a time source. The options are:
- Network Time Protocol — The Probe will synchronize the date and time with the specific NTP server or servers. This is the default setting.
- Local Clock — The Probe will synchronize the date and time based on what is set on the computer.
Step 17. (Optional) Enter the NTP Server in the NTP Server 1 and NTP Server 2 fields.
Note: If you want to learn how to manage the platform settings of the Probe, click here for instructions.
Step 18. Click Save.
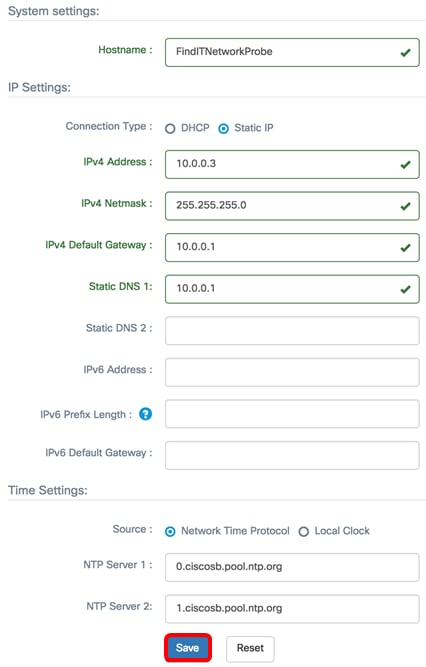
Step 19. (Optional) Click the Reset button to restore the previous settings.
Step 20. Once you are prompted by the popup message below, click Ok.

You should now have configured the static IP address settings on your FindIT Network Probe.
Verify the Configured Static IP Address on the Probe
There are two ways on how to verify that you have successfully configured the static IP address of the Probe.
Step 1. On your web browser, enter the new Administration GUI address of the Probe then press Enter. You should be able to access the Administration GUI of the FindIT Network Probe.

Step 2. Access and log in to the console of the FindIT Network Probe virtual machine (VM). The new IP Address and Administration GUI address will be displayed.

You should now have verified the new static IP address of the Probe.
Revision History
| Revision | Publish Date | Comments |
|---|---|---|
1.0 |
12-Dec-2018 |
Initial Release |
Contact Cisco
- Open a Support Case

- (Requires a Cisco Service Contract)
 Feedback