Introduction
This document describes how to integrate ThreatQ with Cisco Umbrella.
Prerequisites
Requirements
Cisco recommends that you have knowledge of these topics:
Components Used
The information in this document is based on Cisco Umbrella.
The information in this document was created from the devices in a specific lab environment. All of the devices used in this document started with a cleared (default) configuration. If your network is live, ensure that you understand the potential impact of any command.
ThreatQ and Cisco Umbrella Integration Overview
By integrating ThreatQ with Cisco Umbrella, security officers and administrators are now able to extend protection against advanced threats to roaming laptops, tablets, or phones while also providing another layer of enforcement to a distributed corporate network.
This guide outlines how to configure ThreatQ to communicate with Umbrella so security events from the ThreatQ TIP are integrated into policies that can be applied to clients protected by Cisco Umbrella.

Note: The ThreatQ integration is only included in certain Cisco Umbrella packages. If you do not have the required package and want the ThreatQ integration, please contact your Cisco Umbrella representative. If you have the correct Cisco Umbrella package but do not see ThreatQ as an integration for your dashboard, please contact Cisco Umbrella Support.
Integration Functionality
The ThreatQ platform first sends the Cyber Threat Intelligence that it found, such as domains that host malware, command and control for botnet or phishing sites, to Umbrella.
Umbrella then validates the threat to ensure it can be added to a policy. If the information from ThreatQ is confirmed to be a threat, the domain address is added to the ThreatQ Destination List as part of a security setting that can be applied to any Umbrella policy. That policy is immediately applied to any requests being made from devices using policies with the ThreatQ Destination List.
Going forward, Umbrella automatically parses ThreatQ alerts and adds malicious sites to the ThreatQ Destination List. This extends ThreatQ protection to all remote users and devices and providing another layer of enforcement to your corporate network.

Tip: While Cisco Umbrella tries its best to validate and allow domains which are known to be generally safe (for example, Google and Salesforce), to avoid unwanted interruptions, we suggest adding domains you never wish to have blocked to the Global Allow List or other destination lists as per your policy. Examples include:
- The home page for your organization
- Domains representing services you provide that can have both internal and external records. For example, "mail.myservicedomain.com" and "portal.myotherservicedomain.com".
- Lesser-known cloud-based applications you depend on that Cisco Umbrella does not include in automatic domain validation. For example, "localcloudservice.com".
These domains can be added to the Global Allow List, which is found under Policies > Destination Lists in Cisco Umbrella.
Umbrella Script and API Token Generation
Begin by finding your unique URL in Umbrella for the ThreatQ appliance to communicate with:
1. Log into your Umbrella dashboard.
2. Navigate to Settings > Integrations and select ThreatQ in the table to expand it.
3. Select Enable and then select Save. This generates a unique, specific URL for your organization within Umbrella.
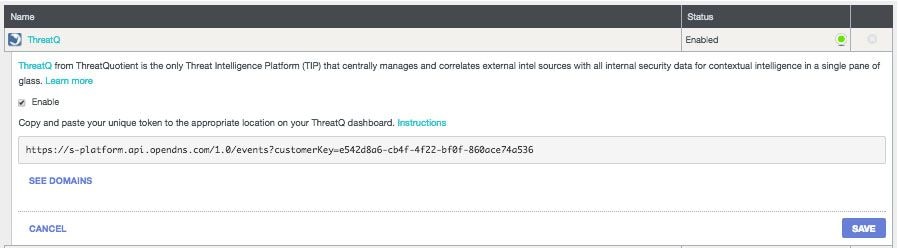
You need the URL later when you are configuring the ThreatQ to send data to Umbrella, so copy the URL and go to your ThreatQ dashboard.
How to Configure ThreatQ to Communicate with Umbrella
Log into your ThreatQ dashboard and add the URL into the appropriate area to connect with Umbrella.
Exact instructions vary, and Umbrella suggests contacting ThreatQ support if you are uncertain of how or where to configure API integrations within ThreatQ.
Observing Events Added to the ThreatQ Security Category in Audit Mode
Over time, events from your ThreatQ dashboard begin to populate a specific destination list that can be applied to policies as a ThreatQ security category. By default, the destination list and the security category are in Audit mode, which means that they are not applied to any policies and cannot result in any change to your existing Umbrella policies.
Note: Audit mode can be enabled for however long is necessary based on your deployment profile and network configuration.
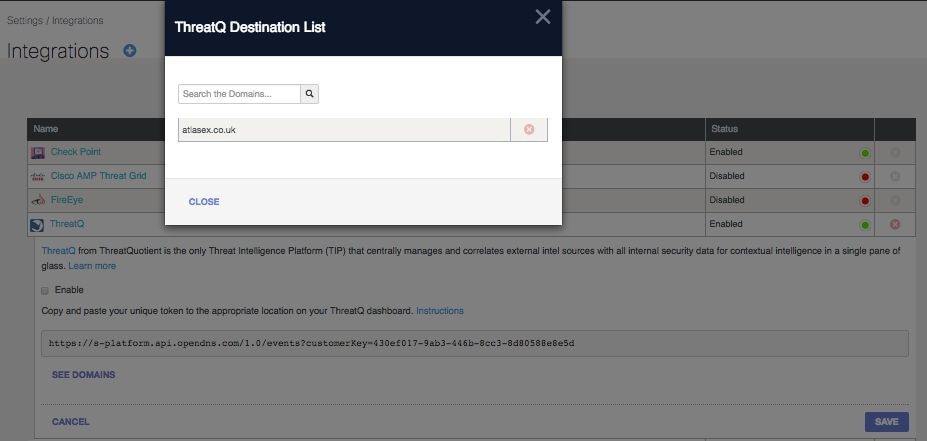
Review Destination List
You can review the ThreatQ Destination List in Umbrella at any time:
1. Navigate to Settings > Integrations.
2. Expand ThreatQ in the table and select See Domains.
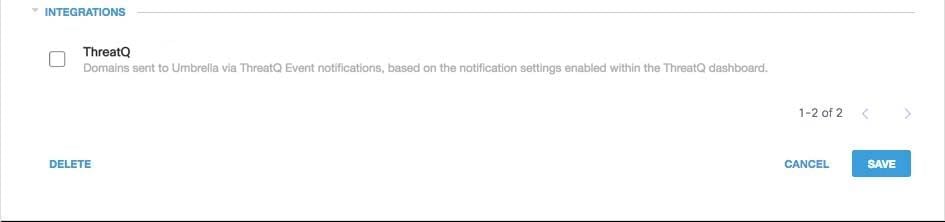
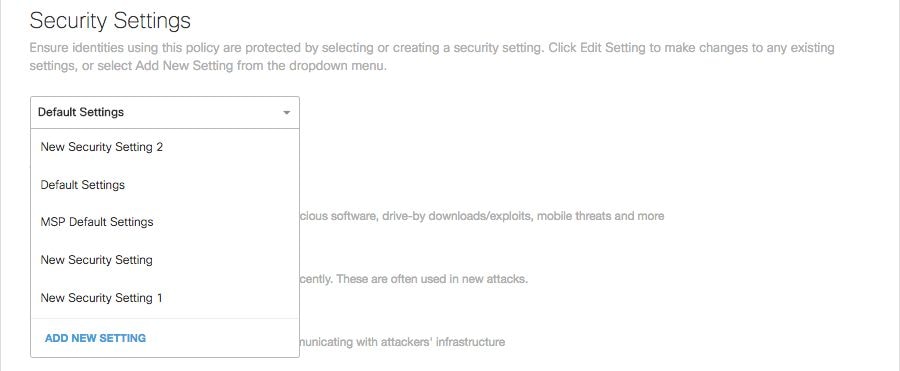
Review Security Settings for a Policy
You can review the security setting that can be enabled for a policy in Umbrella at any time:
1. Navigate to Policies > Security Settings.
2. Select a security setting in the table to expand it.
3. Scroll to Integrations to locate the ThreatQ setting.
 115014040286
You can also review integration information through the Security Settings Summary page.
 25464141748116
Applying the ThreatQ Security Settings in Block Mode to a Policy for Managed Clients
Once you are ready to have these additional security threats enforced against by clients managed by Umbrella, you can change the security setting on an existing policy, or create a new policy that sits higher than your default policy to ensure it is enforced first:
1.Navigate to Policies > Security Settings.
2. Under Integrations, select ThreatQ and select Save.
 115014207403
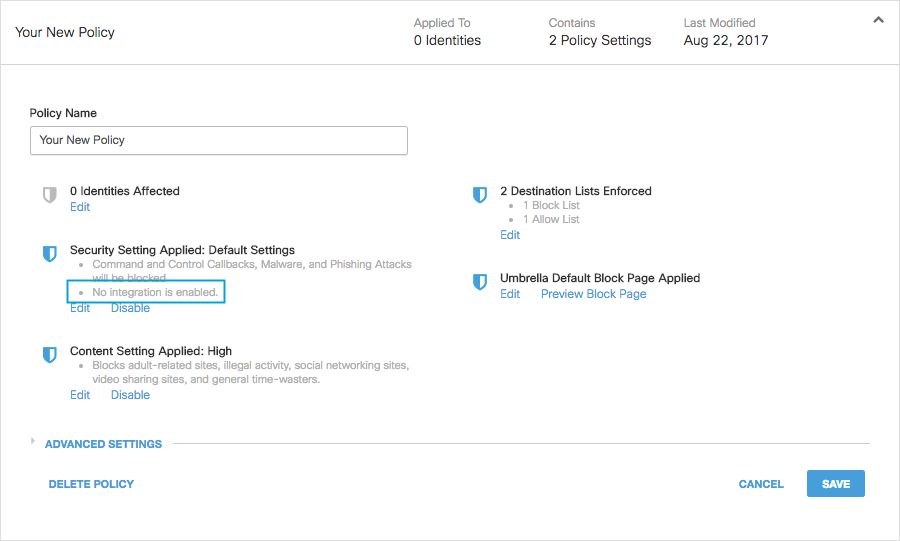
Next, in the Policy wizard, add a security setting to the policy that you are editing:
1. Navigate to Policies > Policy List.
2. Expand a policy and select Edit under Security Setting Applied.
3. In the Security Settings pull-down, select a security setting that includes the ThreatQ setting.
 25464141787668
The shield icon under Integrations updates to blue.
 115014040506
4. Select Set & Return.
ThreatQ domains contained within the security setting for ThreatQ are now blocked for identities using the policy.
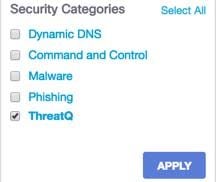
Reporting in Umbrella for ThreatQ Events
Reporting on ThreatQ Security Events
The ThreatQ Destination List is one of the security categories lists you can report on. Most or all of the reports use the Security Categories as a filter. For instance, you can filter security categories to only show ThreatQ related activity.
1. Navigate to Reporting > Activity Search.
2. Under Security Categories, select ThreatQ to filter the report to only show the security category for ThreatQ.
Note: If ThreatQ integration is disabled, it does not appear in the Security Categories filter.
 115014207603
3. Select Apply.
Reporting when Domains were Added to the ThreatQ Destination List
The Umbrella Admin Audit log includes events from the ThreatQ dashboard as it adds domains to the destination list. A user named “ThreatQ Account,” which is also branded with the ThreatQ logo, generates the events. These events include the domain that was added and the time at which it was added. The Umbrella Admin Audit log can be found at Reporting > Admin Audit Log.
You can filter to only include ThreatQ changes by applying a filter for the ThreatQ Account user.
Handling Unwanted Detections or False Positives
Allow Lists
Although unlikely, it is possible that domains added automatically by ThreatQ can trigger an unwanted block that can prevent users from accessing particular websites. In a situation like this, Umbrella recommends adding the domain(s) to an allow list, which takes precedence over all other types of block lists, including security settings.
There are two reasons that this approach is preferable:
- First, in case the ThreatQ dashboard was to re-add the domain again after it was removed, the allow list safeguards against that causing further issues.
- Second, the allow list shows a historical record of problematic domains that can be used for forensics or audit reports.
By default, there is a Global Allow List that is applied to all policies. Adding a domain to the Global Allow List results in the domain being allowed in all policies.
If the ThreatQ security setting in block mode is only applied to a subset of your managed Umbrella identities (for instance, it is only applied to roaming computers and mobile devices), you can create a specific allow list for those identities or policies.
To create an allow list:
1. Navigate to Policies > Destination Lists and select the Add icon.
2. Select Allow, and add your domain to the list.
3. Select Save.
Once the destination list is saved, you can add it to an existing policy covering those clients that have been affected by the unwanted block.
Deleting Domains from the ThreatQ Destination List
There is a Delete icon next to each domain name in the ThreatQ Destination List. Deleting domains lets you clean up the ThreatQ Destination List in the event of an unwanted detection. However, the delete is not permanent if the ThreatQ dashboard resends the domain to Cisco Umbrella.
To delete a domain:
1. Navigate to Settings > Integrations, then select ThreatQ to expand it.
2. Select See Domains.
3. Search for the domain name you want to delete.
4. Select the Delete icon.

5. Select Close.
6. Select Save.
In the instance of an unwanted detection or false positive, Umbrella recommends creating an allow list in Umbrella immediately and then remediating the false positive within the ThreatQ dashboard. Later, you can remove the domain from the ThreatQ Destination List.
 Feedback