Replace Telemetry Broker Identity Certificate
Available Languages
Download Options
Bias-Free Language
The documentation set for this product strives to use bias-free language. For the purposes of this documentation set, bias-free is defined as language that does not imply discrimination based on age, disability, gender, racial identity, ethnic identity, sexual orientation, socioeconomic status, and intersectionality. Exceptions may be present in the documentation due to language that is hardcoded in the user interfaces of the product software, language used based on RFP documentation, or language that is used by a referenced third-party product. Learn more about how Cisco is using Inclusive Language.
Contents
Introduction
This document describes how to replace the Server Identity Certificate on the Cisco Telemetry Broker (CTB) Manager Node.
Prerequisites
Requirements
Cisco recommends that you have knowledge of these topics:
- Cisco Telemetry Broker appliance administration
- x509 Certificates
Components Used
The appliances used for this document are running version 2.0.1
- Cisco Telemetry Broker Manager Node
- Cisco Telemetry Broker Broker Node
The information in this document was created from the devices in a specific lab environment. All of the devices used in this document started with a cleared (default) configuration. If your network is live, ensure that you understand the potential impact of any command.
Configure
Certificate Requirements
The x509 certificate used by the Cisco Telemetry Broker Manager must meet these requirements:
- The Cert and Private Key must be a matching pair
- The Certificate and Private Key must be PEM-encoded
- The Private Key must not be passphrase protected
Confirm Certificate and Private Key are matching pair
Log in to the CTB Manager command line interface (CLI) as the admin user.

Note: It is possible that the files mentioned in this section do not yet exist on the system.
The sudo openssl req -in server.csr -pubkey -noout -outform pem | sha256sum command outputs the SHA-256 checksum of the public key from the Certificate Signing Request file.
The sudo openssl pkey -in server_key.pem -pubout -outform pem | sha256sumcommand outputs the SHA-256 checksum of the public key from the private key file.
The sudo openssl x509 -in server_cert.pem -pubkey -noout -outform pem | sha256sumcommand outputs the SHA-256 checksum of the public key from the issued certficate file.
The Certificate and Private Key output must match. If a Certificate Signing Request was not used then the server_cert.pem file does not exist.
admin@ctb-manager:~$ sudo openssl req -in server.csr -pubkey -noout -outform pem | sha256sum
3e8e6b0d397ada1be7e89be21eb555c9527741460074385730d524c60e3ae315  -
admin@ctb-manager:~$

admin@ctb-manager:~$ sudo openssl pkey -in server_key.pem -pubout -outform pem | sha256sum
3e8e6b0d397ada1be7e89be21eb555c9527741460074385730d524c60e3ae315  -

admin@ctb-manager:~$ sudo openssl x509 -in server_cert.pem -pubkey -noout -outform pem | sha256sum
3e8e6b0d397ada1be7e89be21eb555c9527741460074385730d524c60e3ae315  -
Confirm Private Key is not passphrase protected
Log in to the CTB Manager as the admin user. Run the ssh-keygen -yf server_key.pem command.
A passphrase is not requested if the private key does not require one.
admin@ctb-manager:~$ ssh-keygen -yf server_key.pem
ssh-rsa {removed for brevity}
admin@ctb-manager:~$
Confirm Certificate and Private Key are PEM-encoded

Note: These validations can be performed prior to installing the certificates.
Log in to the CTB Manager as the admin user.
View the server_cert.pem file content with the sudo cat server_cert.pem command. Adjust the command to your certificate file name.
The first and last lines of the file should be -----BEGIN CERTIFICATE----- and -----END CERTIFICATE----- respectively.
admin@ctb-manager:~$ sudo cat server_cert.pem
-----BEGIN CERTIFICATE-----
{removed_for_brevity}
-----END CERTIFICATE-----
admin@ctb-manager:~$
View the server_key.pem file with the sudo cat server_key.pem command. Adjust the command to your private keys file name.
The first and last lines of the file should be -----BEGIN PRIVATE KEY----- and -----END PRIVATE KEY----- respectively.
admin@ctb-manager:~$ sudo cat server_key.pem
-----BEGIN PRIVATE KEY-----
{removed_for_brevity}
-----END PRIVATE KEY-----
admin@ctb-manager:~$
Self Signed Certificate
Generate Self Signed Certificate
- Log in to the CTB Manager over a SSH (Secure Shell) as the user configured during the installation, this is usually the "admin" user.
- Issue the
sudo openssl req -x509 -newkey rsa:{key_len} -nodes -keyout server_key.pem -out server_cert.pem -sha256 -days 3650 -subj /CN={ctb_manager_ip}command.- Change the
rsa:{key_len}with a private key length of your choice such as 2048, 4096, or 8192 - Change the
{ctb_manager_ip}with the IP of the CTB Manager Nodeadmin@ctb-manager:~$ sudo openssl req -x509 -newkey rsa:4096 -nodes -keyout server_key.pem -out server_cert.pem -sha256 -days 3650 -subj /CN=10.209.35.152 [sudo] password for admin: Generating a RSA private key .....................................................................................++++ ............................................................................++++ writing new private key to 'server_key.pem' ----- admin@ctb-manager:~$
- Change the
- View the server_cert.pem file with the
cat server_cert.pemcommand, and copy the contents to your buffer so that it can be pasted to the local workstation into a text editor of choice. Save the file. You can also SCP these files off of the/home/admindirectory.admin@ctb-manager:~$ cat server_cert.pem -----BEGIN CERTIFICATE----- {removed_for_brevity} -----END CERTIFICATE----- admin@ctb-manager:~$ - View the server_key.pem file with the
sudo cat server_key.pemcommand, and copy the contents to your buffer so that it can be pasted to the local workstation into a text editor of choice. Save the file. You can also SCP this file off of the/home/admindirectory.admin@ctb-manager:~$ sudo cat server_key.pem -----BEGIN PRIVATE KEY----- {removed_for_brevity} -----END PRIVATE KEY----- admin@ctb-manager:~$
Upload Self Signed Certificate
- Navigate to the CTB Manager Web UI and log in as the admin user and click on the gear icon to access "
Settings". CTB Setting Icon
 - Navigate to the "TLS Certificate" tab.
 CTB Certificates Tab
 - Select
Upload TLS Certificateand then select theserver_cert.pemand theserver_key.pemfor the Certificate and Private Key respectively in the "Upload TLS Certificate" dialog box. Once the files are selected, select Upload.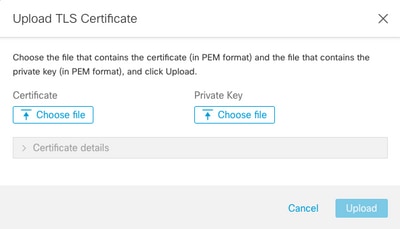
- Once the files are selected, a verification process confirms the certificate and key combination and display the common name of the Issuer and the Subject as shown.
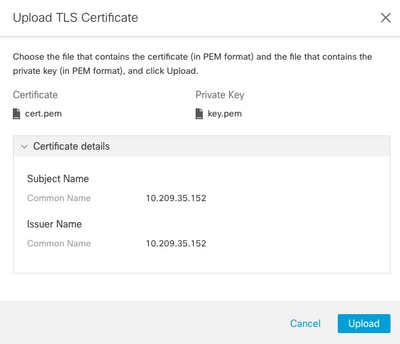 CTB Cert Upload
 - Select the "Upload" button to upload the new certificate. The Web UI restarts on its own in a few moments, and after it restarts log into the device again.
- Log in into the CTB Manager Node Web Console and navigate to
Settings > TLS Certificateto see certificate details such as a new expiry date, or view the certificate details using the browser to view more detailed information such as serial numbers.
Update Broker Nodes
Once the CTB Manager Node has a new identity certificate, each CTB Broker Node must be updated manually.
- Log in to each broker node via ssh and run the
sudo ctb-managecommandadmin@ctb-broker:~$ sudo ctb-manage We trust you have received the usual lecture from the local System Administrator. It usually boils down to these three things: #1) Respect the privacy of others. #2) Think before you type. #3) With great power comes great responsibility. [sudo] password for admin: - Select option
cwhen prompted.== Management Configuration A manager configuration already exists for 10.209.35.152 Options: (o) Associate this node with a new manager (c) Re-fetch the manager's certificate but keep everything else (d) Deactivate this node (should be done after removing this node on the manager UI) (a) Abort How would you like to proceed? [o/c/d/a] c - Verify the certificate details if they match the values for the signed certificate and select
yto accept the certificate. he services start automatically and once the service is started the prompt is returned. The service start can take up to about 15 minutes to complete.== Testing connection to server exists == Fetching certificate from 10.209.35.152 Subject Hash 3fcbcd3c subject=CN = 10.209.35.152 issuer=CN = 10.209.35.152 Validity: notBefore=Mar 28 13:12:43 2023 GMT notAfter=Mar 27 13:12:43 2024 GMT X509v3 Subject Alternative Name: IP Address:10.209.35.152 Do you accept the authenticity of the server? [y/n] y == Writing /var/lib/titan/titanium_proxy/ssl/titanium.pem done == Starting service
Certificate Authority (CA) Issued Certificates
Generate Certicate Signing Request (CSR) for issuance by a Certificate Authority
- Log in to the CTB Manager over a SSH (Secure Shell) as the user configured during the installation, this is usually the "admin" user.
- Issue the
openssl req -new -newkey rsa:{key_len} -nodes -addext "subjectAltName = DNS:{ctb_manager_dns_name},IP:{ctb_manager_ip}" -keyout server_key.pem -out server.csrcommand. The 'extra' attributes on the last two lines can be left blank if desired.
- Change the
{ctb_manager_dns_name}with the DNS name of the CTB Manager Node - Change the
{ctb_manager_ip}with the IP of the CTB Manager Node - Change the
{key_len}with a private key length of your choice such as 2048, 4096, or 8192.admin@ctb-manager:~$ openssl req -new -newkey rsa:4096 -nodes -addext "subjectAltName = DNS:ctb-manager,IP:10.209.35.152" -keyout server_key.pem -out server.csr Generating a RSA private key ......................++++ ....................................++++ writing new private key to 'server_key.pem' ----- You are about to be asked to enter information that will be incorporated into your certificate request. What you are about to enter is what is called a Distinguished Name or a DN. There are quite a few fields but you can leave some blank For some fields there will be a default value, If you enter '.', the field will be left blank. ----- Country Name (2 letter code) [AU]:US State or Province Name (full name) [Some-State]:North Carolina Locality Name (eg, city) []:RTP Organization Name (eg, company) [Internet Widgits Pty Ltd]:Cisco Systems Inc Organizational Unit Name (eg, section) []:TAC Common Name (e.g. server FQDN or YOUR name) []:ctb-manager Email Address []:noreply@cisco.com Please enter the following 'extra' attributes to be sent with your certificate request A challenge password []: An optional company name []:
- Change the
- SCP the CSR and the Key files to a local machine and provide the CSR to the CA. Issuance of the CSR by the CA in PEM format is outside the scope of this document.
Create a Certificate with Chain
The CA issues the server identity certificate in PEM format. A chain file must be created that include all chain certificates and the server identity certificate for the CTB Manager Node.
In a text editor create a file by combining the certificate that was signed in the previous step and appending all the certificates in the chain all the way including the trusted CA into a single file in PEM format in the order shown.
— BEGIN CERTIFICATE —
{CTB Manager Issued Certificate}
— END CERTIFICATE —
— BEGIN CERTIFICATE —
{Issuing Certificate Authority Certificate}
— END CERTIFICATE —
— BEGIN CERTIFICATE —
{Intermediate Certificate Authority Certificate}
— END CERTIFICATE —
— BEGIN CERTIFICATE —
{Root Certificate Authority Certificate}
— END CERTIFICATE —
Ensure that this new certificate file with chain file has no leading or trailing spaces, blank lines, and is in the order shown above.
Upload Certificate Authority Issued Certificate
- Navigate to the CTB Manager Web UI and log in as admin and click on the gear icon to access "
Settings". CTB Setting Icon
 - Navigate to the "TLS Certificate" tab.
 CTB Certificates Tab
 - Select
Upload TLS Certificateand then select the certificate with chain file created in the last section, and the CTB Manager generatedserver_key.pemfor the Certificate and Private Key respectively in the "Upload TLS Certificate" dialog box. Once the files are selected, select Upload.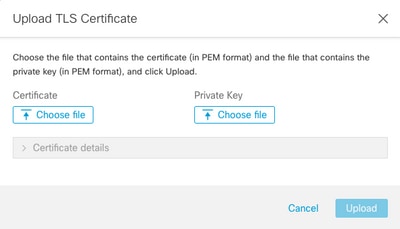
- Once the files are selected, a verification process confirms the certificate and key combination and display the common name of the Issuer and the Subject as shown below.
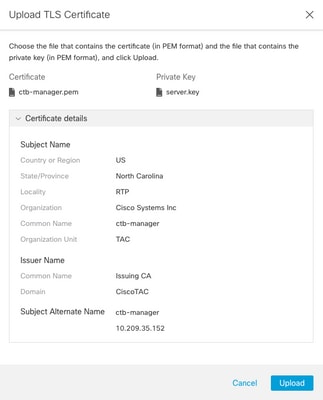 CTB CA Issued Cert Validation
 - Select the "Upload" button to upload the new certificate. The Web UI restarts on its own in about 60 seconds, log in to the Web UI after it restarts.
- Log in into the CTB Manager Node Web Console and navigate to
Settings > TLS Certificateto see certificate details such as a new expiry date, or view the certificate details using the browser to view more detailed information such as serial numbers.
Update Broker Nodes
Once the CTB Manager Node has a new identity certificate, each CTB Broker Node must be updated manually.
- Log in to each broker node via ssh and run the
sudo ctb-managecommandadmin@ctb-broker:~$ sudo ctb-manage We trust you have received the usual lecture from the local System Administrator. It usually boils down to these three things: #1) Respect the privacy of others. #2) Think before you type. #3) With great power comes great responsibility. [sudo] password for admin: - Select option
cwhen prompted.== Management Configuration A manager configuration already exists for 10.209.35.152 Options: (o) Associate this node with a new manager (c) Re-fetch the manager's certificate but keep everything else (d) Deactivate this node (should be done after removing this node on the manager UI) (a) Abort How would you like to proceed? [o/c/d/a] c - Verify the certificate details if they match the values for the signed certificate and select
yto accept the certificate. The services start automatically and once the service is started the prompt is returned. The service start can take up to about 15 minutes to complete.== Testing connection to server exists == Fetching certificate from 10.209.35.152 Subject Hash fa7fd0fb subject=C = US, ST = North Carolina, L = RTP, O = "Cisco Systems Inc", OU = TAC, CN = ctb-manager, emailAddress = noreply@cisco.com issuer=DC = CiscoTAC, CN = Issuing CA Validity: notBefore=Jun 13 16:09:29 2023 GMT notAfter=Sep 11 16:19:29 2023 GMT X509v3 Subject Alternative Name: DNS:ctb-manager, IP Address:10.209.35.152 Do you accept the authenticity of the server? [y/n] y == Writing /var/lib/titan/titanium_proxy/ssl/titanium.pem done == Starting service
Verify
Log in into the CTB Manager Node Web Console and navigate to Settings > TLS Certificate to see certificate details such as a new expiry date, or view the certificate details using the browser to view more detailed information such as serial numbers.
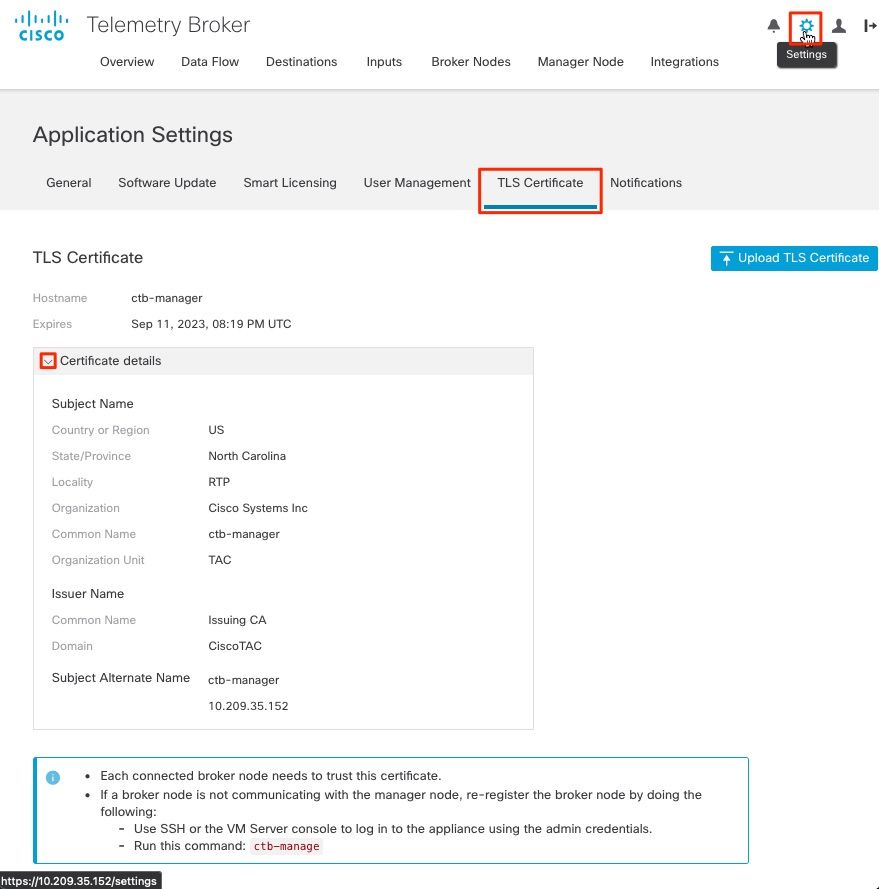 CTB Certificate Details
Verify the CTB Broker Node shows no alarms in the CTB Manager Node Web UI.
Troubleshoot
If the certificate is incomplete such as lacking the chain certificates, the CTB Broker Node Node is not able to communicate with the Manager Node and presents "Not Seen Since" in the Status column in the list of Broker Nodes.
The Broker Node will continue to replicate and distribute traffic in this state.
Log in to the CTB Manager Node CLI and issue the sudo grep -ic begin /var/lib/titan/titanium_frontend/ssl/cert.pem command to see how many certificates are in the cert.pem file.
admin@ctb-manager:~$ sudo grep -ic begin /var/lib/titan/titanium_frontend/ssl/cert.pem
[sudo] password for admin:
3 <-- Output
admin@ctb-manager:~$
The output value returned needs equal the number of CA devices in the chain plus the CTB Manager.
The output of 1 is expected if using a self signed certificate.
The output of 2 is expected if the PKI Infrastructure consists of a single Root CA that is also the Issuing CA.
The output of 3 is expected if the PKI Infrastructure consists of a Root CA, and the Issuing CA.
The output of 4 is expected if the PKI Infrastructure consists of a Root CA, a Subordinate CA, and the Issuing CA.
Compare the output to the PKI listed when viewing the certificate in another appliaction such as Microsoft Windows Crypto Shell Extensions.
 PKI Infrastructure
In this image the PKI infrastructure includes a Root CA, and the Issuing CA.
The output value from the command is expected to be 3 in this scenario.
If the output does not meet expectations, review the steps in the Create a Certificate with Chain section to determine if a certificate was missed.
When viewing a certificate in Microsoft Windows Crypto Shell Extensions it is possible that not all certificiates to be presented if the local machine does not have enough information to verify the certificate.
Issue the sudo ctb-mayday command from the CLI to generate a mayday bundle for TAC to review.
Revision History
| Revision | Publish Date | Comments |
|---|---|---|
1.0 |
05-Jul-2023
|
Initial Release |
Contributed by Cisco Engineers
- Joshua MartinCisco TAC Engineer
Contact Cisco
- Open a Support Case

- (Requires a Cisco Service Contract)
 Feedback