Configure External Authentication and Authorization via LDAPS for SNA Manager Access
Available Languages
Contents
Introduction
This document describes the basic configuration of a Secure Network Analytics Manager with Lightweight Directory Access Protocol (LDAP) over SSL.
Prerequisites
Requirements
Cisco recommends that you have knowledge of these topics:
- Cisco Secure Network Analytics (formerly Stealthwatch)
- General LDAP and SSL Operation
- General Microsoft Active Directory management
Components Used
The information in this document is based on these components:
- Cisco Secure Network Analytics Manager (formerly SMC) version 7.3.2
- Windows Server 2016 configured as Active Directory Domain Controller
The information in this document was created from the devices in a specific lab environment. All of the devices used in this document started with a cleared (default) configuration. If your network is live, ensure that you understand the potential impact of any command.
Configure
Step A. Log into the AD domain controller and export the SSL certificate used for LDAP
- For Windows Server 2012 or later select Run from the Start menu, then enter certlm.msc and continue with Step 8.
- For older Windows Server versions select Run from the Start menu, and then enter mmc.
- From the File menu, select Add/Remove Snap In.
- From the Available snap-ins list, select Certificates, then click Add.
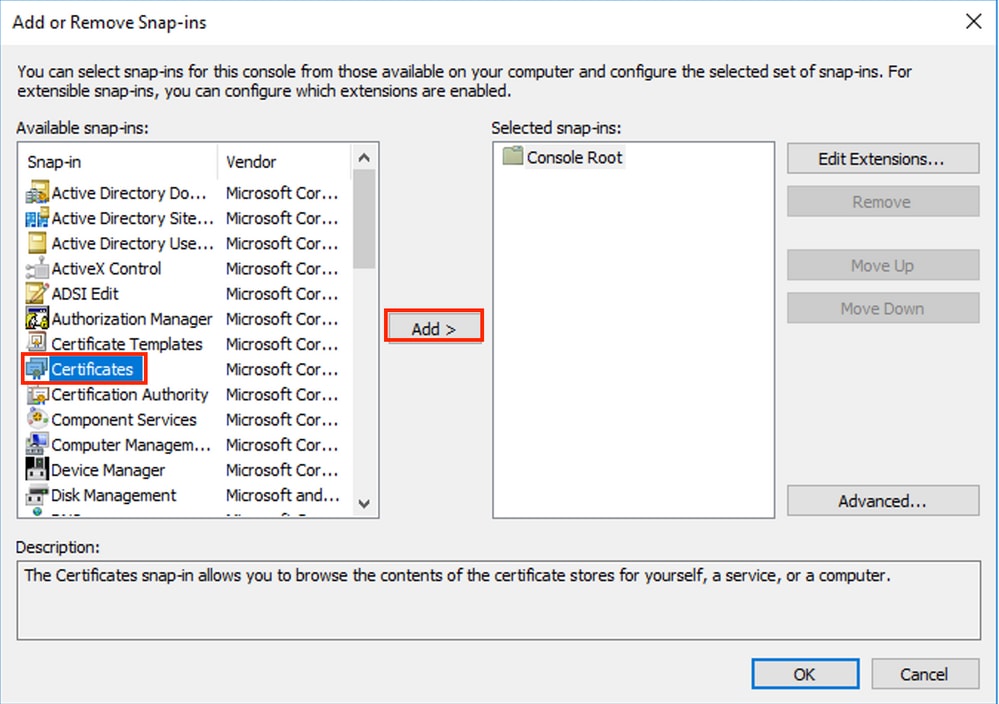
5. In the Certificates snap-in window, select Computer account, and then select Next.
6. Leave Local computer selected, and then select Finish.
7. In the Add or Remove Snap-in window, select OK.
8. Navigate to Certificates (Local Computer) > Personal > Certificates
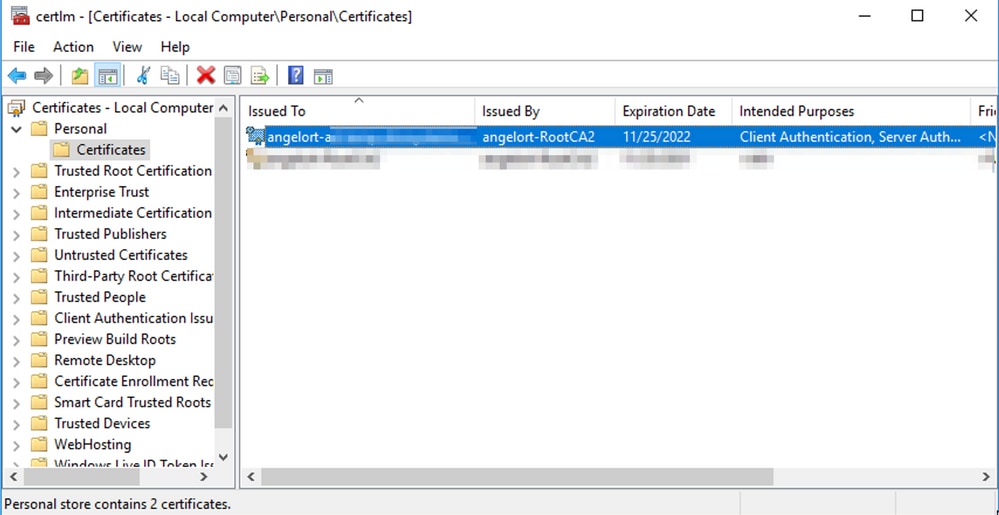
9. Select and right-click the SSL certificate used for LDAPS authentication on your domain controller and click Open.
10. Navigate to the Details tab > click Copy to File > Next
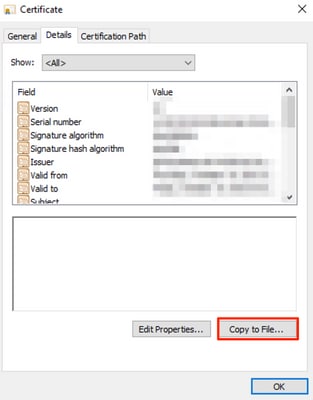
11. Ensure that No, do not export private key is selected and click Next
12. Select Base-64 encoded X.509 format and click Next.
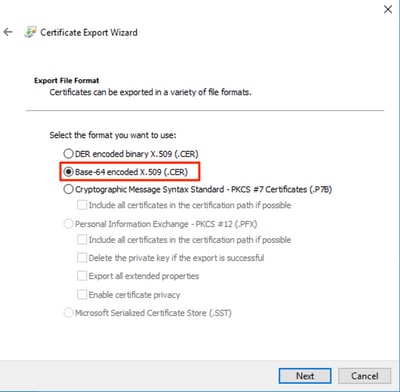
13. Select a location to store the certificate, name the file and click Next.
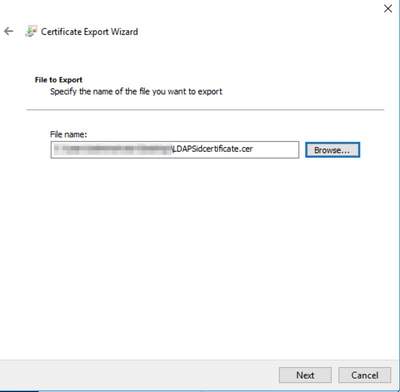
14. Click Finish, you must get a “The export was successful.” message.
15. Go back to the certificate used for LDAPS, then select the Certification Path tab.
16. Select the Root CA issuer on top of the certification path and click View Certificate.
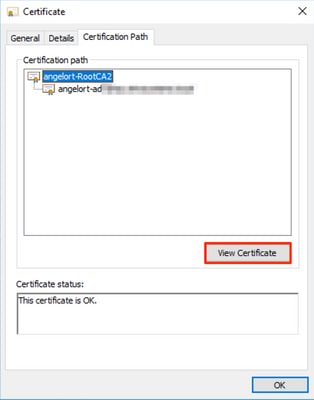
17. Repeat steps 10-14 to export the certificate of the root CA which signed the certificate used for LDAPS authentication.
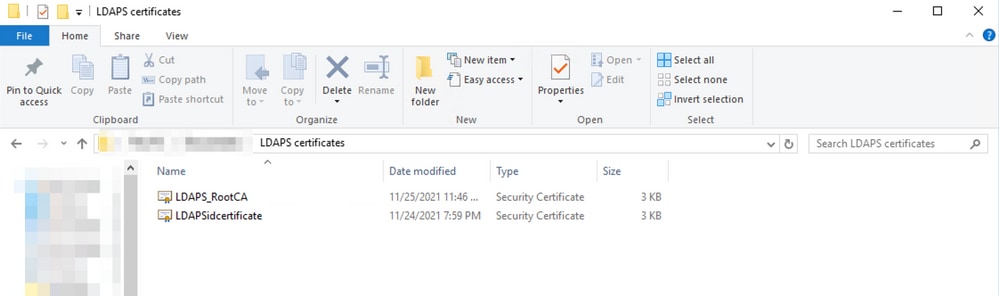
18. Before you continue, ensure that you have one certificate file for the LDAPS server and for each issuer authority in the certification path: Root certificate and intermediate certificates (if applicable).
Step B. Log into the SNA Manager to add the certificate of the LDAP server and the root chain
- Navigate to Central Management > Inventory.
- Locate the SNA Manager appliance and click Actions > Edit Appliance Configuration.
- In the Appliance Configuration window navigate to Configuration Menu > Trust Store > Add New.
- Type the Friendly Name, click Choose File and select the certificate of the LDAP Server, then click Add Certificate.
- Repeat the previous step to add the Root CA certificate and intermediate certificates (if applicable).
- Verify that the certificates which were uploaded are the correct ones and click Apply Settings.
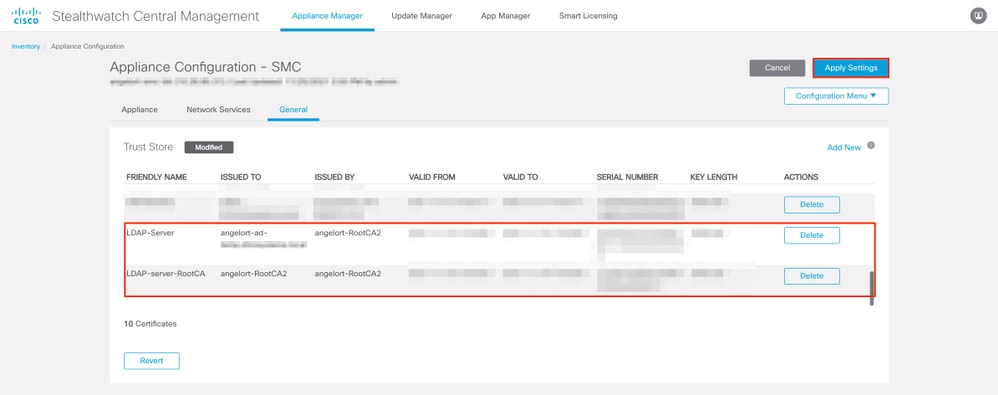
7. Wait for the changes to be applied and for the Manager status to be Up.
Step C. Add the LDAP external service configuration
SNA Version 7.2 or later
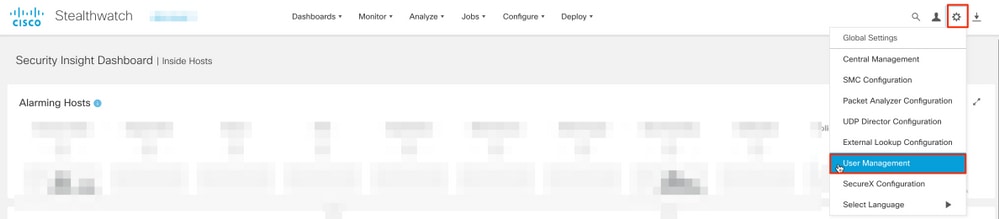
1. Open the Manager main dashboard and navigate to Global Settings > User Management.
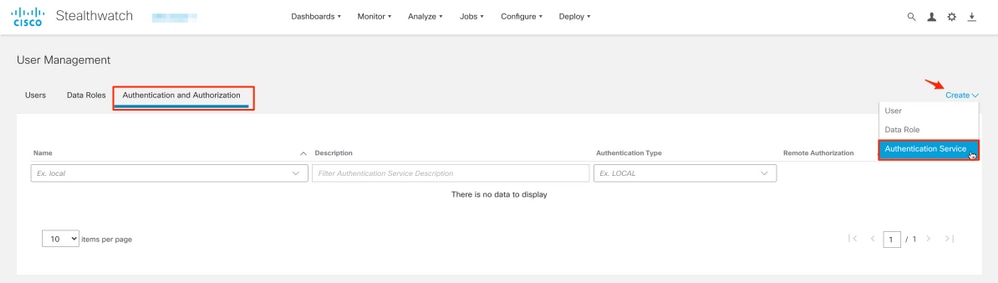
2. In the User Management window select the Authentication and Authorization tab.
3. Click Create > Authentication Service.
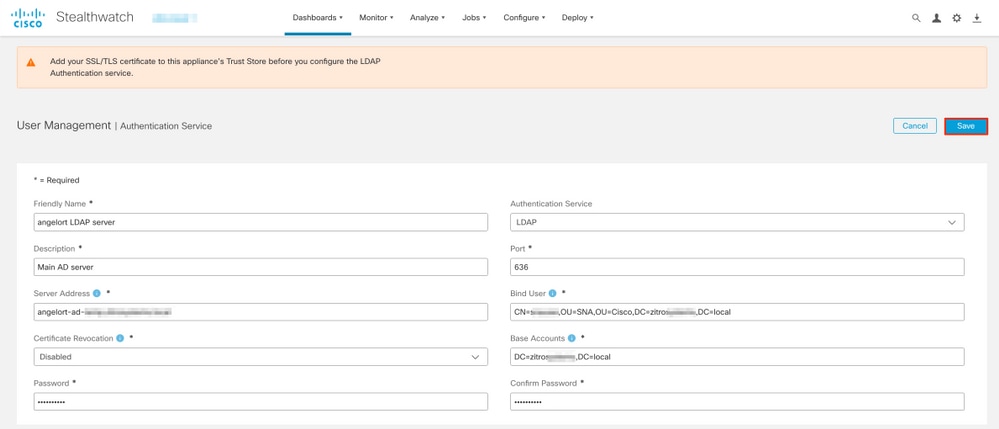
4. From the Authentication Service drop-down menu select LDAP.
5. Complete the required fields.
| Field |
Notes |
| Friendly Name |
Enter a name for the LDAP server. |
| Description |
Enter a description for the LDAP server. |
| Server Address |
Enter the fully qualified domain name as specified in the Subject Alternative Name (SAN) field of the LDAP server certificate.
|
| Port |
Enter the port designated for secure LDAP communication (LDAP over TLS). The well known TCP port for LDAPS is 636. |
| Bind User |
Enter the user ID used to connect to the LDAP server. For example: CN=admin,OU=Corporate Users,DC=example,DC=com |
| Password |
Enter the Bind User password used to connect to the LDAP server. |
| Base Accounts |
Enter the Distinguished Name (DN). The DN applies to the branch of the directory in which searches for users must begin. It is often the top of directory tree (your domain), but you can also specify a sub-tree within the directory. The Bind User and the users intended to be authenticated must be accessible from Base Accounts. For example: DC=example,DC=com |
6. Click Save.
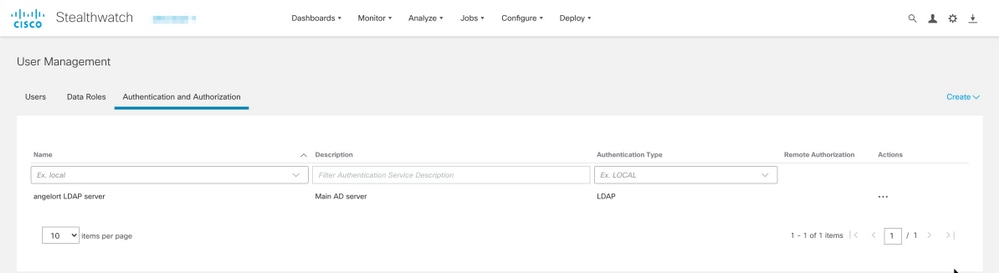
7. If the settings entered and the certificates added to the trust store are correct, you receive a You've successfully saved your changes banner.
8. The configured server must be displayed under User Management > Authentication and Authorization.
SNA Version 7.1
- Navigate to Central Management > Inventory.
- Locate the SMC appliance and click Actions > Edit Appliance Configuration.
- In the Appliance Configuration window navigate to Configuration Menu > LDAP Setup > Add New.
- Complete the required fields as described in SNA Version 7.2 or later Step 5.
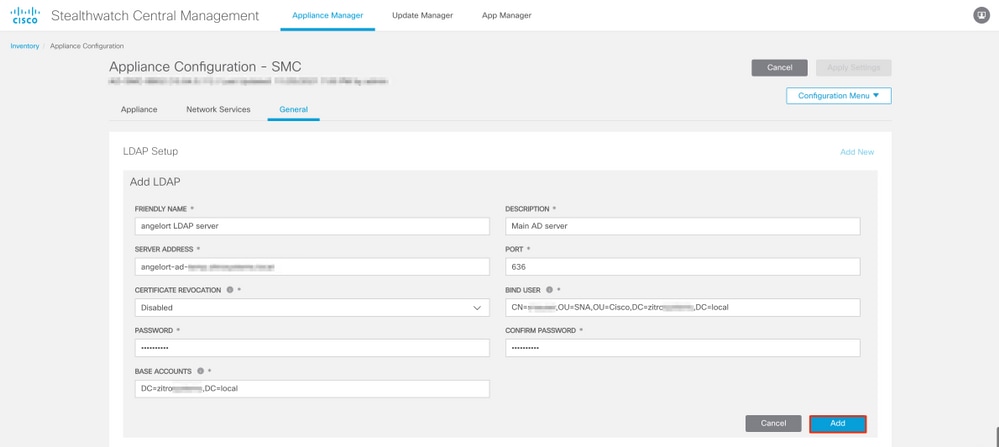
5. Click Add.
6. Click Apply Settings.
7. Once the settings entered and the certificates added to the trust store are correct, the changes on the Manager are applied and the appliance state must be Up.
Step D. Configure Authorization settings.
SNA supports both Local and Remote Authorization via LDAP. With this configuration, the LDAP groups from the AD Server are mapped to built-in or custom SNA roles.
The supported authentication and authorization methods for SNA via LDAP are:
- Remote Authentication & Local Authorization
- Remote Authentication & Remote Authorization (Only supported for SNA version 7.2.1 or later)
Local Authorization
In this case, the users and their roles need to be defined locally. To achieve this, proceed as follows.
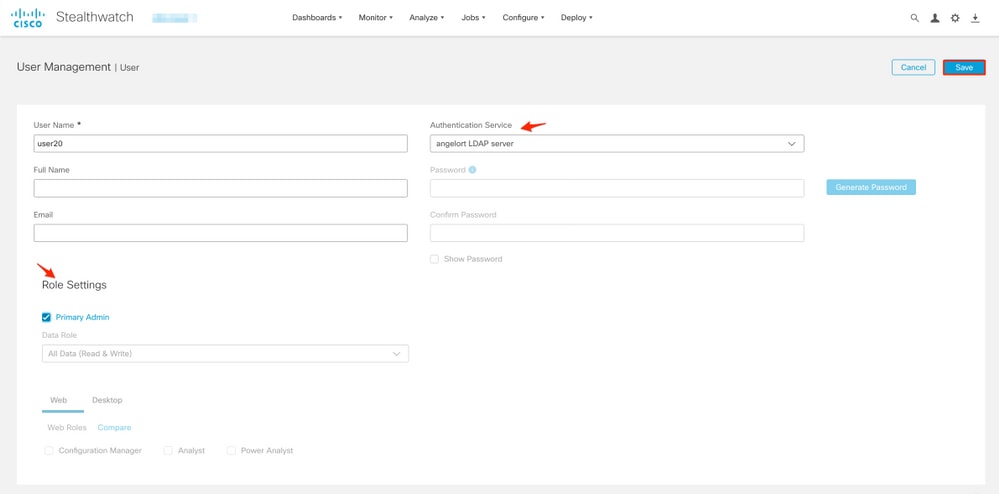
1. Navigate to User Management again, click the Users tab > Create > User.
2. Define the user name to authenticate with the LDAP server and select the configured server from the Authentication Service drop-down menu.
3. Define the permissions that the user must have over the Manager once it is authenticated by the LDAP server and click Save.
Remote Authorization via LDAP
Remote Authentication and Authorization via LDAP was first supported in Secure Network Analytics version 7.2.1.
It is relevant to mention that if a user is defined and enabled locally (in the Manager), then the user is authenticated remotely, but authorized locally. The user selection process is as follows:
- Once the credentials are entered on the welcome page, the Manager looks for a local user with the specified name.
- If a local user is found and it is enabled, it is authenticated remotely (if remote authentication via LDAP with local authorization was configured previously) but authorized with the local settings.
- If remote authorization is configured and enabled, and the user is not found locally (not configured or disabled), both authentication and authorization are performed remotely.
For this reason, the steps to successfully configure remote Authentication are described next.
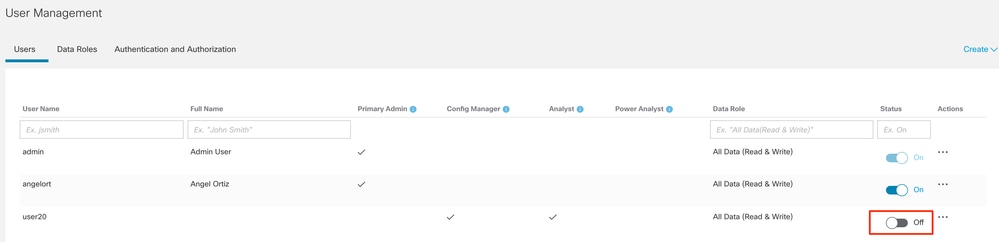
Step D-1. Disable or delete the users intended to use remote authorization but which are defined locally
- Open the Manager main dashboard and navigate to Global Settings > User Management.
- Disable or delete the users (if they exist) intended to use remote authentication and authorization via LDAP, but are configured locally.
Step D-2. Define cisco-stealthwatch Groups in the Microsoft AD server.
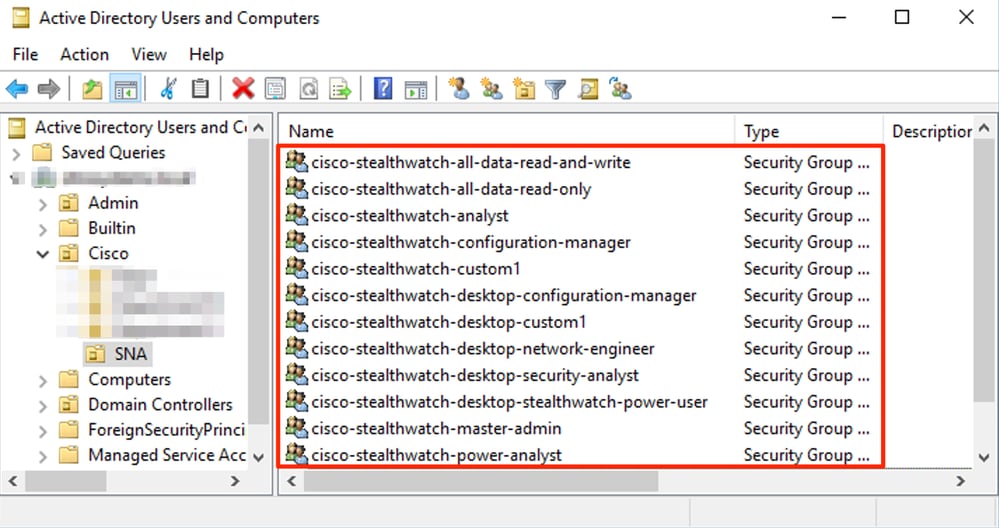
For External Authentication and Authorization via LDAP users, passwords and cisco-stealthwatch groups are defined remotely in Microsoft Active Directory. The cisco-stealthwatch groups to be defined in the AD server are related to the different roles which SNA has, they must be defined as follows.
| SNA Role |
Group(s) Name |
| Primary Admin |
|
| Data Role |
|
| Web Functional Role |
|
| Desktop Functional Role |
|

Step D-3. Define LDAP Authorization Group Mappings for the users
Once the cisco-stealthwatch groups have been defined in the AD server, we can map the users intended to have access to the SNA Manager to the necessary groups. This must be done as follows.
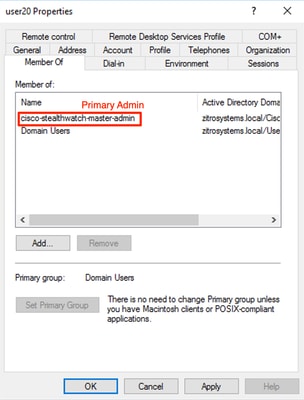
- A Primary Admin user must be assigned to the cisco-stealthwatch-master-admin group and must not be a member of any other cisco-stealthwatch groups.
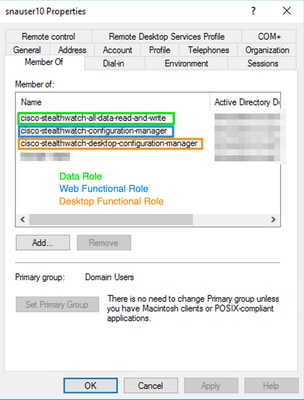
- Each user, other than Primary Admin users, must be assigned to a group of each role with the next conditions.
- Data Role: The user must be assigned to only one group.
- Web Functional Role: The user must be assigned to at least one group.
- Desktop Functional Role: The user must be assigned to at least one group.
Step D-4. Enable Remote Authorization via LDAP on the SNA Manager.
- Open the Manager main dashboard and navigate to Global Settings > User Management.
- In the User Management window select the Authentication and Authorization tab.
- Locate the LDAP authentication service which was configured in Step C.
- Click Actions > Enable Remote Authorization.

Verify
Use this section in order to confirm that your configuration works properly.
The users are able to log in with the credentials defined on the AD server.
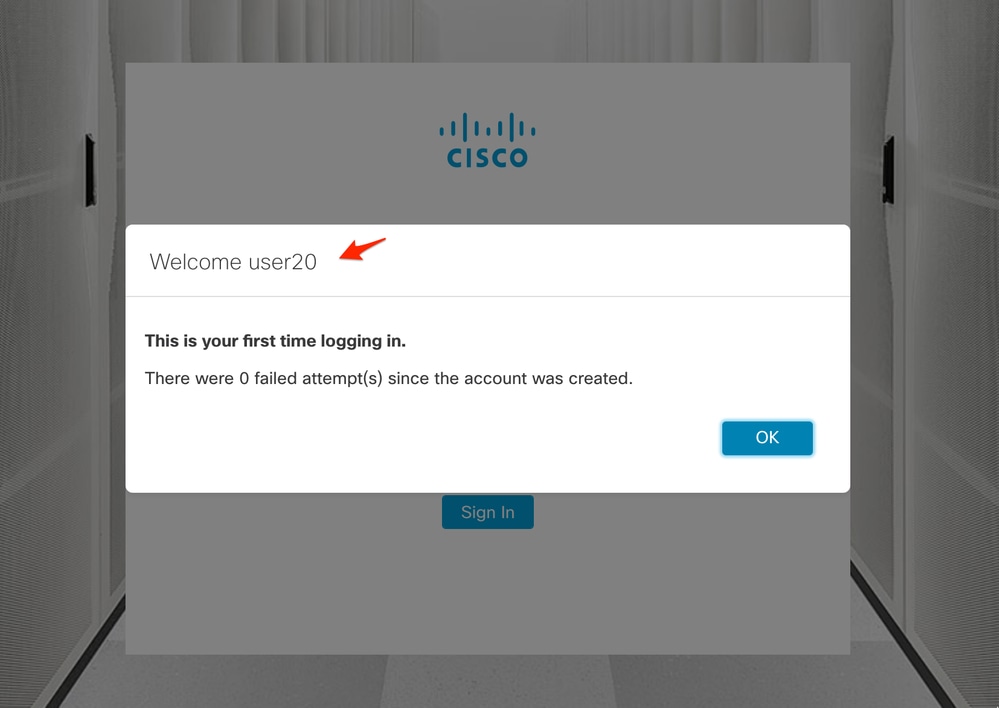
The second verification step is in regards to Authorization. In this example, user "user20" was made a member of the cisco-stealthwatch-master-admin group in the AD server, and you can confirm that the user has Primary Admin permissions. The user is not defined in the local users, so you can confirm that the Authorization attributes were sent by the AD server.
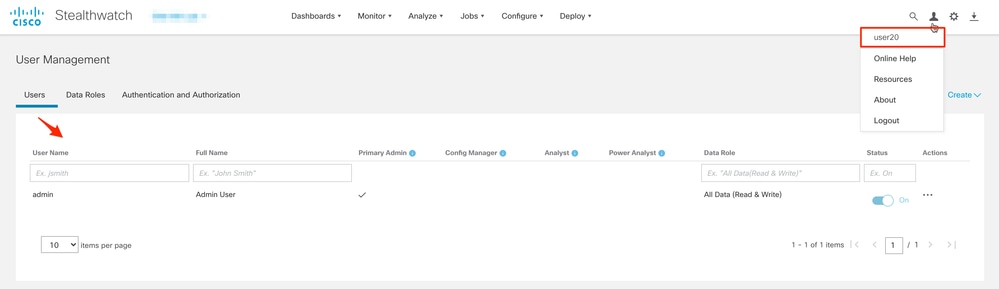
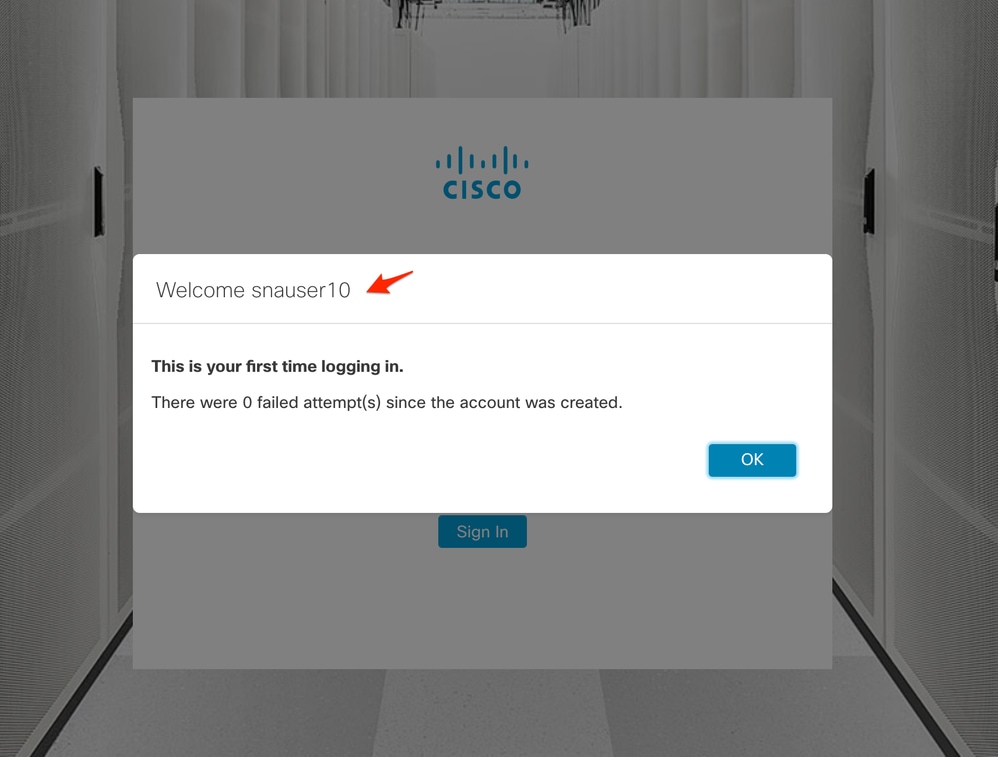
The same verification is done for the other user in this example "snauser10". You can confirm successful authentication with the credentials which were configured on the AD server.
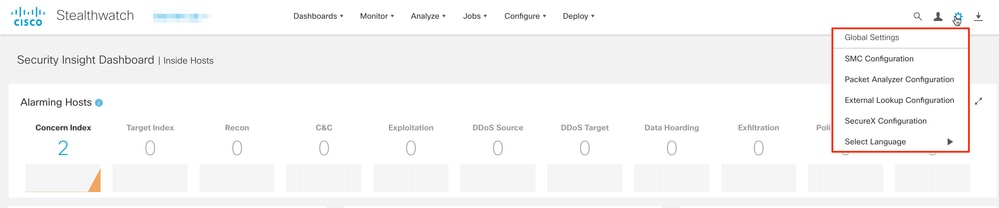
For the Authorization verification, as this user does not belong to the Primary Admin group, some features are not available.
Troubleshoot
This section provides information you can use in order to troubleshoot your configuration.
If the configuration of the Authentication Service cannot be saved successfully verify that:
- You have added the proper certificates of the LDAP server to the trust store of the Manager.
- The configured Server Address is as specified in the Subject Alternative Name (SAN) field of the LDAP server certificate.
-
If the SAN field contains only the IPv4 address, enter the IPv4 address in the Server Address field.
-
If the SAN field contains the DNS name, enter the DNS name in the Server Address field.
-
If the SAN field contains both DNS and IPv4 values, use the first value listed.
-
- The configured Bind User and Base Account fields are correct, as specified by the AD Domain Controller.
Related Information
- For additional assistance, please contact Cisco Technical Assistance Center (TAC). A valid support contract is required: Cisco Worldwide Support Contacts.
- Technical Support & Documentation - Cisco Systems
Revision History
| Revision | Publish Date | Comments |
|---|---|---|
1.0 |
02-Feb-2022
|
Initial Release |

 Feedback
Contact Cisco
- Open a Support Case

- (Requires a Cisco Service Contract)