Introduction
This document describes the necessary steps to successfully configure Hairpin on a Cisco Adaptive Security Appliance (ASA).
Prerequisites
Requirements
Cisco recommends that you have knowledge of these topics:
- NAT Configuration on ASA
- ACL configuration on ASA
Components Used
The information in this document is based on these software and hardware versions:
- Cisco Adaptive Security Appliance Software Version 9.18(4)22
The information in this document was created from the devices in a specific lab environment. All of the devices used in this document started with a cleared (default) configuration. If your network is live, ensure that you understand the potential impact of any command.
Configure
Hairpin Network Address Translation (NAT), also known as NAT loopback or NAT reflection, is a technique used in network routing whereby a device on a private network can access another device on the same private network via a public IP address.
This is used when a server is hosted behind a router, and you want to enable devices on the same local network as the server to access it using the public IP address (the one assigned to the router by the Internet Service Provider) just as an external device would.
The term hairpin is used because the traffic from the client makes it to the router (or firewall implementing NAT) and is then turned back like a hairpin to the internal network after translation to access the private IP address of the server.
For instance, you have a web server on your local network with a private IP address. You want to access this server using its public IP address or a domain name that resolves to the public IP address, even when you are on the same local network.
Without Hairpin NAT, your router would not understand this request because it expects requests for the public IP address to come from outside the network.
Hairpin NAT solves this problem by allowing the router to recognize that, although the request is being made to a public IP, it needs to be routed to a device on the local network.
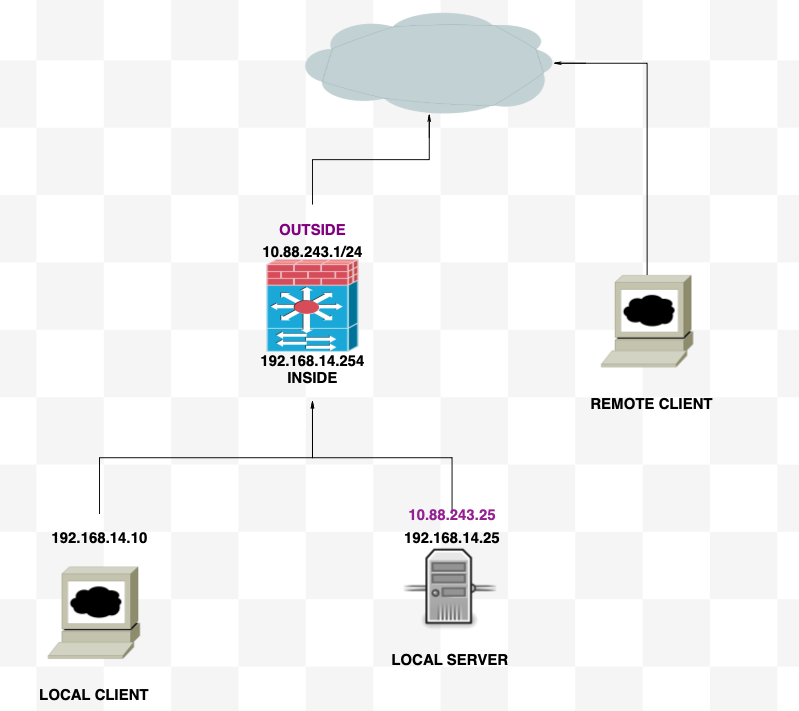
Network Diagram

Configurations
Step 1. Create the Objects
- Internal network:192.168.14.10
- Web Server: 192.168.14.25
- Public Web Server: 10.88.243.25
- Port: 80
ciscoasa(config)# object network Local_Client
ciscoasa(config-network-object)# host 192.168.14.10
ciscoasa(config)# object network Web_Server
ciscoasa(config-network-object)# host 192.168.14.25
ciscoasa(config)# object network P_Web_Server
ciscoasa(config-network-object)# host 10.88.243.25
ciscoasa(config)# object service HTTP
ciscoasa(config-service-object)# service tcp destination eq 80
Step 2. Create the NAT
ciscoasa(config-service-object)# nat (Inside,Inside) source dynamic Local_Client interface destination static P_Web_Server Web_Server service HTTP HTTP
Verify
From the local client do a telnet destination IP with de destination port:
If this message "telnet unable to connect to remote host: Connection timed out" prompt, something went wrong at some point during the configuration.

But if it says Connected, it works!

Troubleshoot
If you are experiencing issues with Network Address Translation (NAT), use this step-by-step guide to troubleshoot and resolve common issues.
Step 1: NAT Rules Configuration Check
- Review NAT Rules: Ensure all NAT rules are correctly configured. Check that the source and destination IP addresses, as well as ports, are accurate.
- Interface Assignment: Confirm that both the source and destination interfaces are correctly assigned in the NAT rule. Incorrect mapping can cause traffic not to be translated or routed properly.
- NAT Rule Priority: Verify that the NAT rule is prioritized higher than any other rule that possibly matches the same traffic. Rules are processed in a sequential order, so a rule placed higher up has precedence.
Step 2: Access Control Rules (ACL) Verification
- Review ACLs: Check the Access Control Lists to make sure they are appropriate for permitting NAT traffic. ACLs must be configured to recognize the translated IP addresses.
- Rules Order: Make sure the access control list is in the correct order. Like NAT rules, ACLs are processed from top to bottom, and the first rule that matches the traffic is the one that is applied.
- Traffic Permissions: Verify that an appropriate access control list exists to allow traffic from the internal network to the translated destination. If a rule is missing or incorrectly configured, the desired traffic could be blocked.
Step 3: Additional Diagnostics
- Use Diagnostic Tools: Utilize the diagnostic tools available to monitor and debug the traffic passing through the device. This includes viewing real-time logs and connection events.
- Restart Connections: In some cases, existing connections do not recognize changes made to NAT rules or ACLs until they are restarted. Consider clearing existing connections to force new rules to be applied.
ciscoasa(config)# clear xlate
- Verify Translation: Use commands like show xlate and show nat on the command line if you are working with ASA devices to verify that NAT translations are being performed as expected.
ciscoasa(config)# show xlate
ciscoasa(config)# show nat


 Feedback