Introduction
This document describes the procedure to configure Custom Local Snort Rules in Snort3 on Firewall Threat Defense (FTD).
Prerequisites
Requirements
Cisco recommends that you have knowledge of these topics:
- Cisco Firepower Management Center (FMC)
- Firewall Threat Defense (FTD)
Components Used
The information in this document is based on these software and hardware versions:
- Cisco Firepower Management Center for VMWare 7.4.1
- Cisco Firepower 2120 7.4.1
The information in this document was created from the devices in a specific lab environment. All of the devices used in this document started with a cleared (default) configuration. If your network is live, ensure that you understand the potential impact of any command.
Background Information
Support for Snort 3 in threat defense with management center begins in version 7.0. For new and reimaged devices of version 7.0 and later, Snort 3 is the default inspection engine.
This document provides an example of how to customize Snort rules for Snort 3, as well as a practical verification example. Specifically, you are introduced how to configure and verify an Intrusion Policy with a customized Snort rule to drop HTTP packets that contain a certain string (username).

Caution: Creating Custom Local Snort Rules and providing support for them falls outside of TAC support coverage. Therefore, this document can be used as a reference only, and ask that you create and manage these custom rules at your own discretion and responsibility.
Network Diagram
This document introduces the configuration and verification for Custom Local Snort Rule in Snort3 on this diagram.
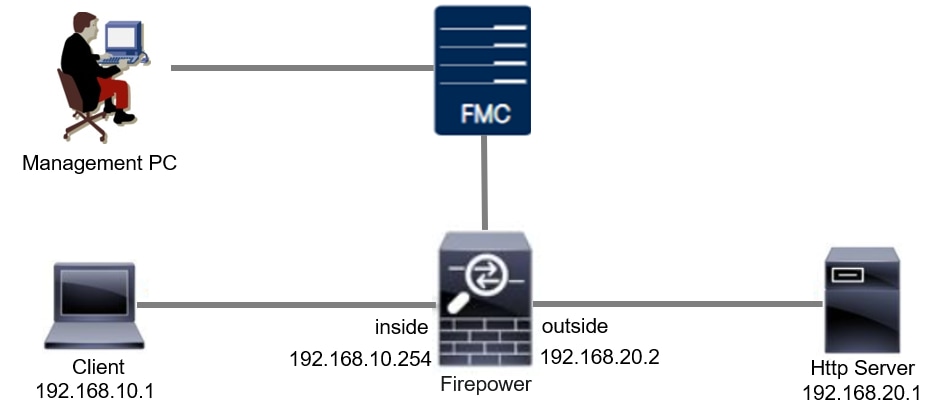 Network Diagram
Configuration
This is the configuration of Custom Local Snort Rule to detect and drop HTTP response packets containing a specific string (username).

Note: As of now, it is not possible to add Custom Local Snort Rules from the Snort 3 All Rules page in the FMC GUI. You must use the method introduced in this document.
Method 1. Import from Snort 2 to Snort 3
Step 1. Confirm Snort Version
Navigate toDevices>Device Management on FMC, click Devicetab. Confirm that the snort version is Snort3.
 Snort Version
Step 2. Create or Edit a Custom Local Snort Rule in Snort 2
Navigate to Objects > Intrusion Rules > Snort 2 All Ruleson FMC. ClickCreate Rulebutton to add a Custom Local Snort Rule, or Navigate to Objects > Intrusion Rules > Snort 2 All Rules > Local Rules on FMC, click Edit button to edit an existing Custom Local Snort Rule.
For instructions on how to create Custom Local Snort Rules in Snort 2, please refer to Configure Custom Local Snort Rules in Snort2 on FTD.
Add a new Custom Local Snort Rule as show in the image.
 Add a New Custom Rule
Edit an existing Custom Local Snort Rule as show in the image. In this example, edits an existing custom rule.
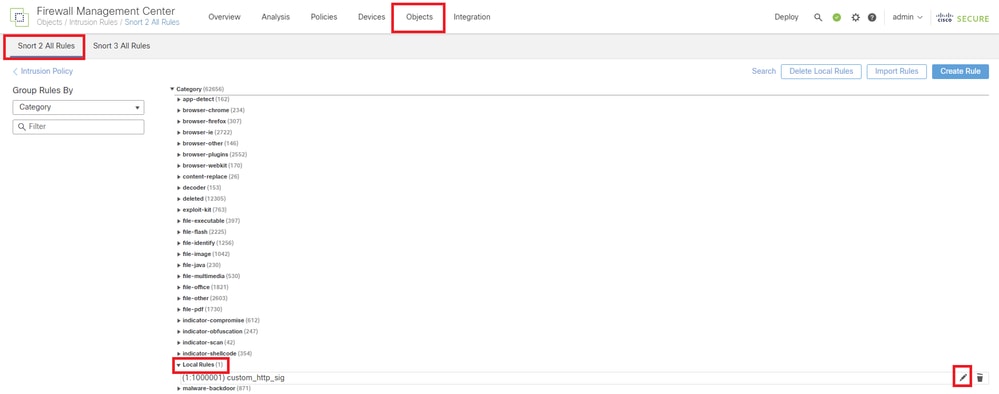 Edit an Existing Custom Rule
Enter the signature information to detect HTTP packets containing a specific string (username).
- Message : custom_http_sig
- Action : alert
- Protocol : tcp
- flow : Established, To Client
- content : username (Raw Data)
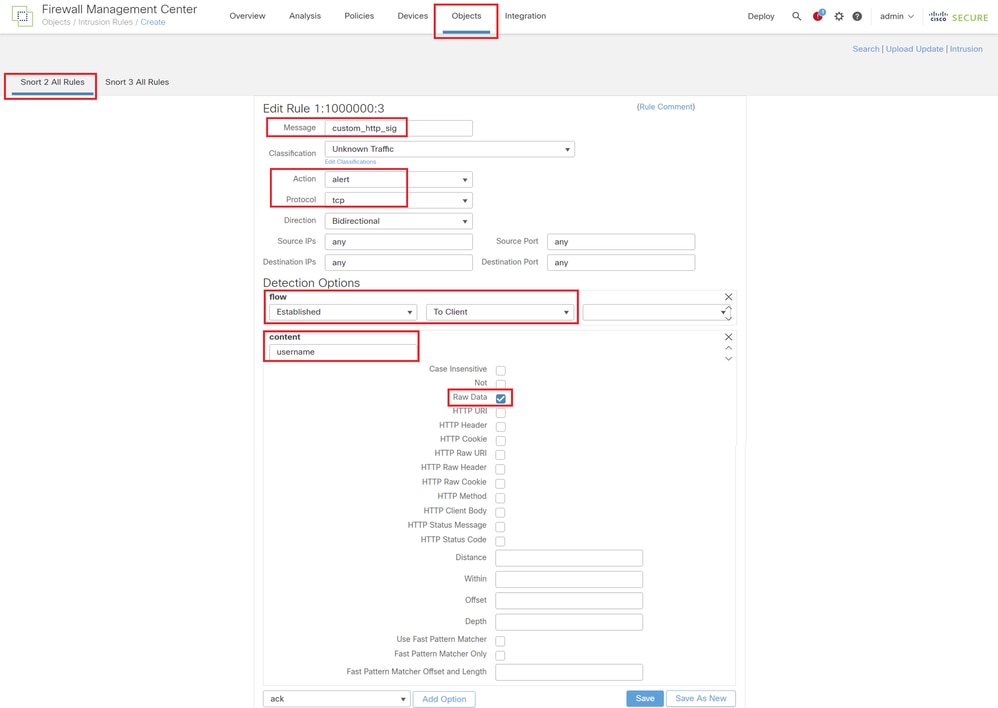 Input Necessary Info for Rule
Step 3. Import Custom Local Snort Rules from Snort 2 to Snort 3
Navigate to Objects > Intrusion Rules > Snort 3 All Rules > All Rules on FMC, click Convert Snort 2 rules and Import from Tasks pulldown list.
 Import Custom Rule to Snort 3
Check the warning message and click OK.
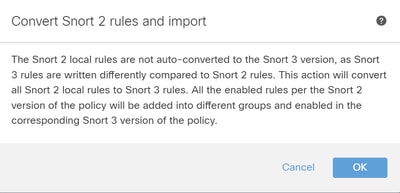 Warning Message
Navigate to Objects > Intrusion Rules > Snort 3 All Rules on FMC, click All Snort 2 Converted Global to confirm the imported Custom Local Snort Rule.
 Confirm Imported Custom Rule
Step 4. Change Rule Action
Click Per Intrusion Policy according to the Rule Action of the target custom rule.
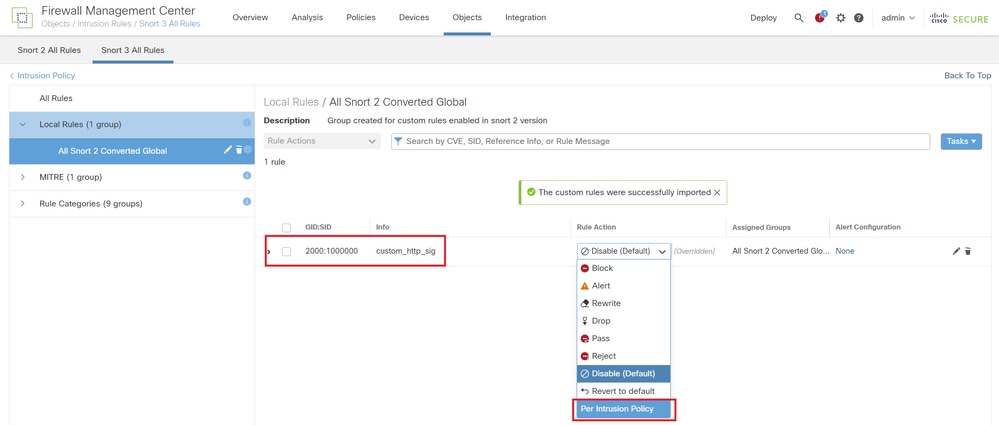 Change Rule Action
In the Edit Rule Action screen, enter the information for the Policy and Rule Action.
- Policy : snort_test
- Rule Action : BLOCK

Note: Rule actions are:
Block— Generates event, blocks current matching packet and all the subsequent packets in this connection.
Alert— Generates only events for matching packet and does not drop packet or connection.
Rewrite— Generates event and overwrites packet contents based on the replace option in the rule.
Pass— No events are generated, allows packet to pass without further evaluation by any subsequent Snort rules.
Drop— Generates event, drops matching packet and does not block further traffic in this connection.
Reject— Generates event, drops matching packet, blocks further traffic in this connection and sends TCP reset if it is a TCP protocol to source and destination hosts.
Disable—Does not match traffic against this rule. No events are generated.
Default—Reverts to the system default action.
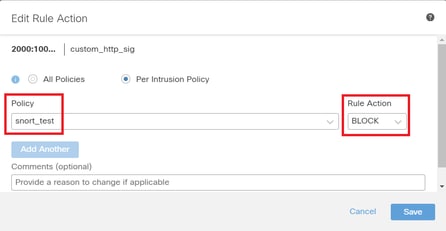 Edit Rule Action
Step 5. Confirm Imported Custom Local Snort Rule
Navigate to Policies > Intrusion Policies on FMC, click Snort 3 Version corresponding to the target Intrusion Policy in the row.
 Confirm Imported Custom Rule
Click Local Rules > All Snort 2 Converted Global to check the details of the Custom Local Snort Rule.
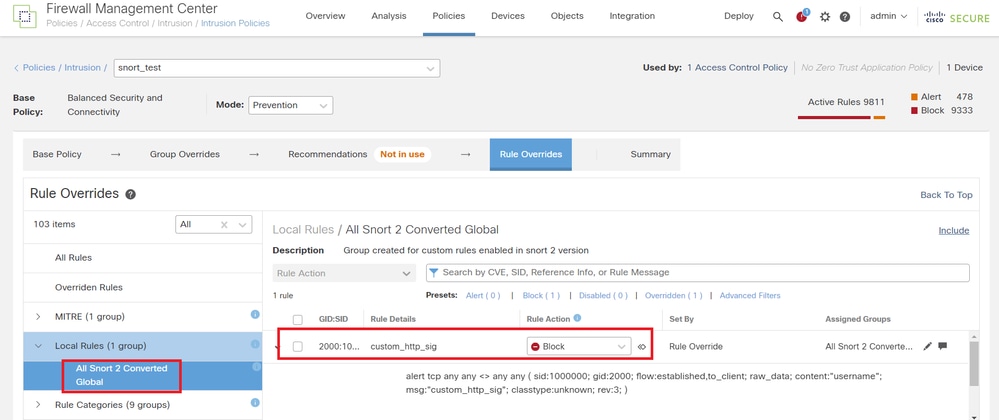 Confirm Imported Custom Rule
Step 6. Associate Intrusion Policy with Access Control Policy (ACP) Rule
Navigate toPolicies>Access Controlon FMC, associate Intrusion Policy with ACP.
 Associate with ACP Rule
Step 7. Deploy Changes
Deploy the changes to FTD.
 Deploy Changes
Method 2. Upload a Local File
Step 1. Confirm Snort version
Same as Step 1 in Method 1.
Step 2. Create a Custom Local Snort Rule
Manually create a Custom Local Snort Rule and save it in a local file named custom-rules.txt.
alert tcp any any <> any any ( sid:1000000; flow:established,to_client; raw_data; content:"username"; msg:"custom_http_sig"; classtype:unknown; rev:3; )
Step 3. Upload the Custom Local Snort Rule
Navigate to Objects > Intrusion Rules > Snort 3 All Rules > All Rules on FMC, click Upload Snort 3 rules from Tasks pulldown list.
 Upload Custom Rule
In the Add Custom Rules screen, drag and drop the local custom-rules.txt file, select the Rule Groups and the Appropriate Action (Merge Rules in this example), and then click the Next button.
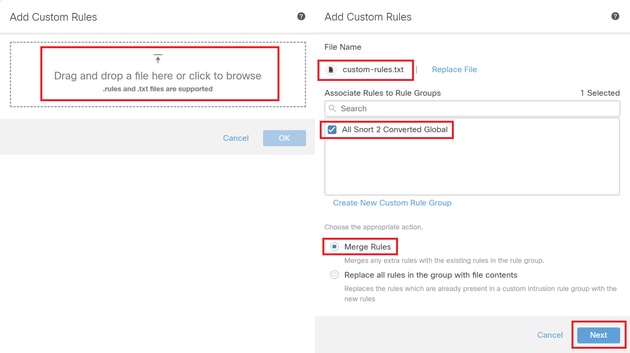 Add Custom Rule
Confirm that the local rule file has been successfully uploaded.
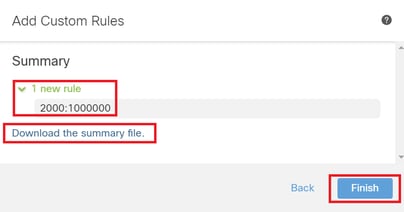 Confirm Upload Result
Navigate to Objects > Intrusion Rules > Snort 3 All Rules on FMC, click All Snort 2 Converted Global to confirm the uploaded Custom Local Snort Rule.
 Detail of Custom Rule
Step 4. Change Rule Action
Same as Step 4 in Method 1.
Step 5. Confirm Uploaded Custom Local Snort Rule
Same as Step 5 in Method 1.
Step 6. Associate Intrusion Policy with Access Control Policy (ACP) Rule
Same as Step 6 in Method 1.
Step 7. Deploy Changes
Same as Step 7 in Method 1.
Verify
Step 1. Set Contents of File in HTTP Server
Set the contents of the test.txt file on HTTP server side to username.
Step 2. Initial HTTP Request
Access the HTTP Server (192.168.20.1/test.txt) from the browser of the client (192.168.10.1) and confirm that the HTTP communication is blocked.
 Initial HTTP Request
Step 3. Confirm Intrusion Event
Navigate toAnalysis>Intrusions>Eventson FMC, confirm the Intrusion Event is generated by the Custom Local Snort Rule.
 Intrusion Event
ClickPacketstab, confirm the detail of Intrusion Event.
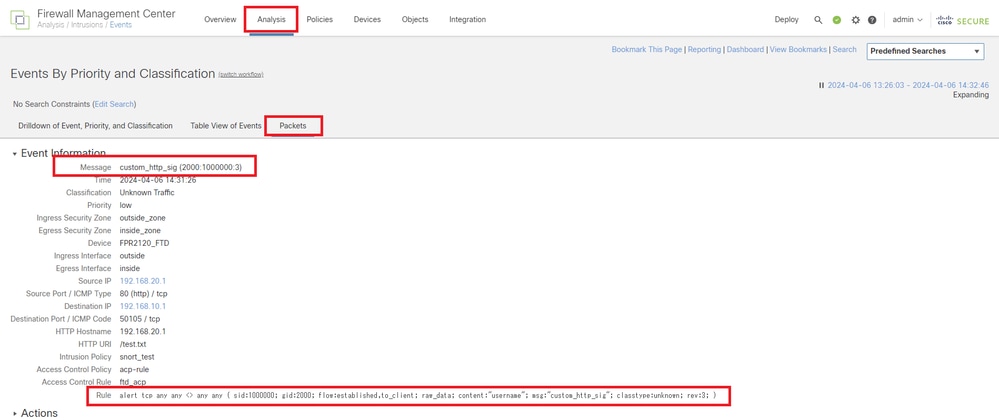 Detail of Intrusion Event
Frequently Asked Questions (FAQ)
Q : Which is recommended, Snort 2 or Snort 3 ?
A : Compared to Snort 2, Snort 3 offers improved processing speeds and new features, making it the more recommended option.
Q : After upgrading from a version of FTD prior to 7.0 to a version 7.0 or later, does the snort version get automatically updated to Snort 3 ?
A : No, the inspection engine remains on Snort 2. To use Snort 3 after the upgrade, you must explicitly enable it. Note that Snort 2 is planned to be deprecated in a future release and you are strongly recommended to stop using it now.
Q : In Snort 3, is it possible to edit an existing custom rule ?
A : No, you can not edit it. To edit a specific custom rule, you must delete the relevant rule and recreate it.
Troubleshoot
Run system support trace command to confirm the behavior on FTD. In this example, the HTTP traffic is blocked by the IPS rule (2000:1000000:3).
> system support trace

Enable firewall-engine-debug too? [n]: y
Please specify an IP protocol: tcp
Please specify a client IP address: 192.168.10.1
Please specify a client port:
Please specify a server IP address: 192.168.20.1
Please specify a server port:

192.168.10.1 50104 -> 192.168.20.1 80 6 AS=0 ID=4 GR=1-1 Firewall: allow rule, 'ftd_acp', allow

192.168.20.1 80 -> 192.168.10.1 50103 6 AS=0 ID=4 GR=1-1 Event: 2000:1000000:3, Action block
192.168.20.1 80 -> 192.168.10.1 50103 6 AS=0 ID=4 GR=1-1 Verdict: blacklist
192.168.20.1 80 -> 192.168.10.1 50103 6 AS=0 ID=4 GR=1-1 Verdict Reason: ips, block
Reference
Cisco Secure Firewall Management Center Snort 3 Configuration Guide


 Feedback