Introduction
This document describes the steps to configure External Threat Feeds from an AlienVault source and use it within the ESA.
Prerequisites
Requirements
Cisco recommends knowledge of these topics:
- Cisco Secure Email Gateway (SEG / ESA) AsyncOS 16.0.2
- Linux CLI
- Python3 pip
- AlienVault account
Components Used
The information in this document is based on these software and hardware versions:
- Email Security Appliance
- Python3
The information in this document was created from the devices in a specific lab environment. All of the devices used in this document started with a cleared (default) configuration. If your network is live, ensure that you understand the potential impact of any command.
Background Information
The External Threat Feeds (ETF) framework enables the email gateway to ingest external threat intelligence shared in STIX format via the TAXII protocol. By leveraging this capability, organizations can:
- Take a proactive stance against cyber threats such as malware, ransomware, phishing, and targeted attacks.
- Subscribe to both local and third-party threat intelligence sources.
- Enhance the overall effectiveness of the email gateway.
What is STIXX/TAXII?
STIX (Structured Threat Information Expression)
STIX is a standardized format used to describe cyber threat intelligence (CTI)—including indicators, tactics, techniques, malware, and threat actors—in a structured and machine-readable way. A STIX feed typically includes indicators—patterns that help detect suspicious or malicious cyber activity.
TAXII (Trusted Automated Exchange of Intelligence Information)
TAXII is a protocol used to exchange STIX data between systems securely and automatically. Defines how cyber threat intelligence is exchanged between systems, products, or organizations through dedicated services (TAXII servers).

Note: AsyncOS 16.0 release supports STIX/TAXII versions: STIX 1.1.1 and 1.2, with TAXII 1.1.
Feed Sources
Email Security Appliances can consume threat intelligence feeds from various sources, including public repositories, commercial providers, and their own private servers within your organization.
To ensure compatibility, all sources must use the STIX/TAXII standards, which enable structured, automated sharing of threat data.
Cabby library
The Cabby Python library is a useful tool for connecting to TAXII servers, discovering STIX collections, and polling threat data. It is a great way to test and validate that a feed source is working correctly and returning data as expected before integrating it into your Email Security Appliance.
Installing Cabby Library
To install the Cabby library, you need to make sure that your local machine have Python pip installed.
Once python pip is installed, you just need to run this command to install the cabby library.
python3 -m pip install cabby
Once cabby library installation is finished, you can verify that the taxii-collections and taxii-poll commands are now available.
(cabby) bash-3.2$ taxii-collections -h
usage: taxii-collections [-h] [--host HOST] [--port PORT] [--discovery DISCOVERY] [--path URI] [--https] [--verify VERIFY] [--timeout TIMEOUT] [--ca-cert CA_CERT]
                         [--cert CERT] [--key KEY] [--key-password KEY_PASSWORD] [--username USERNAME] [--password PASSWORD] [--jwt-auth JWT_AUTH_URL]
                         [--proxy-url PROXY_URL] [--proxy-type {http,https}] [--header HEADERS] [-v] [-x] [-t {1.0,1.1}]
(cabby) bash-3.2$ taxii-poll -h
usage: taxii-poll [-h] [--host HOST] [--port PORT] [--discovery DISCOVERY] [--path URI] [--https] [--verify VERIFY] [--timeout TIMEOUT] [--ca-cert CA_CERT] [--cert CERT]
                  [--key KEY] [--key-password KEY_PASSWORD] [--username USERNAME] [--password PASSWORD] [--jwt-auth JWT_AUTH_URL] [--proxy-url PROXY_URL]
                  [--proxy-type {http,https}] [--header HEADERS] [-v] [-x] [-t {1.0,1.1}] -c COLLECTION [--dest-dir DEST_DIR] [-l LIMIT] [-r] [--begin BEGIN] [--end END]
                  [-b BINDINGS] [-s SUBSCRIPTION_ID] [--count-only]
AlienVault - Pulses and Feeds
To start discovering AlienVault information, first create an account on the AlienVault site, then start to search for the information you want.
In AlienVault, feeds and pulses are related but not the same:
Pulses
Pulses are curated threat intel with grouped indicators + context (human-readable).
- A Pulse is a collection of threat indicators (IOCs) grouped around a specific threat or campaign.
- Created by the community or providers to describe things like malware, phishing, ransomware.
- Each pulse includes context like threat description, associated indicators (IP, domain, file hash and so on), tags, and references.
- Pulses are human-readable and structured in a way that can be easily understood and shared.
Think of a pulse as a threat report with grouped IOCs and metadata.
Feeds
Feeds are automated stream of indicators from multiple pulses (machine-readable).
- Feeds are a stream of raw indicators (IOCs) pulled from one or more pulses, usually in an automated way.
- They are typically used by security tools to ingest indicators in bulk, via formats like STIX/TAXII, CSV, or JSON.
- Feeds are machine-focused and used for automation and integration with SIEMs, firewalls, and email gateways.
A feed is more about the delivery mechanism, while a pulse is the content and context of the threat.
You usually poll feeds, and those feeds are made up of indicators extracted from pulses.
Start Polling Collections
Polling From Own Profile
Once you have your AlienVault account, you can start using the taxii-collections and taxii-poll commands.
This is how to use these commands for this use case:
In this case, within the AlienVault profile, there are no pulses available, but as a test, you can poll a collection from your profile using the taxii-poll command:
 alienvault personal profile
taxii-poll --path https://otx.alienvault.com/taxii/poll --collection user_<your-alienvault-username> --username abcdefg --password ****
 poll personal profile
As you can see, there are no blocks polled because no information is available within the AlienVault profile.
Polling From AlienVault Profiles
Once profiles inside AlienVault are discovered, some of them have pulses. In this example, the AlienVault profile is used.
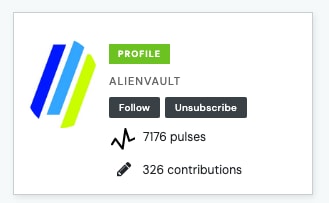 alienvault profile
When running the poll with the taxii-poll command, it immediately starts fetching all the information from the profile.
taxii-poll --path https://otx.alienvault.com/taxii/poll --collection user_AlienVault --username abcdefg --password ****
 alienvault poll
As shown, the process begins fetching the information.
AlienVault Profile Collection Subscriptions
As a test, this user subscribed to 3 profiles.
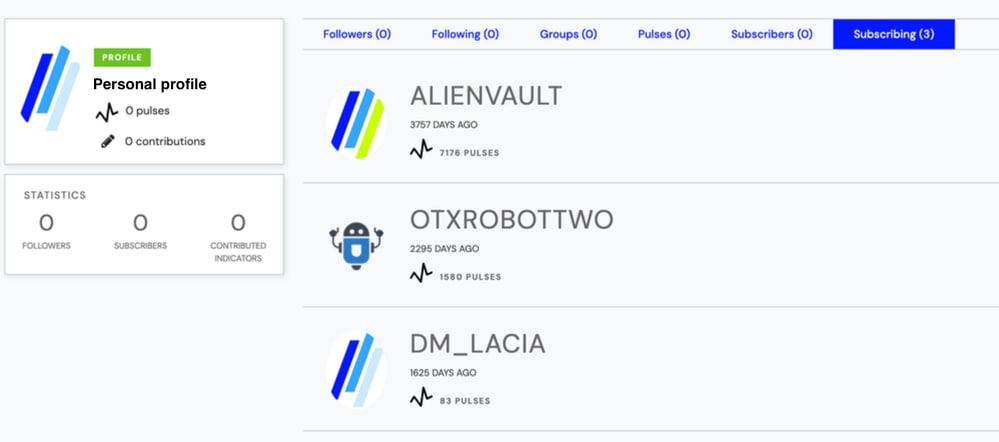 personal profile subscriptions
You can use the taxii-collections command to fetch those subscriptions.
taxii-collections --path https://otx.alienvault.com/taxii/collections --username abcdefg --password ****
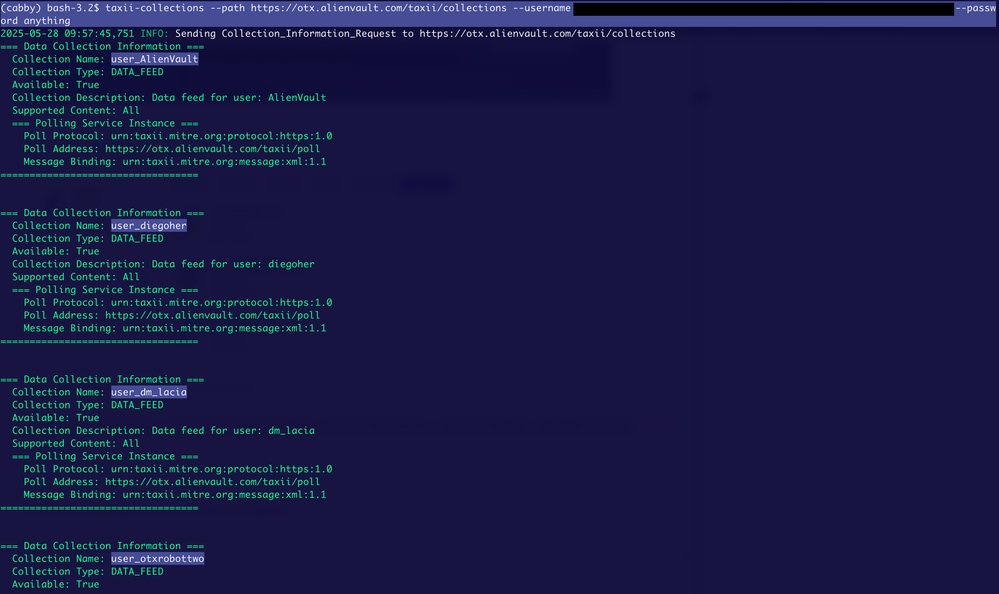 personal profile collections
You can confirm that the taxii-collections command works if the Collection Name is the same as the one you are subscribed to.
Adding Sources to ESA
Adding Source without Feeds
- Navigate to Mail Policies > External Threat Feeds Manager.
- Change to Cluster Mode.
- Click Add Source.
- Hostname: otx.alienvault.com
- Polling Path: /taxi/poll
- Collection Name: user_<your_AlienVault_username>
- Port: 443
- Configure User Credentials: The one that AlienVault provided to you.
- Click Submit > Commit Changes.
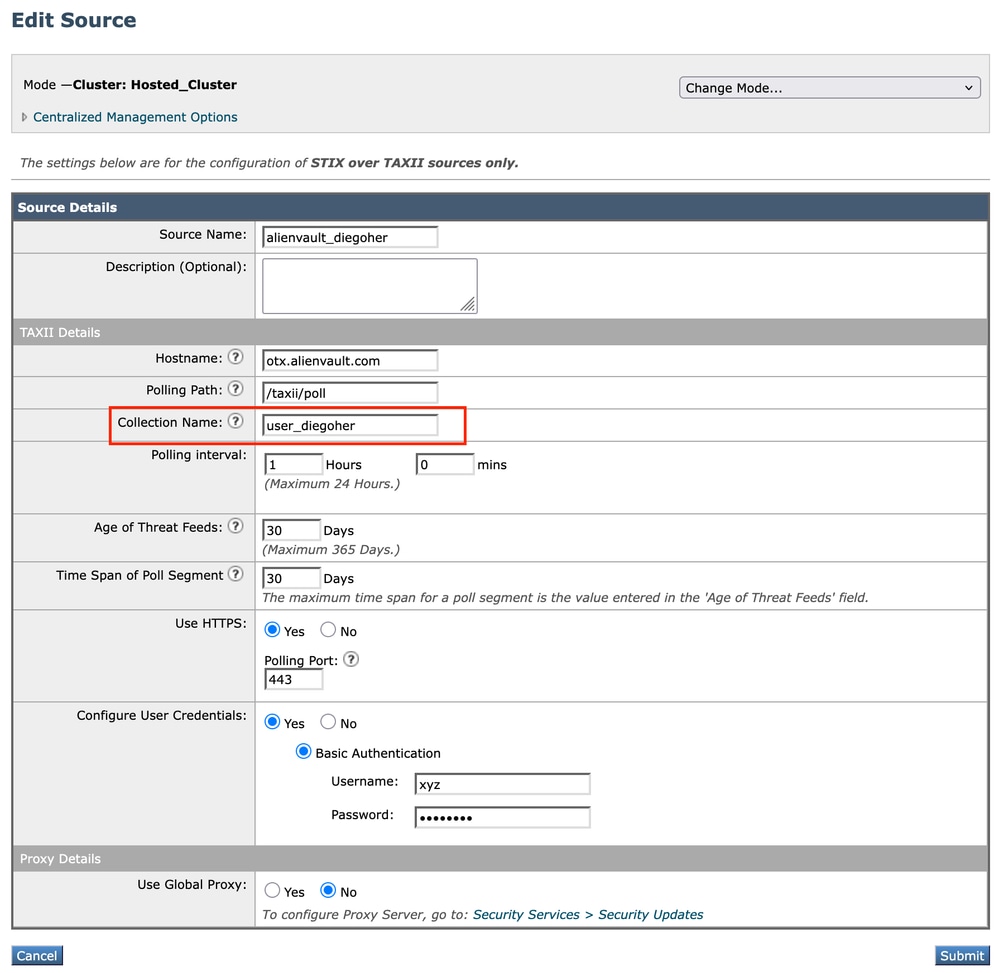 personal source
Polling Source without Feeds
In the External Threat Feeds Manager, after the source is added, the newly added source becomes visible.
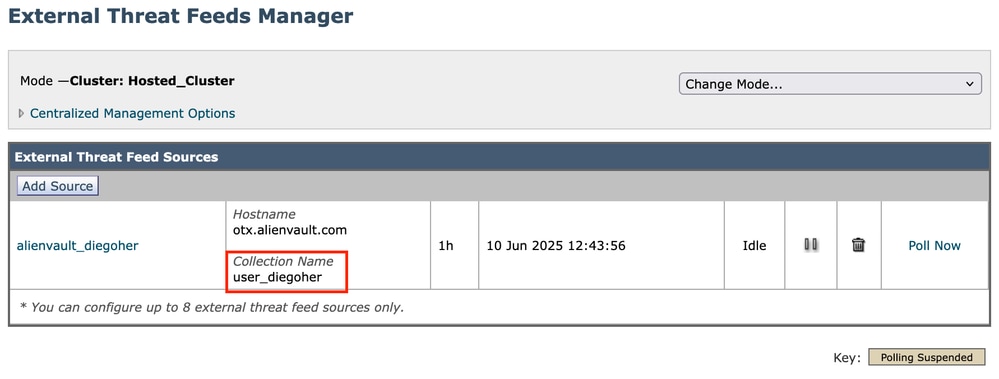 personal feed
Once added, click Poll Now.
Verify
Log into the ESA via CLI and review the threatfeed logs to verify the information.
 ETF personal poll
As shown in the image you can see that 0 observables were fetched and this is expected because there are no feeds in the profile shown.
Adding Source with Feeds
- Navigate to Mail Policies > External Threat Feeds Manager.
- Change to Cluster Mode.
- Click Add Source.
- Hostname: otx.alienvault.com
- Polling Path: /taxi/poll
- Collection Name: user_AlienVault
- Port: 443
- Configure User Credentials: The one that AlienVault provided to you.
- Click Submit > Commit Changes.
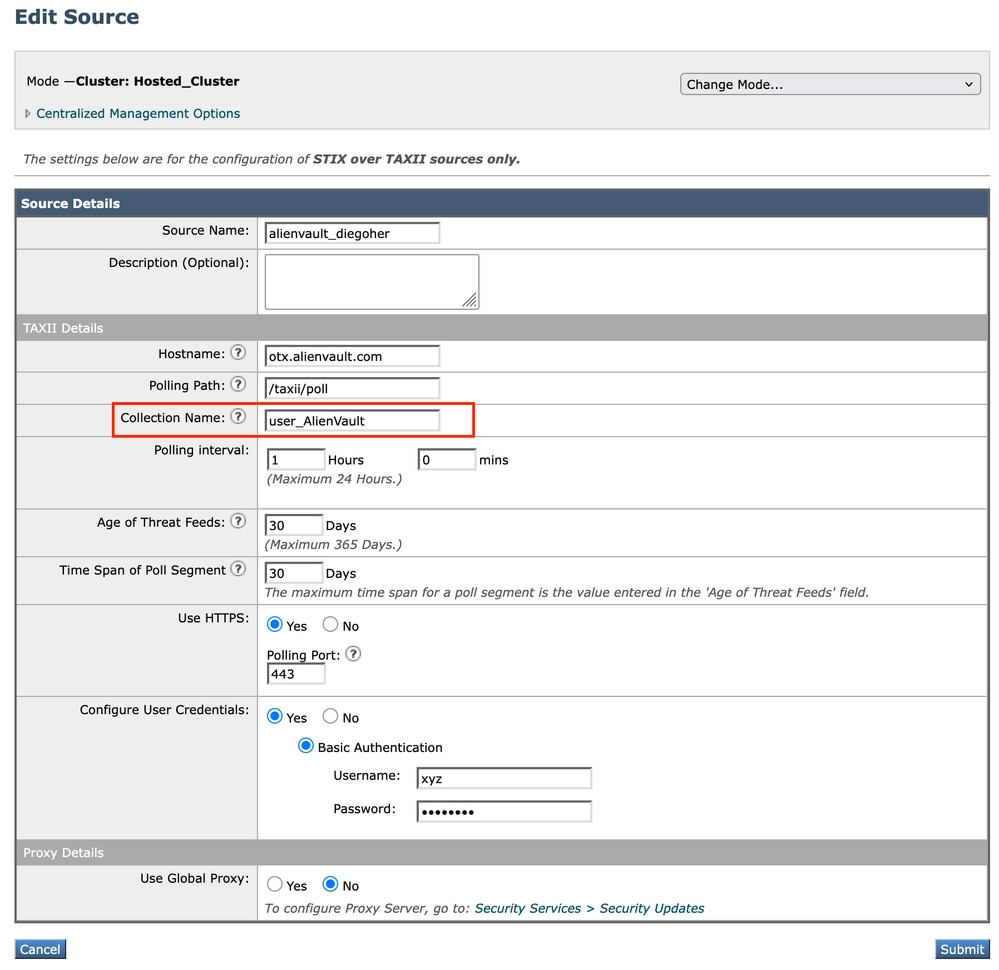 alienvault source
Polling Source with Feeds
In the External Threat Feeds Manager, after the source is added, the newly added source becomes visible.
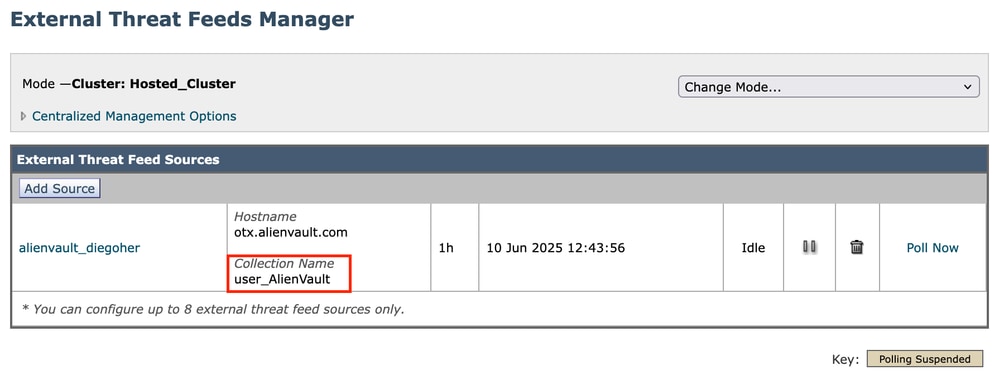 alienvault feed
Once added, click Poll Now.
Verify
Log into the ESA via CLI and review the threatfeed logs to verify the information.
 polling alienvault feed
As shown in the image, you can see that several observables were fetched.

Note: If new feeds are added to the configured collection, the ESA automatically polls the source, and the new observables are fetched.


 Feedback