Introduction
This document describes how to configure multiple Subject Alternative Name (SAN) values on a certificate created with OpenSSL.
Prerequisites
Requirements
Cisco recommends that you have basic knowledge of these topics:
- Secure Socket Layer (SSL) Certificates
- OpenSSL
- Linux commands
- SAN
Components Used
The information in this document is based on these software versions:
- OpenSSL Version CiscoSSL 1.1.1j.7.2sp.230
- Internal Certificate Authority (CA)
The information in this document was created from the devices in a specific lab environment. All of the devices used in this document started with a cleared (default) configuration. If your network is live, ensure that you understand the potential impact of any command.
Background information
Using SAN values in certificates is a common practice today, essential for various applications such as SSL certificates for Remote Access VPN (RAVPN) authentication or Zero Trust Network Access (ZTNA) appliances. These applications often require certificates that include multiple SAN values to support different domain names or IP addresses securely.
By default, Certificate Signing Requests (CSRs) generated by tools like Cisco Firepower Management Center (FMC) or other CSR generators typically do not include the option to add multiple SAN values. This limitation results in certificates containing only a single SAN value, which can not meet the requirements of modern network environments.
Configure
To overcome this limitation, the recommended approach is to add SAN values directly into the CSR using tools like OpenSSL. This ensures that, when the Certificate Authority (CA) signs the CSR, the resulting certificate contains the desired SAN entries. The key to this process is to modify the OpenSSL configuration or use an appropriate configuration file that specifies the SAN values. This way, the CSR explicitly includes the SAN extension, allowing the CA to issue a certificate with multiple SANs as required.
Note: If using a third party or well known CA, verify that the CA supports custom SAN values in the CSR before submission.
Step 1. Create a RSA Private Key
Use the command openssl genrsa -out <key_name>.key 4096.
root@host1:/home/admin/certificate# openssl genrsa -out privatekey.key 4096
Step 2. Create a Configuration File
This file specifies the SAN values to be included in the CSR.
1. Create a configuration file named <config_file_name>.conf, and edit the file with a text editor. For example, run the command <config_file_name>.conf in Vim (you can use another text editor).
vim config.conf
2. Add this content, replacing placeholder values with your actual certificate details and desired SAN entries under the [alt_names] section:
[ req ]
default_bits = 4096
default_md = sha256
prompt = no
distinguished_name = req_distinguished_name
req_extensions = v3_req

[ req_distinguished_name ]
countryName = <Country Code>
stateOrProvinceName = <State or Province>
localityName = <Locality Name>
organizationName = <Organization Name>
organizationalUnitName = <Organizational Unit Name>
commonName = <Common Name>

[ v3_req ]
subjectAltName = @alt_names

[ alt_names ]
DNS.1 = <SAN Value 1>
DNS.2 = <SAN Value 2>
DNS.3 = <SAN Value 3>
DNS.4 = <SAN Value 4>
Step 3. Request the CSR Using the Private Key and the Configuration File
Using the private key and configuration file previously created, create the CSR with the command openssl req -new <key_name>.key -config <conf_name>.conf -out <CSR_Name>.csr.
openssl req -new -key privatekey.key -config config.conf -out CSR.csr
Note: Ensure the private key and configuration file are in the same directory when running this command.
After running the command, your <CSR_name>.csr file appears in the folder. This is the CSR file that must be sent to the CA Server for signing.
Verify
Run the openssl req -text -noout -verify -in CSR.csr command to ensure the SAN values are available in the CSR.
root@FTD1:/home/admin/TZSANValue# openssl req -text -noout -verify -in CSR.csr
verify OK
Certificate Request:
Data:
Version: 1 (0x0)
Subject: C = US, ST = California, L = San Francisco, O = Cisco, OU = VPN, CN = <Domain Name>
Subject Public Key Info:
Public Key Algorithm: rsaEncryption
RSA Public-Key: (4096 bit)
Modulus:
00:de:6a:85:c6:1b:33:8c:14:a4:5b:0b:f8:fb:5a:
c8:a3:2e:b6:74:63:0c:4e:ad:05:24:bd:16:ad:cc:
a3:b9:a3:3b:f4:c7:52:9d:f2:02:ff:67:49:0f:cc:
64:e2:9a:70:53:9b:68:88:f1:92:1e:09:9c:fc:34:
76:31:c4:0a:e8:ce:de:61:8f:fb:1e:02:f9:a6:57:
78:c7:86:71:e9:46:d8:70:88:c0:c6:0d:93:83:ae:
45:05:e6:b4:ca:26:39:b9:8e:42:6d:de:43:92:a7:
c4:4d:11:7c:01:4a:d5:b9:bf:b7:5e:f6:a8:2d:4a:
78:98:36:25:89:a3:52:1c:63:8a:40:f6:6f:84:b3:
8d:c7:b0:dd:29:b7:4a:e7:41:76:cc:b5:a7:87:ca:
90:9d:04:c2:cf:b8:66:8e:8c:50:5e:3d:26:75:ea:
97:bd:8c:a3:fe:77:30:52:6c:38:30:10:e8:a9:9f:
cc:ab:f8:85:fd:c8:c6:c2:88:39:42:e7:7d:41:51:
48:44:78:ae:82:dd:e6:96:cb:eb:15:13:3e:a0:e3:
86:03:b1:c3:fa:fc:5e:db:7c:79:bf:54:06:54:dc:
9c:4e:83:de:97:7a:c0:e1:18:70:ba:d8:f8:20:69:
58:52:23:4a:6f:78:e4:7f:f7:cb:b6:2f:be:59:db:
cf:d5:d5:7c:49:12:e1:9c:ef:24:83:0e:80:94:48:
01:ce:6f:ce:61:c3:a5:aa:bb:98:45:d3:f1:26:99:
02:5a:b1:84:73:8b:31:94:1d:00:4b:96:60:c6:55:
52:7c:f5:62:25:cd:17:eb:7a:1d:c3:0d:53:23:8f:
c3:ce:94:42:35:6a:13:ac:db:76:ac:fc:9d:8d:a1:
39:05:c2:1b:27:04:4f:67:bc:22:58:1d:91:b4:85:
b0:99:44:7d:e9:55:ce:ca:bd:c0:42:26:9c:f8:88:
26:d5:74:5d:43:c4:ba:9c:25:6c:0f:b9:2e:59:91:
a8:d1:01:b4:2c:63:40:46:8f:9a:e2:34:02:00:81:
39:cc:6b:3a:39:ff:c1:aa:c5:80:d1:ed:66:15:94:
a5:25:e8:2c:3a:52:b2:de:f5:03:76:26:be:9d:8f:
84:5c:f4:78:6f:f1:64:55:2a:f0:b0:1e:23:3c:b6:
65:1a:6c:ba:4a:e1:c0:cf:22:cc:cd:e8:59:ce:75:
60:14:c0:c7:dd:e0:61:34:77:a6:d6:cc:c2:5e:5e:
15:e0:37:c3:f4:ed:a3:c0:69:52:78:38:b7:b3:d7:
42:49:97:ff:23:76:80:5b:0b:cd:5e:2f:7e:30:c7:
77:91:bb:b8:52:24:ad:c5:86:8e:9b:18:e0:2e:ea:
e2:bb:83
Exponent: 65537 (0x10001)
Attributes:
Requested Extensions:
X509v3 Subject Alternative Name:
DNS:<SAN Value 1>, DNS:<SAN Value 2>, DNS:<SAN Value 3>, DNS:<SAN Value 4>
Signature Algorithm: sha256WithRSAEncryption
60:9b:12:b8:f8:e8:07:3f:d7:e7:73:f9:4e:d4:a9:28:7f:1d:
30:44:2b:16:88:dc:d6:01:39:ee:c0:06:71:61:90:ad:b4:c3:
f0:ea:eb:bb:4f:8b:11:68:fe:3c:24:ae:a6:bc:cb:68:4a:21:
77:bb:85:37:91:a3:fa:0c:ee:ce:b1:78:5f:fc:cb:d5:c6:2a:
ae:2d:41:df:0f:3d:d4:eb:8e:83:4c:8c:10:d0:81:42:62:0c:
e6:19:e1:2e:14:ef:46:cd:32:20:64:1a:0d:32:44:57:b7:3d:
76:f3:4c:b9:61:51:a6:20:cf:6d:37:ca:b6:b3:4e:ea:36:16:
bb:a9:ec:8a:6d:5b:a0:c8:1a:fe:b5:8c:08:86:7f:c5:a9:f1:
d9:2c:7e:5a:f4:ca:e8:c2:4b:44:70:35:e2:80:ea:ad:12:7c:
70:5e:2c:c9:1f:db:9b:0e:f7:cf:68:a3:93:da:33:18:f2:6c:
8e:4f:2b:ed:04:9d:c0:58:2e:66:d6:dc:25:30:6c:19:54:a2:
9f:68:7d:e7:63:d7:a9:db:6b:6e:e5:53:b4:27:84:98:dc:bc:
65:47:25:ae:7e:02:62:5c:c8:da:83:34:4e:5b:52:5d:5b:76:
bc:47:8f:cc:57:e0:b8:55:2b:6b:78:b0:e1:04:4a:1b:4b:20:
6d:e3:01:06:58:99:1c:1d:15:fb:2b:48:9a:b1:ad:84:fc:ed:
b2:31:98:5d:a2:97:26:69:0e:e6:0d:b4:2c:9b:40:7a:34:99:
e9:11:40:66:79:e1:0c:a9:7d:e7:47:bb:96:59:5a:af:f4:b3:
dc:73:5e:dc:8b:f5:97:88:b3:9d:0f:e0:fb:8a:63:a6:1e:af:
af:19:ea:c6:33:2a:97:a9:f1:bd:cf:67:54:5c:30:bf:1e:5b:
1c:68:9f:ba:91:4b:2f:3a:05:c5:be:43:fc:1a:0c:e1:32:29:
2a:08:04:a7:00:32:33:5b:19:56:17:61:e3:8d:7d:a3:b2:f9:
a8:9d:24:a6:9c:9c:ab:12:09:c3:b3:12:db:8b:8b:39:5b:f8:
09:5e:a0:48:eb:e0:8e:f3:cb:83:d2:89:43:c4:64:06:30:ec:
fa:69:ed:96:08:67:b0:20:48:d8:e9:b2:1e:1b:66:0b:80:3e:
81:0e:cd:2b:a6:5e:07:de:40:b1:70:bd:b8:fb:bf:30:ad:b9:
66:6b:a2:48:da:4e:27:ab:ae:06:13:ec:61:1f:79:bc:e6:c1:
4a:ef:75:f4:a1:bf:28:3d:f2:99:de:f3:71:84:cf:1c:58:17:
4d:66:97:8a:fe:f9:1c:77:ab:5d:b2:d9:20:93:ff:a3:c2:7c:
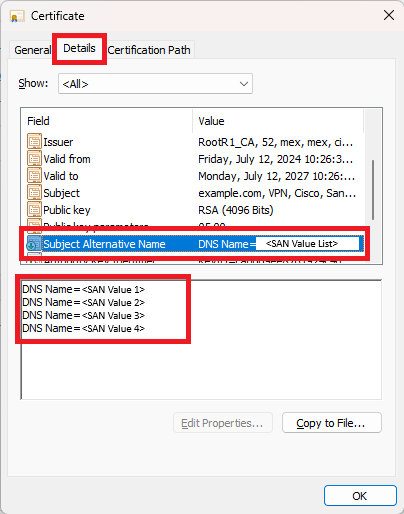
Once the CA authority returns the signed certificate, open the certificate. Navigate to the Details menu and find the Subject Alternative Names. You can see the SAN values on the certificate itself.
 Feedback