Introduction
This document describes how to configure Cisco Identity Service Engine 3.3 pxGrid Context-in using Open API.
Prerequisites
Requirements
Cisco recommends that you have knowledge of these topics:
- Cisco Identity Service Engine (ISE) 3.3
- Advance REST API
Components Used
The information in this document is based on these software and hardware versions:
- Cisco ISE 3.3
- Insomnia REST API client
The information in this document was created from the devices in a specific lab environment. All of the devices used in this document started with a cleared (default) configuration. If your network is live, ensure that you understand the potential impact of any command.
Background Information
pxGrid Context-In solution through REST APIs. This is because the Context-In pubsub model has some limitations with respect to using custom attributes in profiling and authorization policies.
Custom attributes are user-defined attributes that do not come in as endpoint data through regular network probes. Prior to ISE 3.3, there were mainly two ways to input custom attribute values as endpoint data.
- pxGrid Context-In asset topic, where ISE acts as a consumer and consumes endpoint data published by an external third-party product.
- Endpoint Extensible RESTful Services (ERS) Create/Update APIs.
Both these channels have limitations for using custom attributes in profiling and authorization policies.
Initial Steps
Enable Open API on ISE
Open API is disabled by default on ISE. In order to enable it, navigate to Administration > System > API Settings > API Service Settings. Toggle the Open API options and click Save.
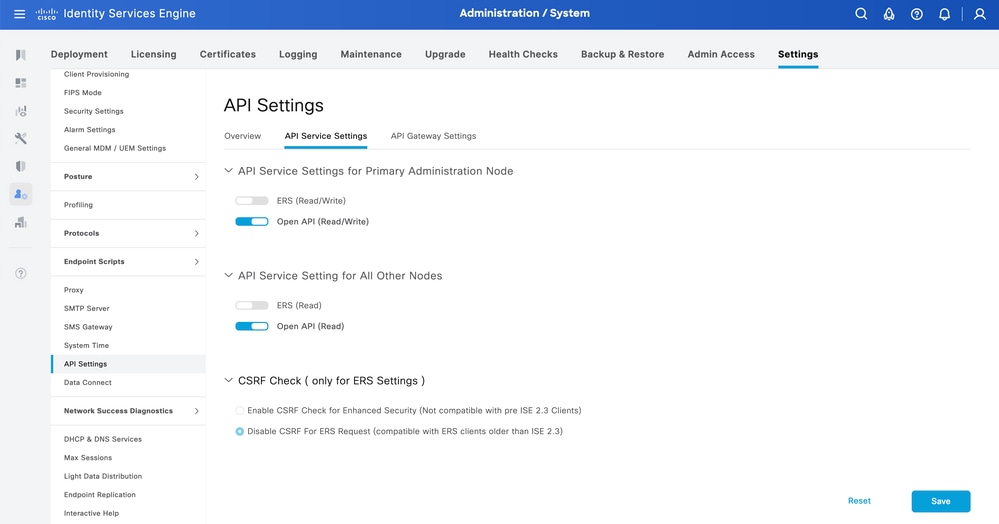 Enable Open API
Enable Custom Attribute for Profiling Enforcement on ISE
Custom Attribute for Profiling Enforcement is disabled by default on ISE. In order to enable it, navigate to Work Centers > Profiler > Settings > Profiler Settings. Enable Custom Attribute for Profiling Enforcement. Click Save.
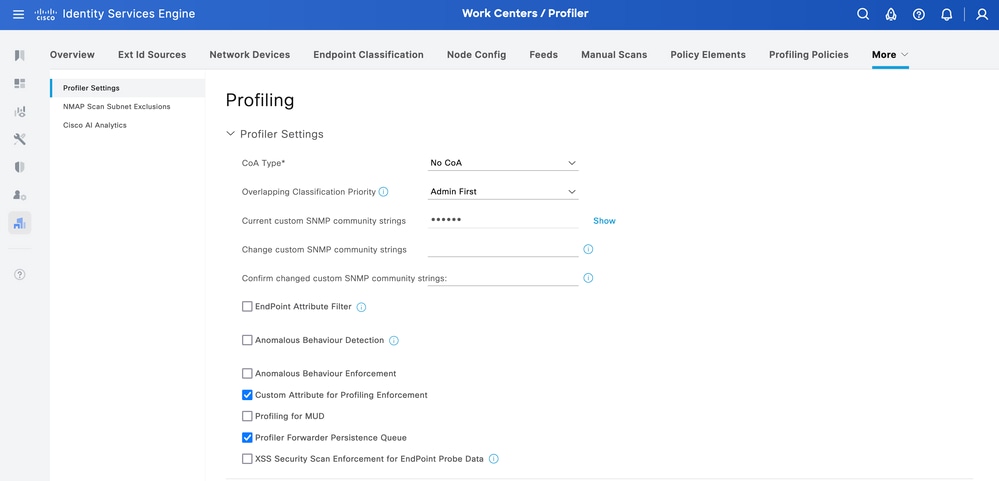 Enable Custom Attribute for Profiling Enforcement

Note: The Custom Attribute for Profiling Enforcement flag indicates that an automatic re-profiling action takes place if any custom attribute is modified.
Swagger UI
In order to access all Open API definitions on ISE, navigate to Administration > System > Settings > API Settings and click 'For more information on ISE Open API, please visit:'.
The URLs for the definitions used in this document are:
- Custom Attribute: https://<ISE-PAN-IP>/api/swagger-ui/index.html?urls.primaryName=CustomAttributes
- Endpoint: https://<ISE-PAN-IP>/api/swagger-ui/index.html?urls.primaryName=Endpoints
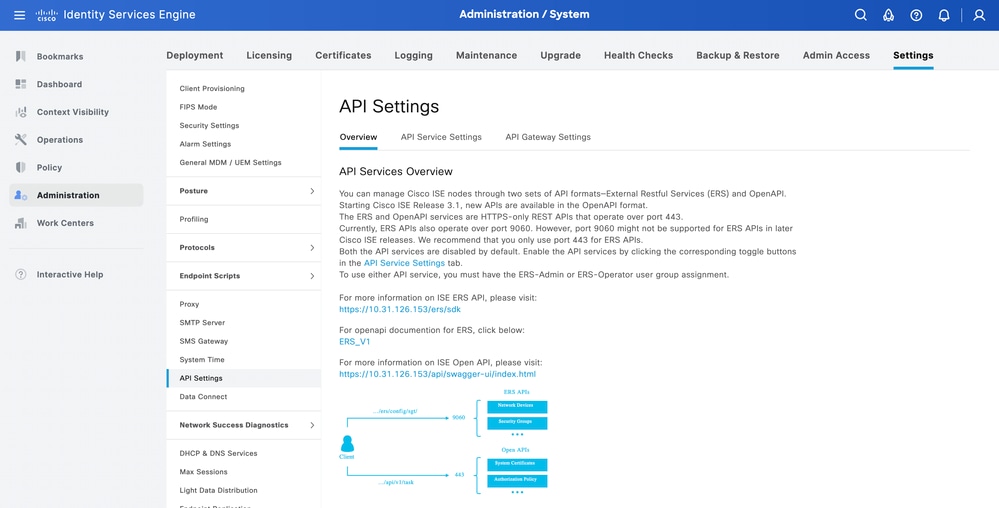 Swagger UI
Configure Endpoint Custom Attributes using Open API
Create Endpoint Custom Attribute
In order to create an endpoint custom attribute, it is mandatory to give it a name and type.
The types that can be used are:
- String
- Int
- Boolean
- Float
- Long
- IP
- Date
|
Method
|
POST
|
|
URL
|
https://<ISE-PAN-IP>:443/api/v1/endpoint-custom-attribute
|
|
Authentication Type
|
Basic
|
|
Credentials
|
Use Open API account credentials
|
|
Headers
|
Accept:application/json
Content-Type:application/json
|
|
Body
|
{
"attributeName": "DeviceType",
"attributeType": "String"
}
|
Body:
 Body Endpoint Custom Attribute
Authentication:
 Authentication Endpoint Custom Attribute
Headers:
 Headers Endpoint Custom Attribute
Expected Output:
 Expected Output Endpoint Custom Attribute
Verify Custom Attribute Creation
From ISE, navigate to Administration > Identity Management > Settings > Endpoint Custom Attributes. Verify that the attribute was created.
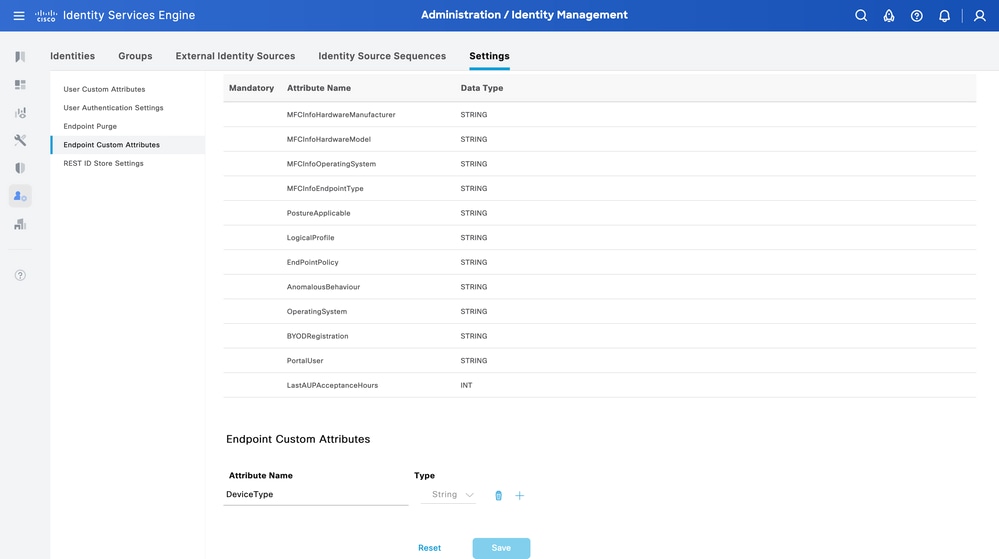 Endpoint Custom Attribute GUI

Note: The Endpoint Custom Attributes can be added manually. From ISE, navigate to Administration > Identity Management > Settings > Endpoint Custom Attributes. Click +, then enter the Attribute Name, and choose the Type.
Context-In API for Single Endpoint
Profiling Policy for Custom Attribute
From ISE, navigate to Work Centers > Profiler > Profiling Policies. Click Add.
Enter Name of the profiling policy.
Under Rules, navigate to Attributes > Create New Condition > CUSTOMATTRIBUTE. Choose the custom attribute created, choose Operator, and enter the value to be matched. Click Submit.
In this example, the DevicTypeA profiling policy is defined with CUSTOMATTRIBUTE_DeviceType.
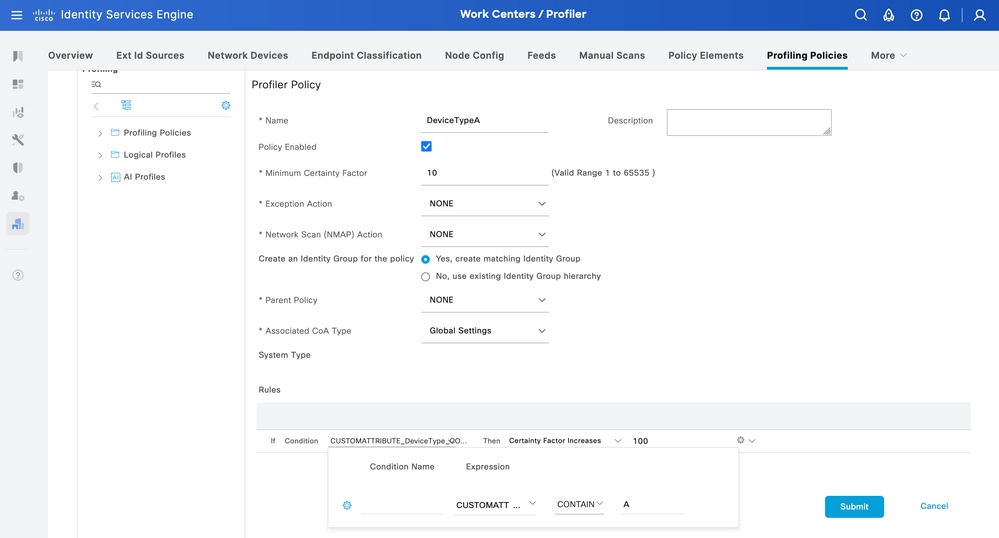 Profiler Policy
Create Endpoint
In this example, an endpoint with the mac address 94:DA:5F:96:74:63 and DeviceType set to A is created.
|
Method
|
POST
|
|
URL
|
https://<ISE-PAN-IP>:443/api/v1/endpoint
|
|
Authentication Type
|
Basic
|
|
Credentials
|
Use Open API account credentials
|
|
Headers
|
Accept:application/json
Content-Type:application/json
|
|
Body
|
{
"name": "94:DA:5F:96:74:63",
"customAttributes": {"DeviceType":"A"},
"description": null,
"connectedLinks": null,
"mdmAttributes": null,
"groupId": "aa0e8b20-8bff-11e6-996c-525400b48521",
"identityStore": "",
"identityStoreId": "",
"mac": "94:DA:5F:96:74:63",
"portalUser": "",
"profileId": "",
"ipAddress": null,
"vendor": null,
"productId": null,
"serialNumber": null,
"deviceType": null,
"softwareRevision": null,
"hardwareRevision": null,
"protocol": null,
"staticGroupAssignment": false,
"staticProfileAssignment": false
}
|
Body:
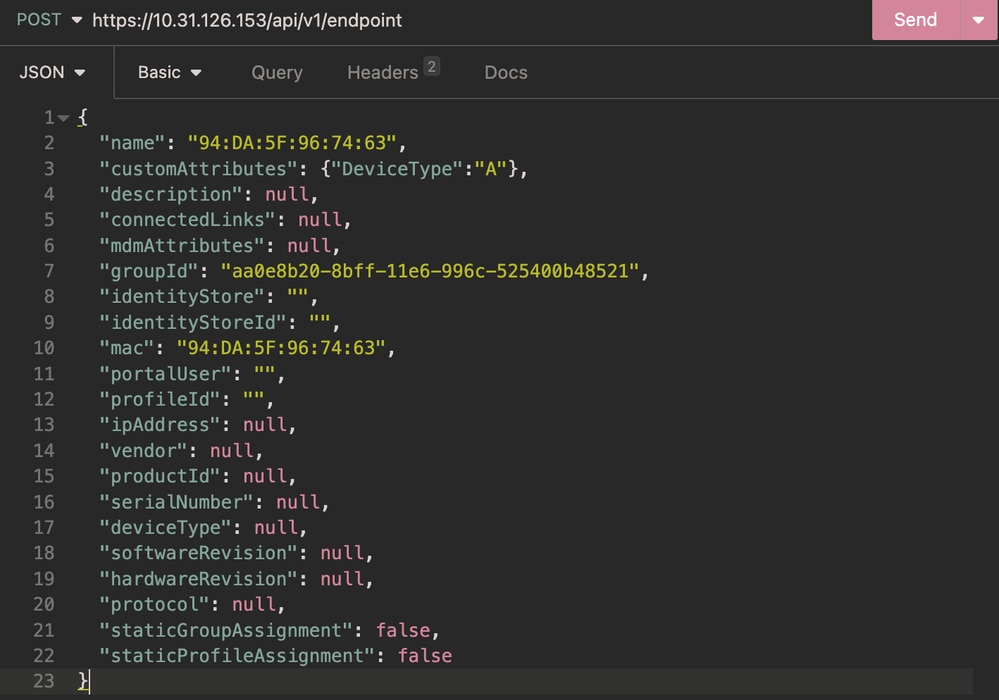 Body Endpoint
Authentication:
 Authentication Endpoint
Headers:
 Headers Endpoint
Expected Output:
 Expected Output Endpoint
Verify Endpoint Creation
From ISE, navigate to Context Visibility > Endpoints. Filter with the name of the profiling policy created under Endpoint Profile column.
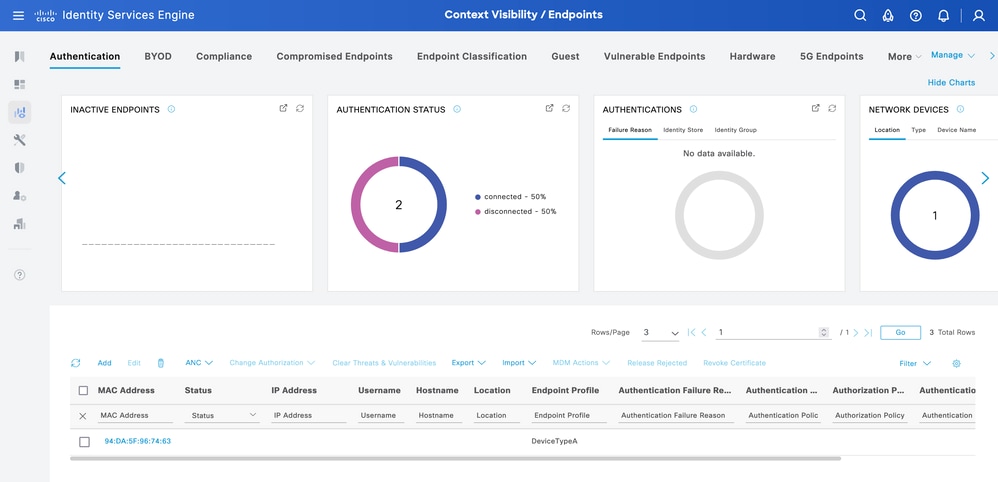 Context Visibility DeviceTypeA
Update Endpoint
In order to update endpoints via Open API, the URL path requires the parameter value. This parameter can be the ID or MAC address of the endpoint.
In this example, a new profiling policy DeviceTypeB was defined in order to update the custom attribute DeviceType set to B and the value is set as the MAC address.
|
Method
|
PUT
|
|
URL
|
https://<ISE-PAN-IP>:443/api/v1/endpoint/{value}
|
|
Authentication Type
|
Basic
|
|
Credentials
|
Use Open API account credentials
|
|
Headers
|
Accept:application/json
Content-Type:application/json
|
|
Body
|
{
"name": "94:DA:5F:96:74:63",
"customAttributes": {"DeviceType":"B"},
"description": null,
"connectedLinks": null,
"mdmAttributes": null,
"groupId": "aa0e8b20-8bff-11e6-996c-525400b48521",
"identityStore": "",
"identityStoreId": "",
"mac": "94:DA:5F:96:74:63",
"portalUser": "",
"profileId": "",
"ipAddress": null,
"vendor": null,
"productId": null,
"serialNumber": null,
"deviceType": null,
"softwareRevision": null,
"hardwareRevision": null,
"protocol": null,
"staticGroupAssignment": false,
"staticProfileAssignment": false
}
|
Body:
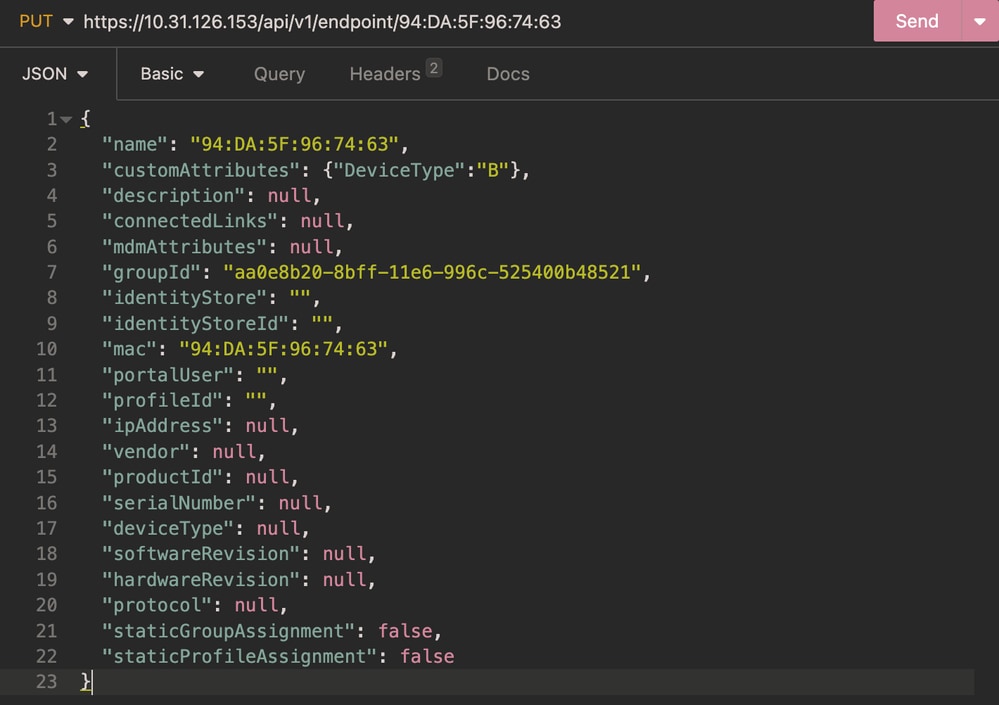 Body Update Endpoint
Authentication:
 Authentication Update Endpoint
Headers:
 Headers Update Endpoint
Expected Output:
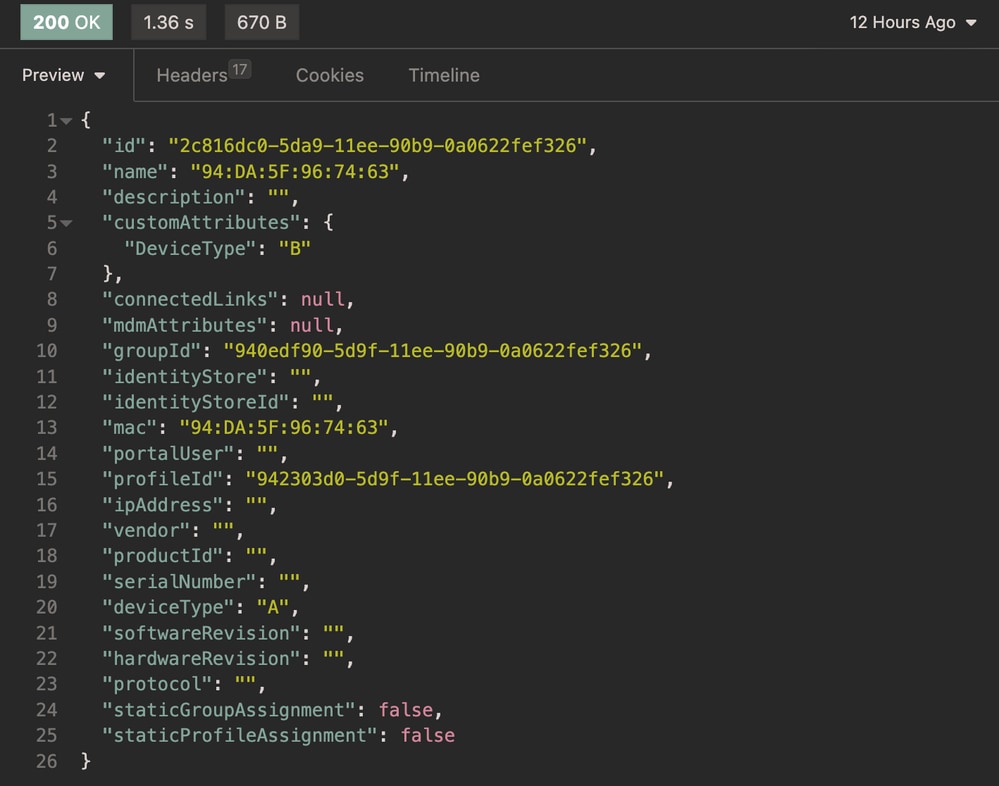 Expected output Update Endpoint
Verify Endpoint Update
From ISE, navigate to Context Visibility > Endpoints. Filter with the name of the profiling policy created under Endpoint Profile column.
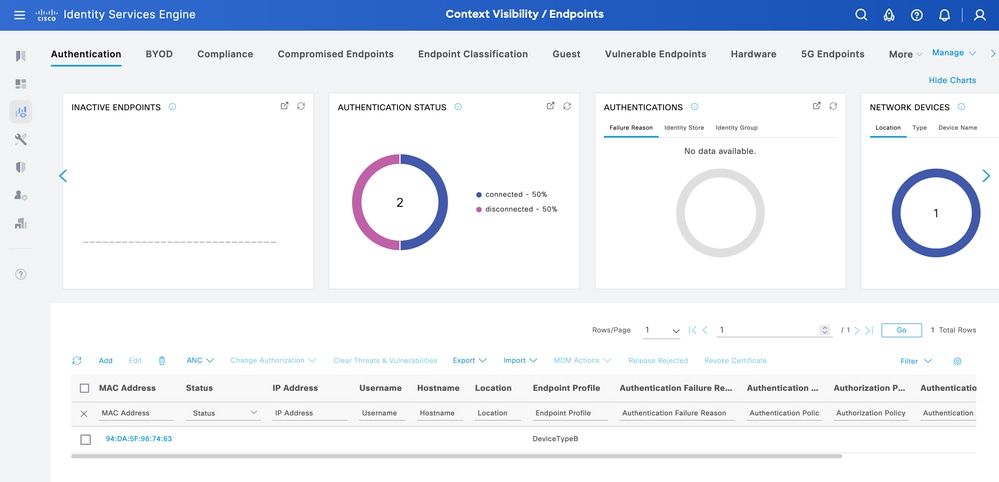 Context Visibility DeviceTypeB
Context-In API Bulk
Authorization Policy Configuration with Endpoint Identity Group
From ISE, navigate to Policy > Policy Sets > Select a Policy Set > Authorization Policy. Click the gear icon in any of the Authorization Policies and chooseInsert.
Give a name to the rule and add a new condition in order to open the Condition Studio.
Add a new attribute and navigate to Identity Group > Name > CONTAINS > Select the Endpoint Profile > USE.
Choose the profile as the result of the condition. Click Save.
In this example, the DeviceTypeA is the name of the rule.
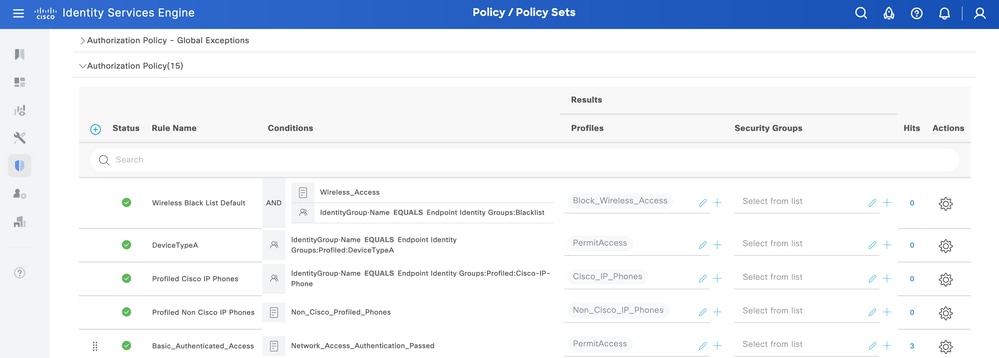 Policy Sets
Update Endpoint in Bulk
In order to change the attribute for different endpoints, the bulk API call is needed.
In this example, the Radius request from different endpoints does not have any custom attribute, and the Endpoint Profile is set as Unknown.
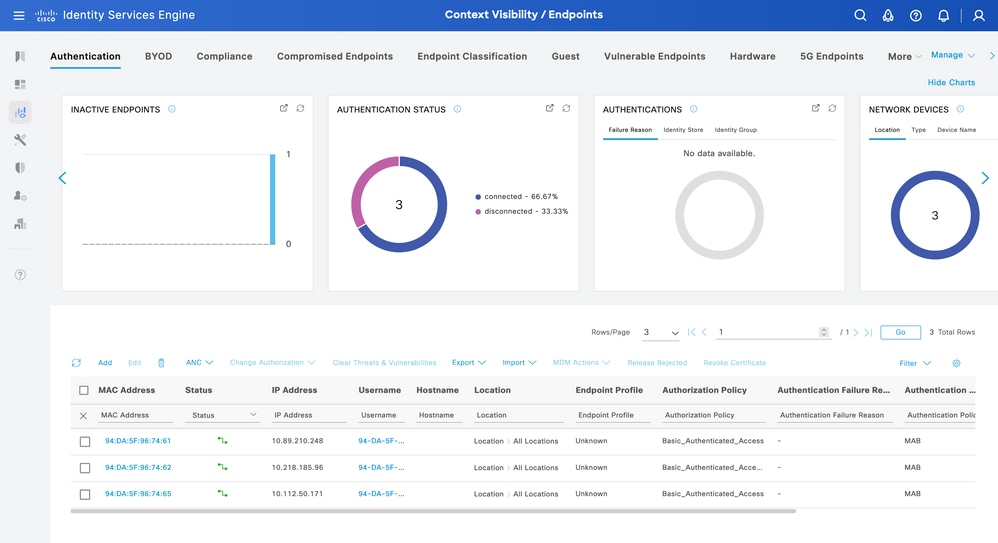 Context Visibility Uknown Profile
| Method |
PUT |
| URL |
https://<ISE-PAN-IP>:443/api/v1/endpoint/bulk |
| Authentication Type |
Basic |
| Credentials |
Use Open API account credentials |
|
Headers
|
Accept:application/json
Content-Type:application/json
|
|
Body
|
[
{
"name": "94:DA:5F:96:74:61",
"customAttributes": {"DeviceType":"A"},
"description": null,
"connectedLinks": null,
"mdmAttributes": null,
"groupId": "aa0e8b20-8bff-11e6-996c-525400b48521",
"identityStore": "",
"identityStoreId": "",
"mac": "94:DA:5F:96:74:61",
"portalUser": "",
"profileId": "",
"ipAddress": "94:DA:5F:96:74:61",
"vendor": null,
"productId": null,
"serialNumber": null,
"deviceType": null,
"softwareRevision": null,
"hardwareRevision": null,
"protocol": null,
"staticGroupAssignment": false,
"staticProfileAssignment": false
},
{
"name": "94:DA:5F:96:74:62",
"customAttributes": {"DeviceType":"A"},
"description": null,
"connectedLinks": null,
"mdmAttributes": null,
"groupId": "aa0e8b20-8bff-11e6-996c-525400b48521",
"identityStore": "",
"identityStoreId": "",
"mac": "94:DA:5F:96:74:62",
"portalUser": "",
"profileId": "",
"ipAddress": "10.218.185.96",
"vendor": null,
"productId": null,
"serialNumber": null,
"deviceType": null,
"softwareRevision": null,
"hardwareRevision": null,
"protocol": null,
"staticGroupAssignment": false,
"staticProfileAssignment": false
},.......
]
|
Body:
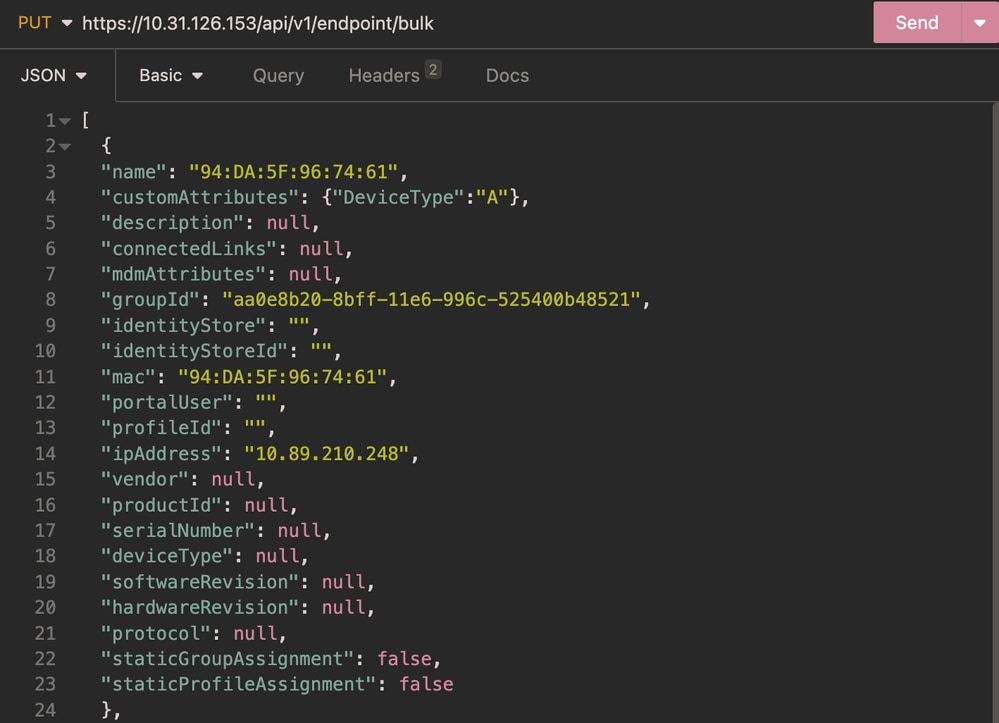 Body Endpoint Bulk
Authentication:
 Authentication Endpoint Bulk
Headers:
 Headers Endpoint Bulk
Expected Output:
 Expected Output Endpoint Bulk
Verify Endpoint Bulk Update
From ISE, navigate to Context Visibility > Endpoints. Filter with the name of the profiling policy created under the Endpoint Profile column.
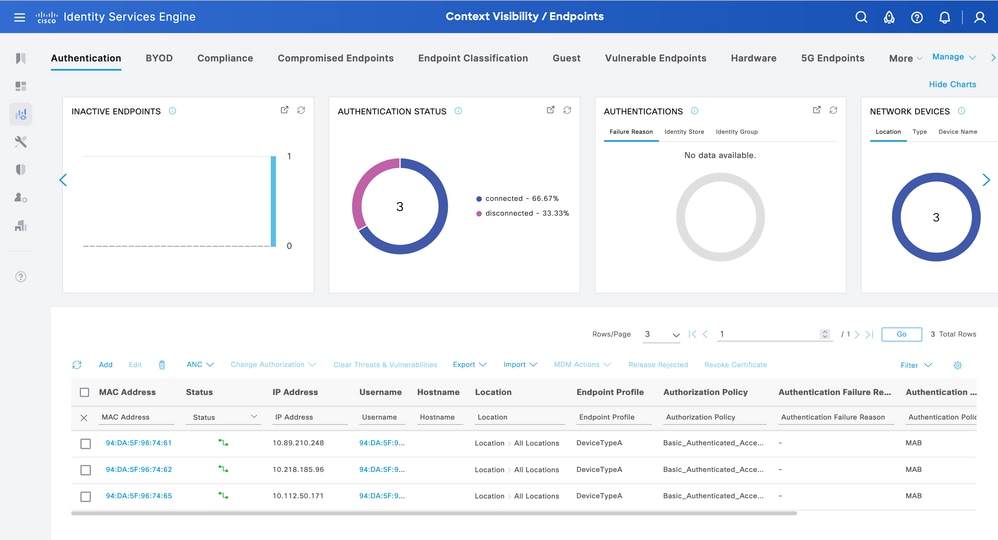 Context Visibility DevcieTypeA Endpoint Profile
For the endpoint, in order to use the correct Authorization Policy DeviceTypeA, the endpoint must re-authenticate.
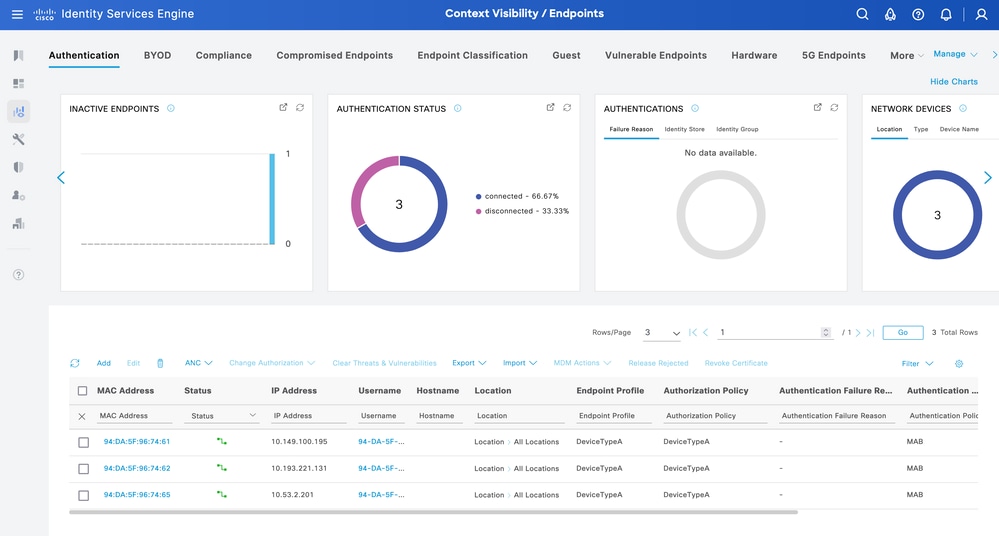 Context Visibility DevcieTypeA Authorization Policy
Troubleshoot
This section provides information that you can use in order to troubleshoot your configuration.
From ISE, navigate to Operation > Troubleshoot > Debug Wizard > Debug Log Configuration. Choose your Primary Admin Node (PAN) and clickEdit.
Filter theComponent Nameby API service and choose the Log Level needed. ClickSave.
 Debug Level Configuration Open API
- On ISE PAN CLI the logs are found at:
admin#show logging application api-service.log
- On ISE GUI navigate to
Operations > Troubleshoot > Download Logs > Select ISE PAN > Debug log > Debug Log Type > Application Logs. Download the zip files for api-service.log.
- API response codes and their possible meanings:
- 200 (OK): Indicates the Open API successfully carried out the desired action.
- 201 (Created): Indicates the resource was created and the request was successful.
- 400 (Bad Request): The server is unable to process the request. Recognize client errors due to malformed request syntax, invalid parameters, and so on. Read the message details if available.
- 401 (Unauthorised): This indicates that the action was undertaken with the wrong credentials or no credentials, or the account is not authorized to perform this action.
- 403 (Forbidden): This indicates the server is capable of understanding the request but is not authorized.
- 404 (Not Found): This indicates the server is unable to find the requested resource.
- 500 (Internal Server Error): Indicates an issue on the server side. Logs on ISE can help understand the cause.


 Feedback