Differentiate Authentication Types on ASA Platforms for Policy Decisions on ISE
Available Languages
Contents
Introduction
This document describes how to configure Cisco Identity Services Engine (ISE) to utilize the Client-Type RADIUS Vendor-Specific Attribute (VSA) in order to differentiate multiple types of authentication used on the Cisco Adaptive Security Appliance (ASA). Organizations often require policy decisions based on the way the user is authenticated to the ASA. This also allows you to apply policy to received management connections on the ASA, which allows us to use RADIUS in place of TACACS+, when prudent.
Prerequisites
Requirements
Cisco recommends that you have knowledge of these topics:
-
ISE authentication and authorization.
-
ASA authentication methods and RADIUS configuration.
Components Used
The information in this document is based on these software and hardware versions:
-
Cisco Adaptive Security Appliance Release 8.4.3.
-
Cisco Identity Services Engine Release 1.1.
Conventions
Refer to Cisco Technical Tips Conventions for more information on document conventions.
RADIUS VSA 3076/150 Client-Type Attribute
The Client-Type attribute was added in ASA Release 8.4.3, which allows the ASA to send the type of client that authenticates to the ISE in Access-Request (and Accounting-Request) packets, and allows ISE to make policy decisions based on that attribute. This attribute requires no configuration on the ASA, and is sent automatically.
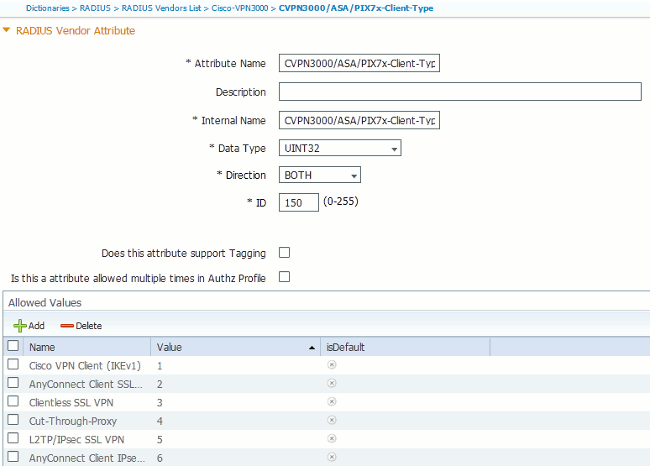
The Client-Type attribute is currently defined with these integer values:
-
Cisco VPN Client (Internet Key Exchange Version (IKEv1))
-
AnyConnect Client SSL VPN
-
Clientless SSL VPN
-
Cut-Through-Proxy
-
L2TP/IPsec SSL VPN
-
AnyConnect Client IPsec VPN (IKEv2)
Configure
In this section, you are provided the information you need in order to configure ISE to utilize the Client-Type attribute described in this document.
Step 1
Create the Custom Attribute
To add the Client-Type attribute values to ISE, create the attribute and populate its values as a custom dictionary.
-
On ISE, navigate to Policy > Policy Elements > Dictionaries > System.
-
Within the System dictionaries, navigate to RADIUS > RADIUS Vendors > Cisco-VPN3000.
-
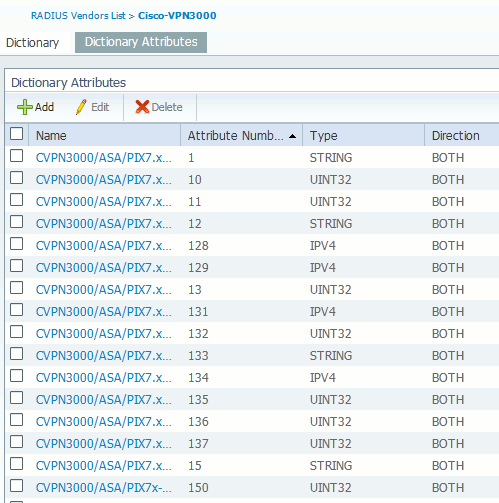
The Vendor ID on the screen should be 3076. Click on the Dictionary Attributes tab.
-
Click Add (See Figure 1).
Figure 1: Dictionary Attributes
-
Populate the fields in the custom RADIUS Vendor Attribute form as seen in Figure 2.
Figure 2: RADIUS Vendor Attribute
-
Click the Save button at the bottom of the screen.
-
Step 2
Add Client-Type Attribute
In order to utilize the new attribute for policy decisions, add the attribute to an authorization rule in the conditions section.
-
In ISE, navigate to Policy > Authorization.
-
Create a new rule or modify an existing policy.
-
In the conditions section of the rule, expand the conditions pane and select either Create a New Condition (for a new rule) or Add Attribute/Value (for a pre-existing rule).
-
In the Select Attribute field, navigate to Cisco-VPN3000 > Cisco-VPN3000:CVPN3000/ASA/PIX7x-Client-Type.
-
Choose the appropriate operator (Equals or Not Equals) for your environment.
-
Choose the Authentication type you wish to match.
-
Assign an Authorization Result appropriate to your policy.
-
Click Done.
-
Click Save.
After the rule is created, the Authorization Condition should look similar to the example in Figure 3.
Figure 3: Authorization Condition Example 
Verify
In order to verify the Client-Type attribute is in use, examine the authentications from the ASA in ISE.
-
Navigate to Operations > Authentications
-
Click the Details button for the authentication from the ASA.
-
Scroll down to Other Attributes and look for CVPN3000/ASA/PIX7x-Client-Type= (See Figure 4)
Figure 4: Other Attributes Details
-
The Other Attributes field should indicate the received value for the authentication. The rule should match the policy defined in step 2 of the configuration section.
Related Information
Revision History
| Revision | Publish Date | Comments |
|---|---|---|
1.0 |
03-Mar-2013
|
Initial Release |
Contact Cisco
- Open a Support Case

- (Requires a Cisco Service Contract)


 Feedback