Configure Repository on ISE
Available Languages
Contents
Introduction
This document describes how to configure a repository on the Identity Services Engine (ISE).
Prerequisites
Requirements
Cisco recommends that you have knowledge of these topics:
- Basic knowledge of the Identity Services Engine (ISE)
- Basic knowledge of File Transfer Protocol (FTP) server and SSH File transfer protocol (SFTP) server
Components Used
The information in this document is based on these software and hardware versions:
- Cisco Identity Service Engine version 3.x
- A functional FTP server and SFTP server
The information in this document was created from the devices in a specific lab environment. All of the devices used in this document started with a cleared (default) configuration. If your network is live, ensure that you understand the potential impact of any command.
Background Information
Cisco allows you to create and delete repositories through the Admin portal. You can create these types of repositories:
- DISK
- FTP
- SFTP
- NFS
- CD-ROM
- HTTP
- HTTPS
ISE Repositories can be configured from both the GUI and the CLI of the ISE and can be used for these purposes:
- Backup and Restore of ISE Configuration and Operational data
- Upgrade of ISE nodes
- Patch installation
- Export of data (Reports) from the ISE
- Export of support bundle from the ISE node
Configuration
The crypto host_key add host <ip address of the server> command needs to be added to all servers of a deployment.
Configure FTP Repository
Configure FTP Repository from the GUI
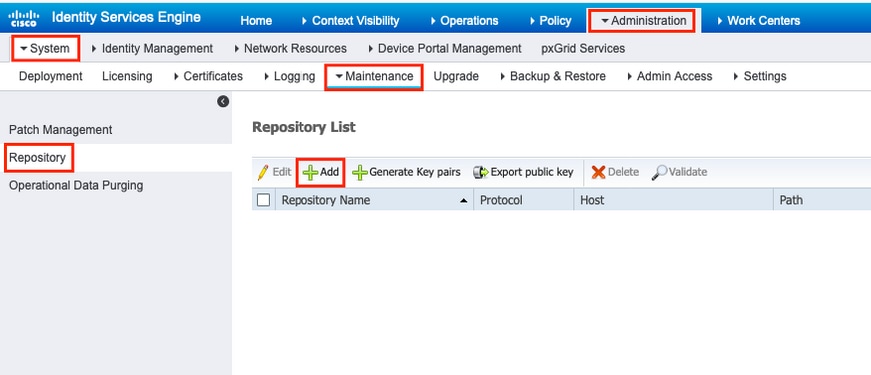
Step 1. In order to configure a repository on the ISE, log in to the ISE GUI and navigate to Administration > System > Maintenance > Repository. Then click Add, as shown in the image.
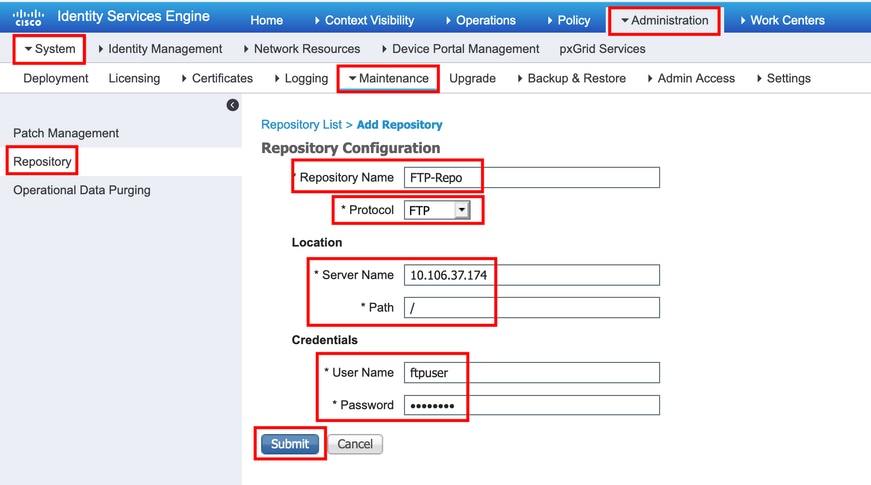
Step 2. Provide Repository Name and choose FTP as the protocol. Then enter Server Name, Path, User Name, and Password. Click Submit, as shown in the image.
Configure FTP Repository from the CLI
Log in to the CLI of the ISE node via SSH and run these commands.
ise/admin#
ise/admin# configure terminal
Enter configuration commands, one per line. End with CNTL/Z.
ise/admin(config)# repository FTP-Repo
ise/admin(config-Repository)# url ftp://10.127.197.145/

ise/adminconfig-Repository)# user <Username> password plain <Password>
ise/admin(config-Repository)# exit
ise/admin(config)# exit
ise/admin#
Configure SFTP Repository
Configure the SFTP Repository from the GUI
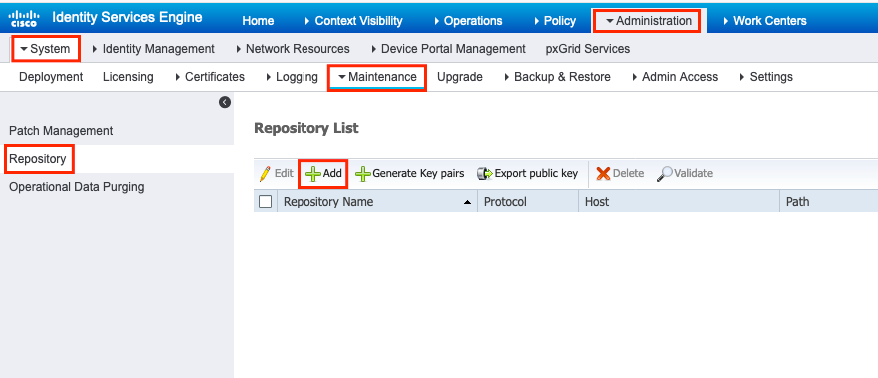
Step 1. In order to configure a repository on the ISE, log in to the ISE GUI and navigate to Administration > System > Maintenance > Repository. Then click Add, as shown in the image.
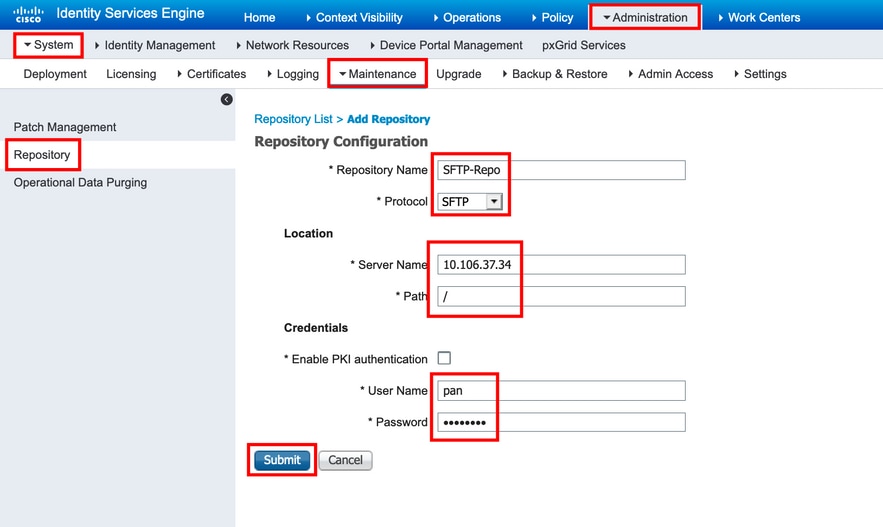
Step 2. Provide Repository Name and choose SFTP as the protocol. Then enter Server Name, Path, User Name, and Password, Click Submit, as shown in the image.
Step 3. After you click Submit, a pop-up message appears. The message prompts you to use CLI to add the host_key of the SFTP server, as shown in the image.
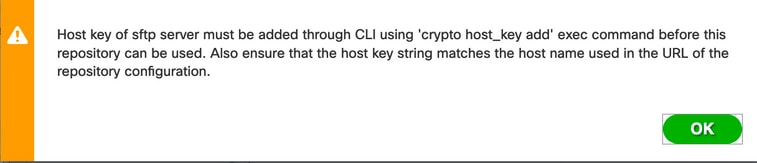
Step 4. Log in to the CLI of the ISE node via SSH and use the command crypto host_key add host <ip address of the server> to add the host key.
ise/admin# crypto host_key add host 10.76.112.35
host key fingerprint added
Operating in CiscoSSL FIPS mode

# Host 10.76.112.35 found: line 1
10.76.112.35 RSA SHA256:exFnNITDhafaNPFr35x6kC1pR0iTP6xS+LBmtIXPfnk
ise/admin#
Configure SFTP Repository from the CLI
Log in to the CLI of the ISE node via SSH and run these commands:
ise/admin#

ise/admin# configure terminal
Enter configuration commands, one per line. End with CNTL/Z.
ise/admin(config)# repository SFTP-Repo
ise/admin(config-Repository)# url sftp://10.76.112.35/

ise/adminconfig-Repository)# user <Username> password plain <Password>
ise/admin(config-Repository)# exit
ise/admin(config)# exit
ise/admin#
Configure NFS Repository
Configure NFS Repository from the GUI
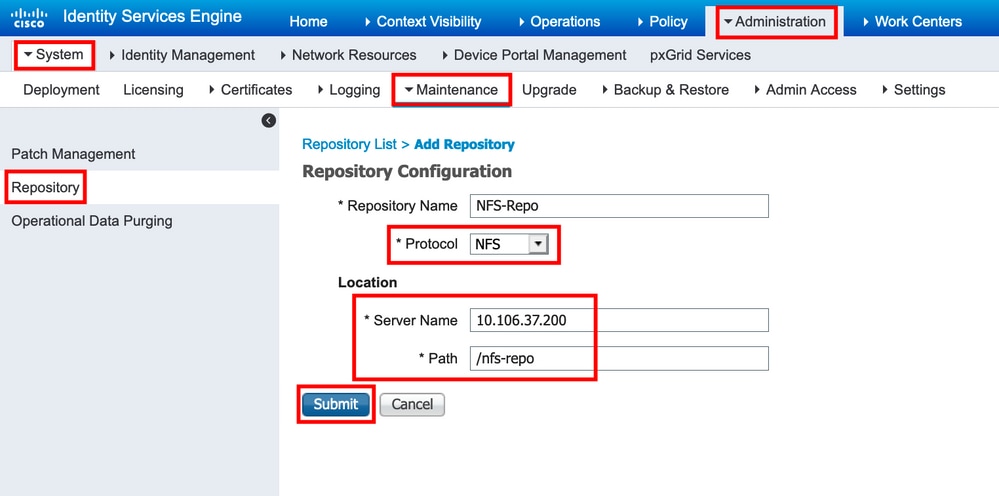
Step 1. In order to configure a repository on the ISE, log in to the ISE GUI and navigate to Administration > System > Maintenance > Repository. Then, click Add, as shown in the image.

Step 2. Provide Repository Name and choose NFS as the protocol. Then enter Server Name and Path. Click Submit, as shown in the image.
Configure NFS Repository from the CLI
Log in to the CLI of the ISE node via SSH and run these commands:
ise/admin#

ise/admin# configure terminal
Enter configuration commands, one per line. End with CNTL/Z.
ise/admin(config)# repository NFS-Repo
ise/admin(config-Repository)#  url nfs://10.127.197.145:/nfs-repo
ise/admin(config-Repository)# exit
ise/admin(config)# exit
ise/admin#
Configure ISE Local Repository
Configure Local Repository from the GUI
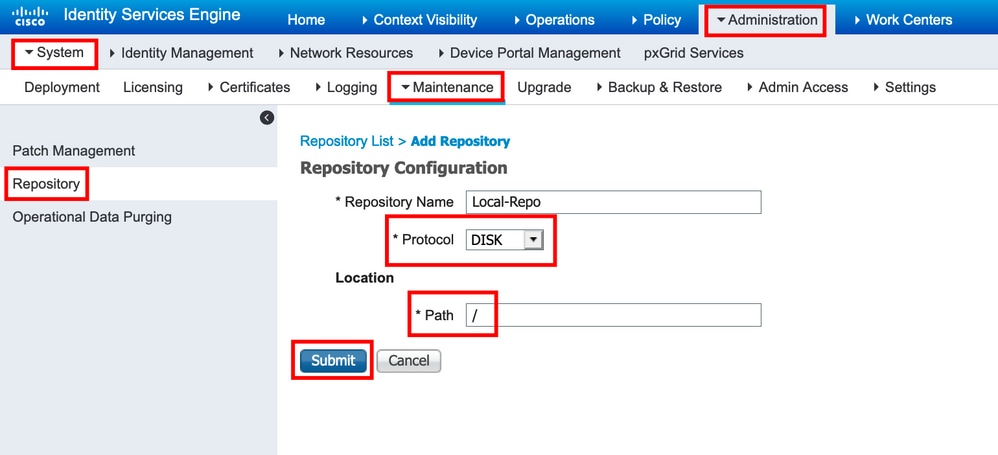
Step 1. In order to configure a repository on the ISE, log in to the ISE GUI and navigate to Administration > System > Maintenance > Repository. Then, click Add, as shown in the image.

Step 2. Provide Repository Name and choose DISK as the protocol. Then, enter the Path and click Submit, as shown in the image.
Configure Local Repository from the CLI
Log in to the CLI of the ISE node via SSH and run these commands:
ise/admin#

ise/admin# configure terminal
Enter configuration commands, one per line. End with CNTL/Z.
ise/admin(config)# repository Local-Repo
ise/admin(config-Repository)# url disk:/
ise/admin(config-Repository)# exit
ise/admin(config)# exit
ise/admin#
Verify
The repository can be verified from both GUI and CLI of the ISE server.
Verify with GUI
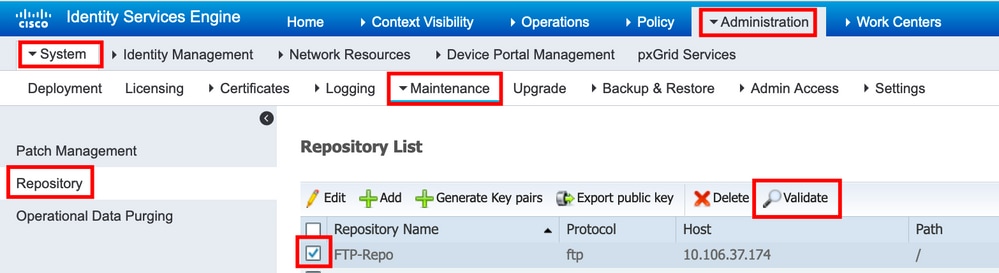
In order to use GUI to validate the repository,navigate to Administration > System > Maintenance > Repository, select the repository, and click Validate, as shown in the image.
After you click Validate, you must get the Repository validated successfully response on the GUI, as shown in the image.

File Management
Steps to transfer the file from repository to ISE local disk:
Repository name -> Test
File name--> test.txt
| ise-pri/admin#show repository Test test.txt ise-pri/admin#copy repository Test file test.txt ? Possible completions: <WORD> Enter URL (use disk:/path for local) (Max Size - 2048) ise-pri/admin#copy repository Test file test.txt disk:/ ise-pri/admin# ise-pri/admin# ise-pri/admin# ise-pri/admin#dir disk:/ Directory of disk:/ 4096 Nov 09 2024 07:01:23 corefileanalysis/ 4096 Nov 09 2024 04:54:58 corefiles/ 4096 Nov 09 2024 05:20:24 CSD-config-backup/ 4096 Dec 19 2024 10:33:44 gc/ 1647 Nov 09 2024 14:13:33 rpm_install.log 0 Nov 09 2024 14:12:39 rpm_uninstall.log 137289 Nov 15 2024 05:52:09 SecondaryMNTlog.txt 0 Dec 19 2024 18:49:33 test.txt 23505 Nov 09 2024 04:57:22 upgraderpms.log Usage for disk: filesystem 57675014144 bytes total used 201842233344 bytes free 273484009472 bytes available |
Steps to Delete the file from repository:
| ise-pri/admin#delete disk:/test.txt Directory of disk:/ 4096 Nov 09 2024 07:01:23 corefileanalysis/ Usage for disk: filesystem |
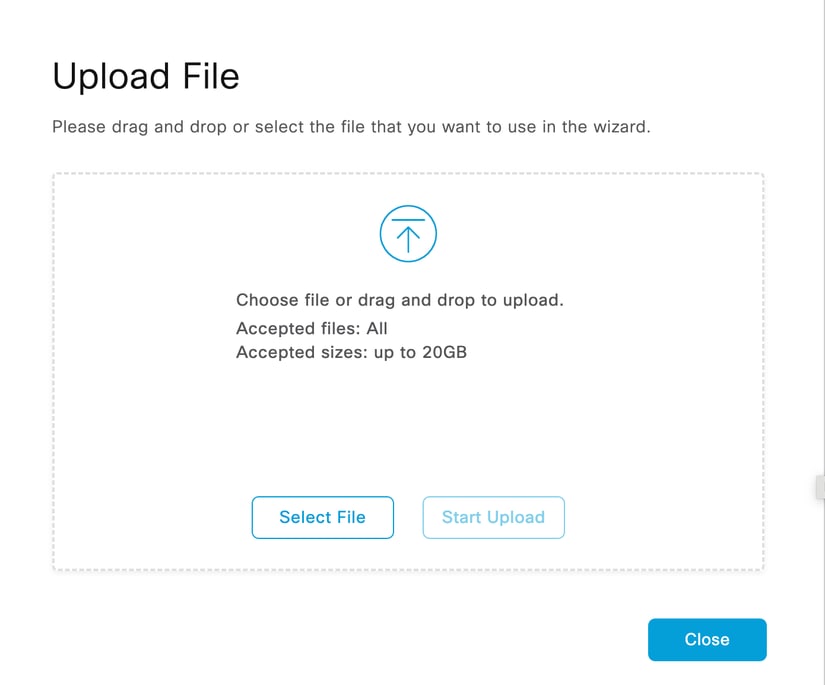
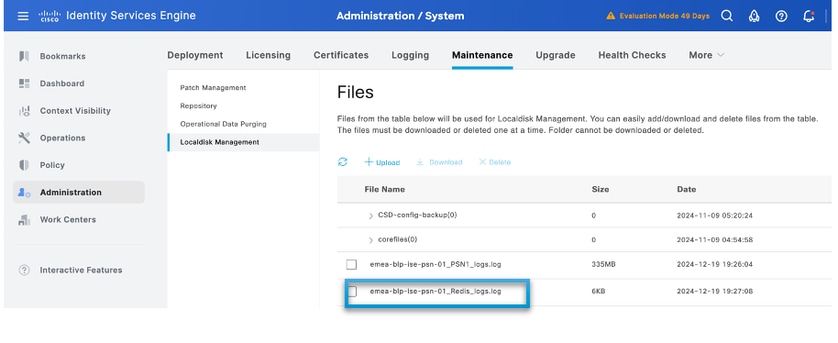
Steps to upload a file in localdisk from GUI.
Navigate to Administration > System > Maintenance > Localdisk Management. Select the node:
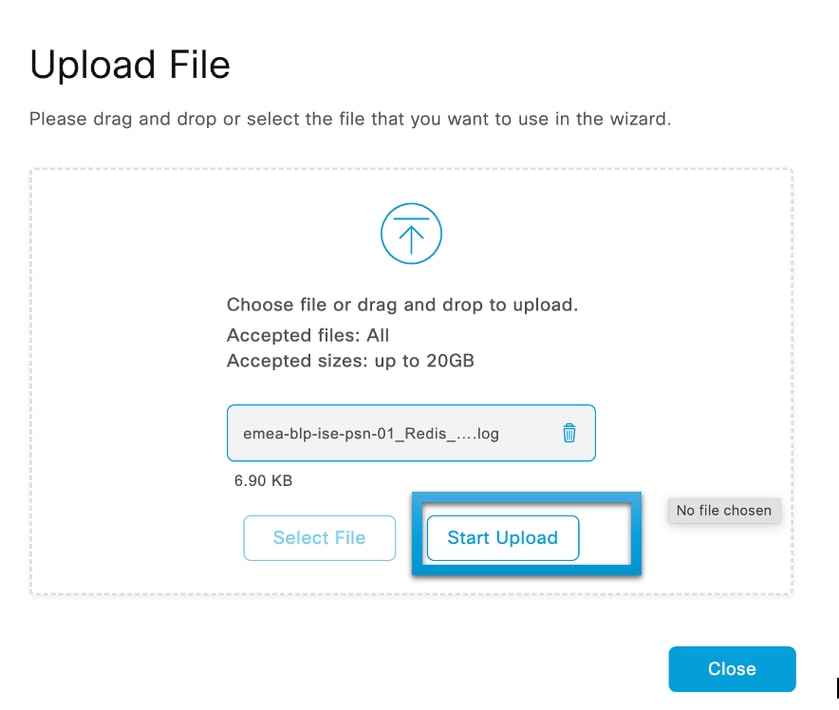
Click upload and select the file that you want to use in the wizard as shown:
Click Start Upload to upload the file as shown:
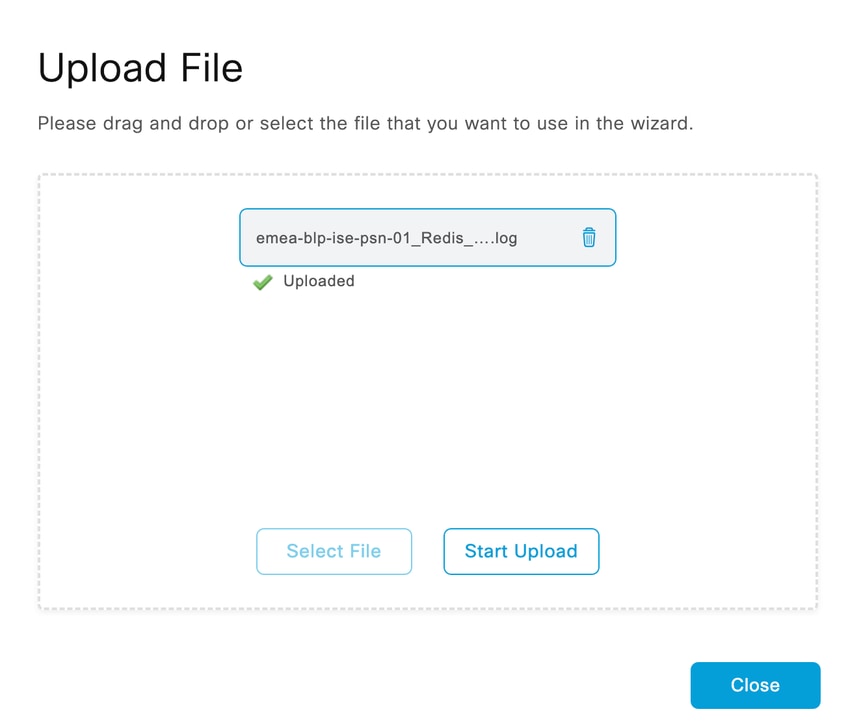
The file can be visible in localdisk of the node as shown:
Verify with CLI
In order to validate the repository from the CLI, log in to the ISE node via SSH and run the command show repository <name of the repository>. The output of the command lists the files present in the repository.
ise/admin#
ise/admin# show repository FTP-Repo
Config-Backup-CFG10-200307-1043.tar.gpg
ise/admin#
Troubleshoot
In order to debug the repository on ISE, use these debugs:
ise-1/pan# debug copy 7
ise-1/pan# debug transfer 7
ise-1/pan#
ise-1/pan# 6 [25683]:[info] transfer: cars_xfer.c[220] [system]: ftp dir of repository FTP-Repo requested
7 [25683]:[debug] transfer: cars_xfer_util.c[2017] [system]: ftp get dir for repos FTP-Repo
7 [25683]:[debug] transfer: cars_xfer_util.c[2029] [system]: initializing curl
7 [25683]:[debug] transfer: cars_xfer_util.c[2040] [system]: full url is ftp://10.127.197.145/ISE/
7 [25683]:[debug] transfer: cars_xfer_util.c[1928] [system]: initializing curl
7 [25683]:[debug] transfer: cars_xfer_util.c[1941] [system]: full url is ftp://10.127.197.145/ISE/Config-Backup-CFG10-200307-1043.tar.gpg
7 [25683]:[debug] transfer: cars_xfer_util.c[1962] [system]: res: 0
7 [25683]:[debug] transfer: cars_xfer_util.c[1966] [system]: res: 0-----filetime Config-Backup-CFG10-200307-1043.tar.gpg: Fri Dec  19 10:55:39 2024
7 [25683]:[debug] transfer: cars_xfer_util.c[1972] [system]: filetime Config-Backup-CFG10-200307-1043.tar.gpg:Fri Dec 19 10:55:39 2024
7 [25683]:[debug] transfer: cars_xfer_util.c[1976] [system]: filesize Config-Backup-CFG10-200307-1043.tar.gpg: 181943580 bytes
6 [25683]:[info] transfer: cars_xfer.c[130] [system]: ftp copy out of /opt/backup/backup-Config-Backup-1587433372/Config-Backup-CFG10-200421-0712.tar.gpg requested
6 [25683]:[info] transfer: cars_xfer_util.c[787] [system]: curl version: libcurl/7.29.0 OpenSSL/1.0.2s zlib/1.2.7 libidn/1.28 libssh2/1.4.2
7 [25683]:[debug] transfer: cars_xfer_util.c[799] [system]: full url is ftp://10.127.197.145/ISE/Config-Backup-CFG10-200421-0712.tar.gpg
Debugs are disabled as shown here:
ise-1/pan#
ise-1/pan# no debug copy 7
ise-1/pan# no debug transfer 7
ise-1/pan#
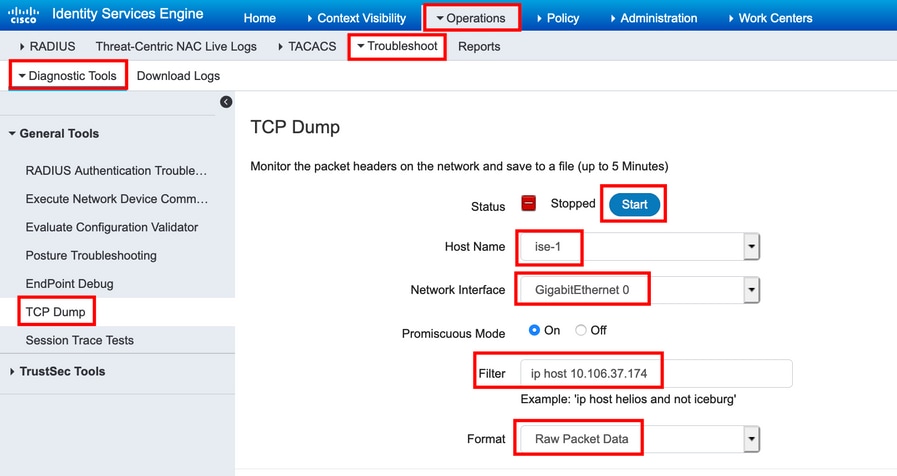
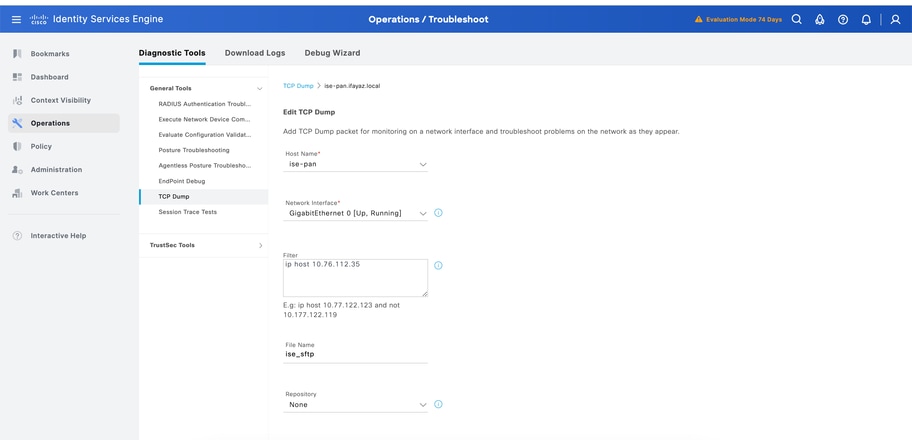
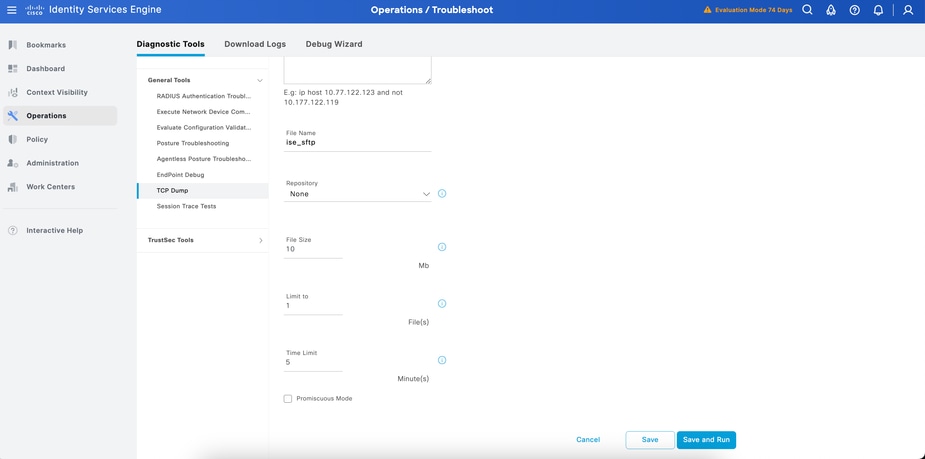
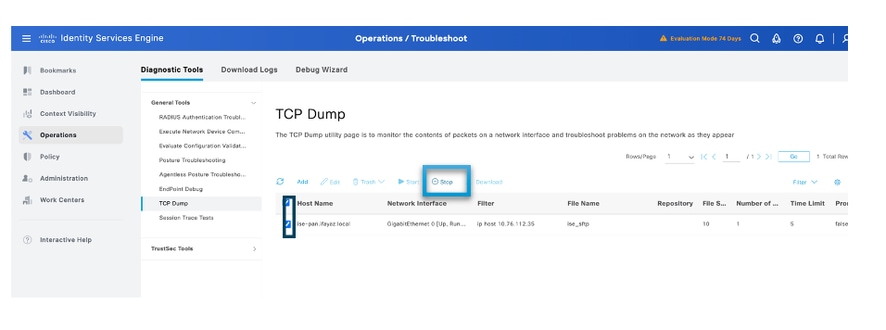
To ensure that there is proper communication between the ISE and the configured repository server, set up a packet capture from the ISE GUI:
- Navigate to Operations > Troubleshoot > Diagnostic tools > TCP Dump.
- Enter the appropriate value in Filter and select Format.
- Click Start.
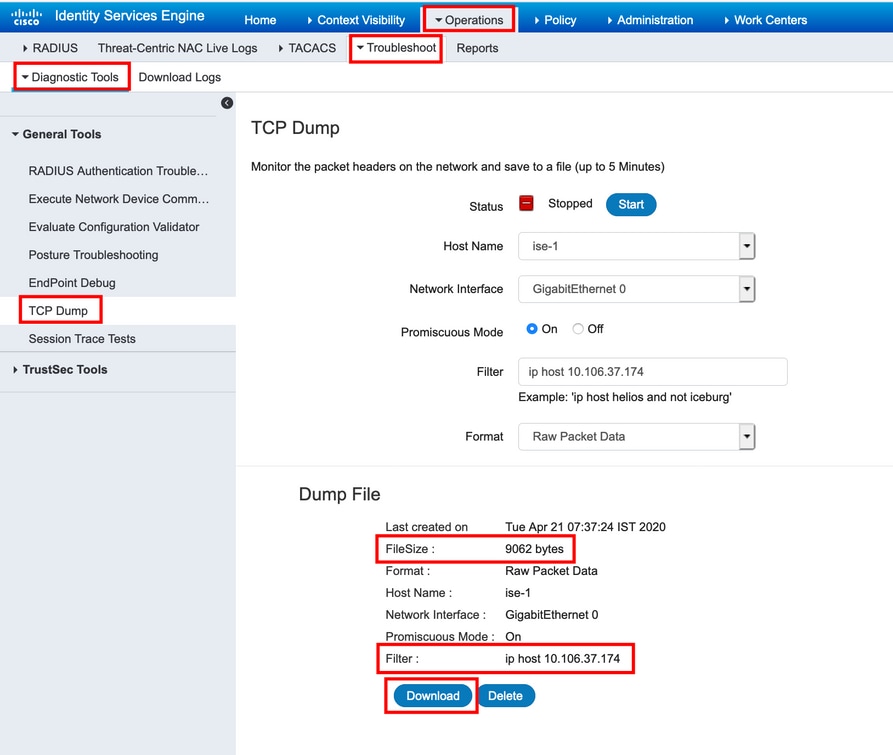
In order to trigger some traffic to the repository which needs to be tested, navigate to Administration > System > Maintenance > Repository, select the repository, and click Validate. Then, navigate to Operations > Troubleshoot > Diagnostic tools > TCP Dump, click Stop, and download the packet capture as shown in the image.
Revision History
| Revision | Publish Date | Comments |
|---|---|---|
7.0 |
04-Jun-2026
|
Formatting |
6.0 |
08-Sep-2025
|
Updated some style issues, added part about crypto_key needs to be added to all servers. |
5.0 |
23-Jul-2025
|
Added Alt Text.
Updated Machine Translation, Style Requirements, and Formatting. |
4.0 |
25-Jul-2024
|
Updated formatting to meet requirements.
Text clarity and changed Alt Text to Title Case. |
3.0 |
13-Jun-2023
|
Updated formatting to meet requirements.
Provided some clarity in alt text. |
2.0 |
20-May-2022
|
Updated the Troubleshoot section. Edited for consistency and clarity. |
1.0 |
24-Mar-2020
|
Initial Release |
 Feedback