Configure ANC on ISE 3.3 and Stealthwatch 7.5.1
Available Languages
Download Options
Bias-Free Language
The documentation set for this product strives to use bias-free language. For the purposes of this documentation set, bias-free is defined as language that does not imply discrimination based on age, disability, gender, racial identity, ethnic identity, sexual orientation, socioeconomic status, and intersectionality. Exceptions may be present in the documentation due to language that is hardcoded in the user interfaces of the product software, language used based on RFP documentation, or language that is used by a referenced third-party product. Learn more about how Cisco is using Inclusive Language.
Introduction
This document describes Configuration of Rapid Threat Containment (Adaptive Network Control) on Cisco ISE® version 3.3 and Stealthwatch.
Prerequisites
Cisco recommends knowledge in these topics:
-
Identity Services Engine (ISE)
-
Platform Exchange Grid (PxGrid)
-
Secure Network Analytics (Stealthwatch)
- Rapid Threat Containment (Adaptive Network Control - ANC).
In this document it is assumed that the Cisco Identity Services Engine is integrated with Secure Network Analytics (Stealthwatch) using pxGrid that is ANC-enabled.
Components Used
The information in this document is based on these software and versions:
- Cisco Identity Services Engine (ISE) version 3.3
- Secure Network Analytics (Stealthwatch) 7.5.1
- Catalyst 9300
The information in this document was created from the devices in a specific lab environment. All of the devices used in this document started with a cleared (default) configuration. If your network is live, ensure that you understand the potential impact of any command.
Background Information
Cisco Secure Cloud Analytics (now part of Cisco XDR) can retrieve user attribution data from Cisco Identity Services Engine (ISE) using pxGrid. This integration enables user activity reporting in the Secure Cloud Analytics Event Viewer.
The combination of Secure Network Analytics (formerly Stealthwatch) and Cisco Identity Services Engine (ISE) helps organizations get a 360° view, respond to threats faster, and secure a growing digital business. Once Secure Network Analytics detects anomalous traffic, it issues an alert, giving the admin the option to quarantine the user. pxGrid enables Secure Network Analytics to hand off the quarantine command directly to Identity Services Engine.
This example describes leveraging Corporate DNS server to protect against Internet threats. The intention is to establish a customized alert mechanism that triggers when internal users connect to external DNS servers. This initiative is designed to block connections to unauthorized DNS servers that could redirect traffic to harmful external sites.
When an alert is triggered, Cisco Secure Network Analytics coordinates with Cisco ISE to quarantine the host accessing unauthorized DNS servers, using an Adaptive Network Control Policy via PxGrid.
Network Diagram

As shown in the diagram:
- A corporate user is connected to a C9300 switch which is configured to export the IP flows and send the data to the Flow collector.
- Same corporate user is configured to user corporate DNS servers.
- Flow Collector is integrated with Stealthwatch Management Console (SMC)
- Stealthwatch Management Console (SMC) integrated via Pxgrid with ISE.
Step-by-Step Configuration
1. Prepare the switch to monitor and export flows using netflow.
The basic flow configuration on a C9300 switch running Cisco IOS® XE 17.15.01
flow record SW_FLOW_RECORD
  description NetFlow record format to send to SW
  match ipv4 tos
  match ipv4 protocol
  match ipv4 source address
  match ipv4 destination address
  match transport source-port
  match transport destination-port
  match interface input
  collect transport tcp flags
  collect interface output
  collect counter bytes long
  collect counter packets long
  collect timestamp absolute first
  collect timestamp absolute last


flow exporter NETFLOW_TO_SW_FC
  description Export NetFlow to SW FC
  destination 10.106.127.51        ! Mention the IPv4 address for the Stealthwatch Flow Collector
  ! source Loopback0               ! OPTIONAL: Source Interface for sending Flow Telemetry (e.g. Loopback0)
  transport udp 2055
  template data timeout 30

flow monitor IPv4_NETFLOW
  record SW_FLOW_RECORD
  exporter NETFLOW_TO_SW_FC
  cache timeout active 60
  cache timeout inactive 15

vlan configuration Vlan992
  ip flow monitor IPv4_NETFLOW input   !Apply this to the VLAN/Interface that you want to monitor the flows


! VALIDATION COMMANDS
!  show flow record SW_FLOW_RECORD
!  show flow monitor IPv4_NETFLOW statistics
!  show flow monitor IPv4_NETFLOW cache
Upon completing the configuration, it enables the C9300 to export IP flow data to the Flow Collector. The Flow Collector then processes and transfers this data to the Stealthwatch Management Console (SMC) for analysis and monitoring.
2. EnableAdaptive Network Controlin Cisco ISE.
ANC is disabled by default. ANC gets enabled only when pxGrid is enabled, and it remains enabled until you manually disable the service in the Admin portal.
Select Operations > Adaptive Network Control > Policy List > Add, then enter Quarantine for the Policy Name and Quarantine for the Action.

3. Configure Secure Network Analytics for Event Trigger and Response Management for Rapid threat containment.
Step 1: Log in the SMC GUI and Navigate to Configure > Detection > Host Group Management > Click on the (...) (ellipsis) icon next to Inside Hosts, then select Add Host Group.
In this example, a new host group is created with the name My Trusted Networks under the parent host group of Inside Hosts.
This network can be typically assigned to the enduser machine for monitoring DNS usage.
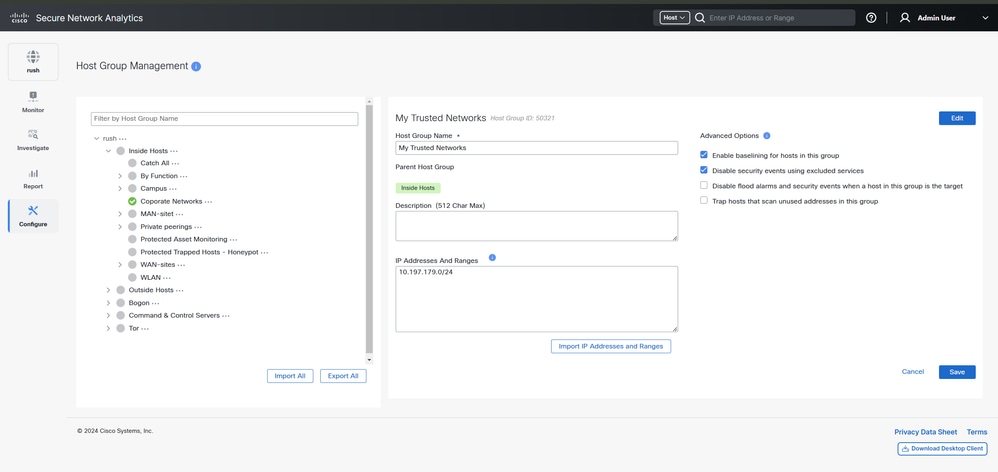

Note: For this example, IP subnet 10.197.179.0/24 is used as a Local Area Network (LAN) subnet, This can differ in the actual network environment depending upon Network Architecture.
Step 2: Log in the SMC GUI and Navigate to Configure > Detection > Host Group Management > Click on (...) besides Outside Hosts and select Add Host Group.
In this example, a new host group is created with name My Corporate DNS under the parent host group of Outside Hosts.
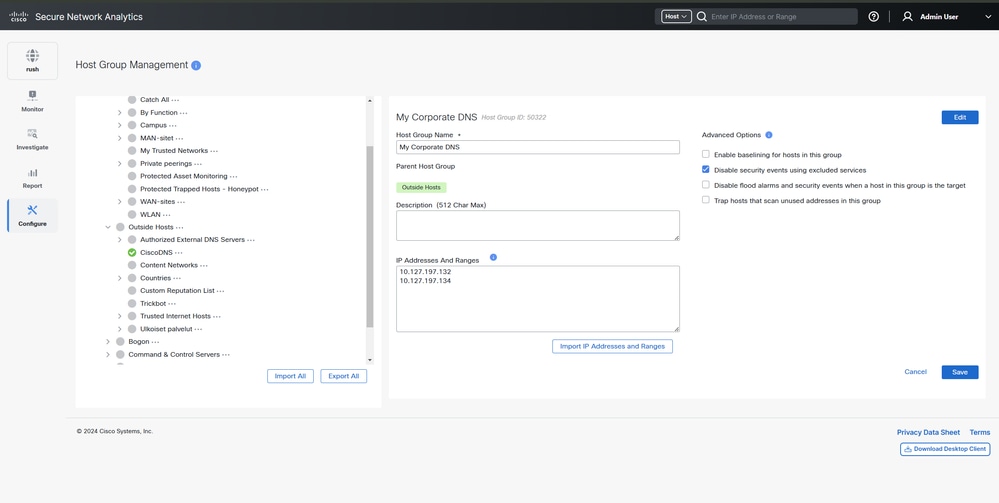
Note: For this example, IPs 10.127.197.132 and 10.127.197.134 are used as the desired DNS servers to be used by the endusers, this can differ in the actual network environment depending upon Network Architecture.
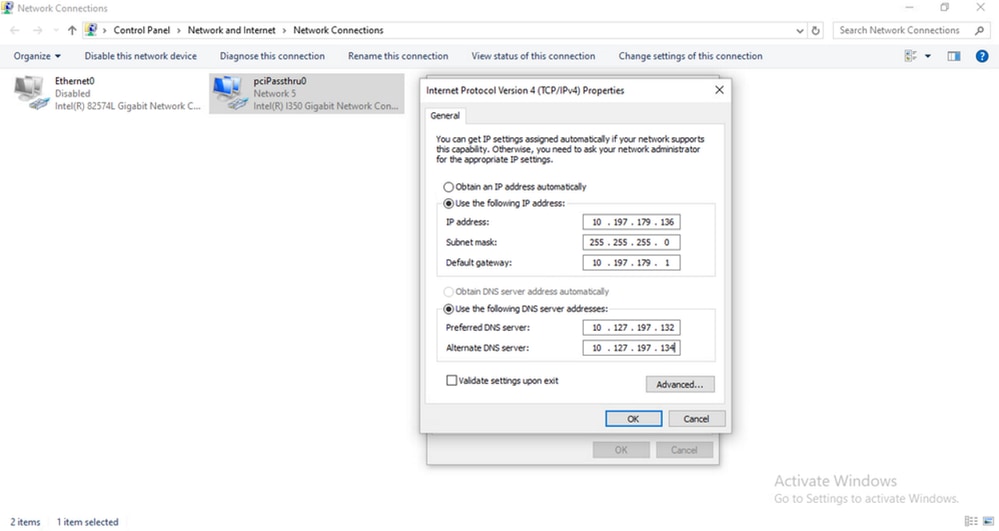
The Test lab PC used for demonstration is configured with static IP 10.197.179.136 (belongs to My Trusted Networks host group created ) and DNS 10.127.197.132 and 10.127.197.134 (belongs to My Corporate DNS host group created).
Step 3: Set up a tailored alert system to detect when internal users connect to external DNS servers, triggering an alarm to block connections to unauthorized DNS servers that could potentially redirect traffic to malicious external sites. Once an alarm is activated, Cisco Secure Network Analytics coordinates with Cisco ISE to isolate the host using these unauthorized DNS servers by employing an Adaptive Network Control Policy via PxGrid.
Navigate to Configure > Policy Management.
Create a Custom Events with the information:
- Name :DNS Violation Event.
- Subject Host Groups :My Trusted Networks.
- Peer Host Groups : (Not) My Corporate DNS.
- Peer Port/Protocols : 53/UDP 53/TCP
This means that when any host within My Trusted Networks (Host group) communicates with any host except those within My Corporate DNS (Host group) through 53/up or 53/tcp, an alarm is raised.

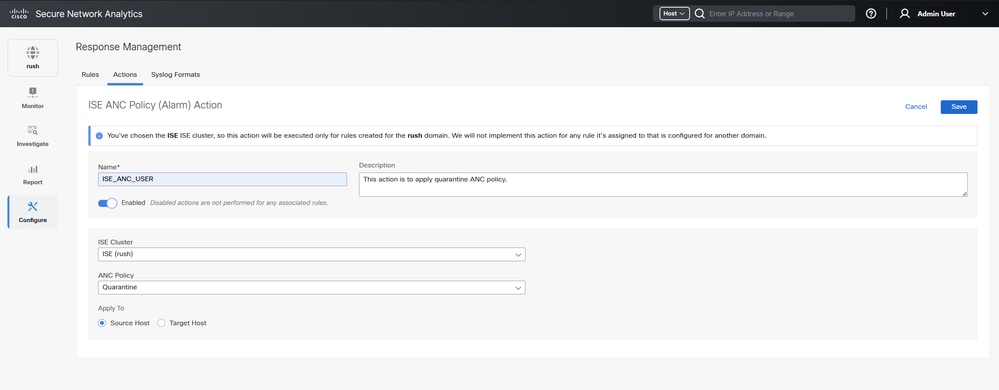
Step 4: Configure a Response Management action to be performed, and which can later applied to the Response Management Rule once created.
Navigate toConfigure > Response Management > Actions, Click on Add New Action and select ISE ANC Policy (Alarm).
Assign a name and choose the specific Cisco ISE cluster to be notified in order to implement a quarantine policy for any violations or connections to unauthorized servers.

4. Configure Cisco ISE to respond to actions initiated by Stealthwatch upon triggering the event.
Log in to Cisco ISE GUI and Navigate to Policy > Policy Sets > Choose the Policy set > under Authorization Policy - Local Exceptions > Create new Policy.
- Name: DNS Violation Exception
- Conditions: Session: ANCPolicy EQUALS Quarantine
- Authorization Profiles: DenyAccess

Note: In this example, once the DNS violation event is triggered access is denied to the user based on the configuration
Verify
To demonstrate the use case, the DNS entry on the endpoint has been changed to 8.8.8.8, which triggers the DNS violation event configured . Since the DNS server does not belong to the host group of My Corporate DNS servers, it triggers the event resulting a deny access to the endpoint.

On the C9300 switch, verify using the show flow monitor IPv4_NETFLOW cache | in 8.8.8.8 command with the output to see the flows are being captured and sent to the Flow Collector. The IPv4_NETFLOW is configured in the switch configuration.
IPV4 SOURCE ADDRESS:       10.197.179.136
IPV4 DESTINATION ADDRESS:  8.8.8.8
TRNS SOURCE PORT:          62734
TRNS DESTINATION PORT:     53
INTERFACE INPUT:           Te1/0/46
IP TOS:                    0x00
IP PROTOCOL:               17
tcp flags:                 0x00
interface output:          Null
counter bytes long:        55
counter packets long:      1
timestamp abs first:       10:21:41.000
timestamp abs last:        10:21:41.000
Once the Event is triggered on the Stealthwatch, navigate to Monitor > Security Insight Dashboard,.

Navigate to Monitor > Integration > ISE ANC Policy Assignments.
Ensure that Cisco Secure Network Analytics has successfully implemented the Adaptive Network Control Policy via PxGrid and Cisco ISE to quarantine the host.

Similarly on Cisco ISE, navigate to Operations > RADIUS > Livelogs and apply filter for the endpoint.

Per the local exception policy DNS Violation Exception, Change of Authorization(CoA) is issued by ISE and access ISE denied to the endpoint.
Once the remediation actions are performed on the endpoint, remove the MAC from Operations > Adaptive Network Control > Endpoint Assignments > Delete to remove the MAC address of the endpoint.

Log Reference on Cisco ISE.
Attributes set to TRACE level for pxgrid (pxgrid-server.log) component on Cisco ISE, logs are seen in the pxgrid-server.log file.
DEBUG [pxgrid-http-pool5][[]] cpm.pxgrid.ws.client.WsIseClientConnection -::::::617fffb27858402d9ff9658b89a29f23:- Queue for publish. topic=/topic/com.cisco.ise.config.anc.status message={"operationId":"ise33.lab.local:3","macAddress":"B4:96:91:F9:63:AF","status":"RUNNING","policyName":"Quarantine"}
TRACE [WsIseClientConnection-1162][[]] cpm.pxgrid.ws.client.WsEndpoint -::::::617fffb27858402d9ff9658b89a29f23:- Send. session=[id=af52725d-d8c3-4294-bf2a-902c0de8f899,client=~ise-admin-ise33,server=wss://ise33.lab.local:8910/pxgrid/ise/pubsub] frame=[command=SEND,headers=[content-length=123, trace-id=617fffb27858402d9ff9658b89a29f23, destination=/topic/com.cisco.ise.config.anc.status],content-len=123] content={"operationId":"ise33.lab.local:3","macAddress":"B4:96:91:F9:63:AF","status":"RUNNING","policyName":"Quarantine"}
TRACE [pxgrid-http-pool2][[]] cpm.pxgridwebapp.ws.pubsub.StompPubsubEndpoint -::::::617fffb27858402d9ff9658b89a29f23:- Received frame=[command=SEND,headers=[content-length=123, trace-id=617fffb27858402d9ff9658b89a29f23, destination=/topic/com.cisco.ise.config.anc.status],content-len=123], content={"operationId":"ise33.lab.local:3","macAddress":"B4:96:91:F9:63:AF","status":"RUNNING","policyName":"Quarantine"}
TRACE [pxgrid-http-pool2][[]] cpm.pxgridwebapp.ws.pubsub.SubscriptionDistributor -::::::617fffb27858402d9ff9658b89a29f23:- Distribute from=[id=2,client=~ise-admin-ise33,server=wss://ise33.lab.local:8910/pxgrid/ise/pubsub] topic=/topic/com.cisco.ise.config.anc.status content={"operationId":"ise33.lab.local:3","macAddress":"B4:96:91:F9:63:AF","status":"RUNNING","policyName":"Quarantine"}
TRACE [sub-sender-0][[]] cpm.pxgridwebapp.ws.pubsub.SubscriptionSender -::::::617fffb27858402d9ff9658b89a29f23:- Complete stompframe published : {"operationId":"ise33.lab.local:3","macAddress":"B4:96:91:F9:63:AF","status":"RUNNING","policyName":"Quarantine"}
DEBUG [RMI TCP Connection(1440)-10.127.197.128][[]] cpm.pxgrid.ws.client.WsIseClientConnection -::::::ef9ad261537846ae906d637d6dc1e597:- Queue for publish. topic=/topic/com.cisco.ise.config.anc.status message={"operationId":"ise33.lab.local:3","macAddress":"B4:96:91:F9:63:AF","status":"SUCCESS","policyName":"Quarantine"}
TRACE [WsIseClientConnection-1162][[]] cpm.pxgrid.ws.client.WsEndpoint -::::::ef9ad261537846ae906d637d6dc1e597:- Send. session=[id=af52725d-d8c3-4294-bf2a-902c0de8f899,client=~ise-admin-ise33,server=wss://ise33.lab.local:8910/pxgrid/ise/pubsub] frame=[command=SEND,headers=[content-length=123, trace-id=ef9ad261537846ae906d637d6dc1e597, destination=/topic/com.cisco.ise.config.anc.status],content-len=123] content={"operationId":"ise33.lab.local:3","macAddress":"B4:96:91:F9:63:AF","status":"SUCCESS","policyName":"Quarantine"}
TRACE [pxgrid-http-pool5][[]] cpm.pxgridwebapp.ws.pubsub.StompPubsubEndpoint -::::::ef9ad261537846ae906d637d6dc1e597:- Received frame=[command=SEND,headers=[content-length=123, trace-id=ef9ad261537846ae906d637d6dc1e597, destination=/topic/com.cisco.ise.config.anc.status],content-len=123], content={"operationId":"ise33.lab.local:3","macAddress":"B4:96:91:F9:63:AF","status":"SUCCESS","policyName":"Quarantine"}
TRACE [pxgrid-http-pool5][[]] cpm.pxgridwebapp.ws.pubsub.SubscriptionDistributor -::::::ef9ad261537846ae906d637d6dc1e597:- Distribute from=[id=2,client=~ise-admin-ise33,server=wss://ise33.lab.local:8910/pxgrid/ise/pubsub] topic=/topic/com.cisco.ise.config.anc.status content={"operationId":"ise33.lab.local:3","macAddress":"B4:96:91:F9:63:AF","status":"SUCCESS","policyName":"Quarantine"}
TRACE [sub-sender-0][[]] cpm.pxgridwebapp.ws.pubsub.SubscriptionSender -::::::ef9ad261537846ae906d637d6dc1e597:- Complete stompframe published : {"operationId":"ise33.lab.local:3","macAddress":"B4:96:91:F9:63:AF","status":"SUCCESS","policyName":"Quarantine"}
Troubleshooting
Quarantined Endpoints do not Renew Authentication Post-policy Change
Problem
Authentication has failed due to change in policy or additional identity and no re-authentication is taking place. Authentication fails or the endpoint in question remains unable to connect to the network. This issue often occurs on client machines that fails posture assessment per the posture policy that is assigned to the user role.
Possible Causes
The authentication timer setting is not correctly set on the client machine, or the authentication interval is not correctly set on the switch.
Solution
There are several possible resolutions for this issue:
-
Check theSession Status Summaryreport in Cisco ISE for the specified NAD or switch, and ensure that the interface has the appropriate authentication interval configured.
-
Enter show running configuration on the NAD/switch and ensure that the interface is configured with an appropriate authentication timer restart setting. (For example, authentication timer restart 15, and authentication timer reauthenticate 15).
-
Enter interface shutdown and no shutdown to bounce the port on the NAD/switch and force re-authentication and potential configuration change in Cisco ISE.
Note: Because CoA requires a MAC address or session ID, it is recommended that you do not bounce the port that is shown in the Network Device SNMP report.
ANC Operations Fail when IP Address or MAC Address is not Found
AnANCoperation that you perform on an endpoint fails when an active session for that endpoint does not contain information about the IP address. This also applies to the MAC address and session ID for that endpoint.
Note: When you want to change the authorization state of an endpoint through ANC, you must provide the IP address or the MAC address for the endpoint. If the IP address or the MAC address is not found in the active session for the endpoint, you can see the error message: "No active session found for this MAC address, IP Address or Session ID".
Revision History
| Revision | Publish Date | Comments |
|---|---|---|
1.0 |
21-Mar-2025
|
Initial Release |
Contributed by Cisco Engineers
- Anurag VasteTechnical Consulting Engineer
 Feedback
Contact Cisco
- Open a Support Case

- (Requires a Cisco Service Contract)