Configure TACACS+ with ISE Gigabit Ethernet 1 Interface
Available Languages
Download Options
Bias-Free Language
The documentation set for this product strives to use bias-free language. For the purposes of this documentation set, bias-free is defined as language that does not imply discrimination based on age, disability, gender, racial identity, ethnic identity, sexual orientation, socioeconomic status, and intersectionality. Exceptions may be present in the documentation due to language that is hardcoded in the user interfaces of the product software, language used based on RFP documentation, or language that is used by a referenced third-party product. Learn more about how Cisco is using Inclusive Language.
Contents
Introduction
This document describes ISE TACACS+ configuration with Gigabit Ethernet 1 Interface where Router and Switch work as Network Devices.
Background Information
Cisco ISE supports up to 6 Ethernet interfaces. It can have only three bonds, bond 0, bond 1, and bond 2. You cannot change the interfaces that are part of a bond or change the role of the interface in a bond.
Prerequisites
Requirements
Cisco recommends that you have knowledge on these topics:
- Basic networking knowledge
- Cisco Identity Service Engine.
Components Used
The information in this document is based on these hardware and software versions:
- Cisco Identity Service Engine v3.3
- Cisco IOS® Software Release 17.x
- Cisco C9200 switch.
The information in this document was created from the devices in a specific lab environment. All of the devices used in this document started with a cleared (default) configuration. If your network is live, ensure that you understand the potential impact of any command.
Configure
The aim of the configuration is: Configure Gigabit Ethernet 1 of ISE for TACACS+ and authenticate switch & router with TACACS+ with ISE as authentication server.
Network Diagram
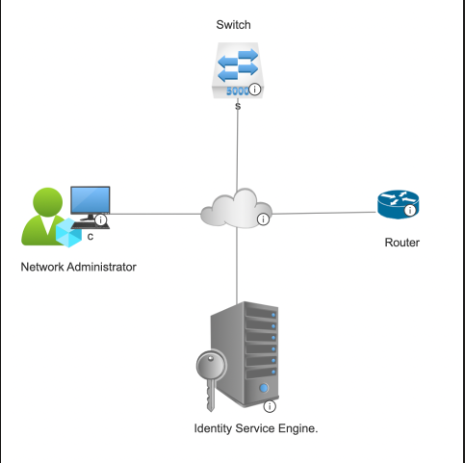 Network Topology
Configuration of Identity Services Engine for TACACS+
Configure IP Address for Gigabit Ethernet 1 Interface in ISE
- Log in to the CLI of the ISE PSN node where Device admin is enabled and verify the available interfaces using the show interface command:
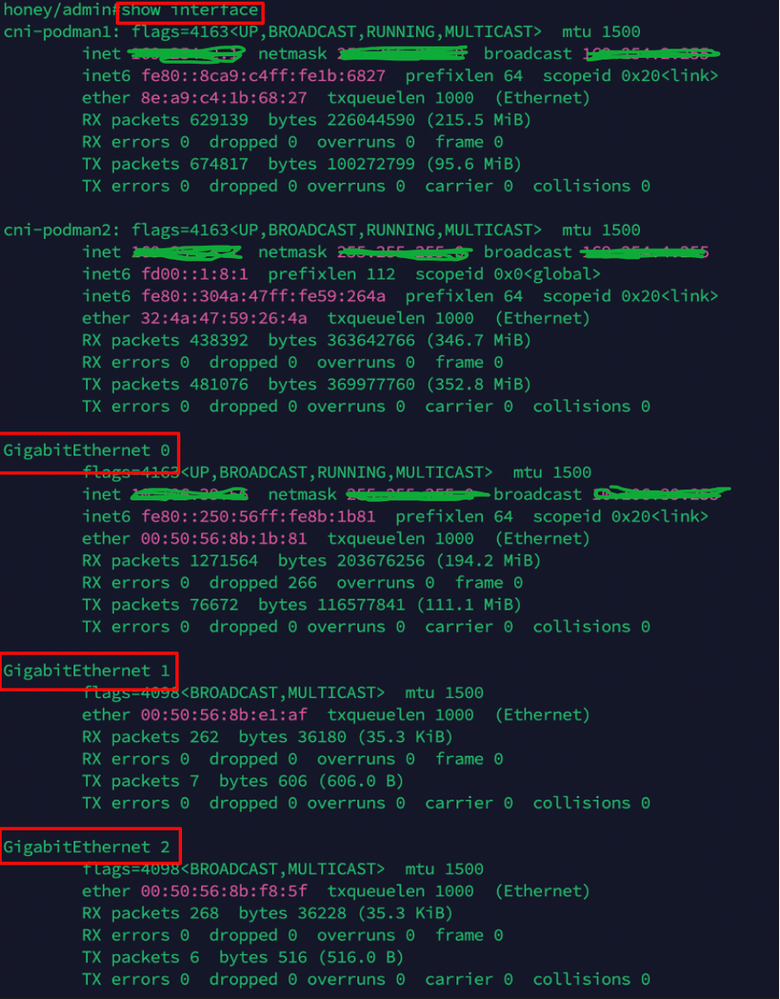 Verification of Interfaces in ISE

Note: In this configuration, only three interfaces are configured in ISE, with a focus on the Gigabit Ethernet 1 interface. The same procedure can be applied to configure the IP address for all interfaces. By default, ISE supports up to six Gigabit Ethernet interfaces.
2. From CLI of same PSN node, assign an IP address to the Gigabit Ethernet 1 Interface by using these commands:
hostnameofise#configure t
hostnameofise/admin(config)#interface Gigabit Ethernet 1
hostnameofise/admin(config-GigabitEthernet-1)# <ip address> <subnet netmask> % Changing the IP address might cause ise services to restart
Continue with IP address change?
Proceed? [yes,no] yes
3. Performing step 2 makes the ISE node services to restart. To verify the status of ISE services, run the command show application status ise and ensure that the status of the services is running as per this screenshot:
 ISE service status verification
4. Verify the IP address of the Gig1 interface using the show interface command:
V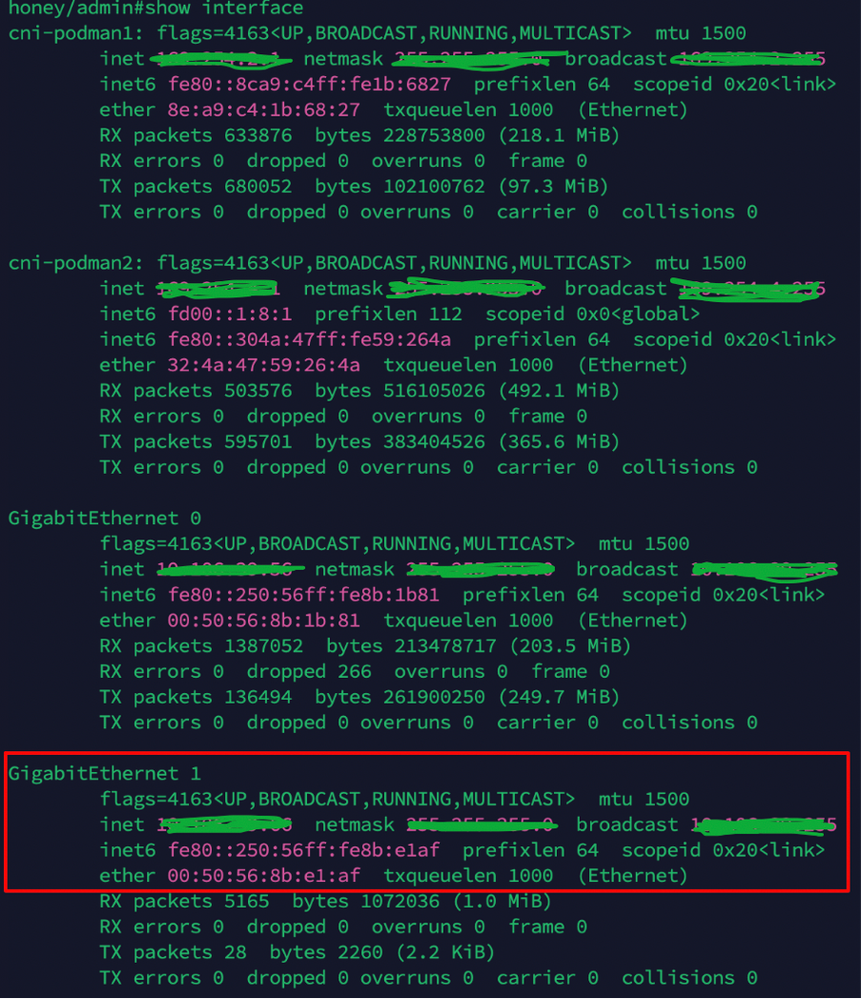 Verification of ISE Gig2 interface IP address from CLI
5.Verify the allowance of port 49 in the ISE node using the show ports | inc 49 command:
 verification of port 49 allowance in ISE
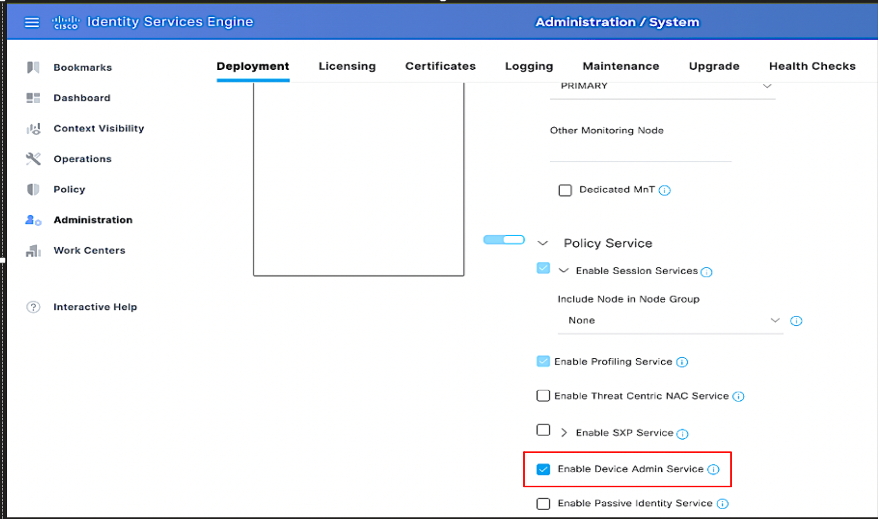
Enable Device Administration in ISE
Navigate to GUI of ISE > Administration > Deployment > Select the PSN node, then check Enable Device admin service:
 Enabling Device administration service in ISE
Note: To enable the Device Admin service, a Device Administration License is required.
Add a Network Device in ISE
1. Navigate to Work Centers > Device Administration > Network Resources > Network Devices. Click Add. Provide Name, IP Address. Select the TACACS+ Authentication Settings checkbox and provide the Shared Secret key.
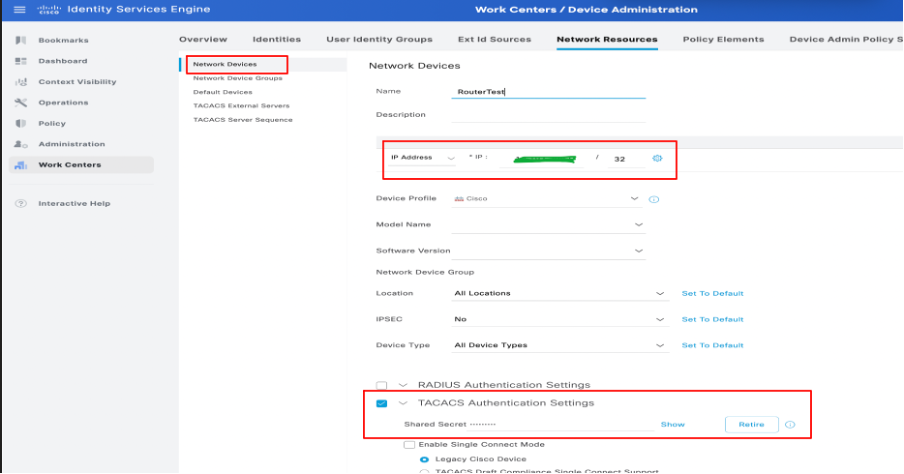 Configuration of Network Device in ISE
2. Follow the above procedure for adding all the required network devices for TACACS authentication.
Configure TACACS+ Command Sets
Two command sets are configured for this demonstration:
Permit_all_commands, is assigned to the user admin and allows all commands on the device.
permit_show_commands, is assigned to a user and permits only show commands
- Navigate to Work Centers > Device Administration > Policy Results > TACACS Command Sets. Click Add. Provide the Name PermitAllCommands, then choose the Permit any command checkbox that is not listed. Click Submit.
 Configuration of Command Sets in ISE
2. Navigate to Work Centers > Device Administration > Policy Results > TACACS Command Sets. Click Add. Provide the Name PermitShowCommands, click Add, then finally, permit show and exit commands. By default, if arguments are left blank, all arguments are included. Click Submit.
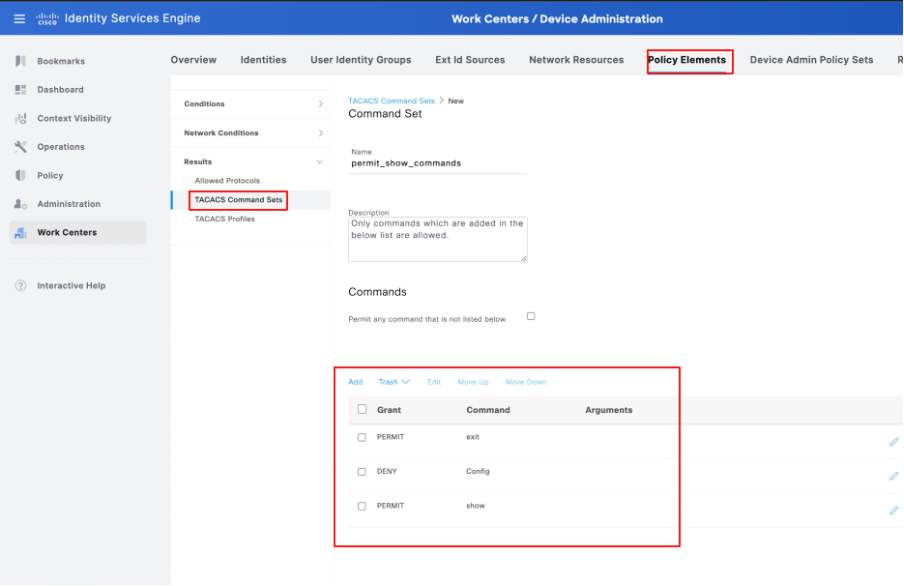 Configuration of permit_show_commands in ISE
Configure the TACACS+ Profile
A single TACACS+ profile is configured, and command authorization is carried out via command sets.
To configure a TACACS+ profile, navigate to Work Centers > Device Administration > Policy Results > TACACS Profiles. Click Add, provide a name for the Shell Profile, select the Default Privilege checkbox, and enter the value 15. Finally, click Submit.
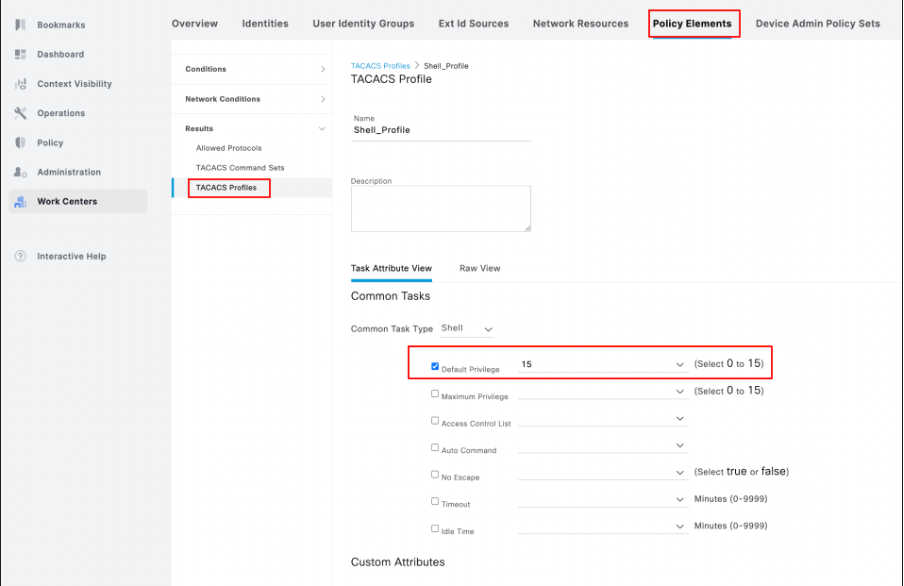 Configuration of TACACS profile in ISE
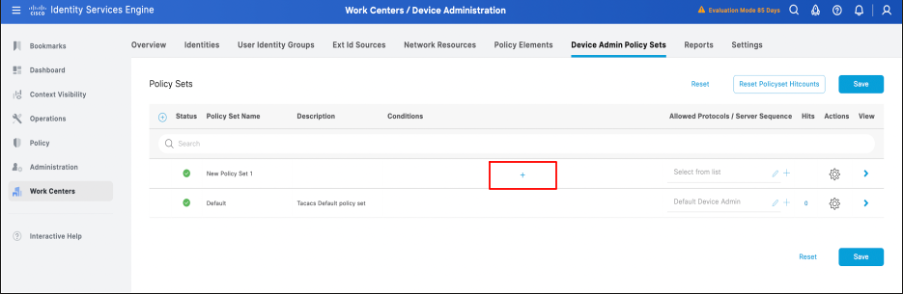
Configure TACACS+ Authentication and Authorization Profile
1. Log in to the ISE PAN GUI -> Administration -> Work Centers -> Device administration -> Device admin policy sets. Click the + (plus) icon to create a new policy. In this case, the policy set is named as New Policy set 1.
 Configuration of policy set in ISE
2. Before saving the policy set, it is required to configure the conditions, as shown in this screenshot. Click the + (plus) icon to configure conditions for the policy set.
 Configuration of policy set conditions in ISE
3. After clicking the + (plus) icon as mentioned in step 2, the conditions studio dialog box opens. There, configure the conditions required. Save the condition with the new or existing conditions, scroll. Click use.
 Configuration of policy set conditions in ISE
Note: For this documentation, the conditions are matched with network device IP. However, the conditions can be varied as per the deployment requirements.
4. After the conditions are configured and saved, configure allowed protocols as Default device admin. Save the policy set created by clicking on the option Save .
 Policy set configuration confirmation.
5. Expand the New Policy set -> Authentication Policy (1) -> Create a new authentication policy by clicking + (plus) Icon or by clicking the gear Icon, then Insert new row above.
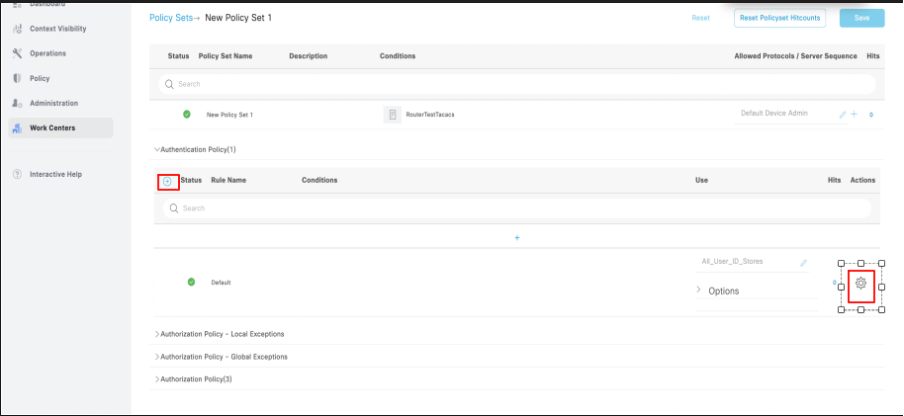 Configuration of Authentication Policy in the policy set.
Note: For this demonstration, the default Authentication policy set with All_User_ID_Stores is used. However, the use of the Identity stores is customizable as per the deployment requirements.
6. Expand the New Policy set -> Authorization Policy (1). Either click the + (plus) Icon or click the gear icon. Then, Insert new row above for creating an authorization policy.
 Configuration of Authorization Policy
7. Configure the Authorization Policy with conditions, command sets and shell profile mapped to the authorization policies.
 Complete configuration of Authorization policy in ISE
Note: The conditions configured are as per the lab environment and can be configured as per the deployment requirements.
8. Follow the first 6 steps for configuring the Policy sets for switch or any other network device used for TACACS+.
Configure Network Access Users for NAD’s TACACS Authentication in ISE
- Navigate to Workcenters -> Device Administration -> Identities -> Users. Click the +(plus) icon to create a new user.
 Configure network access users in ISE
2. Provide to expand the Username and Password details, map the user to an User Identity Group ( optional ), then click Submit.
 Configure network access users - Continue
3. After submitting the username configuration in Work Centers -> Identities -> Users -> Network Access users , the user is visibly configured and enabled.
 Confirmation of Network access user configuration.
Configure Router for TACACS+
Configure Cisco IOS Router for TACACS+ Authentication and Authorization
- Log in to the CLI of the Router and run these commands for configuring TACACS in the Router.
ASR1001-X(config)#aaa new-model --- command required to enable aaa in NAD
ASR1001-X(config)#aaa session-id common. ----command required to enable aaa in NAD.
ASR1001-X(config)#aaa authentication login default group tacacs+ local
ASR1001-X(config)#aaa authorization exec default group tacacs+
ASR1001-X(config)#aaa authorization network list1 group tacacs+
ASR1001-X(config)#tacacs server ise1
ASR1001-X(config-server-tacacs)#address ipv4 <IP address of TACACS server > . --- ISE interface G1 IP address.
ASR1001-X(config-server-tacacs)# key XXXXX
ASR1001-X(config)# aaa group server tacacs+ isegroup
ASR1001-X(config-sg-tacacs+)#server name ise1
ASR1001-X(config-sg-tacacs+)#ip vrf forwarding Mgmt-intf
ASR1001-X(config-sg-tacacs+)#ip tacacs source-interface GigabitEthernet0
ASR1001-X(config-sg-tacacs+)#ip tacacs source-interface GigabitEthernet1
ASR1001-X(config)#exit
2. After saving router TACACS+ configurations, verify TACACS+ configuration by using the show run aaa command.
ASR1001-X#show run aaa
!
aaa authentication login default group isegroup local
aaa authorization exec default group isegroup
aaa authorization network list1 group isegroup
username admin password 0 XXXXXXX
!
tacacs server ise1
address ipv4 <IP address of TACACS server>
key XXXXX
!
!
aaa group server tacacs+ isegroup
server name ise1
ip vrf forwarding Mgmt-intf
ip tacacs source-interface GigabitEthernet1
!
!
!
aaa new-model
aaa session-id common
!
!
Configure Switch for TACACS+
Configure Switch for TACACS+ Authentication and Authorization
- Log in to the CLI of the switch and run these commands for configuring TACACS in the switch.
C9200L-48P-4X#configure t
Enter configuration commands, one per line. End with CNTL/Z.
C9200L-48P-4X(config)#aaa new-model. --- command required to enable aaa in NAD
C9200L-48P-4X(config)#aaa session-id common. --- command required to enable aaa in NAD.
C9200L-48P-4X(config)#aaa authentication login default group isegroup local
C9200L-48P-4X(config)#aaa authorization exec default group isegroup
C9200L-48P-4X(config)#aaa authorization network list1 group isegroup
C9200L-48P-4X(config)#tacacs server ise1
C9200L-48P-4X(config-server-tacacs)#address ipv4 <IP address of TACACS server> -- ISE Interface G1 IP address.
C9200L-48P-4X(config-server-tacacs)#key XXXXX
C9200L-48P(config)#aaa group server tacacs+ isegroup
C9200L-48P(config-sg-tacacs+)#server name ise1
C9200L-48P-4X(config)#exit
C9200L-48P-4X#wr mem
Note: In the NAD TACACS+ configuration, tacacs+ is the group which can be customized as per the deployment requirements.
2. After saving the switch TACACS+ configurations, verify TACACS+ configuration by using the show run aaa command.
C9200L-48P#show run aaa
!
aaa authentication login default group isegroup local
aaa authorization exec default group isegroup
aaa authorization network list1 group isegroup
username admin password 0 XXXXX
!
!
tacacs server ise1
address ipv4 <IP address of TACACS server>
key XXXXX
!
!
aaa group server tacacs+ isegroup
server name ise1
!
!
!
aaa new-model
aaa session-id common
!
!
Verification
Verification from Router
From the CLI of the router, verity authentication of TACACS+ against ISE with Gigabit Ethernet 1 interface by using the test aaa group tacacsgroupname username password new command.
Here is the sample output from Router & ISE:
Verification of port 49 from Router:
ASR1001-X#telnet ISE Gig 1 interface IP 49
Trying to ISE GIg 1 interface IP, 49... Open
ASR1001-X#test aaa group isegroup router XXXX new
Sending password
User successfully authenticated
USER ATTRIBUTES
username 0 "router"
reply-message 0 "Password:"
For verification from ISE, log in to the GUI -> Operations -> TACACS live logs, then filter with router IP in the Network Device Details field.
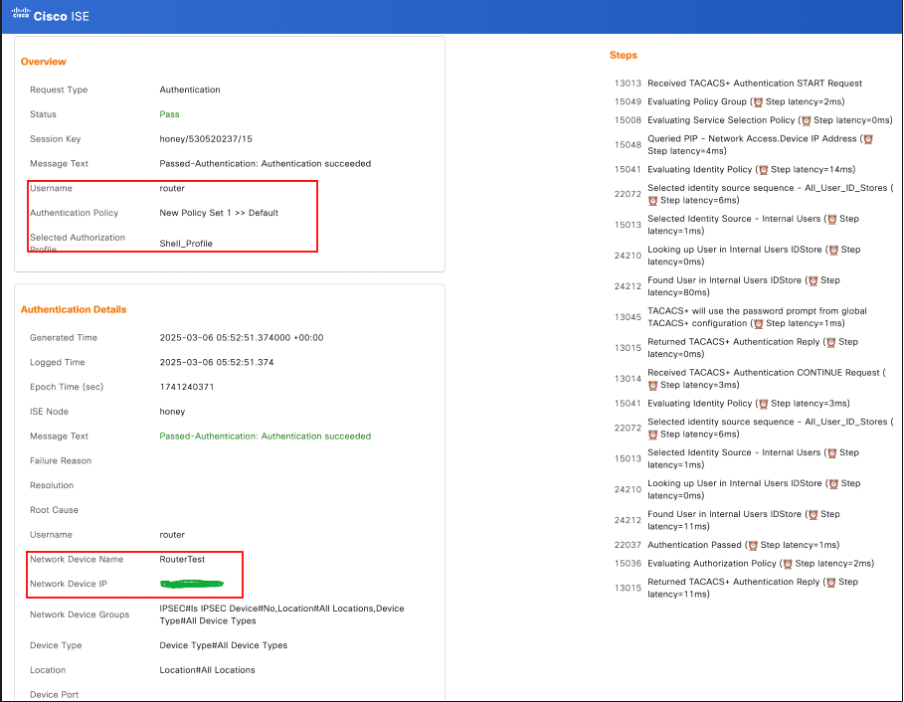 TACACS live logs from ISE - Router Verification.
Verification of the Switch
From the CLI of switch, verify the authentication of TACACS+ against ISE with Gigabit Ethernet 1 interface by using the test aaa group tacacsgroupname username password newn command:
Here is sample output from switch & ISE.
Verification of port 49 from switch:
C9200L-48P# telnet ISE Gig1 interface IP 49
Trying to ISE Gig1 interface IP, 49... Open
C9200L-48P#test aaa group isegroup switch XXXX new
Sending password
User successfully authenticated
USER ATTRIBUTES
username 0 "switch"
reply-message 0 "Password:"
For verification from ISE, log in to the GUI -> Operations -> TACACS live logs, then filter with switch IP in the Network Device Details field.
 TACACS live logs from ISE - Switch verification.
Troubleshoot
This section discusses some of the common issues found related to TACACS+ authentications.
Scenario 1: TACACS+ authentication fails with "Error: 13017 Receved TACACS+ packet from unknown Network Device or AAA Client".
This scenario occurs when the network device is not added as Network Resources in ISE. As shown in this screenshot, the switch is not added in the network resources of ISE.
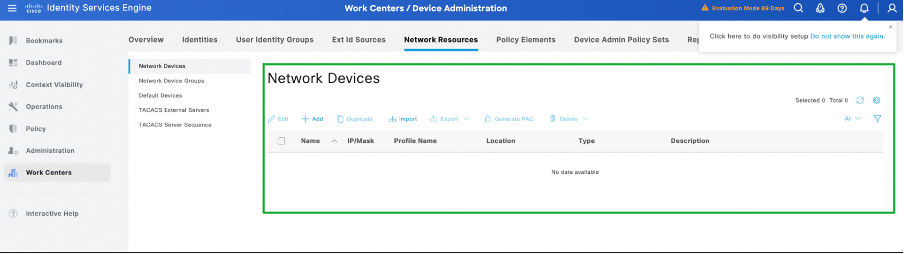 Troubleshooting scenario - Network devices are not added in ISE.
Now, when you test the authentication from the switch / network device, the packet reaches ISE as expected. However, the authentication fails with the error "Error : 13017 Received TACACS+ packet from unknown Network Device or AAA Client" as shown in this screenshot:
 TACACS live logs - Failure when network device is not added to ISE.
Verification from the Network Device (Switch)
Switch#test aaa group isegroup switch XXXXXX new
User rejected
Solution : Verify if the switch / Router / Network device is added as the Network device in ISE. If the device is not added, add the network device to network device list of ISE.
Scenario 2 : ISE drops the TACACS+ packet silently without any information.
This scenario occurs when Device Administration Service is disabled in ISE. In this scenario, ISE drops the packet and no live logs are seen even though authentication is being initiated from the network device which is added to the Network Resources of ISE.
As shown in this screenshot, Device Administration is disabled in ISE.
 Scenario, device administration is not enabled in ISE.
When a user initiates the authentication from the network device, ISE silently drops the packets without any information in the live logs and ISE does not respond to the Syn packet sent by the network device to complete the TACACS authentication process. Refer to this screenshot:
 ISE dropping packets silently during TACACS
ISE shows up no live logs during the authentication.
 No TACACS live logs - Verification from ISE
Verification from the Network Device (Switch)
Switch#
Switch#test aaa group isegroup switch XXXX new
User rejected
Switch#
*Mar 14 13:54:28.144: T+: Version 192 (0xC0), type 1, seq 1, encryption 1, SC 0
*Mar 14 13:54:28.144: T+: session_id 10158877 (0x9B031D), dlen 14 (0xE)
*Mar 14 13:54:28.144: T+: type:AUTHEN/START, priv_lvl:15 action:LOGIN ascii
*Mar 14 13:54:28.144: T+: svc:LOGIN user_len:6 port_len:0 (0x0) raddr_len:0 (0x0) data_len:0
*Mar 14 13:54:28.144: T+: user: switch
*Mar 14 13:54:28.144: T+: port:
*Mar 14 13:54:28.144: T+: rem_addr:
*Mar 14 13:54:28.144: T+: data:
*Mar 14 13:54:28.144: T+: End Packet
Solution: Enable Device administration in ISE.
Reference
Revision History
| Revision | Publish Date | Comments |
|---|---|---|
1.0 |
21-Mar-2025
|
Initial Release |
Contributed by Cisco Engineers
- Sri Srimat Tirumala PeddinitiTechnical Consulting Engineer
 Feedback
Contact Cisco
- Open a Support Case

- (Requires a Cisco Service Contract)