FMC 6.6.1+ - Tips for Before and After an Upgrade
Available Languages
Download Options
Bias-Free Language
The documentation set for this product strives to use bias-free language. For the purposes of this documentation set, bias-free is defined as language that does not imply discrimination based on age, disability, gender, racial identity, ethnic identity, sexual orientation, socioeconomic status, and intersectionality. Exceptions may be present in the documentation due to language that is hardcoded in the user interfaces of the product software, language used based on RFP documentation, or language that is used by a referenced third-party product. Learn more about how Cisco is using Inclusive Language.
Contents
Introduction
This document describes the verification and configuration best practices to complete before and after the upgrade of Cisco Secure Firewall Management Center (FMC) to Version 6.6.1+.
Prerequisites
Requirements
There are no specific requirements for this document.
Components Used
The information in this document is based on these software and hardware versions:
- Hardware: Cisco FMC 1000
- Software: Release 7.0.0 (build 94)
The information in this document was created from the devices in a specific lab environment. All of the devices used in this document started with a cleared (default) configuration. If your network is live, ensure that you understand the potential impact of any command.
Top Things to Do Before the FMC Upgrade
Choose the FMC Target Software Version
Review the Firepower Release Notes for the Target Version and get familiar with:
- Compatibility
- Features and Functionality
- Resolved Issues
- Known Issues
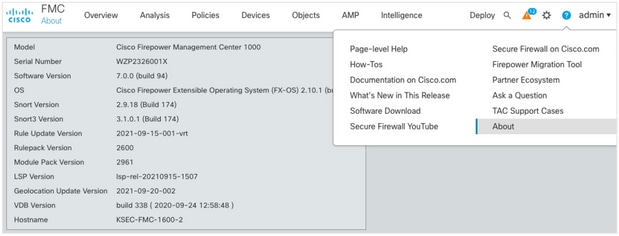
Verify the Current FMC Model and Software Version
Verify the current FMC Model and Software Version:
- Navigate to Help > About.
- Verify the Model and Software Version.
Plan the Upgrade Path
Subject to the current and target FMC software version, an interim upgrade might be required. In the Cisco Firepower Management Center Upgrade Guide, review the Upgrade Path: Firepower Management Centers section and plan the upgrade path.
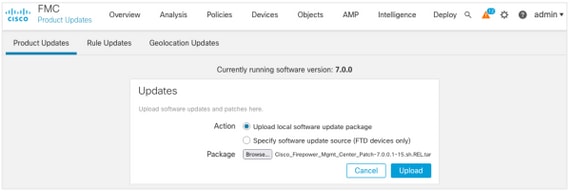
Upload Upgrade Packages
In order to upload the upgrade package to the device, complete these steps:
- Download the upgrade package from the Software Download page.
- In the FMC navigate to System > Updates.
- Choose the Upload Update.
- Click the Upload local software update package radio button.
- Click Browse and choose the package.
- Click Upload.
Create the FMC Backup
Backup is an important disaster recovery step, which allows to restore configuration if an upgrade fails catastrophically.
- Navigate to System > Tools > Backup/Restore.
- Choose the Firepower Management Backup.
- In the Name field, enter the backup name.
- Choose the Storage Location and information that should be included in the backup.
- Click Start Backup.
- From Notification > Tasks, monitor the Backup creation progress.
Tip: We strongly recommend to back up to a secure remote location and verify transfer success. Remote Storage can be configured from the Backup Management page.

For more information, see:
- Firepower Management Center Configuration Guide, Version 7.0 - Chapter: Backup and Restore
- Firepower Management Center Configuration Guide, Version 7.0 - Remote Storage Management
Verify NTP Synchronization
For a successful FMC upgrade, NTP synchronization is required. In order to check NTP synchronization, complete these steps:
- Navigate to System > Configuration > Time.
- Verify the NTP Status.
Note: Status: "Being Used" indicates that the appliance is synchronized with the NTP server.

For more information, see Firepower Management Center Configuration Guide, Version 7.0 - Time and Time Synchronization.
Verify the Disk Space
Dependent upon the FMC model and target version, ensure that there is enough of free disk space available, otherwise the upgrade fails. In order to check available FMC disk space, complete these steps:
- Navigate to System > Health > Monitor.
- Choose the FMC.
- Expand the menu and search for Disk Usage.
- The disk space requirements can be found in Time Tests and Disk Space Requirements.

Deploy All Pending Policy Changes
Before the update or patch installation, it is required to deploy changes into the sensors. In order to ensure that all pending changes are deployed, complete these steps:
- Navigate to Deploy > Deployment.
- Choose all devices in the list and Deploy.
Caution: The Inspect Interruption column indicates traffic interruption

Run Firepower Software Readiness Checks
Readiness checks assess a Firepower appliance's preparedness for a software upgrade.
In order to perform the Software Readiness Checks, complete these steps:
- Navigate to System > Updates.
- Select the Install icon next to the target version.
- Choose the FMC and click Check Readiness.
- In the pop-up window, click OK.
- Monitor the Readiness Check process from Notifications > Tasks.
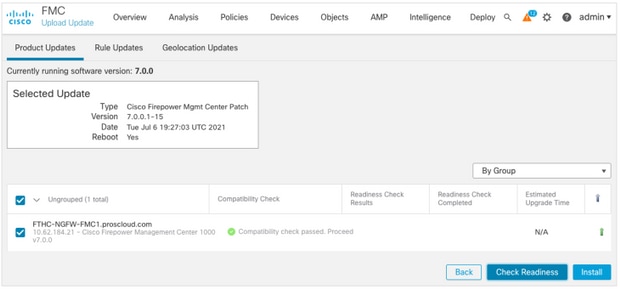
For more information, see Cisco Firepower Management Center Upgrade Guide - Firepower Software Readiness Checks.
Top Things to Do After the FMC Upgrade
Deploy All Pending Policy Changes
Immediately after every update or patch installation, it is required to deploy changes into the sensors. In order to ensure that all pending changes are deployed, complete these steps:
- Navigate to Deploy > Deployment.
- Choose all devices in the list and click Deploy.
Caution: The Inspect Interruption column indicates traffic interruption

Verify if the Latest Vulnerability and Fingerprint Database is Installed
In order to verify the current Fingerprint (VDB) version, complete these steps:
- Navigate to Help > About.
- Verify the VDB Version.
In order to download the VDB updates directly from cisco.com, reachability from the FMC to cisco.com is required.
- Navigate to System > Updates > Product Updates.
- Choose Download updates.
- Install the latest version available.
- You must redeploy the sensors afterward.
Note: If the FMC does not have Internet access, the VDB package can be download directly from software.cisco.com.
It is recommended to schedule tasks to perform automatic VDB package downloads and installations.
As a good practice, check for VDB updates daily and install them on the FMC during the weekends.
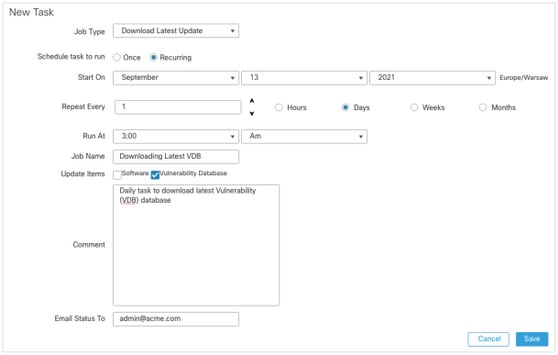
In order to check the VDB daily from www.cisco.com, complete these steps:
- Navigate to System > Tools > Scheduling.
- Click Add Task.
- From the Job Type drop-down list, choose Download Latest Update.
- For Schedule task to run, click the Recurring radio button.
- Repeat the task every day and run it at 3:00 AM or outside business hours.
- For Update Items, check the Vulnerability Database check box.
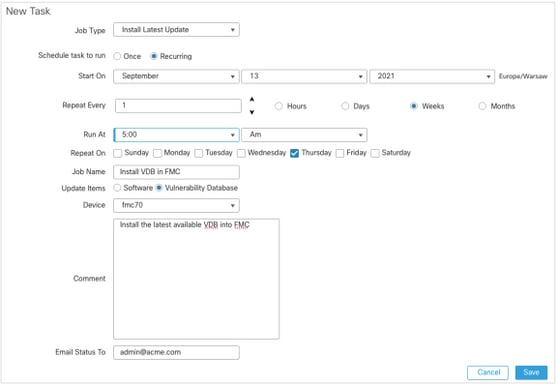
In order to install the latest VDB into the FMC, set the periodic task weekly:
- Navigate to System > Tools > Scheduling.
- Click Add Task.
- From the Job Type drop-down list, choose Install Latest Update.
- For Schedule Task to run, click the Recurring radio button.
- Repeat the task every 1 week and run it at 5:00 AM or outside business hours.
- For Update Items, check the Vulnerability Database check box.
For more information, see Firepower Management Center Configuration Guide, Version 7.0 - Update the Vulnerability Database (VDB)
Verify the Snort Rule and Lightweight Security Package Current Version
In order to verify the current Snort Rule (SRU), Lightweight Security Package (LSP), and Geolocation versions, complete these steps:
- Navigate to Help > About.
- Verify the Rule Update Version and LSP Version.
To download the SRU and LSP directly from www.cisco.com, reachability from the FMC to www.cisco.com is required.
- Navigate to System > Updates > Rule Updates.
- From the One-Time Rule Update/Rules Import tab, choose Download new rule update from the Support Site.
- Choose Import.
- Deploy the configuration to the sensors afterwards.
Note: If the FMC does not have Internet access, the SRU and LSP packages can be downloaded directly from software.cisco.com.
Intrusion rule updates are cumulative, and it is recommended to always import the latest update.
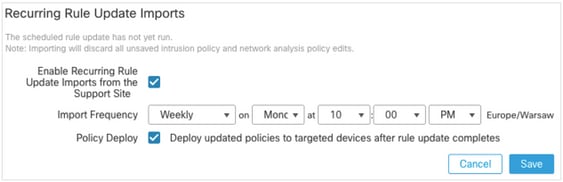
In order to turn on the weekly download and deployment of snort rule updates (SRU/LSP), complete these steps:
- Navigate to System > Updates > Rule Updates.
- In the Recurring Rule Update Imports tab, check the Enable Recurring Rule Update Imports from the Support Site check box.
- Choose the import frequency as weekly, pick one day of the week and late afternoon for the download and policy deploy.
- Click Save.
For more information, see Firepower Management Center Configuration Guide, Version 7.0 - Update Intrusion Rules.
Verify the Geolocation Update Current Version
In order to verify the current Geolocation version, complete these steps:
- Navigate to Help > About.
- Verify the Geolocation Update Version.
To download Geolocation Updates directly from www.cisco.com, reachability from the FMC to www.cisco.com is required.
- Navigate to System > Updates > Geolocation Updates.
- From the One-Time Geolocation Update tab, choose Download and install geolocation update from the Support Site.
- Click Import.
Note: If the FMC does not have Internet access, the Geolocation Updates package can be downloaded directly from software.cisco.com.
In order to turn on the automatic Geolocation Updates, complete these steps:
- Navigate to System > Updates > Geolocation Updates.
- In the Recurring Geolocation Updates section, check the Enable Recurring Weekly Updates from the Support Site check box.
- Choose the import frequency as weekly, pick Monday at midnight.
- Click Save.

For more information, see Firepower Management Center Configuration Guide, Version 7.0 - Update the Geolocation Database (GeoDB).
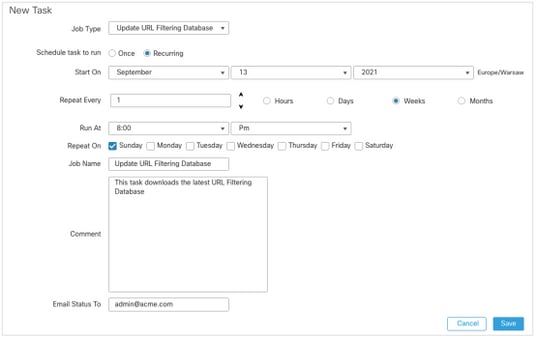
Automate URL Filtering Database Update with Scheduled Task
In order to ensure that threat data for URL filtering is current, the system must obtain data updates from the Cisco Collective Security Intelligence (CSI) cloud. To automate this process, follow these steps:
- Navigate to System > Tools > Scheduling.
- Click Add Task.
- From the Job Type drop-down list, choose Update URL Filtering Database.
- For Schedule task to run, click the Recurring radio button.
- Repeat the task every week and run it at 8:00 PM on Sundays or outside business hours.
- Click Save.
For more information, see Firepower Management Center Configuration Guide, Version 7.0 - Automating URL Filtering Updates Using a Scheduled Task.
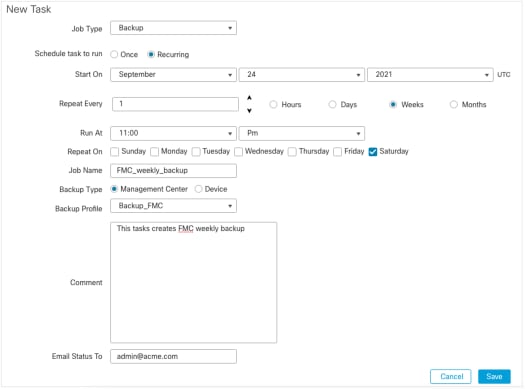
Configure Periodic Backups
As part of the disaster recovery plan, it is recommended to perform periodic backups.
- Ensure that you are in the global domain.
- Create the FMC backup profile. For more information, see the Create the FMC Backup section.
- Navigate to System > Tools > Scheduling.
- Click Add Task.
- From the Job Type drop-down list, choose Backup.
- For Schedule task to run, click the Recurring radio button.
The backup frequency must be adjusted to fit the organization's needs. We recommend to create backups during a maintenance window or other time of low use. - For Backup Type, click the Management Center radio button.
- From the Backup Profile drop-down list, choose the Backup Profile.
- Click Save.
For more information, see Firepower Management Center Configuration Guide, Version 7.0 - Chapter: Backup and Restore.
Ensure that the Smart License is Registered
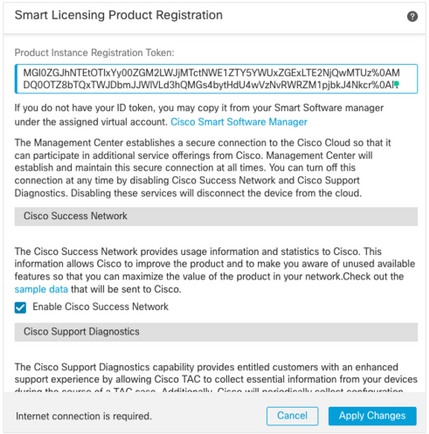
In order to register the Cisco Firewall Management Center with the Cisco Smart Software Manager, complete these steps:
- In https://software.cisco.com, navigate to Smart Software Manager > Manage licenses.
- Navigate to Inventory > General tab and create a New Token.
- In the FMC UI, navigate to System > Licenses > Smart Licenses.
- Click Register.
- Insert the Token generated in the Cisco Smart Software Licensing portal.
- Ensure that The Cisco Success Network is enabled.
- Click Apply Changes.
- Verify The Smart License Status.
For more information, see Firepower Management Center Configuration Guide, Version 7.0 - Register Smart Licenses.
Review the Configuration of the Variable Sets
Ensure HOME_NET variable contains only the inside networks/subnets in the organization. Improper variable set definition adversely impacts the firewall’s performance.
- Navigate to Objects > Variable Set.
- Edit the variable set used by your intrusion policy. It is allowed to have one variable set per intrusion policy with different settings.
- Adjust the variables according to your environment and click Save.
Other variables of interest are DNS_SERVERS OR HTTP_SERVERS.
For more information, see Firepower Management Center Configuration Guide, Version 7.0 - Variable Sets.
Verify the Cloud Services Enablement
In order to take advantage of the different cloud services, navigate to System > Integration > Cloud Services.
URL Filtering
- Enable URL Filtering and allow automatic updates, turn on Query Cisco Cloud for Unknown URLs.
A more frequent Cache URL expiration requires more queries to the cloud which results in slower web loads. - Save the changes.
Tip: For cache URL expiration, leave the default Never. If stricter web reclassification is needed this setting can be modified accordingly.
AMP for Networks
- Ensure both settings are on: Enable automatic Local Malware Detection Updates and Share URI from Malware Events with Cisco.
- In FMC 6.6.X, disable the use of legacy port 32137 for AMP for Networks so the TCP port used instead is 443.
- Save the changes.
Note: This setting is no longer available in FMC 7.0+ and the port is always 443.
Cisco Cloud Region
- The cloud region needs to match with the SecureX organization region. If the SecureX organization is not created, choose the region closer to the FMC installation: APJ Region, EU Region, or US Region.
- Save the changes.
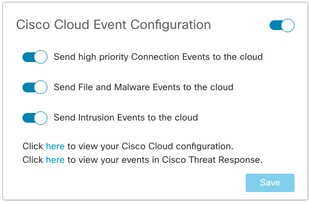
Cisco Cloud Event Configuration
For FMC 6.6.x
- Ensure all three options: Send high priority Connection Events to the cloud, Send File and Malware Events to the cloud, and Send Intrusion Events to the cloud are chosen.
- Save the changes.
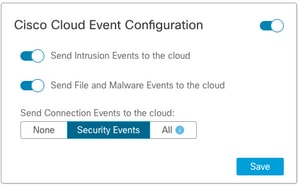
For FMC 7.0+
- Ensure both options are chosen: Send Intrusion Events to the cloud and Send File and Malware Events to the cloud.
- For the type of connection events, choose All if Security Analytics and Logging solution is in use. For SecureX, choose only Security Events.
- Save the changes.
Enable SecureX Integration
The SecureX integration provides instant visibility into the threat landscape across your Cisco security products. In order to connect SecureX and enable the ribbon, follow these steps:
Integrate SecureX Ribbon
Note: This option is available for FMC version 7.0+.
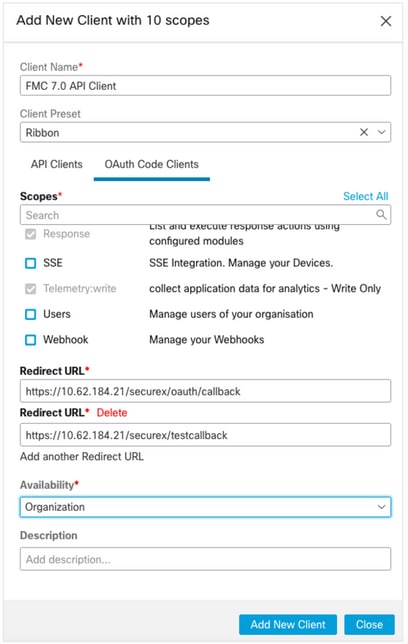
- Log into SecureX and create an API client:
- In the Client Name field, enter a descriptive name of the FMC. For example, FMC 7.0 API Client.
- Click the Oauth Code Clients tab.
- In the Client Preset drop-down list, choose Ribbon. It chooses the scopes: Casebook, Enrich:read, Global Intel:read, Inspect:read, Notification, Orbital, Private Intel, Profile, Response, Telemetry:write.
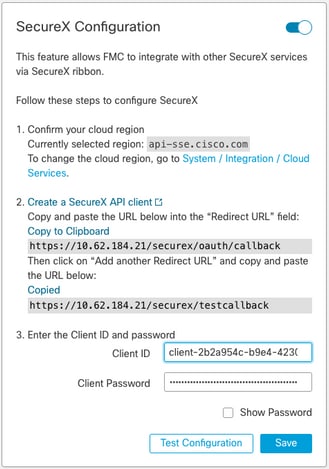
- Add the two redirect URLs presented in the FMC:
Redirect URL: <FMC_URL>/securex/oauth/callback
Second Redirect URL: <FMC_URL>/securex/testcallback
-
- In the Availability drop-down list, choose Organization.
- Click Add New Client.
2. From the FMC, navigate to System > SecureX.
3. Turn on the toggle in the upper right corner and confirm that the region shown matches with SecureX organization.
4. Copy the Client Id and Client Password and paste them into the FMC.
5. Choose test the configuration.
6. Log in to SecureX to authorize the API Client.
7. Save the changes and refresh the browser in order to see the ribbon displayed at the bottom.
8. Expand the Ribbon and choose Get SecureX. Enter the SecureX credentials if prompted.
9. The SecureX ribbon is now fully functional for your FMC user.
5YVPsGdzrkX8q8q0yYl-tDitezO6p_17MtH6NATx68fUZ5u9T3qOEQ
Note: If any other FMC user requires access to the ribbon, that user needs to log in to the ribbon with SecureX credentials.
Send Connection Events to SecureX
- In the FMC, navigate to System > Integration > Cloud Services and ensure the Cisco Cloud Event Configuration sends Intrusion, File and Malware events as explained in the Turn on Cloud Services section.
- Ensure the FMC is registered with a Smart License as explained in the Register the Smart Licenses section.
- Take a note of the Assigned virtual Account name as displayed in FMC under System > Licenses > Smart Licenses.
- Register the FMC into SecureX:
- In SecureX, navigate to Administration > Devices.
- Choose Manage Devices.
- Ensure that pop-up windows are allowed in the browser.
- Log in to Security Services Exchange (SSE).
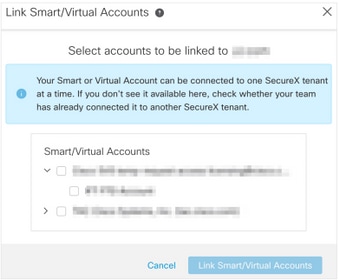
- Navigate to Tools menu > Link Smart/Virtual Accounts.
- Choose Link more accounts.
- Select the virtual account assigned to the FMC (step 3).
- Choose Link Smart/Virtual Accounts.
- Ensure that the FMC device is listed in the Devices.
- Navigate to the Cloud Services tab, turn on Cisco SecureX threat response and Eventing features.
- Choose the Additional service settings (gear icon) next to the Eventing feature.
- In the General tab, choose Share event data with Talos.
- In the Auto-Promote Events tab, in the section By Event Type choose all available event types and Save.
5. In the main SecureX portal, navigate to Integration Modules > Firepower and add the Firepower integration module.
6. Create a new dashboard.
7. Add the Firepower related tiles.
Integrate Secure Endpoint (AMP for Endpoints)
In order to enable Secure Endpoint (AMP for Endpoints) integration with your Firepower deployment, follow these steps:
- Navigate to AMP > AMP Management.
- Choose Add AMP Cloud Connection.
- Choose the cloud and Register.
Note: The status Enabled means that the connection to the cloud is established.
Integrate Secure Malware Analytics (Threat Grid)
By default, the Firepower Management Center can connect to the public Cisco Threat Grid cloud for file submission and report retrieval. It is not possible to delete this connection. Nevertheless, it is recommended to choose the closest to your deployment cloud:
- Navigate to AMP > Dynamic Analysis Connections.
- Click Edit (pencil icon) in the Action section.
- Choose the correct cloud name.
- To associate the Threat Grid account for detailed reporting and advanced sandbox functionalities, click the Associate icon.
For more information, see Firepower Management Center Configuration Guide, Version 7.0 - Enabling Access to Dynamic Analysis Results in the Public Cloud.
For on-premise Thread Grid appliance integration, see Firepower Management Center Configuration Guide, Version 7.0 - Dynamic Analysis On-Premises Appliance (Cisco Threat Grid) .
Revision History
| Revision | Publish Date | Comments |
|---|---|---|
2.0 |
13-Oct-2021
|
Updated Engineer Titles. |
1.0 |
07-Oct-2021
|
Initial Release |
Contributed by Cisco Engineers
- Anita PietrzykCustomer Success Specialist
- Juan Jose Ponce DominguezCustomer Success Specialist
 Feedback
Contact Cisco
- Open a Support Case

- (Requires a Cisco Service Contract)