Introduction
This document describes how to integrate Duo with Security Management Appliance (SMA) and Azure for Security Assertion Markup Language (SAML) authentication.
Prerequisites
Requirements
Cisco recommends that you have knowledge of these topics:
- An active Azure account: You must have an Azure subscription and access to the Azure AD console to set up the integration with Duo (Free License)
- A SAML-supported Service Provider (SP): You must have an application or system that supports SAML authentication and is configured to work with Azure AD as the identity provider.
- Configuration information: You must have specific configuration information for your SP and Duo, such as SAML entity IDs, SAML response URL, and SAML security key.
Components Used
The information in this document is based on these software and hardware versions:
- Cisco SMA
- Azure Cloud
- Duo
The information in this document was created from the devices in a specific lab environment. All of the devices used in this document started with a cleared (default) configuration. If your network is live, ensure that you understand the potential impact of any command.
Background Information
Duo is a two-factor authentication service provider that adds a layer of security to SAML authentication.
In a typical scenario, Azure acts as the Identity Provider (IdP) and an external service, such as a web application or information system, acts as the Security SMA.
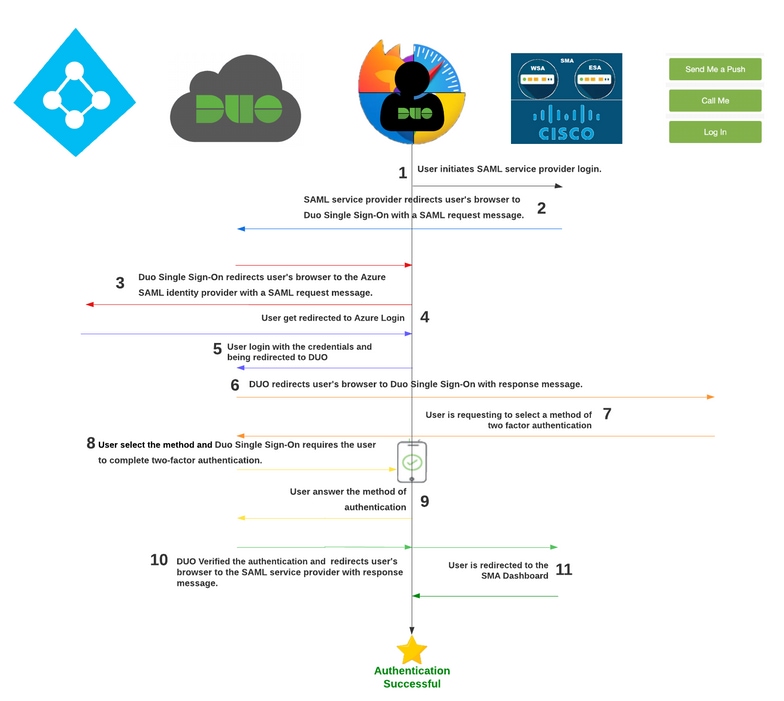
The flow of SAML authentication with Duo and Azure would look like this:
- A user attempts to access the Security SMA and is redirected to Azure to log in.
- Azure requests user authentication and uses Duo to verify the users identity through a second authentication factor (Call, SMS, Hardware Token, WebAuth).
- Once authenticated, Azure sends a SAML response to the SMA which includes authorization information and assertions about the user.
- The SMA validates the SAML response and, if valid, allows the user to access the protected resource.
- In summary, SAML with Duo and Azure enables secure and centralized user authentication across different systems and platforms, use a combination of password authentication and two-factor authentication to increase security.
Important Observations
- SAML is a security standard that enables user authentication and authorization across different systems and platforms.
- IdP is the Identity that stores all the information of the users to permit the authentication (that means Duo has all the user information to confirm and approve a request for authentication).
- SP In simple words, it is the application.

Note: This only works with Azure as a SAML authentication source.
Configure
1. Configure Single Sign-on
Navigate in the admin portal to Single Sign-on > Duo Central > Add source.

And select Add SAML Identity Provider as shown in the image.
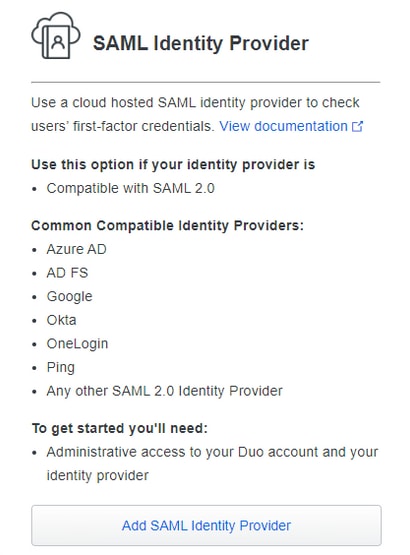
Here in this part, you find all the information which you need to integrate Duo with Azure to integrate with your SMA.
Maintain the information in other windows to use in the integration meanwhile, you configure the parameters in Azure.
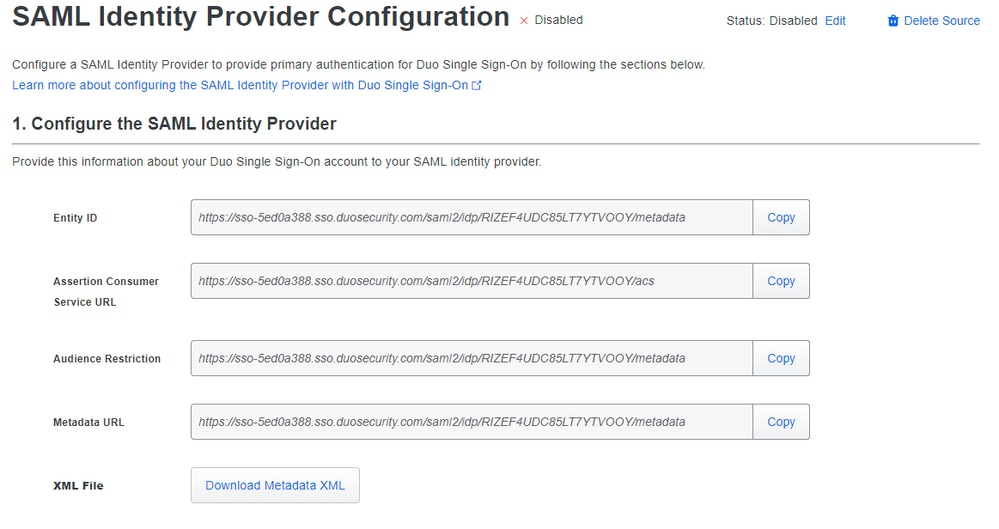
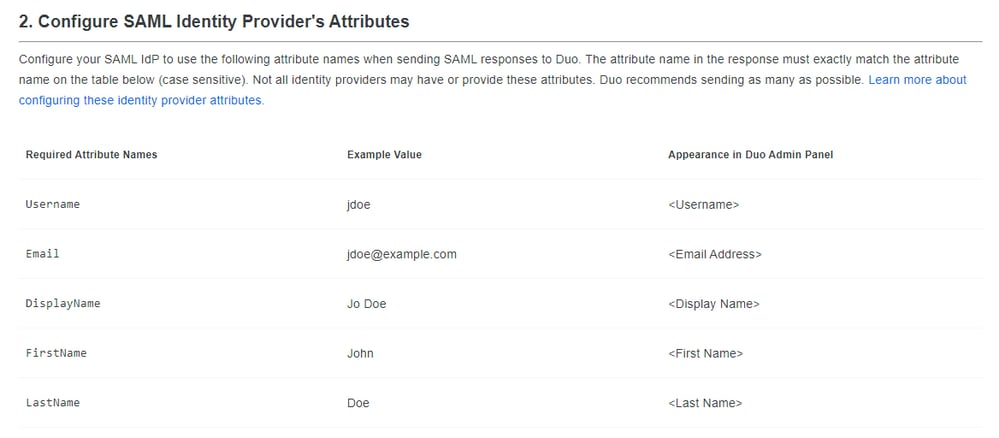
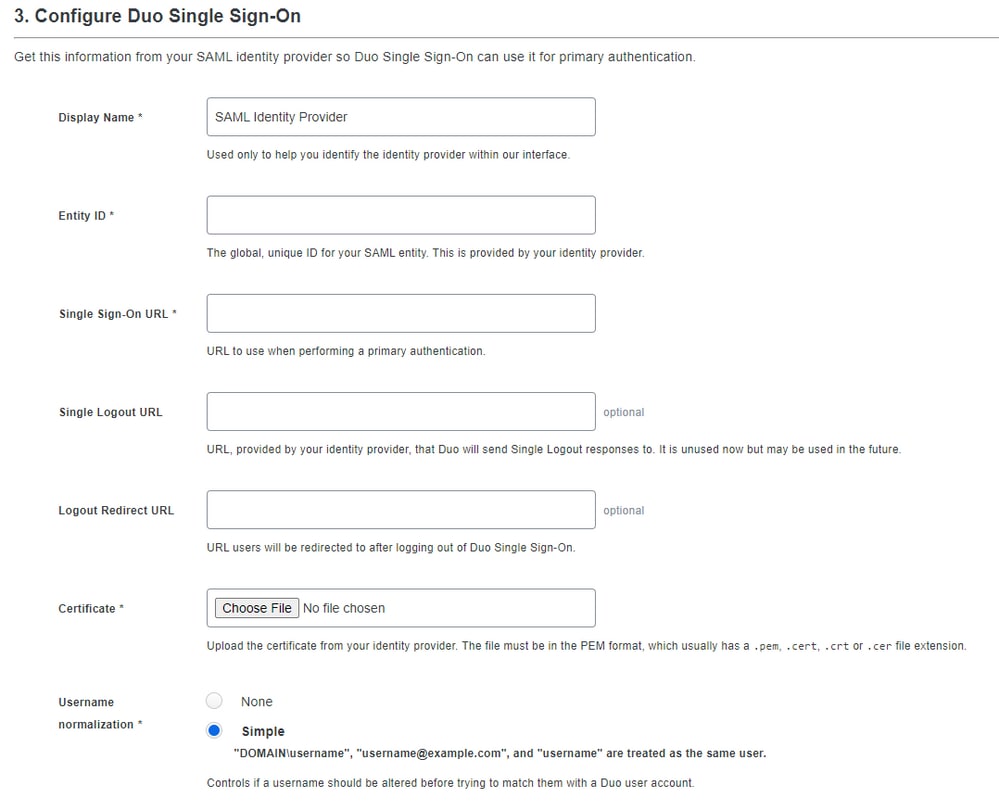
Now, after you check what information you have in the SAML Azure integration (Duo Admin Portal) part you need to log under the Azure portal https://portal.azure.com/.
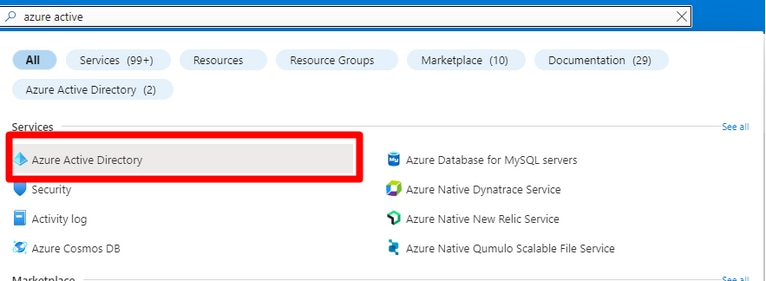
Search for Azure Active Directory in the search bar at the top as shown in the image.
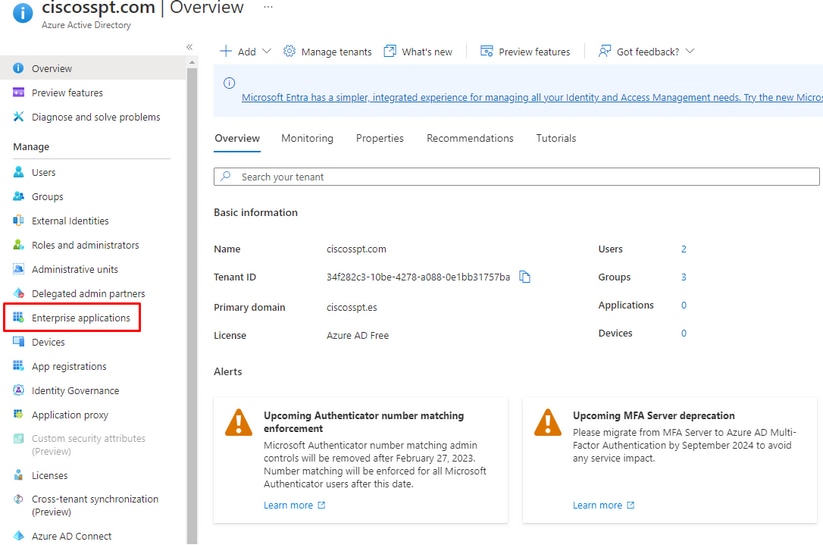
Navigate to Enterprise Applications as shown in the image.
Select New Application as shown in the image.

Select Create your own application, choose the name of your app and select Integrate any other application you don't find in the gallery (Non-Gallery)and click Create.

Now, add the users. (only the users added here can be used at the time of Single Sign-on (SSO) login).
Select Assign Users and Groups as shown in the image.
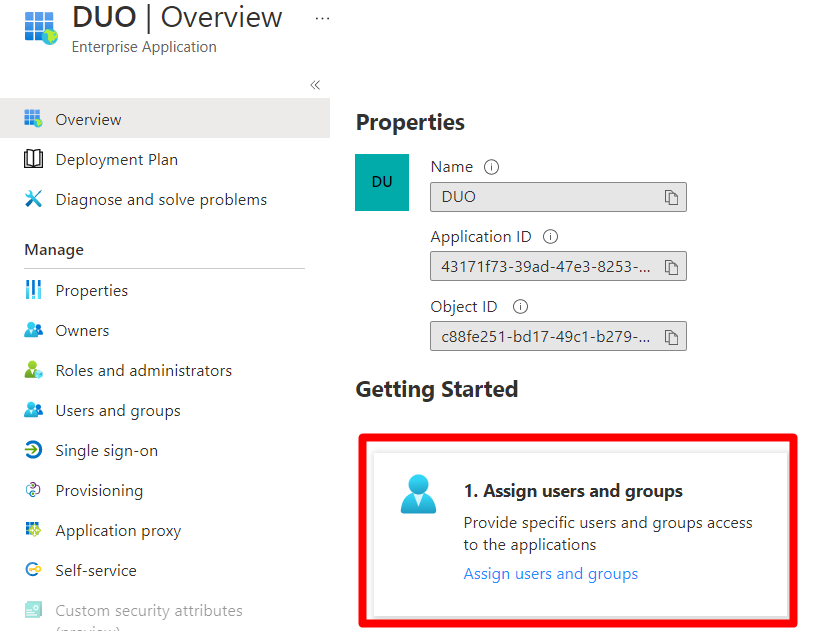
Select Add user/group as shown in the image.
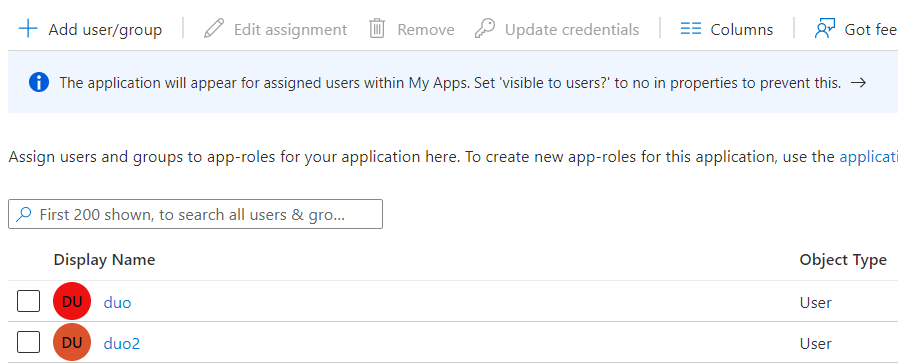

Note: You only can add groups if your AD is licensed, if not then you can use users.
After the users or groups have been added, you start with the SSO Configuration.
- Select
Set Up Single Sign-on
- Select
SAML

After that, you need to configure the Duo SAML-Based Sign-on on Azure with the data of SAML Azure integration in the Duo Admin Portal.
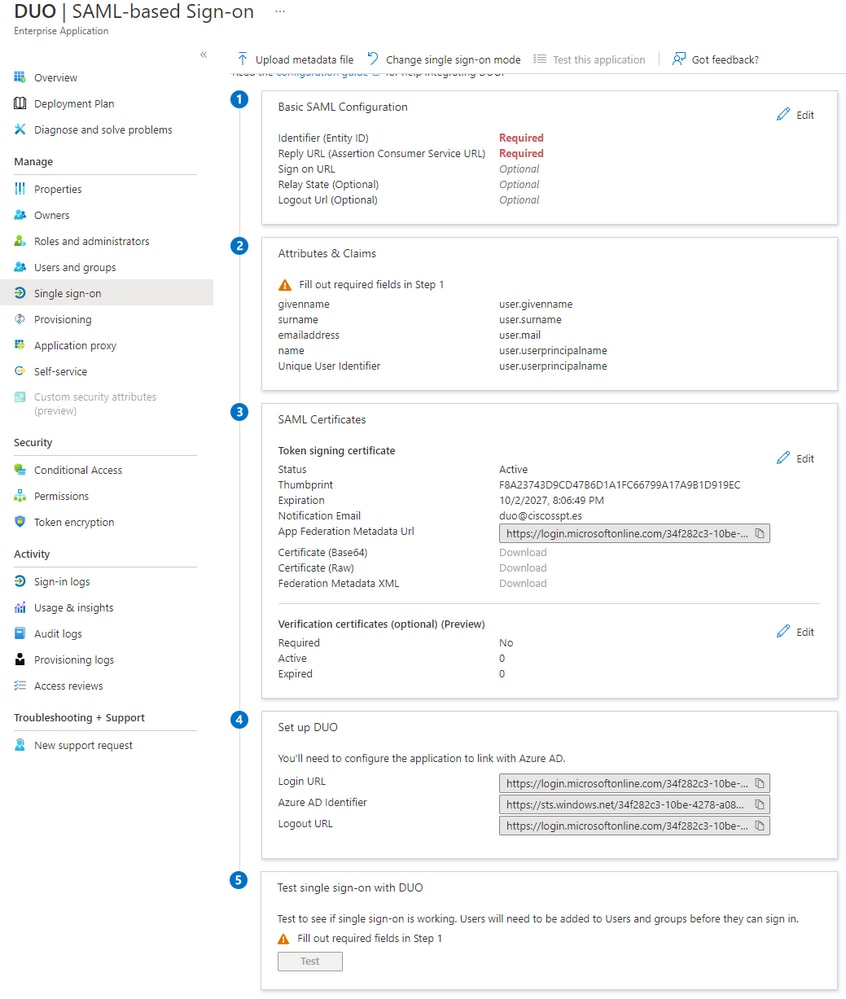
Select Edit under Basic SAML Configuration as shown in the image.


After you copy the data from Duo of Entity ID and Assertion Consumer Service URL to Azure inIdentifier (Entity ID) and Reply URL (Assertion Consumer Service URL), you are done.

Now, select Edit for Attributes & Claims .
Delete the previous configuration and add the next configuration to your Attributes & Claims .
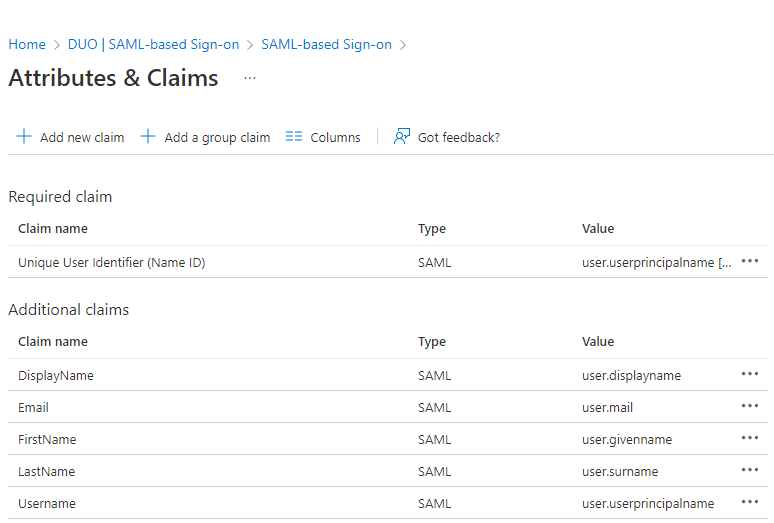
And you have something like this:

To finalize the configuration, you need to download the certificate under SAML Certificates, and upload it to the Duo Admin Portal on your SAML configuration.
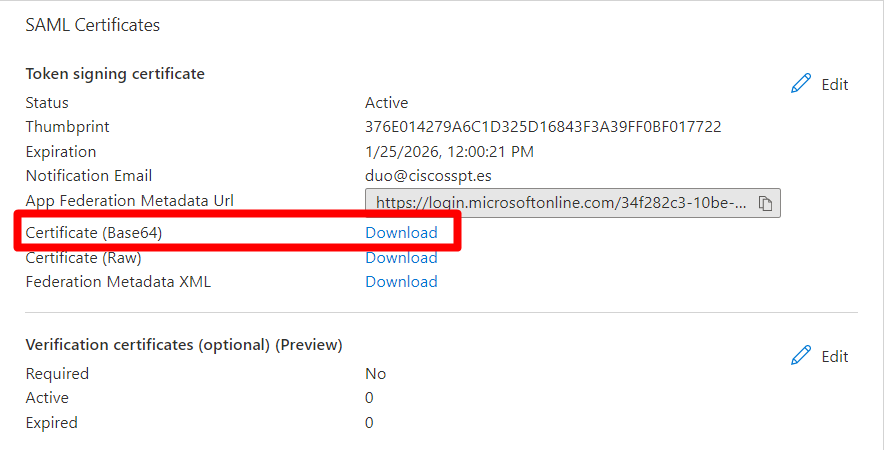
Click Choose File
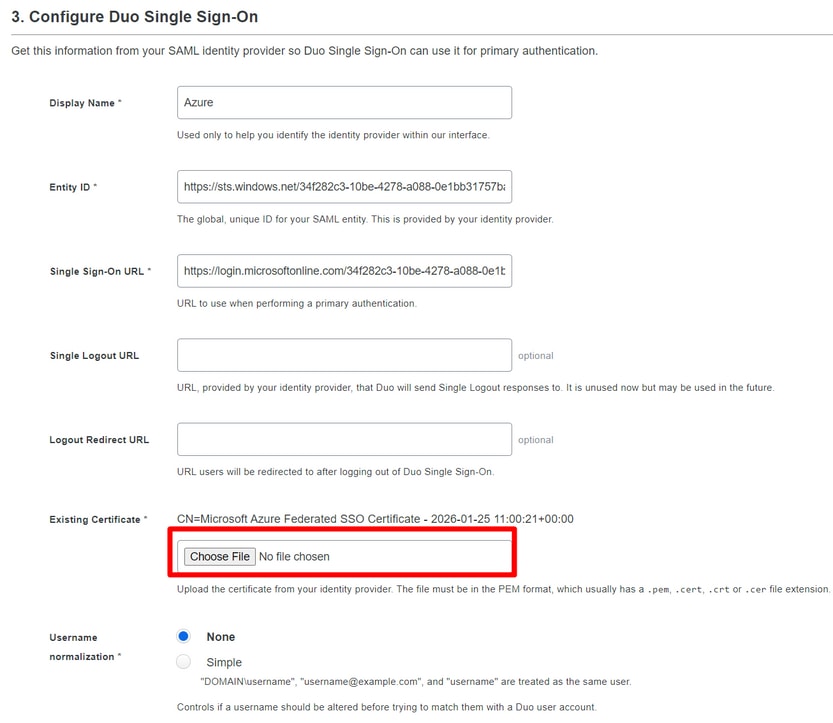
You have now ended the SAML Configuration between Duo and Azure.

Warning: The test in Azure does not work, it fails (please do not try).

2. Configure AD Sync to Sync the Users from Azure in Duo (Optional)
This step is optional but helps to Sync the Groups from Azure to Duo. You can skip this step if you do not want to do that.
Navigate toUsers > Directory Sync > Add New Sync > Azure AD

After that, you are redirected to New Azure AD Sync. Choose Add New Connection, and click Continue.
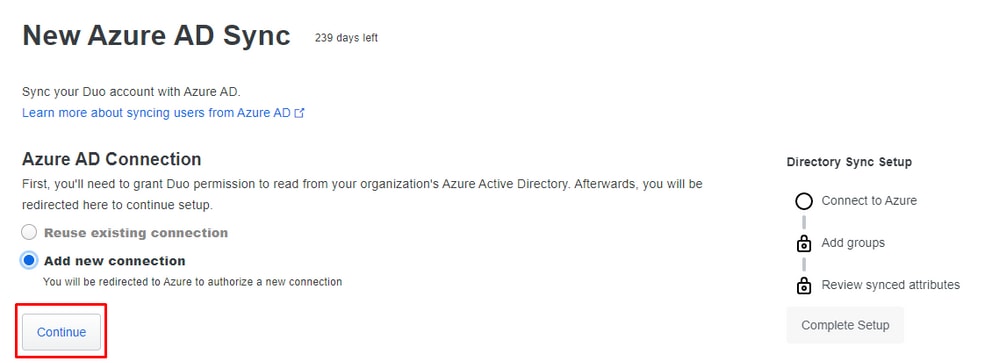
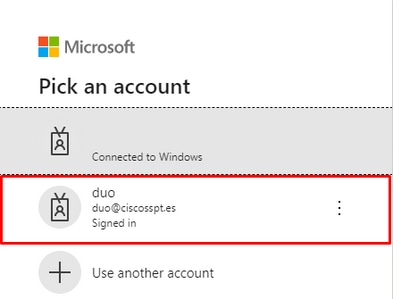
You must need to authenticate in Azure in order to accept the agreements and rights.
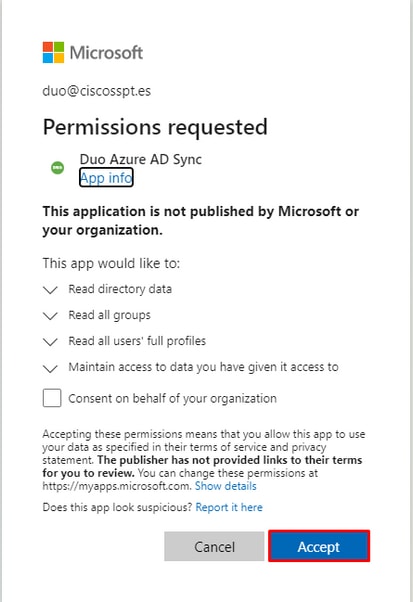
Select theGroups which you want to integrate.
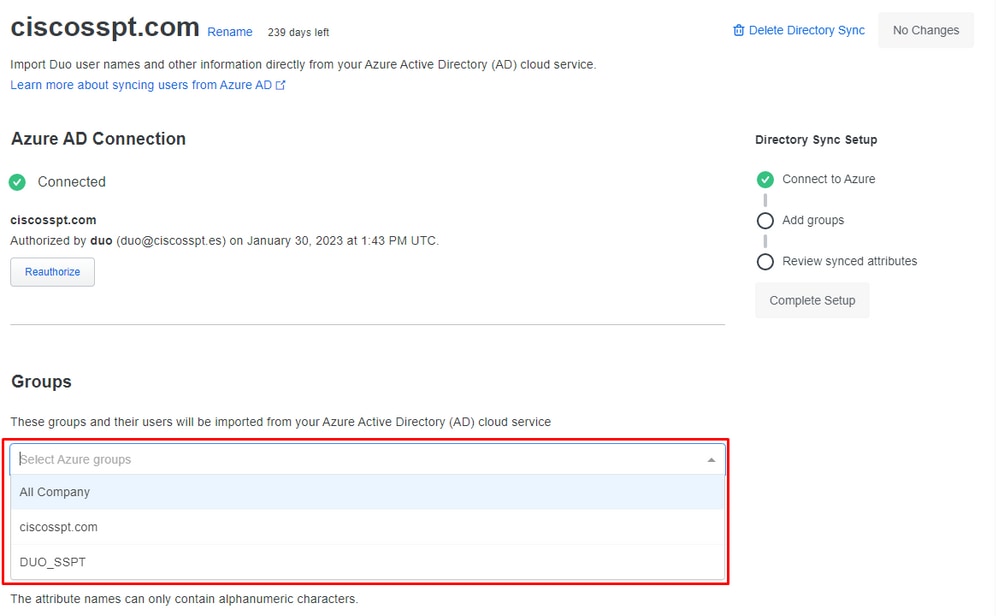
Before that, you can mark the checkbox to permit you to send the email for enrollment, or wait for the user to log in to the app and be prompted to enroll in Duo.

And choose Save.
3. Configure Duo Single Sign-on App for the SMA
Please refer to Single Sign-On for Generic SAML Service Providers | Duo Security.
Create the APP in Duo to integrate the SMA.
Navigate to Applications > Protect an Application- Search for
Generic SAML Service Provider.
- Choose
Protect.

In this part, you configure some variables for Service Provider and SAML Response that share the SP and the IdP.
You configure the most important part for the IdP to permit the users to authenticate and send the correct parameters in SAML.
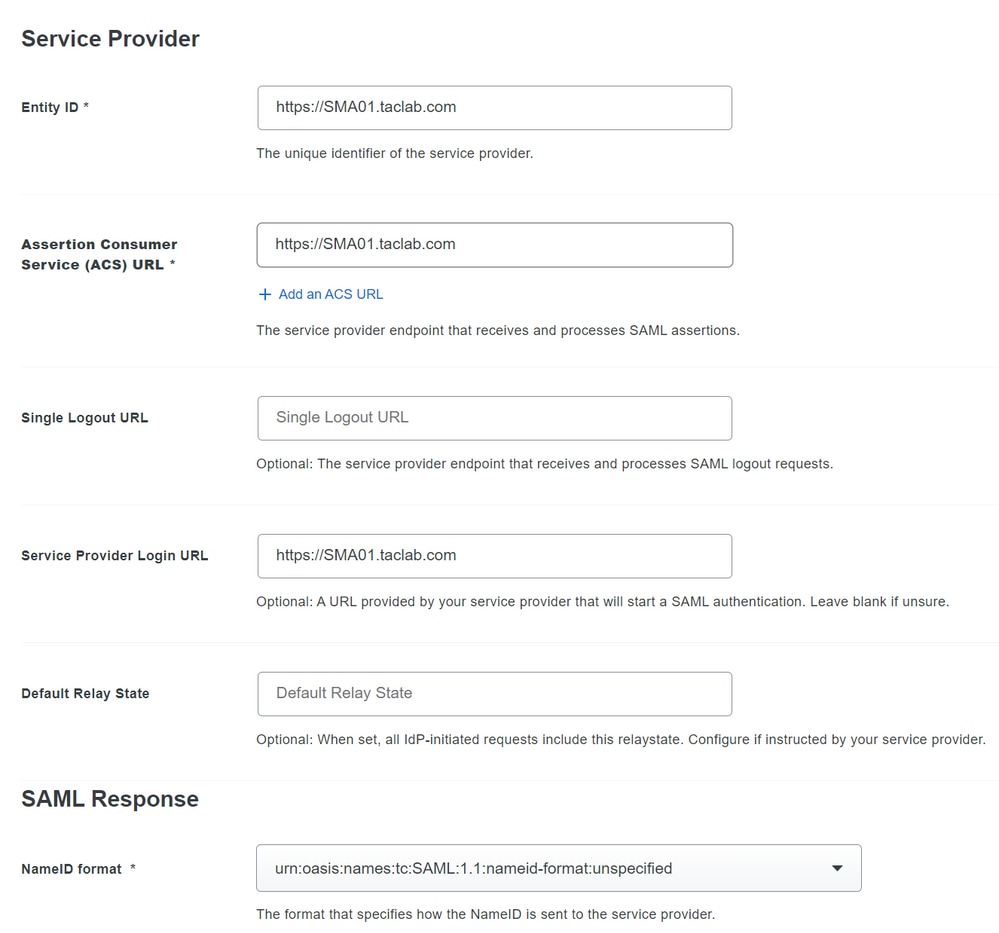
- Entity ID: The Service Provider Entity ID is used to uniquely identify a service provider. The format of the Service Provider Entity ID is typically a URI.
- Assertion Consumer: The service provider endpoint that receives and processes SAML assertions. The SAML Assertion Consumer Service (ACS) URL for your application.
- Service Provider Login URL: The location where the SAML assertion is sent with HTTP POST. This is often referred to as the SAML Assertion Consumer Service (ACS) URL for your application.
- Name ID format: Identifies the SAML processing rules and constraints for the assertion subject statement. Use the default value of 'Unspecified' unless the application explicitly requires a specific format.
Sign response and Sign assertion need to be marked on both SMA and Duo.

- Attribute Name: The Attribute Name depends on the attributes configured for the Identity Provider. The appliance search for match entries of the Attribute Name in the Group Mapping field, this is optional. If you do not configure it, the appliance search for match entries of all attributes in the Group Mapping field.
- Service Provider Role: Write whatever you want this is only to make the match with the
group name in the directory in the SMA.
- Duo Groups: The group integrated to be used under the authentication phase between the SMA and Duo. (remember the groups to be used for the authentication are in Duo not in the SMA).

4. Configure SMA to Use SAML
Navigate to System Administration > SAML as shown in the image.

Choose Add Service Provider.
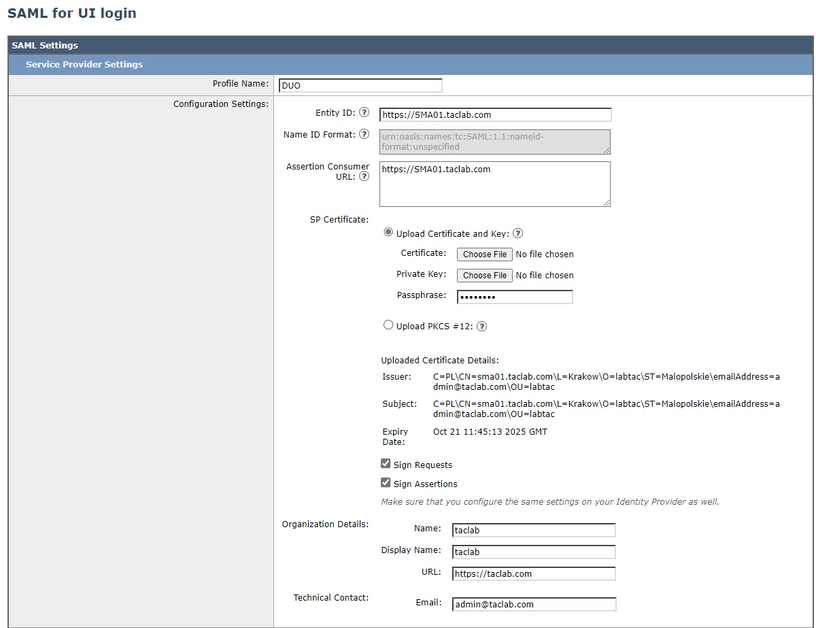

Note: Remember this parameter needs to be identical in SMA and Duo.
- Entity ID: The Service Provider Entity ID is used to uniquely identify a service provider. The format of the Service Provider Entity ID is typically a URL.

- Assertion Consumer URL: The Assertion Consumer URL is the URL that the Identity Provider must send the SAML assertion after successful authentication. The URL that you use to access the web interface of your SMA must be the same as the Assertion Consumer URL. You need this value while you configure the SMA settings on Duo.

- SP Certificate: That is the certificate for the hostname for which you have configured the assertion consumer URL.
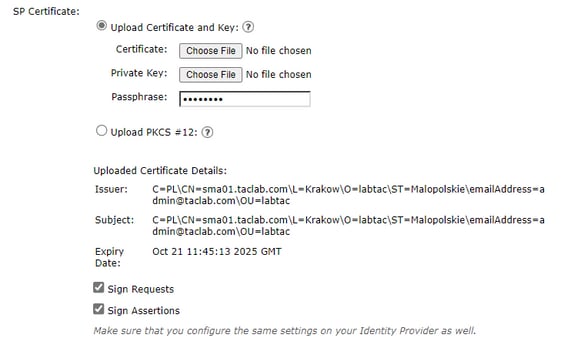
It would be best if you used openssl on Windows or Linux. If you want to configure a self-signed certificate you can do that with the next step-by-step or you can use your certificate:
1. Create the private key. This helps to enable encryption or decryption.
openssl genrsa -out domain.key 2048
2. Create a Certificate Signing Request (CSR).
openssl req -key domain.key -new -out domain.csr
3. Create the self-signed certificate.
openssl x509 -signkey domain.key -in domain.csr -req -days 365 -out domain.crt
If you want more days, you can change the value after -days .

Note: Remember, by best practices, you must not put more than 5 years for the certificates.
After that, you have the certificate and keys to upload on the SMA in the option upload certificate and key.

Note: If you want to upload the certificate in PKCS #12 format, it is possible to create it after Step 3.
Optional
openssl pkcs12 -inkey domain.key -in domain.crt -export -out domain.pfx
For organization details, you can fill it as you want and select submit
Navigate toSystem Administration > SAML > Add Identity Provider as shown in the image.
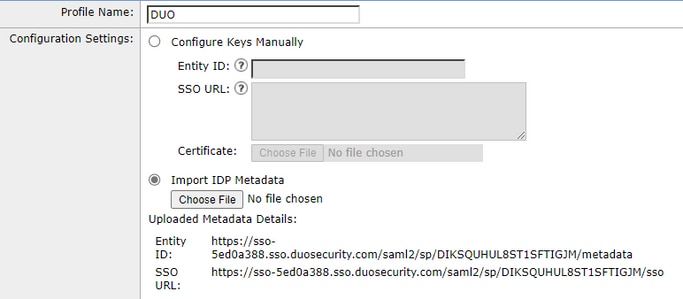
In this step, you have two options, you can upload that information manually or via an XML file.
Navigate to your application in Duo and download the IdP metadata file.
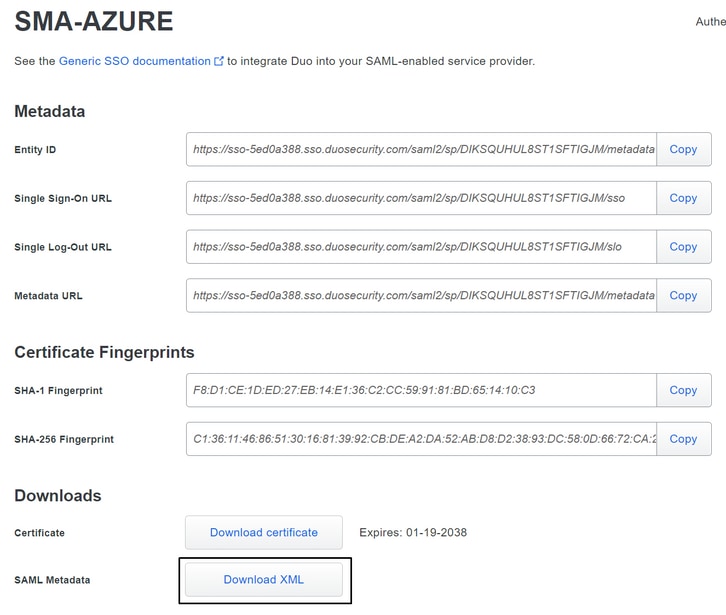
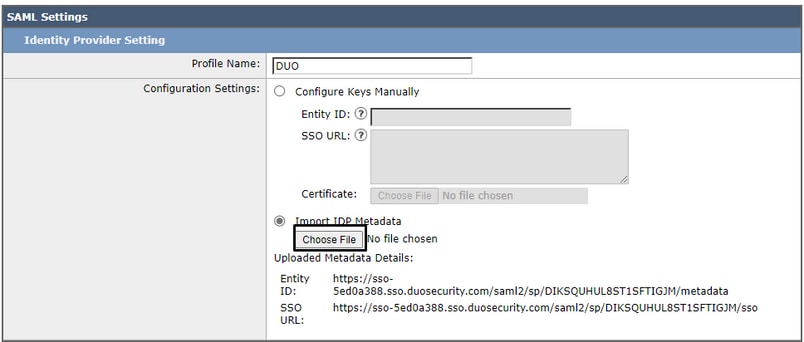
After you have the file downloaded, you can just upload it in the IdP Metadata option in the SMA.
For the final step under the SMA, navigate to System Administration > Users > External Authentication > SAML. And configure the next parameters to look the same as the Duo configuration.
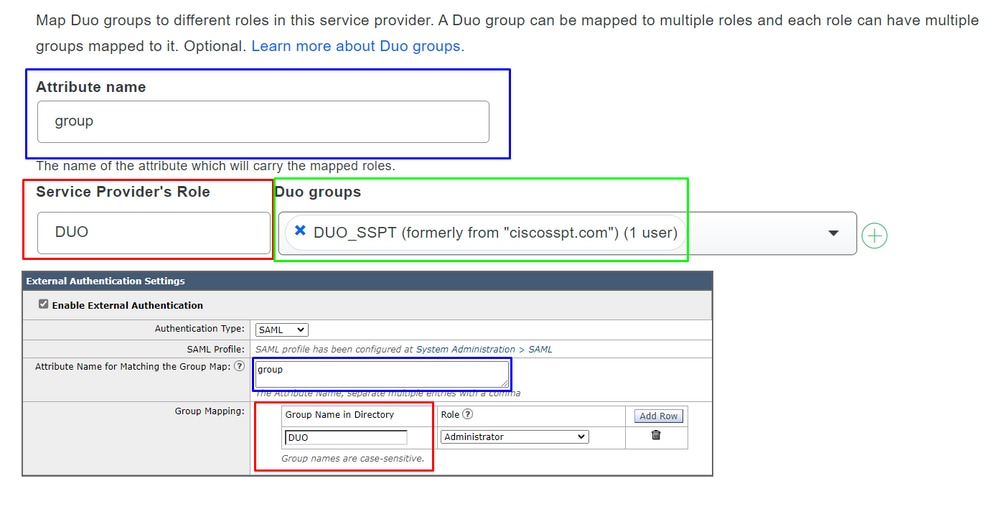
Attribute Name = Attribute Name for Match the Group Map
Service Provider Role = Group Mapping
After that, you can commit the changes and confirm if your deployment work as expected!
Verify
Use this section to confirm that your configuration works properly.
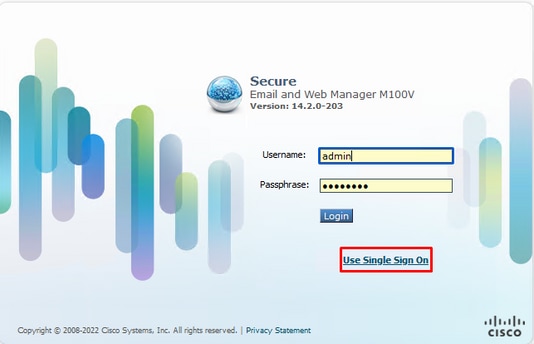
In order to test your configuration, select Use Single Sign on as shown in the image.
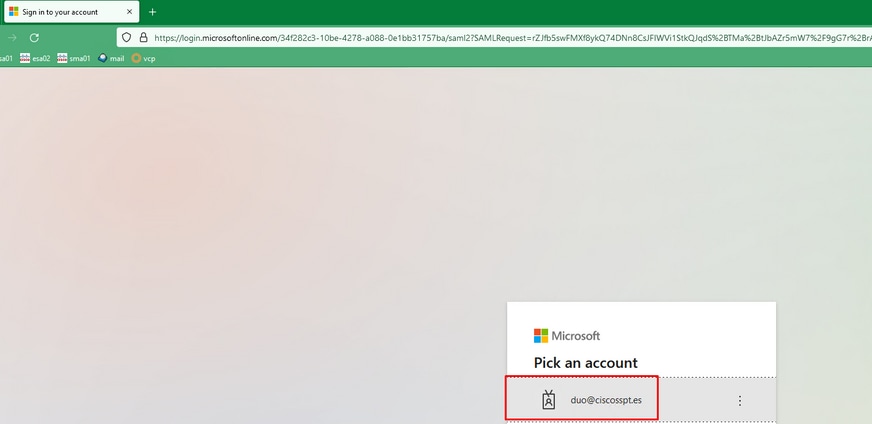
You are prompted to log in on Microsoft Log in as shown in the image.
After that, if you have your user enrolled you must be prompted to configure a username and password in Duo to authenticate, and after that, you need to select the authentication method.
If you do not have your user enrolled and you have the policy configured to enroll an unenrolled user, you are moved to the enrollment process and authentication method after that, like in the next example.
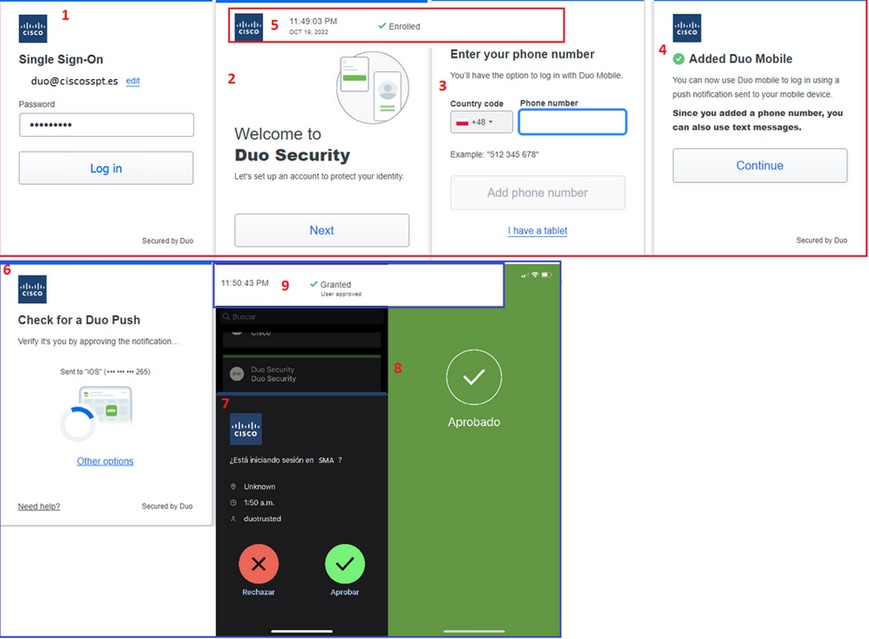
If everything was configured and corrected, you have successfully logged in.

Troubleshoot
There is currently no specific troubleshooting information available for this configuration.


 Feedback