Apply a Non-Custom ESXI Image Patch on an Hyperflex Cluster
Available Languages
Download Options
Bias-Free Language
The documentation set for this product strives to use bias-free language. For the purposes of this documentation set, bias-free is defined as language that does not imply discrimination based on age, disability, gender, racial identity, ethnic identity, sexual orientation, socioeconomic status, and intersectionality. Exceptions may be present in the documentation due to language that is hardcoded in the user interfaces of the product software, language used based on RFP documentation, or language that is used by a referenced third-party product. Learn more about how Cisco is using Inclusive Language.
Introduction
This document describes the process to patch an Hyperflex ESXI node with a non-custom HX Image via Command Line Interface (CLI) or via HX Connect.
Prerequisites
Requirements
Cisco recommends that you have knowledge of these topics:
- Hyperflex
- ESXI
Components Used
The information in this document is based on these software and hardware versions:
- HyperFlex Connect 5.0.2d
- Hyperflex Standard Cluster
- vCenter 8.0
- VMware ESXI, 7.0.3 build-23794027
- VMware ESXI, 7.0.3 build-24585291 (target patch)
The information in this document was created from the devices in a specific lab environment. All of the devices used in this document started with a cleared (default) configuration. If your network is live, ensure that you understand the potential impact of any command.
Background Information
Cisco does not always provide a separate HyperFlex bundle for every new VMware ESXI patch release. With critical ESXI updates it is possible to apply them manually with any of the methods presented on this article. However, HyperFlex does not recommend upgrading ESXI using VMware Update Manager (VUM) or VMware Lifecycle Manager (vLCM), as it can cause issues with certain HyperFlex vSphere Installation Bundles (VIBs).
Non-custom patches can only be applied for the same ESXI versions. If you are using ESXI 7.0 u3 you can only apply 7.0u3+ patches and you cannot upgrade from 7.0u3 to 8.0u2 or 8.0u3, nor upgrade from 8.0u2x to 8.0u3x with non-custom images.
Before applying any patch, make sure your current HyperFlex Data Platform (HXDP) version is compatible with the ESXi version you plan to install. The compatibility chart is as follows:
| Version | VMware ESXi Version HX Servers |
| 6.0(1x) | 7.0 U3, 8.0 U2 |
| 5.5(2a) | 7.0 U3, 8.0 U2, 8.0 U3 |
| 5.5(1a) | 7.0 U3 |
| 5.0(2x) | 7.0 U3 |
If your HXDP version is older, please upgrade HXDP first, then upgrade ESXI.
Configure
Download ESXI zip file from Broadcom website
Make sure cluster is online and healthy before starting with the activity.
Verify initial versions for Hyperflex, nenic and nfnic vibs on ESXi nodes of the cluster.
esxcli software vib list | egrep -i 'scvmclient|STFSNasPlugin|stHypervisorSvc|nenic|nfnic'
Upgrade via CLI
Step 1. From HX Connect navigate to System Information > Nodes, select one of the hosts and click Enter HX Maintenance Mode.
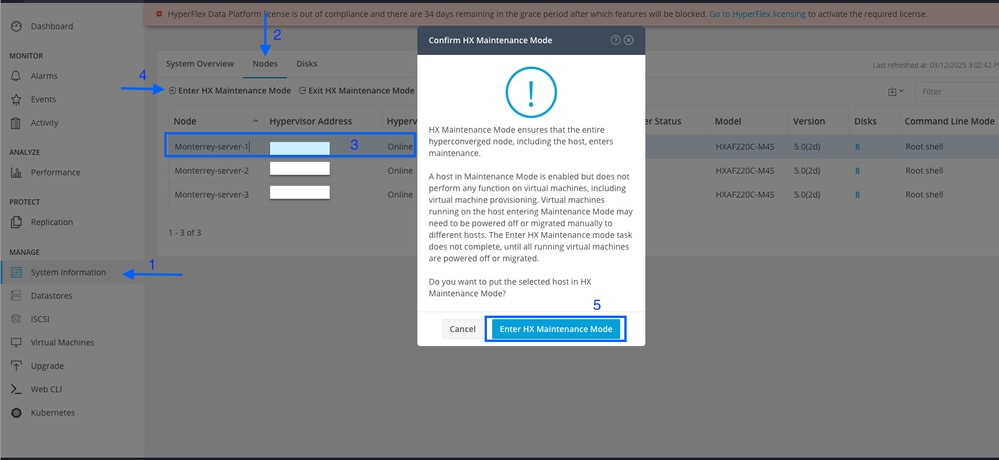
After the host enters maintenance mode, move on to the next steps.
Step 2. Transfer the zip file to the host.
You can upload it via vCenter to a mounted datastore.
Navigate to the desired datastore and select Files then, select UPLOAD FILES and upload the zip file. On the image below, a datastore named Upgrade is used.

You can also remote secure copy the ESXI upgrade bundle to an appropriate folder with sufficient space with SCP.
scp local_filename user@ESXIserver:/path/where/file/should/goStep 3. SSH to the ESXI host in maintenance mode and navigate to the datastore folder where the ESXI upgrade bundle is copied. In this scenario, the file is availbled on Upgrade datastore.
[root@Monterrey-server-1:~]cd /vmfs/volumes/UpgradeYou can verify current version with command vmware -v
[root@Monterrey-server-1:~] vmware -v
VMware ESXi 7.0.3 build-23794027
Run this command in order to view the package profile details: esxcli software sources profile list -d /complete/path/VMware-ESXi...zip
[root@Monterrey-server-1:/vmfs/volumes/2f27e295-70f773c4] esxcli software sources profile list -d /vmfs/volumes/Upgrade/VMware-ESXi-7.0U3s-24585291-depot.zip
Name                           Vendor        Acceptance Level  Creation Time        Modification Time
-----------------------------  ------------  ----------------  -------------------  -----------------
ESXi-7.0U3s-24585291-standard  VMware, Inc.  PartnerSupported  2025-03-04T00:00:00  2025-03-04T00:00:00
ESXi-7.0U3s-24585291-no-tools  VMware, Inc.  PartnerSupported  2025-03-04T00:00:00  2025-02-21T03:24:14
Step 4. Run this command to install the patch: esxcli software profile update -d /complete/path/VMware-ESXi...zip -p PackageProfileName and wait until it shows successful result.
root@Monterrey-server-1:/vmfs/volumes/2f27e295-70f773c4] esxcli software profile update -d /vmfs/volumes/Upgrade/VMware-ESXi-7.0U3s-24585291-depot.zip -p ESXi-7.0U3s-24585291-standard
Update Result
   Message: The update completed successfully, but the system needs to be rebooted for the changes to be effective.
   Reboot Required: true
   VIBs Installed: VMware_bootbank_bmcal_7.0.3-0.135.24585291, VMware_bootbank_cpu-microcode_7.0.3-0.135.24585291, VMware_bootbank_crx_7.0.3-0.135.24585291, VMware_bootbank_esx-base_7.0.3-0.135.24585291, VMware_bootbank_esx-dvfilter-generic-fastpath_7.0.3-0.135.24585291, VMware_bootbank_esx-update_7.0.3-0.135.24585291, VMware_bootbank_esx-xserver_7.0.3-0.135.24585291, VMware_bootbank_esxio-combiner_7.0.3-0.135.24585291, VMware_bootbank_gc_7.0.3-0.135.24585291, VMware_bootbank_loadesx_7.0.3-0.135.24585291, VMware_bootbank_native-misc-drivers_7.0.3-0.135.24585291, VMware_bootbank_trx_7.0.3-0.135.24585291, VMware_bootbank_vdfs_7.0.3-0.135.24585291, VMware_bootbank_vsan_7.0.3-0.135.24585291, VMware_bootbank_vsanhealth_7.0.3-0.135.24585291
   VIBs Removed: VMware_bootbank_bmcal_7.0.3-0.125.23794027, VMware_bootbank_cpu-microcode_7.0.3-0.125.23794027, VMware_bootbank_crx_7.0.3-0.125.23794027, VMware_bootbank_esx-base_7.0.3-0.125.23794027, VMware_bootbank_esx-dvfilter-generic-fastpath_7.0.3-0.125.23794027, VMware_bootbank_esx-update_7.0.3-0.125.23794027, VMware_bootbank_esx-xserver_7.0.3-0.125.23794027, VMware_bootbank_esxio-combiner_7.0.3-0.125.23794027, VMware_bootbank_gc_7.0.3-0.125.23794027, VMware_bootbank_loadesx_7.0.3-0.125.23794027, VMware_bootbank_native-misc-drivers_7.0.3-0.125.23794027, VMware_bootbank_trx_7.0.3-0.125.23794027, VMware_bootbank_vdfs_7.0.3-0.125.23794027, VMware_bootbank_vsan_7.0.3-0.125.23794027, VMware_bootbank_vsanhealth_7.0.3-0.125.23794027
   VIBs Skipped: VMW_bootbank_atlantic_1.0.3.0-8vmw.703.0.20.19193900, VMW_bootbank_bnxtnet_216.0.50.0-44vmw.703.0.50.20036589, VMW_bootbank_bnxtroce_216.0.58.0-23vmw.703.0.50.20036589, VMW_bootbank_brcmfcoe_12.0.1500.2-3vmw.703.0.20.19193900, VMW_bootbank_elxiscsi_12.0.1200.0-9vmw.703.0.20.19193900, VMW_bootbank_elxnet_12.0.1250.0-5vmw.703.0.20.19193900, VMW_bootbank_i40en_1.11.1.32-1vmw.703.0.125.23794027, VMW_bootbank_iavmd_2.7.0.1157-3vmw.703.0.105.22348816, VMW_bootbank_icen_1.4.1.20-1vmw.703.0.50.20036589, VMW_bootbank_igbn_1.4.11.2-1vmw.703.0.20.19193900, VMW_bootbank_ionic-en_16.0.0-16vmw.703.0.20.19193900, VMW_bootbank_irdman_1.3.1.22-1vmw.703.0.50.20036589, VMW_bootbank_iser_1.1.0.1-1vmw.703.0.50.20036589, VMW_bootbank_ixgben_1.7.1.35-1vmw.703.0.20.19193900, VMW_bootbank_lpfc_14.0.169.26-5vmw.703.0.50.20036589, VMW_bootbank_lpnic_11.4.62.0-1vmw.703.0.20.19193900, VMW_bootbank_lsi-mr3_7.718.02.00-1vmw.703.0.20.19193900, VMW_bootbank_lsi-msgpt2_20.00.06.00-4vmw.703.0.20.19193900, VMW_bootbank_lsi-msgpt35_19.00.02.00-1vmw.703.0.20.19193900, VMW_bootbank_lsi-msgpt3_17.00.12.00-2vmw.703.0.105.22348816, VMW_bootbank_mtip32xx-native_3.9.8-1vmw.703.0.20.19193900, VMW_bootbank_ne1000_0.9.0-1vmw.703.0.50.20036589, VMW_bootbank_nenic_1.0.33.0-1vmw.703.0.20.19193900, VMW_bootbank_nfnic_4.0.0.70-1vmw.703.0.20.19193900, VMW_bootbank_nhpsa_70.0051.0.100-4vmw.703.0.20.19193900, VMW_bootbank_nmlx4-core_3.19.16.8-2vmw.703.0.20.19193900, VMW_bootbank_nmlx4-en_3.19.16.8-2vmw.703.0.20.19193900, VMW_bootbank_nmlx4-rdma_3.19.16.8-2vmw.703.0.20.19193900, VMW_bootbank_nmlx5-core_4.19.16.11-1vmw.703.0.20.19193900, VMW_bootbank_nmlx5-rdma_4.19.16.11-1vmw.703.0.20.19193900, VMW_bootbank_ntg3_4.1.9.0-5vmw.703.0.90.21686933, VMW_bootbank_nvme-pcie_1.2.3.16-3vmw.703.0.105.22348816, VMW_bootbank_nvmerdma_1.0.3.5-1vmw.703.0.20.19193900, VMW_bootbank_nvmetcp_1.0.0.3-1vmw.703.0.125.23794027, VMW_bootbank_nvmxnet3-ens_2.0.0.22-1vmw.703.0.20.19193900, VMW_bootbank_nvmxnet3_2.0.0.30-1vmw.703.0.20.19193900, VMW_bootbank_pvscsi_0.1-4vmw.703.0.20.19193900, VMW_bootbank_qcnic_1.0.15.0-14vmw.703.0.20.19193900, VMW_bootbank_qedentv_3.40.5.53-22vmw.703.0.20.19193900, VMW_bootbank_qedrntv_3.40.5.53-18vmw.703.0.20.19193900, VMW_bootbank_qfle3_1.0.67.0-22vmw.703.0.20.19193900, VMW_bootbank_qfle3f_1.0.51.0-22vmw.703.0.20.19193900, VMW_bootbank_qfle3i_1.0.15.0-15vmw.703.0.20.19193900, VMW_bootbank_qflge_1.1.0.11-1vmw.703.0.20.19193900, VMW_bootbank_rste_2.0.2.0088-7vmw.703.0.20.19193900, VMW_bootbank_sfvmk_2.4.0.2010-6vmw.703.0.20.19193900, VMW_bootbank_smartpqi_70.4149.0.5000-1vmw.703.0.20.19193900, VMW_bootbank_vmkata_0.1-1vmw.703.0.20.19193900, VMW_bootbank_vmkfcoe_1.0.0.2-1vmw.703.0.20.19193900, VMW_bootbank_vmkusb_0.1-8vmw.703.0.85.21424296, VMW_bootbank_vmw-ahci_2.0.11-3vmw.703.0.125.23794027, VMware_bootbank_elx-esx-libelxima.so_12.0.1200.0-4vmw.703.0.20.19193900, VMware_bootbank_esx-ui_2.13.2-22721163, VMware_bootbank_lsuv2-hpv2-hpsa-plugin_1.0.0-3vmw.703.0.20.19193900, VMware_bootbank_lsuv2-intelv2-nvme-vmd-plugin_2.7.2173-1vmw.703.0.20.19193900, VMware_bootbank_lsuv2-lsiv2-drivers-plugin_1.0.0-12vmw.703.0.50.20036589, VMware_bootbank_lsuv2-nvme-pcie-plugin_1.0.0-1vmw.703.0.20.19193900, VMware_bootbank_lsuv2-oem-dell-plugin_1.0.0-1vmw.703.0.20.19193900, VMware_bootbank_lsuv2-oem-hp-plugin_1.0.0-1vmw.703.0.20.19193900, VMware_bootbank_lsuv2-oem-lenovo-plugin_1.0.0-1vmw.703.0.20.19193900, VMware_bootbank_lsuv2-smartpqiv2-plugin_1.0.0-9vmw.703.0.105.22348816, VMware_bootbank_qlnativefc_4.1.14.0-26vmw.703.0.20.19193900, VMware_bootbank_vmware-esx-esxcli-nvme-plugin_1.2.0.44-1vmw.703.0.20.19193900, VMware_locker_tools-light_12.3.5.22544099-23794019
Step 5. Once the upgrade completes, restart the ESXi host.
Step 6. SSH into the host and verify the version with the command: vmware -v
[root@Monterrey-server-1:~] vmware -v
VMware ESXi 7.0.3 build-24585291
Step 7. Exit the node from maintenance mode and wait for the cluster to become healthy.
Open the HX-Connect, choose System Information> Nodes, choose the node in maintenance mode and click Exit HX Maintenance Mode

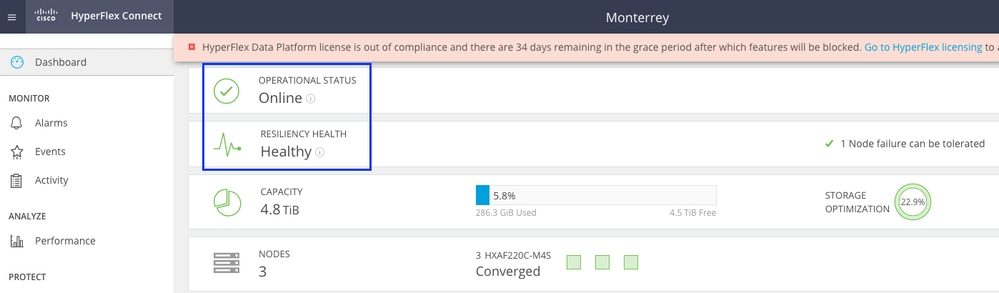
Allow a few minutes for the Hyperflex Cluster to complete healing. The HX Connect Dashboard shows you the Operational Status, it must be Online, and the Resiliency Health must show Healthy.
Also from VCenter, make sure the server can see all the datastores.
Repeat the steps on all nodes which are part of the cluster, one at a time.
Upgrade via HX Connect UI
Navigate to Upgrade tab, select ESXI upgrade type and upload the ESXI upgrade file.

Note: If your cluster is on HX version 5.5 or 6.0, you need to perform a combined upgrade by selectin HX Data Platform and uploading the HX bundle of your current version
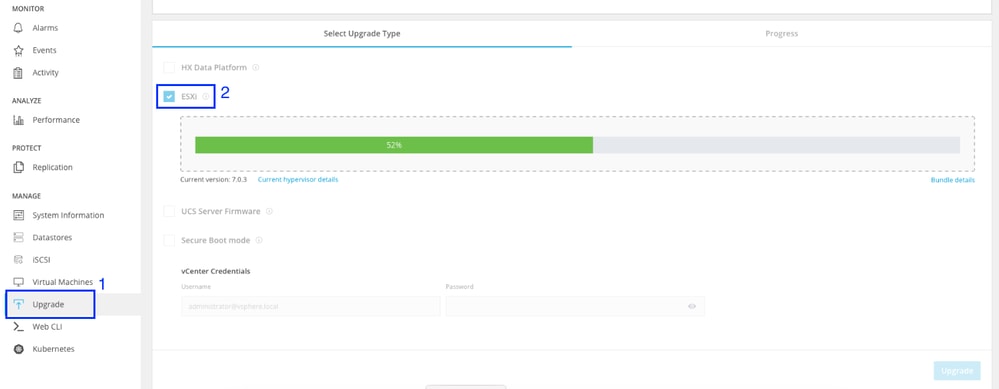
Once the file is uploaded, enter the vCenter Credentials and click Upgrade.

First stage is to validate the upgrade If Distributed Resource Scheduler (DRS) is Enabled, the VMs are automatically vMotioned to other hosts.
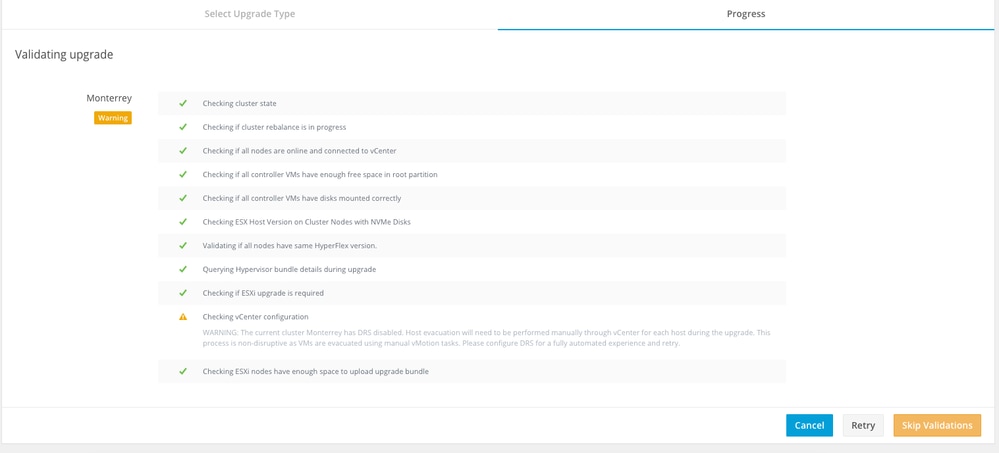
Click Skip Validations and upgrade start automatically.
Monitor the ugrade process.
Note: If DRS is Disabled, vMotion the VMs manually to continue the upgrade process.
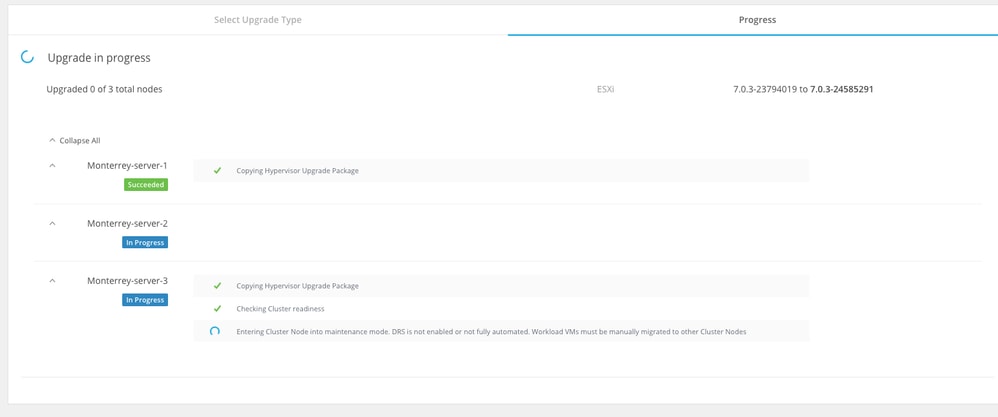
Wait until upgrade completes on all the nodes of the cluster.

Verify
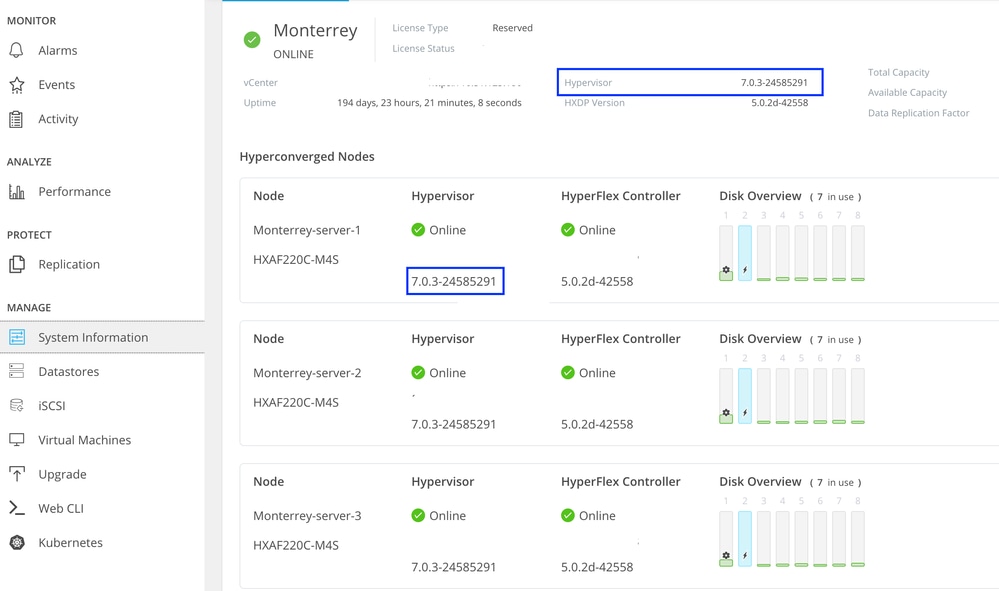
You can verify the ESXI installed version from HX Connect on System Information tab.
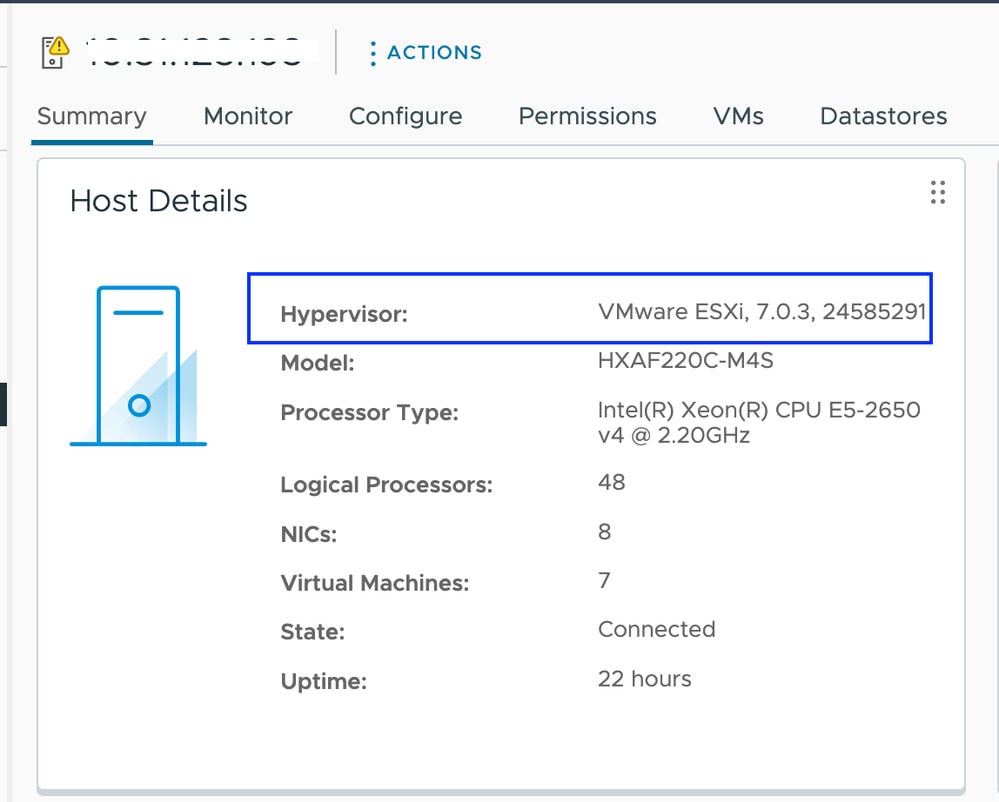
From vCenter you can see the ESXI version on the Summary of the server.
Since the ESXI image is non-custom you need to confirm Hyperflex VIBs are still showing intact on the servers.
SSH into each ESXI host after the patch completed and before starting with the next node and verify the Hyperflex VIBs with command: esxcli software vib list | egrep -i 'scvmclient|STFSNasPlugin|stHypervisorSvc'
Note: In versions ESXi 7.0 U3, vmware-esx-STFSNasPlugin changed to CIS-ESX-STFSNasPlugi
In versions ESXi 8.0 U1, stHypervisorSvc changed to sthypervisorsvc.
[root@Monterrey-server-1:~] esxcli software vib list | egrep -i 'scvmclient|STFSNasPlugin|stHypervisorSvc'
CIS-ESX-STFSNasPlugin          4.5.1-11                               CIS     VMwareAccepted    2023-10-25
scvmclient                     5.5.1-38                               CIS     VMwareAccepted    2023-11-25
stHypervisorSvc                4.5.1-11                               CIS     VMwareAccepted    2023-10-24
Caution: In certain scenarios, the non-custom image can overwrite the nenic and nfnic VIBs with a different version than the ones of the custom image. You need to validate we have the correct versions after the patch.
SSH into each ESXI host after the patch completed and before starting with the next node and verify the Hyperflex VIBs with command: esxcli software vib list | egrep -i 'nenic|nfnic'
[root@Monterrey-server-3:~]  esxcli software vib list | egrep -i 'nenic|nfnic'
nfnic                          5.0.0.43-1OEM.700.1.0.15843807         CIS     VMwareCertified   2025-02-23
nenic-ens                      1.0.6.0-1OEM.700.1.0.15843807          Cisco   VMwareCertified   2023-10-25
nenic                          2.0.10.0-1OEM.700.1.0.15843807         Cisco   VMwareCertified   2024-03-17
Troubleshoot
If nenic or nfnic got overwritten with a different version you can install the correct ones by downloading an ESXI custom zip image f your same version from software.cisco.com. Unzip the image a and from the vib directory look for nenic and nfnic directories. Extract the vib file and upload it via vCenter to a datastore mounted on the servers. Make sure cluster is online and healthy.
Step 1. From HX Connect navigate to System Information > Nodes, select one of the hosts and click Enter HX Maintenance Mode.
After the host enters maintenance mode, move on to the next steps.
SSH to the ESXI host in maintenance mode and navigate to the datastore folder where the ESXI vib file is copied. In this scenario, the file is availbled on Upgrade datastore
[root@Monterrey-server-3:~] cd /vmfs/volumes/Upgrade

[root@Monterrey-server-3:/vmfs/volumes/2f27e295-70f773c4] ls
CIS_bootbank_nenic_2.0.10.0-1OEM.700.1.0.15843807.vib
Run this command in order to upgrade the vib: esxcli software vib update -v "/complete/path/vib-file.vib" -f
[root@Monterrey-server-3:/vmfs/volumes/2f27e295-70f773c4] esxcli software vib update -v "/vmfs/volumes/Upgrade/CIS_bootbank_nenic_2.0.10.0-1OEM.700.1.0.15843807.vib" -f
Installation Result
   Message: The update completed successfully, but the system needs to be rebooted for the changes to be effective.
   Reboot Required: true
   VIBs Installed: CIS_bootbank_nenic_2.0.10.0-1OEM.700.1.0.15843807
   VIBs Removed: Cisco_bootbank_nenic_1.0.45.0-1OEM.700.1.0.15843807
   VIBs Skipped:
Once the vib update completes, restart the ESXi host.
SSH into the host and verify the vib was updated successfully with the command: esxcli software vib list | egrep -i 'nenic|nfnic'
Exit the node from maintenance mode and wait for the cluster to become healthy.
Open the HX-Connect, choose System Information> Nodes, choose the node in maintenance mode and click Exit HX Maintenance Mode
If your server boots from SD card, you can run into a known issue while applying the patch. "Unable to Remediate Host due to Error while waiting for untar process" This issue is caused when untar operation of individual VIBs takes more than the default 30 seconds timeout during the remediation process. For environments using SD card as the OSData partition, there are chances that VMware tools untar process takes slightly higher duration. You can refer this article to resolve it.
Revision History
| Revision | Publish Date | Comments |
|---|---|---|
1.0 |
14-Mar-2025
|
Initial Release |
Contributed by Cisco Engineers
- Alejandra Ortiz RegaladoTechnical Consulting Engineer
 Feedback
Contact Cisco
- Open a Support Case

- (Requires a Cisco Service Contract)