Introduction
This document describes how to enable and automatically record all sessions using Network-based Recording in Webex.
Prerequisites
Requirements
It is recommended that you have some familiarity with these topics:
Control Hub Platform
Webex site settings
Components Used
The software listed here has been used to make the tests and produce the results described in this document:
Control Hub Organization
Webex site
The information in this document was created from the devices in a specific lab environment. All of the devices used in this document started with a cleared (default) configuration. If your network is live, ensure that you understand the potential impact of any command.
Scenario and Feature Clarification
The automatic recording feature in Webex ensures that all meetings, events, and training sessions hosted by a user are recorded from the moment they start. Allowing storage allocation overages for a user grants them the ability to exceed their normal storage limit.
How to Enable automatic recordings.
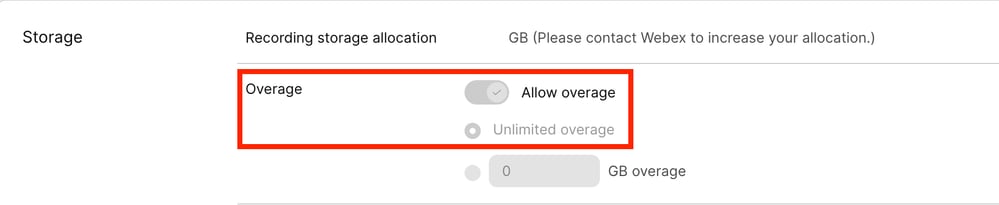
1. Enable Unlimited Overage (Applies Site-wide):
1. Navigate to Control Hub > Meeting > Sites.
2. Open the desired site and navigate to Common Settings.
3. From the dropdown menu, select Site Options.
4. Scroll down to the Storage section and locate the Overage options.
5. Toggle Allow Overage and select Unlimited Overage.
6. Confirm your changes by clicking Save.
 Allow Overage
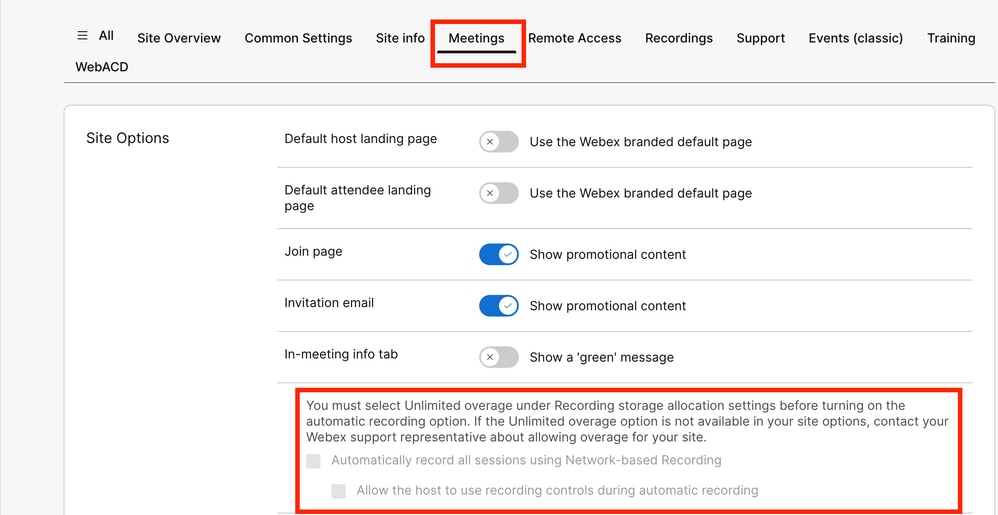
2. Turn On Automatic Recordings (Applies Site-wide):
1. Navigate to Control Hub > Meeting > Sites, and select the desired site.
2. Go to the Meetings tab in the navigation menu.
3. From the dropdown, select Site Options.
4. Scroll down to the Automatically record all sessions using Network-based Recording option.
5. Check the box to enable automatic recording for all sessions.
 Enable automatic recording

Note: While these settings enable automatic recording for the selected meeting site, you still need to enable the service at the user level for users who require automatic recording.
3. Enable Automatic Recordings for Individual Users:
1. Navigate to Control Hub > Users and select the user.
2. Click the Meetings tab and select the site from the Settings apply to dropdown.
3.Scroll to the bottom of the page and select Advanced settings to open User Settings in a new tab.
4. In the new tab under User Settings, check the box for Automatically record all meetings.
5. Click Update to save the changes.
6. In the confirmation prompt, click OK to apply the changes.
 Automatically record all meetings
4. Enable Automatic Recordings at the Meeting Level:
While scheduling a meeting or webinar, users see the option Automatically start recording when the meeting starts under Advanced Options. Simply check the box next to this option to enable automatic recording for that specific meeting.
 Automatic recording
Note: This option is available only for users who have automatic recording enabled at the user level.
Problem
Automatically record option is disabled.
 Automatic recording option greyed out.
Solution
In order to enable automatic recording for all sessions, you need to have unlimited recording storage option enabled first.
Follow the steps outlined in Step 1 to enable overage. If the Overage option is not available, it is likely that you need to purchase additional licenses to enable Unlimited Overage on your site.
If you would like to enable Unlimited Overage on your site, you need to contact your CSM (Customer Success Manager) or TAC (if a CSM is not available for your account) and address your request.
 Feedback