Introduction
This document describes how to manually add an Attribute UID in ADFS relying party trust using a syntex.
Prerequisites
Requirements
Components Used
- ADFS server
- Cisco Webex Control Hub
- On-Prem AD
The information in this document was created from the devices in a specific lab environment. All of the devices used in this document started with a cleared (default) configuration. If your network is live, ensure that you understand the potential impact of any command.
Configure
This is something that is useful in case there is an issue adding an Attribute Claim in ADFS due to an existing attribute.
Scenario 1
You have an existing relying party trust which has a Claim rule created with attribute named UID or Uid.
This fails the Authentication since Webex (SP) is case sensitive about the required attribute and it has to be uid and must pass the emailAddress of the user in SAML response.
Scenario 2
You have a party trust which has a Claim rule passing an attribute named uid but associated with different attribute in AD than what is needed (emailAddress/UserPrincipleName). This creates issues.
Configurations
In an ideal configuration as per the Cisco Webex Guide, ADFS configuration must look like this:
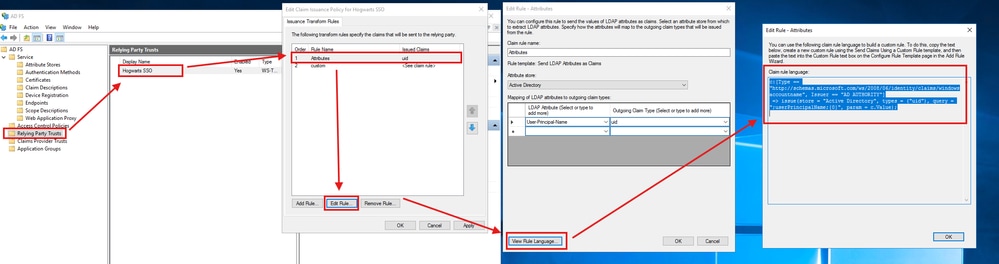
ADFS Admins can visit this from their Relying Party Trusts-> Trust they created for Webex -> Edit Claim Issuance Policy -> Edit Rule -> Attributes -> View Rule Language.
The rule language in plain text is:
c:[Type == "http://schemas.microsoft.com/ws/2008/06/identity/claims/windowsaccountname", Issuer == "AD AUTHORITY"]
=> issue(store = "Active Directory", types = ("uid"), query = ";userPrincipalName;{0}", param = c.Value);
Since the configuration does not display properly, manually create this rule by using the plain text of the rule language.
Add a Custom Claim Rule in the ADFS Server under Webex Relying Party Trust
Steps to Create This Rule
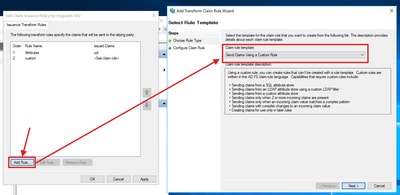
- In the main ADFS pane, select the trust relationship that you created, and then select Edit Claim Rules. Under the Issuance Transform Rules tab, select Add Rule.
- Select Send Claims Using a Custom Rule, and then select Next.
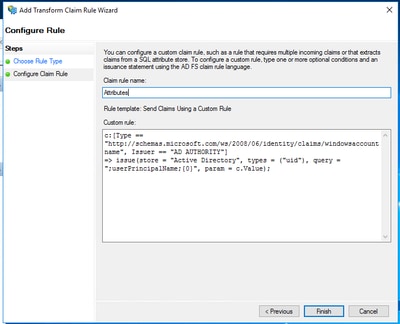
- Copy the rule from your text editor (starting at c:) and paste it in to the custom rule box on your ADFS server.
This must look like this:
Once this is done you can test SSO from the Control Hub and that must work as expected.
 Feedback