Configure Central Web Authentication on SD-Access
Available Languages
Download Options
Bias-Free Language
The documentation set for this product strives to use bias-free language. For the purposes of this documentation set, bias-free is defined as language that does not imply discrimination based on age, disability, gender, racial identity, ethnic identity, sexual orientation, socioeconomic status, and intersectionality. Exceptions may be present in the documentation due to language that is hardcoded in the user interfaces of the product software, language used based on RFP documentation, or language that is used by a referenced third-party product. Learn more about how Cisco is using Inclusive Language.
Contents
Introduction
This document describes a step-by-step guide to configure Central Web Authentication (CWA) and outlines verification procedures across all components.
Prerequisites
Requirements
Cisco recommends that you have knowledge of these topics:
- Cisco Catalyst Center
- Cisco Identity Services Engine (ISE)
- Catalyst 9800 Wireless Controller Architecture
- Authentication, Authorization, and Accounting (AAA)
Components Used
The information in this document is based on these software and hardware versions:
- Cisco Wireless LAN Controller (WLC) - C9800-CL, Cisco IOS® XE 17.12.04
- Cisco Catalyst Center - Version 2.3.7.7
- Cisco Identity Services Engine (ISE) - Version 3.0.0.458
- SDA Edge Node - C9300-48P, Cisco IOS® XE 17.12.05
- SDA Border Node/Control Plane - C9500-48P, Cisco IOS® XE17.12.05
- Cisco Access Point - C9130AXI-A, version 17.9.5.47
The information in this document was created from the devices in a specific lab environment. All of the devices used in this document started with a cleared (default) configuration. If your network is live, ensure that you understand the potential impact of any command.
Topology
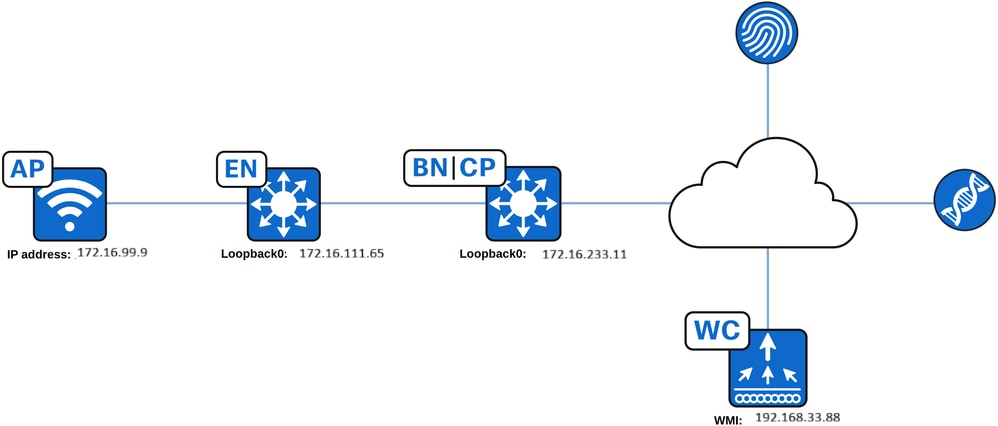
Overview
Central Web Authentication (CWA) uses a guest-type SSID to redirect the user's web browser to a captive portal hosted by Cisco ISE, using a configured redirection ACL. The captive portal enables the user to register and authenticate, and after successful authentication, the Wireless LAN Controller (WLC) applies the appropriate authorization to grant full network access. This guide provides step-by-step instructions for configuring CWA using Cisco Catalyst Center.
Configure CWA on Cisco Catalyst Center
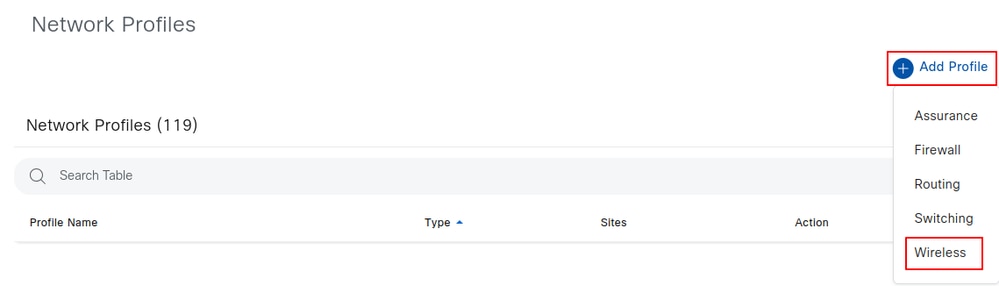
Create the Network Profile
A network profile allows configuration of settings that can be applied to a specific site. Network profiles can be created for various elements in Cisco Catalyst Center, including:
- Assurance
- Firewall
- Routing
- Switching
- Telemetry Appliance
- Wireless
For CWA, a wireless profile must be configured.
To configure a wireless profile, navigate to Design > Network Profiles, click Add Profile and select Wireless.
Name the profile as required. In this example, the wireless profile is named CWA_Cisco_Wireless_Profile. You can add any existing SSIDs to this profile by selecting Add SSID. SSID creation is covered in next section.
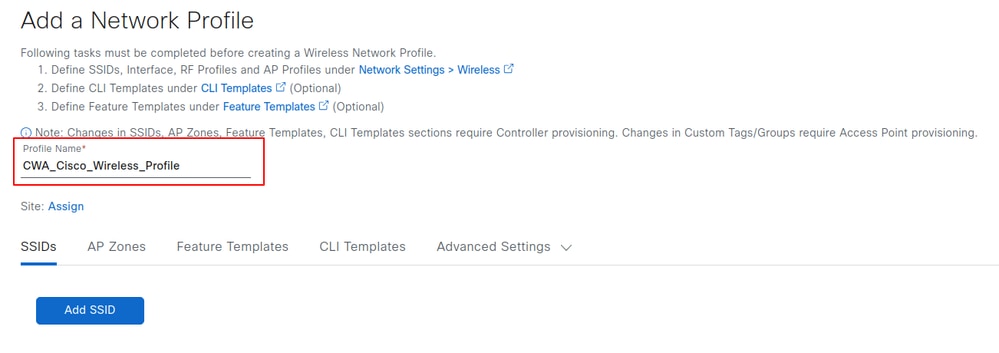
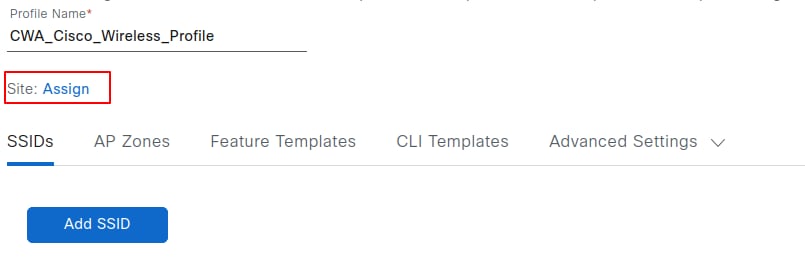
Select Assign to choose the site where this profile is to be applied, and then select the desired site. After you select the sites click Save.
Create the SSID
Navigate to Design > Network Settings > Wireless > SSIDs and click Add.
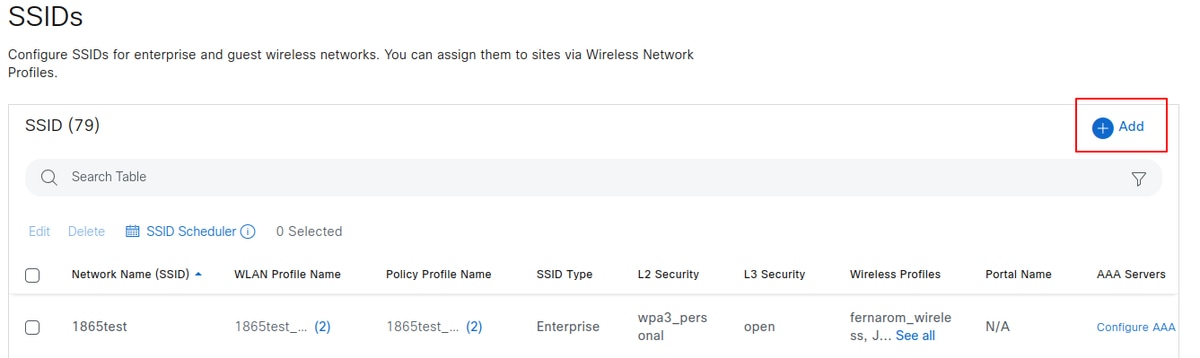

Tip: When creating an SSID for CWA, it is essential to select the Guest type. This selection adds a command to the SSID's wireless policy profile on the WLC - the nac command - which allows CoA to be used for reauthentication after the user registers on the captive portal. Without this configuration, users can experience an endless loop of registering and being redirected to the portal repeatedly.
After selecting Add, proceed through the SSID configuration workflow. On the first page, configure the SSID name, you can also select the radio policy band, and define the SSID state, including administrative status and broadcast settings. For this configuration guide, the SSID is named CWA_Cisco.
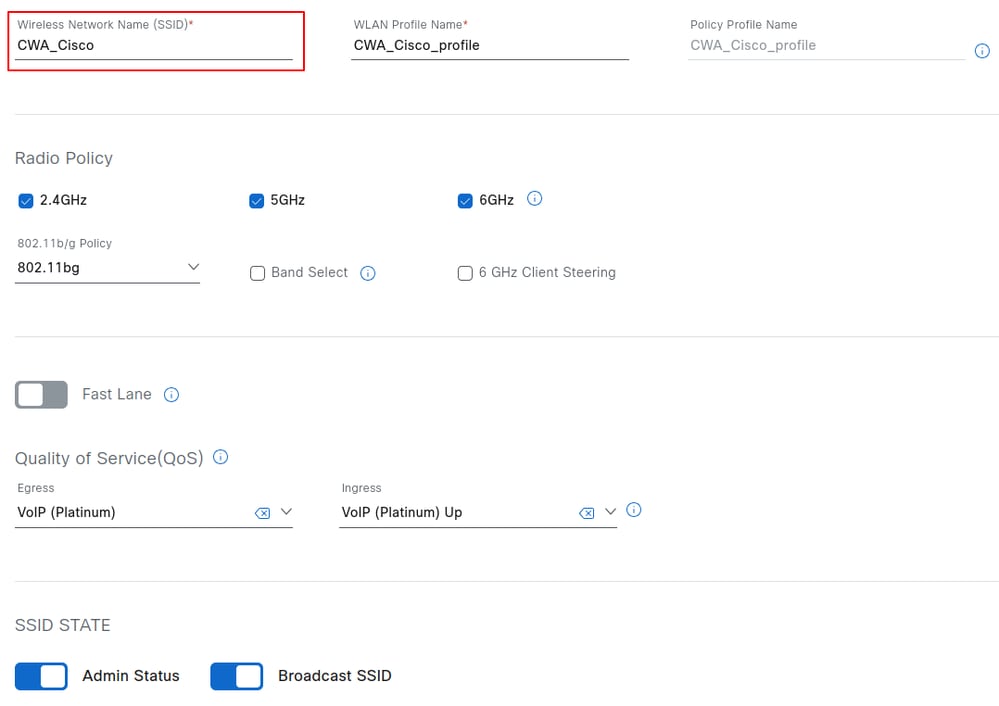
After entering the SSID name, the WLAN profile name and policy profile name are automatically generated. Select Next to proceed.
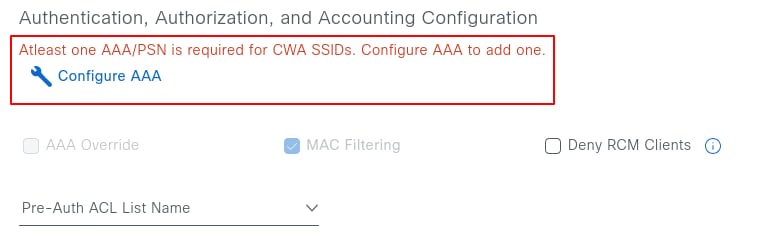
At least one AAA/PSN must be configured for CWA SSIDs. If none is configured, select Configure AAA and choose the PSN IP address from the drop-down list.
After selecting the AAA server, set the Layer 3 security parameters and select the portal type: Self-Registered or Hotspot.
Hotspot guest portals: A hotspot guest portal provides network access for guests without the need for usernames and passwords. Here, users must accept an Acceptable Use Policy (AUP) to obtain access to the network, leading to subsequent internet access. Credentialed guest portals: Access through a credentialed guest portal requires guests to have a username and password.

The action that occurs after the user registers or accepts the use policy can also be configured. Three options are available: Success Page, Original URL, and Custom URL.
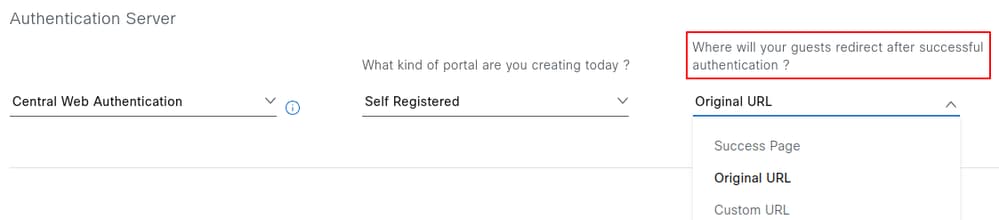
The following describes the behavior of each option:
Success Page: Redirects the user to a confirmation page indicating that authentication was successful.
Original URL: Redirects the user to the original URL that was requested before being intercepted by the captive portal.
Custom URL: Redirects the user to a specified custom URL. Selecting this option enables an additional field to define the destination URL
On the same page, under Authentication, Authorization, and Accounting Configuration, a Pre-auth ACL can also be configured. This ACL allows the addition of extra entries for protocols beyond DHCP, DNS, or PSN IP addresses, which are obtained from the network settings and appended to the redirection ACL during provisioning. This feature is available in Cisco Catalyst Center version 2.3.3.x and later.
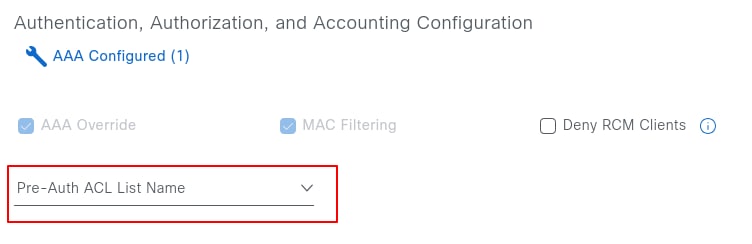
To configure a Pre-Auth ACL, navigate to Design > Network Settings > Wireless > Security Settings, and click Add.

The first name identifies the ACL in Catalyst Center, while the second name corresponds to the ACL name on the WLC. The second name can match the existing redirect ACL configured on the WLC. As a reference, Catalyst Center provisions the name Cisco DNA_ACL_WEBAUTH_REDIRECT to the WLC. Entries from the Pre-Auth ACL are appended after the existing entries.

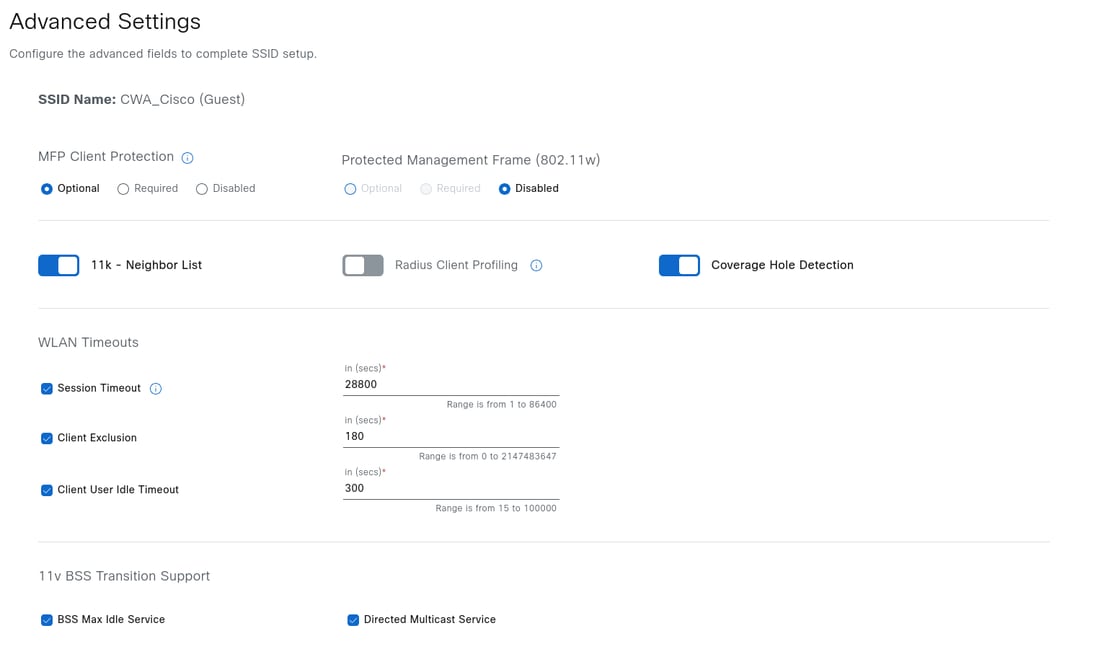
Returning to the SSID creation workflow, selecting Next displays the advanced settings, including fast transition, session timeout, client user timeout, and rate limiting. Adjust the parameters as required, then select Next to proceed. For the purpose of this configuration guide, the example retains the default settings.
After selecting Next, a prompt appears to associate any feature templates with the SSID. If applicable, select the desired templates by clicking Add, and when finished, click Next.

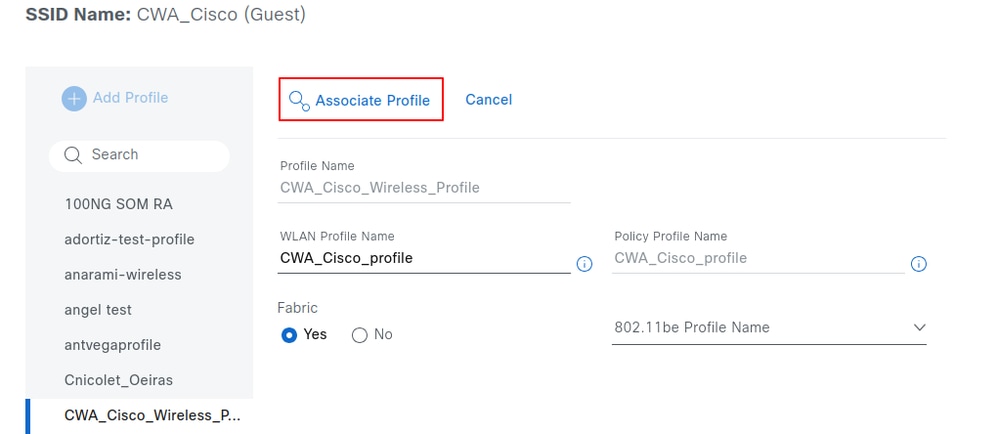
Associate the SSID with the previously created wireless profile. For reference, see the section Create the Wireless Network Profile. In this section you can also select if the SSID is fabric enabled or not. After you are finished, click Associate profile.
show wireless management trustpoint
Once the profile is associated with the SSID, click Next to create and design the captive portal, to start, click Create Portal.
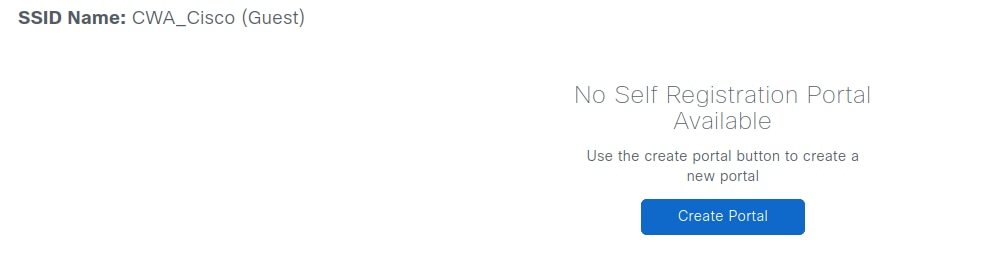
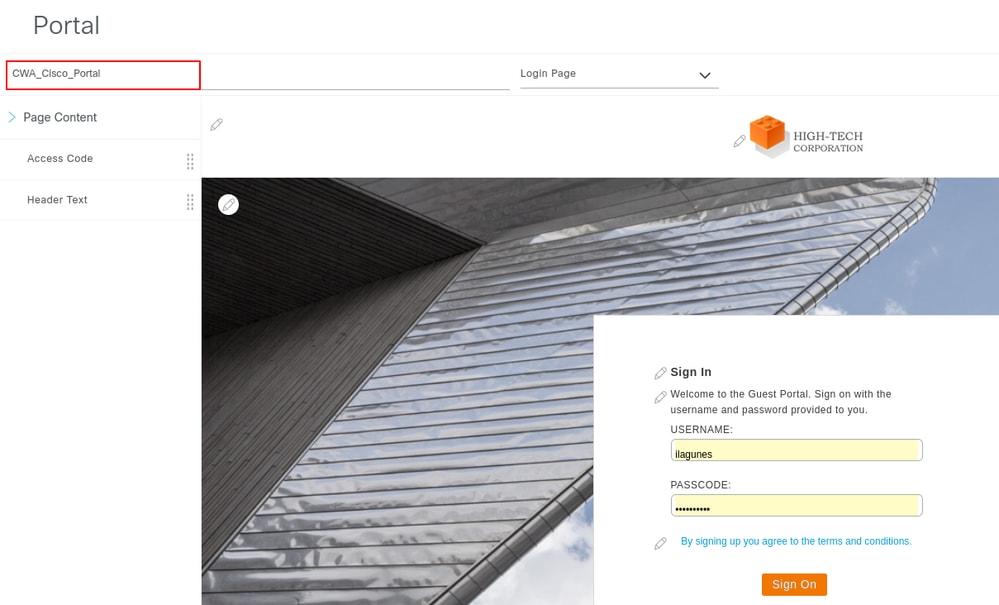
The portal name defines the domain name in the FQDN and the policy set name on ISE. Click Save when finished. The portal remains editable and can be deleted if necessary.
Select Next to display a summary of all configuration parameters defined in the previous steps.
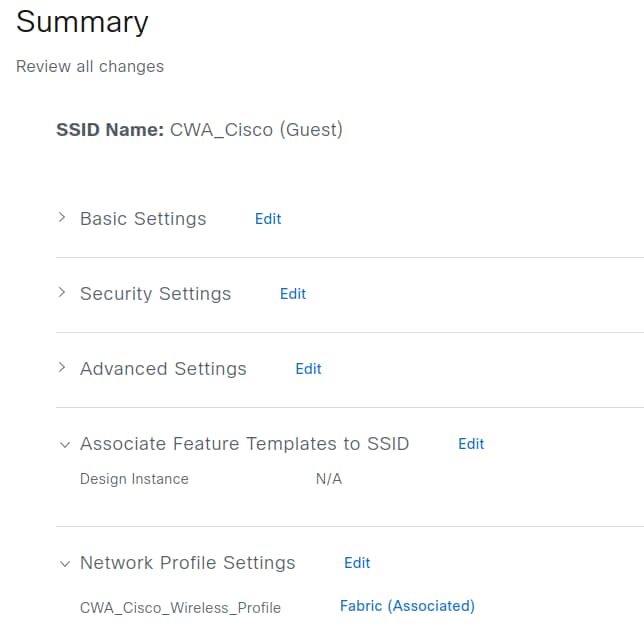
Confirm the configuration details, and then select Save to apply the changes.
Fabric Provisioning
After associating the wireless network profile with the fabric site, the SSID appears under Provision > Fabric Sites > (Your site) > Wireless SSIDs.

Note: You need to provison the Wireless LAN Controller for the site for the SSIDs to show under Wireless SSIDs
Choose the SSID pool, optionally associate a Security Group Tag, and click Deploy. The SSID is broadcast by access points only if a pool is assigned.

On AireOS and Catalyst 9800 controllers, re-provision the Wireless LAN Controller after any SSID configuration changes in Network Settings.
Note: If no pool is assigned to the SSID, it is expected that the APs do not broadcast it. The SSID is broadcast only after a pool is assigned. Once the pool is assigned, the controller does not need to be re-provisioned.
Review the Configuration Provisioned to Cisco ISE
This section examines the configuration provisioned by Catalyst Center to Cisco ISE.
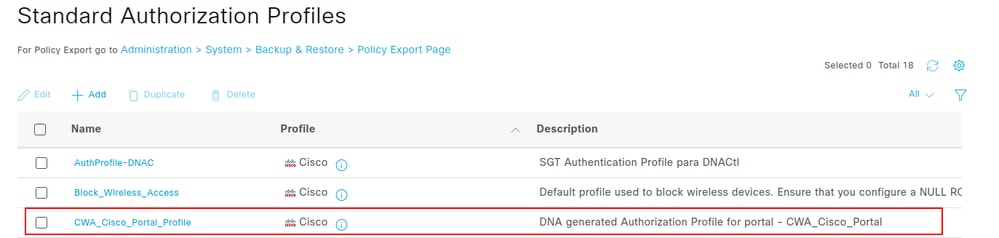
Authorization Profile
Part of the configuration that Catalyst Center provisions on Cisco ISE is an Authorization Profile. This profile defines the result assigned to a client based on its parameters and can include specific settings such as VLAN assignment, ACLs, or URL redirects.
To view the Authorization Profile in ISE, navigate to Policy > Policy Elements > Results. If the portal name is CWA_Cisco_Portal, the profile name is CWA_Cisco_Portal_Profile. The description field displays the text: DNA generated Authorization Profile for portal - CWA_Cisco_Portal.
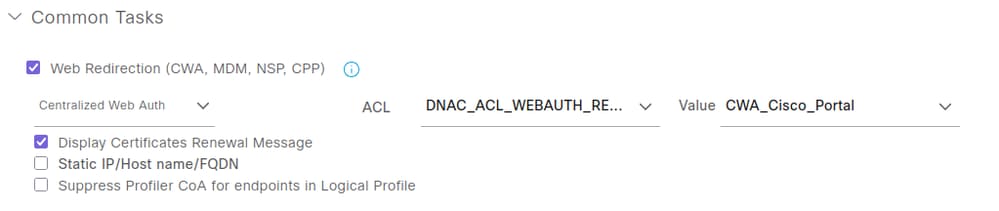
To view the attributes sent to the Wireless LAN Controller by this authorization profile, click the Authorization Profile name and refer to the Common Tasks section.
This Authorization Profile delivers the Redirect ACL and the Redirect URL.
Web Redirection attribute includes two parameters:
- ACL Name: Set to Cisco DNA_ACL_WEBAUTH_REDIRECT.
- Value: Refers to the name of the captive portal, in this example CWA_Cisco_Portal.
The Display Certificates Renewal Message option enables the portal to be used for renewing certificates that the endpoint is currently using.
An additional option, Static IP/Host Name/FQDN, is available under Display Certificates Renewal Message. This feature allows the delivery of the portal's IP address instead of its FQDN, which is useful when the captive portal fails to load due to the inability to reach the DNS server.
Policy Sets
Navigate to Policy > Policy Sets > Default > Authorization Policy to view the two policy sets created for the portal named CWA_Cisco_Portal. These policy sets are:
- CWA_Cisco_Portal_GuestAccessPolicy
- CWA_Cisco_Portal_RedirectPolicy

The CWA_Cisco_Portal_GuestAccessPolicy policy is applied when the client has already completed the web authentication process, either through self-registration or via the hotspot portal.

This policy set matches three criteria:
- Wireless_MAB: Used when Cisco ISE receives a MAC Authentication Bypass (MAB) authentication request from a Wireless LAN Controller.
- Guest_Flow: Refers to ISE checking the MAC address of the endpoint against the GuestEndpoints identity group. If the endpoint MAC address is not present in this group, the policy is not applied.
- RADIUS Called-Station-ID ENDS_WITH :CWA_Cisco: The Called-Station-ID is a RADIUS attribute in ISE that stores the bridge or Access Point MAC address in ASCII format and appends the SSID being accessed, separated by a semicolon (:). In this example, CWA_Cisco represents the SSID name.
Under the column profiles you see the name PermitAccess, this is a reserved authorization profile that cannot be edited, which gives full access to the network and you can also assign an SGT under the column Security Groups, which in this case is Guests.
The PermitAccess profile is used. This is a reserved authorization profile that cannot be edited and grants full access to the network. An SGT can also be assigned under the Security Groups column; in this case, the SGT is set to Guests.
The next policy to review is CWA_Cisco_Portal_RedirectPolicy.

This policy set matches the following two criteria:
- Wireless_MAB: Used when Cisco ISE receives a MAB authentication request from a Wireless LAN Controller.
- RADIUS Called-Station-ID ENDS_WITH :CWA_Cisco: The Called-Station-ID is a RADIUS attribute in ISE that stores the bridge or Access Point MAC address in ASCII format and appends the SSID being accessed, separated by a semicolon (:). In this example, :CWA_Cisco represents the SSID name.
The order of these policies is critical. If CWA_Cisco_Portal_RedirectPolicy appears first in the list, it matches only MAB authentication and the SSID name using the RADIUS attribute Called-Station-ID ENDS_WITH :CWA_Training. In this configuration, even if the endpoint has already authenticated through the portal, it will continue to match this policy indefinitely. As a result, full access is never granted via the PermitAccess profile, and the client remains stuck in a continuous loop of authentication and redirection to the portal.
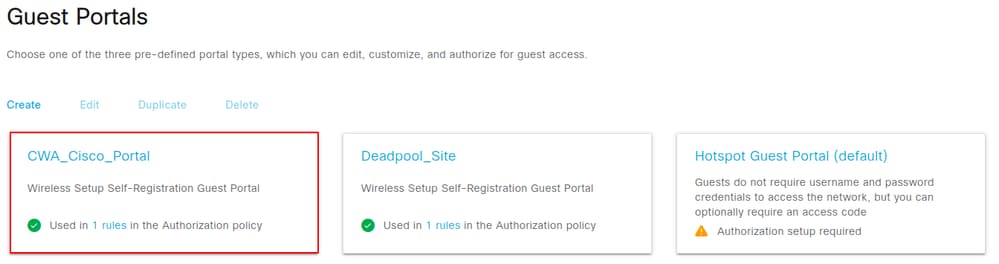
Guest Portal Configuration
Navigate to Work Centers > Guest Access > Portals & Components to view the portal.
The Guest portal created here uses the same name as in Catalyst Center CWA_Cisco_Portal. Select the portal name to if you wish to view additional details.
Review the Configuration Provisioned to the WLC
This section examines the configuration provisioned by Catalyst Center to the Wireless LAN Controller.
SSID Configuration
In the WLC GUI, navigate to Configuration > Tags & Profiles > WLANs to view the SSID configuration.

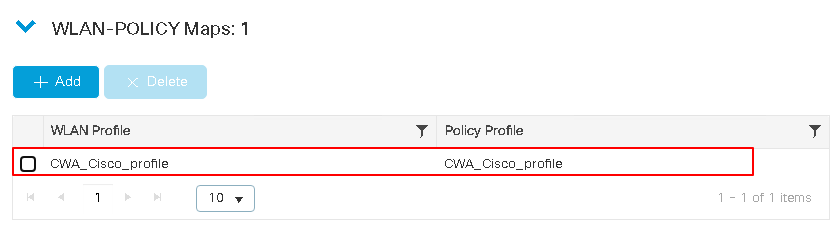
The SSID CWA_Cisco is has the name CWA_Cisco_profile on the WLC, with ID 21 and an Open security type using MAC filtering. Double click the SSID to view its configuration.
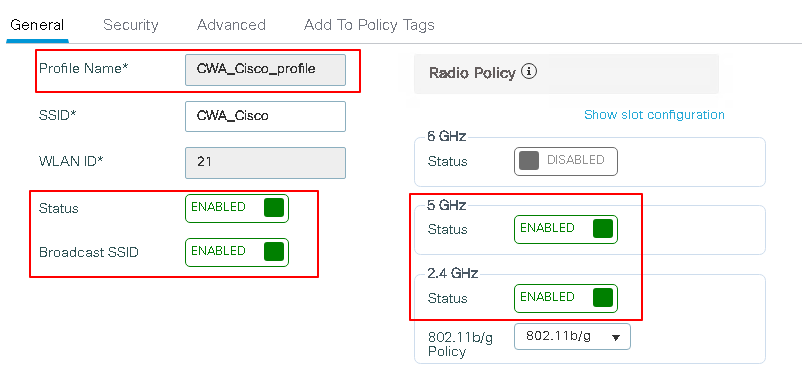
The SSID is UP and broadcasting on both 5 GHz and 2.4 GHz channels and is attached to the policy profile CWA_CIsco_Profile. Click the Security tab to view the settings.
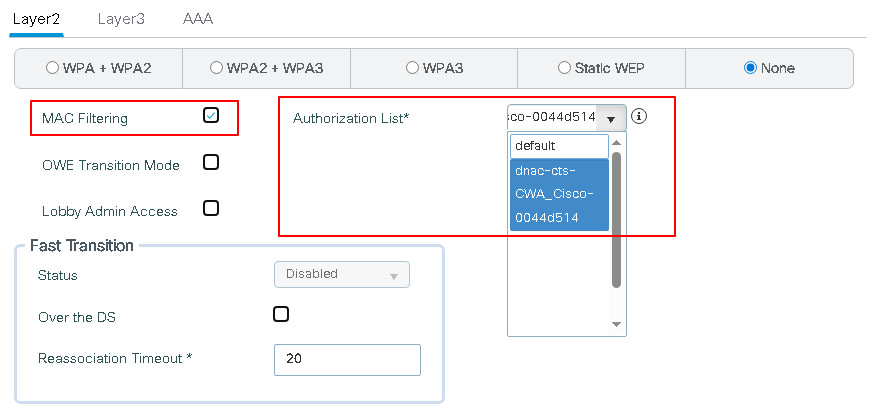
Key settings include the Layer 2 security method (MAC Filtering) and the AAA authorization list (Cisco DNA-cts-CWA_Cisco-0044d514). To review its configuration, navigate to Configuration > Security > AAA > AAA Method List > Authorization.
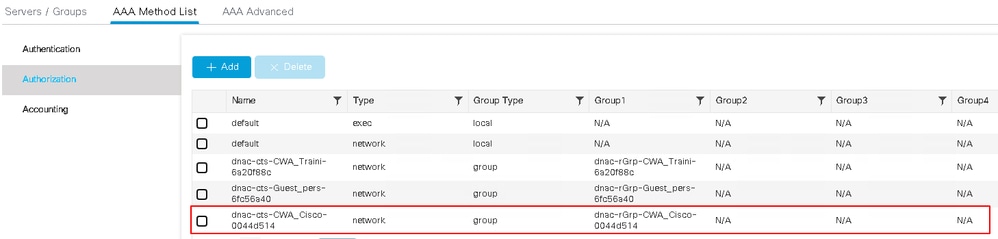
The method list points to the RADIUS group Cisco DNA-rGrp-CWA_Cisco-0044d514in the Group1 column. To view its configuration, navigate to Configuration > Security > AAA > Server/Groups > Server Groups.

The server group group Cisco DNA-rGrp-CWA_Cisco-0044d514 points to Cisco DNA-radius_10.88.244.180 in the Server 1 column. View its configuration in the Servers tab.

The server Cisco DNA-radius_10.88.244.180 has the IP address 10.88.244.180, Click its name to view its configuration
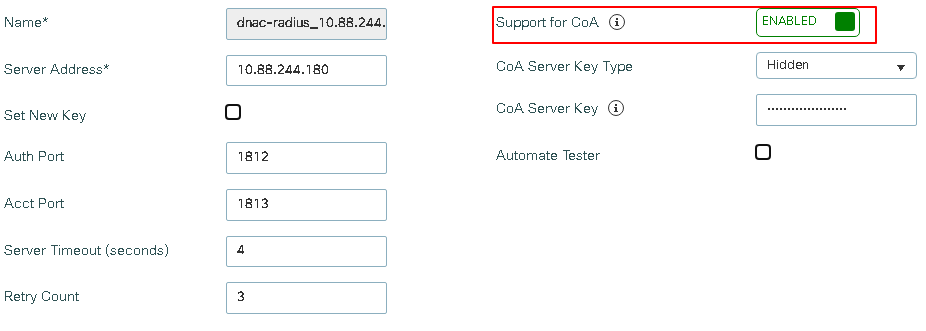
A critical configuration is Change of Authorization (CoA), which provides a mechanism to modify the attributes of an Authentication, Authorization, and Accounting (AAA) session after it has been authenticated on the captive portal. Without this feature, the endpoint remains in a web-auth pending state even after completing registration on the portal.
Wireless Policy Profile Configuration
Inside the Policy Profile, clients can be assigned settings such as VLAN, ACLs, QoS, Mobility Anchor, and timers. To view the configuration for the policy profile, navigate to Configuration > Tags & Profiles > Policy.

Click the policy name to view its configuration.
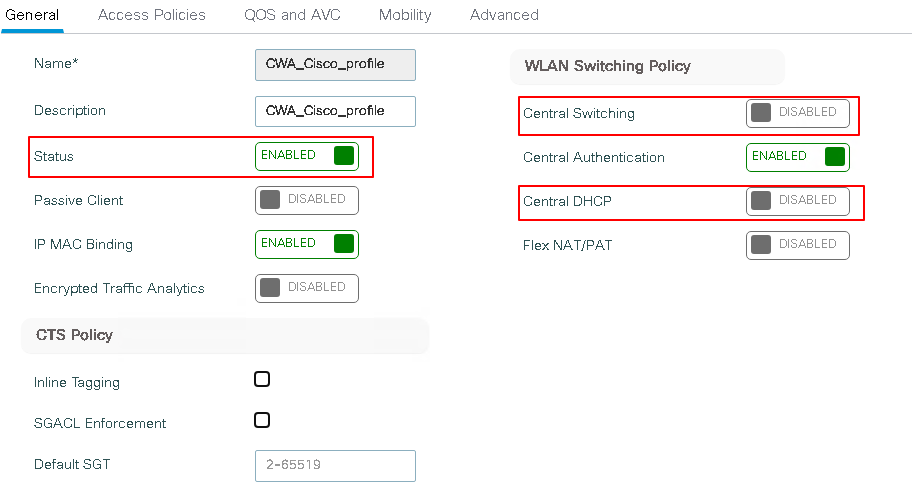
The policy status is Enabled and as with any fabric SSID, central switching and central DHCP are disabled. Click Advanced tab, then navigate to the AAA Policy section to view additional configuration details.
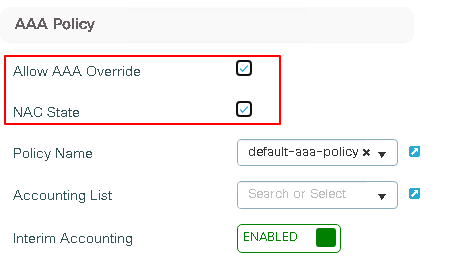
Both AAA Override and Network Access Control (NAC) can be enabled. AAA Override allows the controller to accept attributes returned by the RADIUS server, such as ACLs or URLs, and apply these attributes to clients. NAC enables Change of Authorization (CoA) after the client has registered on the portal.
This configuration can also be viewed through the CLI on the WLC.
To verify the policy profile, the SSID is attached to run the command:
WLC#show fabric wlan summary

Number of Fabric wlan : 1

WLAN  Profile Name       SSID       Status
----------------------------------------------------------------------------
21    CWA_Cisco_profile  CWA_Cisco  UP
To view the configuration for the policy profile CWA_Cisco_profile run the command:
WLC#show running-config | section policy CWA_Cisco_profile
wireless profile policy CWA_Cisco_profile
 aaa-override
 no central dhcp
 no central switching
 description CWA_Cisco_profile
 dhcp-tlv-caching
 exclusionlist timeout 180
 fabric CWA_Cisco_profile
 http-tlv-caching
 nac
 service-policy input platinum-up
 service-policy output platinum
 no shutdown
Policy Tag Configuration
The policy tag is the way you link the WLAN with the Policy Profile, navigate to Configuration > Tags & Profiles > WLANs, click the WLAN name, and navigate to Add to Policy Tags to identify the policy tag assigned to the SSID.
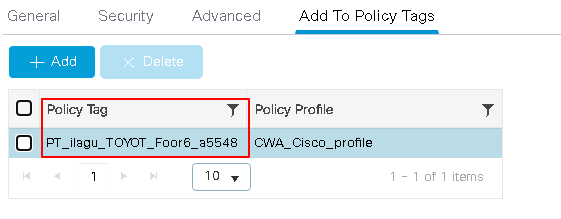
For the SSID CWA_Cisco_profile the policy tag PT_ilagu_TOYOT_Foor6_a5548 is used to verfy tis configuration navigate to Configuration > Tags & Profiles > Tags > Policy.

Click the name to view its details. The policy tag PT_ilagu_TOYOT_Foor6_a5548 links the WLAN CWA_Cisco which is associated with the name CWA_Cisco_profile on the WLC (see the WLANs page for reference) to the Policy Profile CWA_Cisco_profile.
The WLAN name CWA_Cisco_profile references the WLAN CWA_Cisco.

Redirect ACL Configuration
In CWA, a Redirect Access Control List defines which traffic is redirected to the WLC for further processing and which traffic bypasses redirection
This configuration is pushed to the WLC after creating the SSID and provisioning the WLC from Inventory. To view it, navigate to Configuration > Security >ACL, The name of the ACL that Catalyst Center uses for the redirect ACL is Cisco DNA_ACL_WEBAUTH_REDIRECT.

Click the name to view its configuration. The values are derived from the network settings of the network settings from the site on Catalyst Center.
Note: These values are obtained from the site's network settings configured in Catalyst Center, and DHCP/DNS values are sourced from the pool configured in the WLAN. The ISE PSN IP address is referenced in the AAA configuration within the SSID workflow.
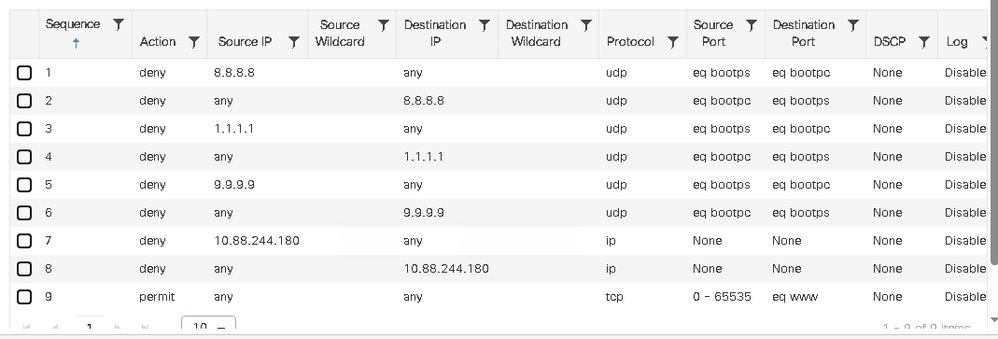
To view the redirection ACL on the WLC CLI, run this command:
WLC#show ip access-lists Cisco DNA_ACL_WEBAUTH_REDIRECT
Extended IP access list Cisco DNA_ACL_WEBAUTH_REDIRECT
1 deny udp host 8.8.8.8 eq bootps any eq bootpc
2 deny udp any eq bootpc host 8.8.8.8 eq bootps
3 deny udp host 1.1.1.1 eq bootps any eq bootpc
4 deny udp any eq bootpc host 1.1.1.1 eq bootps
5 deny udp host 9.9.9.9 eq bootps any eq bootpc
6 deny udp any eq bootpc host 9.9.9.9 eq bootps
7 deny ip host 10.88.244.180 any
8 deny ip any host 10.88.244.180
9 permit tcp any range 0 65535 any eq www
The redirect ACL can be applied to the Flex Profile so it can be sent to the access points. Run this command to confirm this configuration
WLC#show running-config | section flex
wireless profile flex default-flex-profile
 acl-policy Cisco DNA_ACL_WEBAUTH_REDIRECT
  central-webauth
  urlfilter list Cisco DNA_ACL_WEBAUTH_REDIRECT
Redirect ACL on the Access Point
On the access point, the permit and deny values are reversed: permit indicates forwarding traffic, and deny indicates redirection. To review the configuration for the redirect ACL on the AP, run this command:
AP#sh ip access-lists
Extended IP access list Cisco DNA_ACL_WEBAUTH_REDIRECT
1 permit udp 8.8.8.8 0.0.0.0 dhcp_server any eq 68
2 permit udp any dhcp_client 8.8.8.8 0.0.0.0 eq 67
3 permit udp 1.1.1.1 0.0.0.0 dhcp_server any eq 68
4 permit udp any dhcp_client 1.1.1.1 0.0.0.0 eq 67
5 permit udp 9.9.9.9 0.0.0.0 dhcp_server any eq 68
6 permit udp any dhcp_client 9.9.9.9 0.0.0.0 eq 67
7 permit ip 10.88.244.180 0.0.0.0 any
8 permit ip any 10.88.244.180 0.0.0.0
9 deny tcp any range 0 65535 any eq 80
Revision History
| Revision | Publish Date | Comments |
|---|---|---|
1.0 |
27-Oct-2025
|
Initial Release |
Contributed by Cisco Engineers
- Ivan LagunesTechnical Consulting Engineer
 Feedback
Contact Cisco
- Open a Support Case

- (Requires a Cisco Service Contract)