أستكشاف أخطاء GuestShell وإصلاحها على الأنظمة الأساسية Catalyst 9K
خيارات التنزيل
-
ePub (152.0 KB)
العرض في تطبيقات مختلفة على iPhone أو iPad أو نظام تشغيل Android أو قارئ Sony أو نظام التشغيل Windows Phone
لغة خالية من التحيز
تسعى مجموعة الوثائق لهذا المنتج جاهدة لاستخدام لغة خالية من التحيز. لأغراض مجموعة الوثائق هذه، يتم تعريف "خالية من التحيز" على أنها لغة لا تعني التمييز على أساس العمر، والإعاقة، والجنس، والهوية العرقية، والهوية الإثنية، والتوجه الجنسي، والحالة الاجتماعية والاقتصادية، والتمييز متعدد الجوانب. قد تكون الاستثناءات موجودة في الوثائق بسبب اللغة التي يتم تشفيرها بشكل ثابت في واجهات المستخدم الخاصة ببرنامج المنتج، أو اللغة المستخدمة بناءً على وثائق RFP، أو اللغة التي يستخدمها منتج الجهة الخارجية المُشار إليه. تعرّف على المزيد حول كيفية استخدام Cisco للغة الشاملة.
حول هذه الترجمة
ترجمت Cisco هذا المستند باستخدام مجموعة من التقنيات الآلية والبشرية لتقديم محتوى دعم للمستخدمين في جميع أنحاء العالم بلغتهم الخاصة. يُرجى ملاحظة أن أفضل ترجمة آلية لن تكون دقيقة كما هو الحال مع الترجمة الاحترافية التي يقدمها مترجم محترف. تخلي Cisco Systems مسئوليتها عن دقة هذه الترجمات وتُوصي بالرجوع دائمًا إلى المستند الإنجليزي الأصلي (الرابط متوفر).
المحتويات
المقدمة
يصف هذا وثيقة كيف أن يتحرى إصدار مع Guest Shell على Cat9K مفتاح.
المتطلبات الأساسية
المتطلبات
- الفهم الأساسي لبرنامج Cisco IOS® XE
- أنظمة ملفات لينوكس
- أوامر Linux
المكونات المستخدمة
تستند المعلومات الواردة في هذا المستند إلى إصدارات البرامج والمكونات المادية التالية:
- Catalyst 9200
- Catalyst 9300
- Catalyst 9400
- Catalyst 9500
- Catalyst 9600
- Cisco IOS XE 17.9.1 والإصدارات الأحدث
تم إنشاء المعلومات الواردة في هذا المستند من الأجهزة الموجودة في بيئة معملية خاصة. بدأت جميع الأجهزة المُستخدمة في هذا المستند بتكوين ممسوح (افتراضي). إذا كانت شبكتك قيد التشغيل، فتأكد من فهمك للتأثير المحتمل لأي أمر.
معلومات أساسية
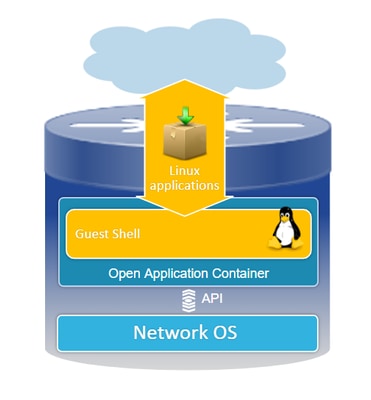
نظرة عامة على Guest Shell
- توفر Guest Shell بيئة تنفيذ معزولة تعمل داخل حاوية لينوكس (LXC).
- الوصول إلى الشبكة: يمكن للمسؤولين الاتصال بالشبكة من خلال واجهات شبكات Linux، مما يوفر إمكانية اتصال وإدارة قوية.
- الوصول إلى ذاكرة Bootflash: يتوفر الوصول المباشر إلى وحدة تخزين ذاكرة Bootflash، مما يعمل على تسهيل إدارة الملفات وعمليات النظام بكفاءة تامة.
- وصول Cisco IOS CLI: يتمتع المسؤولون بالقدرة على التفاعل مباشرة مع واجهة سطر الأوامر Cisco IOS، مما يتيح إمكانية الدمج والتحكم بسلاسة تامة.
- تنفيذ البرنامج النصي: تدعم البيئة تثبيت وتنفيذ برامج Python النصية، مما يتيح التشغيل التلقائي والتخصيص.
- دعم التطبيق: يمكن تركيب وتشغيل كل من تطبيقات لينوكس 32 بت و 64 بت، مما يوفر المرونة ونطاق واسع من الاحتمالات الوظيفية.
استكشاف الأخطاء وإصلاحها
.
التكوين
1. تمكين IOx.
Switch#conf terminal
Switch(config)#iox
Switch(config)#
انتظر 1-5 دقائق لتهيئة IOx. تأكد من تشغيل الطراز IOx. أنت يستطيع فحصت الرسالة عرض أثناء ال CLI جلسة أو ب يراجع الإنتاج من العرض أمر.
*Mar 10 15:35:40.206: %UICFGEXP-6-SERVER_NOTIFIED_START: Switch 1 R0/0: psd: Server iox has been notified to start
*Mar 10 15:35:51.186: %IOX-3-PD_PARTITION_CREATE: Switch 1 R0/0: run_ioxn_caf: IOX may take upto 5 mins to be ready. Wait for iox to be ready before installing the apps
*Mar 10 15:37:56.643: %IOX-3-IOX_RESTARTABITLITY: Switch 1 R0/0: run_ioxn_caf: Stack is in N+1 mode, disabling sync for IOx restartability
*Mar 10 15:38:05.835: %IM-6-IOX_ENABLEMENT: Switch 1 R0/0: ioxman: IOX is ready.
Switch#show iox-service

IOx Infrastructure Summary:
---------------------------
IOx service (CAF)              : Running
IOx service (HA)               : Running
IOx service (IOxman)           : Running
IOx service (Sec storage)      : Running
Libvirtd 5.5.0                 : Running
Dockerd v19.03.13-ce           : Running
Sync Status                    : Disabled
2. تكوين الشبكة.
يستخدم هذا المثال واجهة AppGigabitEthernet لتوفير الوصول إلى الشبكة.
!
interface AppGigabitEthernet1/0/1
 switchport trunk allowed vlan 50
 switchport mode trunk
!
app-hosting appid guestshell
 app-vnic AppGigabitEthernet trunk
  vlan 50 guest-interface 0
   guest-ipaddress 192.168.10.10 netmask 255.255.255.0
 name-server0 192.168.10.254
end
!

ملاحظة: يستخدم GuestShell عنوان IP ثابت لأنه لا يتضمن خدمة عميل DHCP بشكل افتراضي. يمكنك تثبيت خدمة عميل DHCP للحصول على عنوان IP بشكل ديناميكي.
يستخدم هذا المثال واجهة الإدارة (Gi0/0) لتوفير الوصول إلى الشبكة. في وضع الإدارة، يستخدم Guestshell منفذ الإدارة للشبكات يعمل عنوان IP لمنفذ الإدارة الذي تم تكوينه من Cisco IOS كبوابة.
!
app-hosting appid guestshell
 app-vnic management guest-interface 0
 name-server0 8.8.8.8
!
ملاحظة: عندما يستعمل أنت الإدارة قارن، التقصير تشكيل ل ال Guestshell eth0 قارن برمجت إلى العنوان 192.168.30.2.
يمكنك تكوين واجهة مجموعة المنافذ الظاهرية:
- تكوين مجموعة المنافذ الظاهرية: قم بإنشاء مجموعة منافذ ظاهرية باستخدام عنوان IP ثابت.
- الاتصال بالإنترنت: تأكد من توصيل واجهة المنفذ الأمامي بالإنترنت للسماح بالوصول الخارجي.
- تشكيل nat: قم بإعداد NAT بين مجموعة المنافذ الظاهرية والمنفذ الأمامي لتسهيل ترجمة عنوان الشبكة.
- تعيين GuestShell IP: قم بتعيين عنوان IP إلى GuestShell داخل الشبكة الفرعية نفسها الخاصة بواجهة مجموعة المنافذ الظاهرية.
!
interface VirtualPortGroup0
 ip address 192.168.35.1 255.255.255.0
 ip nat inside
!
interface GigabitEthernet1/0/3
 no switchport
 ip address 192.168.100.10 255.255.255.0
 ip nat outside
!
ip route 0.0.0.0 0.0.0.0 192.168.100.254
ip route vrf Mgmt-vrf 0.0.0.0 0.0.0.0 192.168.10.254
ip nat inside source static tcp 192.168.35.2 7023 192.168.100.10 7023 extendable
!
!
ip access-list standard NAT_ACL
 10 permit 192.168.0.0 0.0.255.255
!
app-hosting appid guestshell
 app-vnic gateway1 virtualportgroup 0 guest-interface 0
  guest-ipaddress 192.168.35.2 netmask 255.255.255.0
 app-default-gateway 192.168.35.1 guest-interface 0
 name-server0 8.8.8.8
end
3. قم بتمكين طبقة الأمان.
Switch#guestshell enable
Interface will be selected if configured in app-hosting
Please wait for completion
guestshell installed successfully
Current state is: DEPLOYED
guestshell activated successfully
Current state is: ACTIVATED
guestshell started successfully
Current state is: RUNNING
Guestshell enabled successfully
ملاحظة: الأمر guestshell enable هو الطريقة الوحيدة لتثبيت guestshell. يمكن إستخدام تنشيط/اتصال/إلغاء تنشيط واجهة سطر الأوامر (CLI) المضيفة للتطبيقات للتحكم في Guestshell. يوصى باستخدام واجهة سطر الأوامر (CLI) الخاصة ب Guestshell exec بدلا من ذلك.
دورة حياة Guestshell
تعطيل Guestshell: يؤدي تعطيل Guesthell إلى إزالة الوصول إلى Guestshell وقتل الجلسات الحالية. يتم الاحتفاظ بالملفات/البيانات، يمكنك إستخدام تمكين Guestshell لاستعادة الوصول.
Switch#guestshell disable
Guestshell disabled successfully
تدمير طبقة الأمان: يؤدي هذا إلى حذف نظام ملف Guest Shell بشكل لا رجعة فيه. كافة الملفات/البيانات/البرامج النصية/Settingingestshell/ الحزم والوحدات النمطية المثبتة.
Switch#guestshell destroy
Guestshell destroyed successfully
ملاحظة: عند تشغيل هذا الأمر، يتم فقد جميع البيانات بشكل لا رجعة فيه.
تشغيل Guestshell: يشغل Guestshell الأمر guestshell يركض base لإنشاء طبقة ضمن Guest Shell، مما يتيح لك إستخدام أي Linux ثنائي تحت /bin و /sbin.
Switch#guestshell run bash
[guestshell@guestshell ~]$ ping 192.168.10.1
PING 192.168.10.1 (192.168.10.1) 56(84) bytes of data.
64 bytes from 192.168.10.1: icmp_seq=2 ttl=254 time=0.517 ms
64 bytes from 192.168.10.1: icmp_seq=3 ttl=254 time=0.552 ms
64 bytes from 192.168.10.1: icmp_seq=4 ttl=254 time=0.447 ms
64 bytes from 192.168.10.1: icmp_seq=5 ttl=254 time=0.549 ms
Guestshell تشغيل بايثون: أستخدم هذا الأمر لبدء مترجم بايثون تفاعلي.
Switch#guestshell run python3
Python 3.6.8 (default, Dec 22 2020, 19:04:08)
[GCC 8.4.1 20200928 (Red Hat 8.4.1-1)] on linux
Type "help", "copyright", "credits" or "license" for more information.
>>>
عمليات التحقق من الصحة
يمكنك إستخدام هذه الأوامر للتحقق من صحة Guestshell:
Switch#show app-hosting detail appid guestshell
App id                 : guestshell
Owner                  : iox
State                  : RUNNING
Application
  Type                 : lxc
  Name                 : GuestShell
  Version              : 3.3.0
  Description          : Cisco Systems Guest Shell XE for x86_64
  Author               : Cisco Systems
  Path                 : /guestshell/:guestshell.tar
  URL Path             :
  Multicast            : yes
Activated profile name : custom

Resource reservation
  Memory               : 256 MB
  Disk                 : 1 MB
  CPU                  : 800 units
  CPU-percent          : 11 %
  VCPU                 : 1

Platform resource profiles
  Profile Name                  CPU(unit)  Memory(MB)  Disk(MB)
  --------------------------------------------------------------

Attached devices
  Type              Name               Alias
  ---------------------------------------------
  serial/shell     iox_console_shell   serial0
  serial/aux       iox_console_aux     serial1
  serial/syslog    iox_syslog          serial2
  serial/trace     iox_trace           serial3

Network interfaces
   ---------------------------------------
eth0:
   MAC address         : 52:54:dd:5b:c4:b8
   IPv4 address        : 192.168.30.2
   IPv6 address        : ::
   Network name        : mgmt-bridge200

Port forwarding
  Table-entry  Service  Source-port  Destination-port
  ---------------------------------------------------
  Switch#show app-hosting list
App id                                   State
---------------------------------------------------------
guestshell                               RUNNING
Switch#guestshell run sudo ifconfig
eth0: flaguestshell=4163<UP,BROADCAST,RUNNING,MULTICAST>  mtu 1500
        inet 192.168.10.10  netmask 255.255.255.0  broadcast 192.168.10.255
        inet6 fe80::5054:ddff:fece:a7c9  prefixlen 64  scopeid 0x20
        ether 52:54:dd:ce:a7:c9  txqueuelen 1000  (Ethernet)
        RX packets 3  bytes 266 (266.0 B)
        RX errors 0  dropped 0  overruns 0  frame 0
        TX packets 9  bytes 726 (726.0 B)
        TX errors 0  dropped 0 overruns 0  carrier 0  collisions 0

lo: flaguestshell=73<UP,LOOPBACK,RUNNING>  mtu 65536
        inet 127.0.0.1  netmask 255.0.0.0
        inet6 ::1  prefixlen 128  scopeid 0x10
        loop  txqueuelen 1000  (Local Loopback)
        RX packets 338  bytes 74910 (73.1 KiB)
        RX errors 0  dropped 0  overruns 0  frame 0
        TX packets 338  bytes 74910 (73.1 KiB)
        TX errors 0  dropped 0 overruns 0  carrier 0  collisions 0
تغيير حجم الموارد
!
app-hosting appid guestshell
 app-vnic management guest-interface 0
 app-resource profile custom
  cpu 1000
  memory 512
  persist-disk 200
!
يجب تعطيل Guest Shell ثم تمكينه حتى تصبح التغييرات نافذة المفعول.
Switch#guestshell disable
Guestshell disabled successfully
Switch#guestshell enable
*Mar 11 01:17:46.841: %SYS-5-CONFIG_I: Configured from console by coguestshell enable
Interface will be selected if configured in app-hosting
Please wait for completion
guestshell activated successfully
Current state is: ACTIVATED
guestshell started successfully
Current state is: RUNNING
Guestshell enabled successfully
Switch#show app-hosting detail appid guestshell | sec Resource reservation
Resource reservation
  Memory               : 512 MB
  Disk                 : 200 MB
  CPU                  : 1110 units
  CPU-percent          : 15 %
  VCPU                 : 1
ملاحظة: في المحولات، يسمح بتغيير حجم الموارد حتى الحد الأقصى للقيود التي يفرضها النظام الأساسي، يرجى الرجوع إلى موارد أجهزة النظام الأساسي Cisco Catalyst 9000 للتطبيقات.
السيناريوهات الشائعة
تكوين DHCP
المشكلة: ثنائي عميل DHCP (DHCLIENT) غير موجود.
الحل
يمكنك تثبيت عميل DHCP باستخدام الأداة المساعدة Yum باستخدام الأمر sudo yum install dhcp-client. ومع ذلك، الرجاء ملاحظة أن مستودعات تدفق CentOS 8 لم تعد متوفرة.
1. يجب تجنب تعيين عنوان IP في إستضافة التطبيقات للسماح ل DHCP بالعمل.
!
interface AppGigabitEthernet1/0/1
 switchport trunk allowed vlan 50
 switchport mode trunk
!
app-hosting appid guestshell
 app-vnic AppGigabitEthernet trunk
  vlan 50 guest-interface 0
name-server0 8.8.8.8
!
2. تغيير قائمة النسخ إلى مخزن BaseUrl Vault في يوم repo.
Switch#guestshell run bash
[guestshell@guestshell ~]$ sudo find /etc/yum.repos.d/ -type f -exec sed -i 's/mirrorlist=/#mirrorlist=/g' {} +
[guestshell@guestshell ~]$ sudo find /etc/yum.repos.d/ -type f -exec sed -i 's/#baseurl=/baseurl=/g' {} +
[guestshell@guestshell ~]$ sudo find /etc/yum.repos.d/ -type f -exec sed -i 's/mirror.centos.org//g' {} +
[guestshell@guestshell ~]$ cat /etc/yum.repos.d/CentOS-Stream-RealTime.reporepo
# CentOS-Stream-RealTime.repo
# The mirrorlist system uses the connecting IP address of the client and the
# update status of each mirror to pick current mirrors that are geographically
# close to the client.  You should use this for CentOS updates unless you are
# manually picking other mirrors.
#
# If the mirrorlist does not work for you, you can try the commented out
# baseurl line instead.

[rt]
name=CentOS Stream $releasever - RealTime
#mirrorlist=http://mirrorlist.centos.org/?release=$stream&arch=$basearch&repo=RT&infra=$infra
baseurl=http:///$contentdir/$stream/RT/$basearch/os/
gpgcheck=1
enabled=0
gpgkey=file:///etc/pki/rpm-gpg/RPM-GPG-KEY-centosofficial
3. قم بتركيب الحزم.
guestshell@guestshell ~]$ sudo yum install dhcp-client
ast metadata expiration check: 0:50:34 ago on Wed Mar 12 17:44:46 2025.
Dependencies resolved.
================================================================================
 Package                Architecture Version                 Repository    Size
================================================================================
Installing:
 dhcp-client            x86_64       12:4.3.6-50.el8         baseos       319 k
Installing dependencies:
 bind-export-libs       x86_64       32:9.11.36-13.el8       baseos       1.1 M
 dhcp-common            noarch       12:4.3.6-50.el8         baseos       208 k
 dhcp-libs              x86_64       12:4.3.6-50.el8         baseos       148 k

Transaction Summary
================================================================================
Install  4 Packages

Total download size: 1.8 M
Installed size: 3.9 M
Is this ok [y/N]: y
Downloading Packages:
(1/4): dhcp-client-4.3.6-50.el8.x86_64.rpm      284 kB/s | 319 kB     00:01
(2/4): dhcp-common-4.3.6-50.el8.noarch.rpm      171 kB/s | 208 kB     00:01
(3/4): dhcp-libs-4.3.6-50.el8.x86_64.rpm        572 kB/s | 148 kB     00:00
(4/4): bind-export-libs-9.11.36-13.el8.x86_64.r 577 kB/s | 1.1 MB     00:02
--------------------------------------------------------------------------------
Total                                           908 kB/s | 1.8 MB     00:02
CentOS Stream 8 - BaseOS                        1.6 MB/s | 1.6 kB     00:00
Importing GPG key 0x8483C65D:
 Userid     : "CentOS (CentOS Official Signing Key) <CentOS Official Signing Key>"
 Fingerprint: 99DB 70FA E1D7 CE22 7FB6 4882 05B5 55B3 8483 C65D
 From       : /etc/pki/rpm-gpg/RPM-GPG-KEY-centosofficial
Is this ok [y/N]: y
Key imported successfully
Running transaction check
Transaction check succeeded.
Running transaction test
Transaction test succeeded.
Running transaction
  Preparing        :                                                        1/1
  Installing       : dhcp-libs-12:4.3.6-50.el8.x86_64                       1/4
  Installing       : dhcp-common-12:4.3.6-50.el8.noarch                     2/4
  Installing       : bind-export-libs-32:9.11.36-13.el8.x86_64              3/4
  Running scriptlet: bind-export-libs-32:9.11.36-13.el8.x86_64              3/4
  Installing       : dhcp-client-12:4.3.6-50.el8.x86_64                     4/4
  Running scriptlet: dhcp-client-12:4.3.6-50.el8.x86_64                     4/4
  Verifying        : bind-export-libs-32:9.11.36-13.el8.x86_64              1/4
  Verifying        : dhcp-client-12:4.3.6-50.el8.x86_64                     2/4
  Verifying        : dhcp-common-12:4.3.6-50.el8.noarch                     3/4
  Verifying        : dhcp-libs-12:4.3.6-50.el8.x86_64                       4/4

Installed:
  bind-export-libs-32:9.11.36-13.el8.x86_64  dhcp-client-12:4.3.6-50.el8.x86_64
  dhcp-common-12:4.3.6-50.el8.noarch         dhcp-libs-12:4.3.6-50.el8.x86_64

Complete!
ملاحظة: (بالنسبة ل CALO) من الممكن تكوين وكيل ل YUM. وهذا يسمح ل Yum بالاتصال من خلال خادم وكيل لتنزيل الحزم:
[guestshell@guestshell ~]$ echo=proxy=http://<ip_address:port>/ | sudo tee -a /etc/yum.conf > /dev/null
4. .طلب عنوان DHCP ل th0.
[guestshell@guestshell ~]$ sudo dhclient eth0
5. تحقق مما إذا كان عميل DHCP يعمل عن طريق التحقق من تعيين عنوان IP.
Switch#guestshell run ifconfig
eth0: flags=4163<UP,BROADCAST,RUNNING,MULTICAST>  mtu 1500
        inet 192.168.10.2  netmask 255.255.255.0  broadcast 192.168.10.255
        inet6 fe80::5054:ddff:fea0:4aef  prefixlen 64  scopeid 0x20
        ether 52:54:dd:a0:4a:ef  txqueuelen 1000  (Ethernet)
        RX packets 1516  bytes 2009470 (1.9 MiB)
        RX errors 0  dropped 0  overruns 0  frame 0
        TX packets 687  bytes 54603 (53.3 KiB)
        TX errors 0  dropped 0 overruns 0  carrier 0  collisions 0

lo: flags=73<UP,LOOPBACK,RUNNING>  mtu 65536
        inet 127.0.0.1  netmask 255.0.0.0
        inet6 ::1  prefixlen 128  scopeid 0x10
        loop  txqueuelen 1000  (Local Loopback)
        RX packets 773  bytes 90658 (88.5 KiB)
        RX errors 0  dropped 0  overruns 0  frame 0
        TX packets 773  bytes 90658 (88.5 KiB)
        TX errors 0  dropped 0 overruns 0  carrier 0  collisions 0
فشل تحديث إدارة حزم DNF
المشكلة: يتعذر إكمال تحديث Sudo DNF -y على Guestshell بسبب الخطأ:
[guestshell@guestshell ~]$ sudo dnf upgrade --refresh
Warning: failed loading '/etc/yum.repos.d/CentOS-Base.repo', skipping.
الحل
1. إعادة تثبيت حزم RPM وترقيتها.
! Clean packages

[guestshell@guestshell ~]$ sudo dnf clean all

! Reinstall and update the tpm2-tss package:

[guestshell@guestshell ~]$ sudo dnf install tpm2-tss-2.3.2-3.el8
[guestshell@guestshell ~]$ sudo dnf upgrade rpm
2. تثبيت حزمة GIT بشكل منفصل.
[guestshell@guestshell ~]$ sudo dnf install git -y
تم فقد الوصول إلى Guestshell بعد الترقية
المشكلة: بعد الترقية إلى الإصدار 17.08.01 أو إصدار أحدث، يصبح الوصول إلى Guest Shell غير ممكن، مما يؤدي إلى عدم القدرة على تنفيذ البرامج النصية.
Switch#guestshell run bash
Switch#
الحل
الإصدار متعلق بمعرف تصحيح الأخطاء من Cisco CSCwi63075  الذي يتم تشغيله أثناء الترقية عند تمكين FIPS على المحول.
1. تعطيل FIPS.
Switch#configure terminal
Switch(config)#no fips authorization-key
FIPS: Authorization-key erased ONLY from the  Flash.
But the authorization-key is still operational. Use "reload" command for complete removal of key and to enter into non fips-mode.
Make sure to remove fips key from all the members of the stack individually
2. يمكنك الترقية إلى أحد الإصدارات التي تتضمن الإصلاح أو الإصدار 17.12.04 أو أي إصدار أحدث.
تقييد عنونة IPv6
المشكلة: يتضمن الإصدار عناوين IPv6 غير المقصودة التي تظهر على الواجهات داخل بيئة Cisco Guestshell. على الرغم من أنه لم يتم تكوينه بشكل متعمد.
التكوين الملاحظ على المحول باستخدام IPv4 هو:
!
app-hosting appid guestshell
 app-vnic AppGigabitEthernet trunk
  vlan 50 guest-interface 0
   guest-ipaddress 192.168.20.10 netmask 255.255.255.0  <-- IPv4 address configured
 app-default-gateway 192.168.20.1 guest-interface 0
 app-resource profile custom
 name-server1 192.168.20.1
 !
عند تشغيل الأمر ifconfig داخل بيئة Guestshell، يصبح عنوانا IPv4 و IPv6 مرئيين.
lat1-2-ssw01.gts#guestshell run bash
[guestshell@guestshell ~]$ sudo ifconfig
eth0: flags=4163  mtu 1500
        inet 192.168.20.10  netmask 255.255.255.0 broadcast 192.168.20.255
        inet6 2620:119:5022:515:5054:ddff:fe41:c643  prefixlen 64  scopeid 0x0
        inet6 fe80::5054:ddff:fe41:c643  prefixlen 64  scopeid 0x20
        ether 52:54:dd:41:c6:43  txqueuelen 1000  (Ethernet)
        RX packets 7829  bytes 1750981 (1.6 MiB)
        RX errors 0  dropped 0  overruns 0  frame 0
        TX packets 5551  bytes 744320 (726.8 KiB)
        TX errors 0  dropped 0 overruns 0  carrier 0  collisions 0

lo: flags=73  mtu 65536
        inet 127.0.0.1  netmask 255.0.0.0
        inet6 ::1  prefixlen 128  scopeid 0x10
        loop  txqueuelen 1000  (Local Loopback)
        RX packets 292  bytes 63812 (62.3 KiB)
        RX errors 0  dropped 0  overruns 0  frame 0
        TX packets 292  bytes 63812 (62.3 KiB)
        TX errors 0  dropped 0 overruns 0  carrier 0  collisions 0
الحل
الخطوة 1: تعطيل توجيه IPv6 والعنونة في Guestshell.
lat1-2-ssw01.gts#guestshell run bash
[guestshell@guestshell ~]$ sudo sysctl -w net.ipv6.conf.all.disable_ipv6=1
[guestshell@guestshell ~]$ sudo sysctl -w net.ipv6.conf.default.disable_ipv6=1
[guestshell@guestshell ~]$ sudo sysctl -w net.ipv6.conf.lo.disable_ipv6=1
الخطوة 2: تحقق من تعطيل IPv6.
[guestshell@guestshell ~]$ /sbin/ifconfig
eth0: flags=4163  mtu 1500
        inet 192.168.20.10  netmask 255.255.255.0 broadcast 192.168.20.255
        ether 52:54:dd:41:c6:43  txqueuelen 1000  (Ethernet)
        RX packets 7829  bytes 1750981 (1.6 MiB)
        RX errors 0  dropped 0  overruns 0  frame 0
        TX packets 5551  bytes 744320 (726.8 KiB)
        TX errors 0  dropped 0 overruns 0  carrier 0  collisions 0

lo: flags=73  mtu 65536
        inet 127.0.0.1  netmask 255.0.0.0
        loop  txqueuelen 1000  (Local Loopback)
        RX packets 292  bytes 63812 (62.3 KiB)
        RX errors 0  dropped 0  overruns 0  frame 0
        TX packets 292  bytes 63812 (62.3 KiB)
        TX errors 0  dropped 0 overruns 0  carrier 0  collisions 0
أخطاء في مساحة القرص أثناء تشغيل برامج Python النصية
المشكلة: تتضمن القضية كتابة بايثون تعمل على مدير الحدث المضمن (IM) داخل Guestshell. فشل البرنامج النصي بسبب نفاد مساحة القرص مع حدوث الخطأ:
guestshell run python3 /flash/guest-share/monitoring.py -rt True -bgp True
---- pushing bgp status ----
OSError: [Errno 28] No space left on device

During handling of the above exception, another exception occurred:

Traceback (most recent call last):
  File "/flash/guest-share/monitoring_periodic_tasks.py", line 18, in
    print(bgp_status())
  File "/bootflash/guest-share/monitoring_bgp_status.py", line 15, in bgp_status
    vrf = cli.cli('show vrf')
  File "/usr/lib/python3.6/site-packages/cli/__init__.py", line 311, in cli
    _log_to_file("CLI execution invoked for '" + command + "'")
  File "/usr/lib/python3.6/site-packages/cli/__init__.py", line 87, in _log_to_file
    logfile.close()
OSError: [Errno 28] No space left on device
! This error indicates that the disk space allocated for logging command executions within the Guestshell environment has been exhausted.
الحل
لحل مشكلة نفاد مساحة القرص، تحتاج إلى زيادة حجم القرص الثابت لبيئة Guestshell:
1. قم بتعديل ملف تعريف موارد التطبيق لزيادة حجم القرص الثابت.
Switch(config-app-hosting)# app-resource profile custom
Switch(config-app-hosting-profile)# persist-disk 100
Switch(config-app-hosting-profile)# cpu 800
Switch(config-app-hosting-profile)# memory 256
Switch(config-app-hosting-profile)# end
2. احفظ التكوين و enable/disable ال guestshell.
Switch# write memory
Switch#guestshell disable
Guestshell disabled successfully
Switch#guestshell enable
Interface will be selected if configured in app-hosting
Please wait for completion
guestshell installed successfully
Current state is: DEPLOYED
guestshell activated successfully
Current state is: ACTIVATED
guestshell started successfully
Current state is: RUNNING
Guestshell enabled successfully
Syslog للتسجيل
أنت يستطيع ركضت هذا أمر في switestshell أن يعرض ال syslog رسالة :
[guestshell@guestshell ~]$ sudo logger -p 1 "Priority 1"
[guestshell@guestshell ~]$ sudo cat /var/log/messages
Mar 11 02:05:24 localhost systemd[248]: user@0.service: Failed at step PAM spawning /usr/lib/systemd/systemd: Operation not permitted
Mar 11 02:05:24 localhost systemd[1]: user@0.service: Failed with result 'protocol'.
Mar 11 02:05:24 localhost systemd[1]: Failed to start User Manager for UID 0.
Mar 11 02:05:24 localhost systemd[1]: Stopping /run/user/0 mount wrapper...
Mar 11 02:05:24 localhost systemd[1]: run-user-0.mount: Succeeded.
Mar 11 02:05:24 localhost systemd[1]: user-runtime-dir@0.service: Succeeded.
Mar 11 02:05:24 localhost systemd[1]: Stopped /run/user/0 mount wrapper.
Mar 11 02:05:24 localhost root[250]: Priority 1
[guestshell@guestshell ~]$ sudo cat /var/log/secure
Mar 11 02:05:24 localhost systemd[248]: pam_unix(systemd-user:account): expired password for user root (root enforced)
Mar 11 02:05:24 localhost sudo[246]: pam_systemd(sudo:session): Failed to create session: Start job for unit user@0.service failed with 'failed'
Mar 11 02:05:24 localhost sudo[246]: pam_unix(sudo:session): session opened for user root by (uid=0)
تريلغ
يمكنك إستخدام سجل AppHostShell لنقل إستضافة التطبيقات إلى bootflash:folder_name لتدوير الملف. يمكن إستخدام هذا للتدوير إلى دليل هدف، ولكن يتم تدوير هذا أيضا إلى دليل traceloguestshell.
Switch#app-hosting move appid guestshell log to bootflash:
Successfully moved tracelog to flash:/ioxapploguestshell/iox_R0-0_R0-0.14195_0.20250311023831.bin.gz
ملاحظة: IOx Guestshell.log هو دائما ملف tracelog النشط تحت /tmp/rp/trace · عندما يصل هذا الملف إلى 1 ميجابايت، يتم تدويره تلقائيا إلى bootflash:traceloguestshell/ مع ختم زمني، ويتم بدء تشغيل ملف جديد.
معلومات ذات صلة
- إستضافة التطبيق على التقرير الرسمي للمحولات من السلسلة Cisco Catalyst 9000 Series
- دليل تثبيت أجهزة المحولات Cisco Catalyst 9300 Series
- دليل تكوين قابلية البرمجة، Cisco IOS XE 17.9.x
- التقرير الرسمي لبنية نظام Catalyst 9300 StackWise
- معرف تصحيح الأخطاء من Cisco CSCwi63075 - لا يمكن الوصول إلى Guestshell عبر CLI بعد الترقية إلى 17.08.01 أو إصدار أحدث إذا تم تمكين وضع FIPS
- الدعم التقني والمستندات - Cisco Systems
محفوظات المراجعة
| المراجعة | تاريخ النشر | التعليقات |
|---|---|---|
1.0 |
17-Mar-2025
|
الإصدار الأولي |
تمت المساهمة بواسطة مهندسو Cisco
- كريستوفر مارتينيز باريوسمهندس إستشاري تقني
 التعليقات
اتصل بنا
- فتح حالة دعم

- (تتطلب عقد خدمة Cisco)