Introduction
This document describes how to use the default parameters to connect and configure management terminals.
Prerequisites
Requirements
There are no specific requirements for this document.
Components Used
The information in this document is based on these software and hardware versions:
-
Catalyst 1900, 2820, 2900, 2940, 2950, 2970, 3560, 4500, 4840G, 4908G-L3, and 6500/6000 series switches
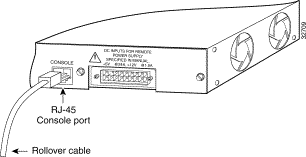
These switches require the use of either a rollover or straight-through RJ-45 cable to connect a terminal to the console port. The cable you use depends on the type of Supervisor Engine and other factors. Rollover cables and straight-through cables have pinouts that are different than crossover cables, which can connect 10/100BASE-TX Ethernet ports between switches. To identify the type of cable you use, refer to Configure Cable Requirements for Console and AUX Ports.
The information in this document was created from the devices in a specific lab environment. All of the devices used in this document started with a cleared (default) configuration. If your network is live, ensure that you understand the potential impact of any command.
Conventions
For more information on document conventions, refer to the Cisco Technical Tips Conventions.
Background Information
This document focuses on use of the default parameters to connect and configure management terminals. This document covers the Catalyst 1900, 2820, 2900, 3500, 3560, 2948G-L3, 4500, 4840G, 4908G-L3, and 6500/6000 series switches.
Connect a Terminal to Catalyst 1900/2820, 2900/3500XL, 3560, and 3750 Series Switches
Use the supplied rollover cable and the DB-9 adapter to connect a PC to the switch console port. You need to provide an RJ-45-to-DB-25 female DTE adapter if you want to connect the switch console port to a terminal. You can order a kit (part number ACS-DSBUASYN=) that contains the adapter from Cisco. The PC or terminal must support VT100 terminal emulation. The terminal emulation software—frequently a PC application such as Microsoft Windows HyperTerminal or Symantec Procomm Plus—makes possible the communication between the switch and your PC or terminal during the setup program.
To connect the PC or terminal to the switch:
-
Be sure that you have configured your PC or terminal emulation software to communicate with the switch via hardware flow control.
-
Configure the baud rate and character format of the PC or terminal to match these console port default characteristics:
-
9600 baud
-
8 data bits
-
1 stop bit
-
No parity
-
With the supplied rollover cable, insert the RJ-45 connector into the console port.
-
Attach the supplied RJ-45-to-DB-9 female DTE adapter to a PC or attach an appropriate adapter to the terminal.
-
Insert the other end of the supplied rollover cable in the attached adapter.
-
Run the terminal emulation program if you have a PC or a terminal.
Table A-1: Console Port Signaling and Cabling with a DB-9 Adapter
| Console Port (DTE) |
RJ-45-to-RJ-45 Rollover Cable |
RJ-45-to-DB-9 Terminal Adapter |
Console Device |
| Signal |
RJ-45 Pin |
RJ-45 Pin |
DB-9 Pin |
Signal |
| RTS1 |
1 |
8 |
8 |
CTS2 |
| No connection |
2 |
7 |
6 |
DSR |
| TxD3 |
3 |
6 |
2 |
RxD4 |
| GND5 |
4 |
5 |
5 |
GND |
| GND |
5 |
4 |
5 |
GND |
| RxD |
6 |
3 |
3 |
TxD |
| No connection |
7 |
2 |
4 |
DTR6 |
| CTS |
8 |
1 |
7 |
RTS |
1RTS = Request To Send
2CTS = Clear To Send
3TxD = Transmit Data
4RxD = Receive Data
5GRD = Ground
6DTR = Data Terminal Ready
Connect to a Terminal
Use the thin, flat RJ-45-to-RJ-45 rollover cable and RJ-45-to-DB-25 female DTE adapter to connect the console port to a terminal. Table A-2 lists the pinouts for the console port, the RJ-45-to-RJ-45 rollover cable, and the RJ-45-to-DB-25 female DTE adapter.
Note: The RJ-45-to-DB-25 female DTE adapter does not come with the switch. You can order a kit (part number ACS-DSBUASYN=) that contains this adapter from Cisco.
Table A-2: Console Port Signaling and Cabling with a DB-25 Adapter
| Console Port (DTE) |
RJ-45-to-RJ-45 Rollover Cable |
RJ-45-to-DB-25 Terminal Adapter |
Console Device |
| Signal |
RJ-45 Pin |
RJ-45 Pin |
DB-25 Pin |
Signal |
| RTS |
1 |
8 |
5 |
CTS |
| No connection |
2 |
7 |
6 |
DSR |
| TxD |
3 |
6 |
3 |
RxD |
| GND |
4 |
5 |
7 |
GND |
| GND |
5 |
4 |
7 |
GND |
| RxD |
6 |
3 |
2 |
TxD |
| No connection |
7 |
2 |
20 |
DTR |
| CTS |
8 |
1 |
4 |
RTS |
Connect a Terminal to Catalyst 2948G-L3, 4908G-L3, and 4840G Series Switches
You can configure the Catalyst switch routers from a direct console connection to the console port or remotely through the management port.
-
Use the RJ-45-to-RJ-45 rollover cable and RJ-45-to-DB-9 female DTE adapter (with the label Terminal ) to connect the console port to a PC that runs terminal emulation software.
-
If you use a direct console connection, configure your terminal emulation program for 9600 baud, 8 data bits, no parity, and 1 stop bit.
Console Port Pinouts
The console port is an RJ-45 receptacle. There is support for DTR and DSR handshake signals. The RTS signal tracks the state of the CTS signal.Table B-1 lists pinouts for the console port.
Table B-1: Console Port Pinouts
| Pin |
Signal |
Direction |
Description |
| 11 |
RTS/CTS |
Output |
Request To Send/Clear To Send |
| 2 |
DTR |
Output |
Data Terminal Ready |
| 3 |
TxD |
Output |
Transmit Data |
| 4 |
SGND |
— |
Signal Ground |
| 5 |
SGND |
— |
Signal Ground |
| 6 |
RxD |
Input |
Receive Data |
| 7 |
DSR |
Input |
Data Set Ready |
| 81 |
RTS/CTS |
Input |
Request To Send/Clear To Send |
1Pin 1 has a connection to pin 8.
Connect a Terminal to Catalyst 2926 and 2926G Series Switches
On the Catalyst 2926 series switch, you find the console port on the Supervisor Engine front panel. The port has the label CONSOLE, as shown in this figure:
Figure: Console Port Connector (Catalyst 2926 Series Switch)

The Supervisor Engine console port is a DCE DB-25 receptacle that supports a DCE EIA/TIA-232 interface. EIA/TIA-232 supports unbalanced circuits at signal speeds of up to 64 kbps.
Before you connect the console port, check the terminal documentation to determine the baud rate. The baud rate of the terminal must match the default baud rate (9600 bits per second [bps]) of the switch console port. Set up the terminal in this way:
-
9600 bps
-
8 data bits
-
No parity
-
1 stop bit
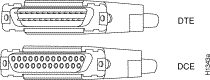
Use a straight-through cable to connect the switch to a DTE device, such as a terminal or a PC. Use a null modem cable to connect the switch to a remote DCE device, such as a modem or a data service unit (DSU). See this next figure for DCE and DTE cable connectors:
Figure: EIA/TIA-232 Adapter Cable Connectors, Network End
Note: The console port is an asynchronous (async) serial port; any device that connects to this port must be capable of asynchronous transmission.
Both DSR and data carrier detect (DCD) are active when the system runs. The RTS signal tracks the state of the CTS input. The console port does not support modem control or hardware flow control. Table C-1 lists the console port pinouts:
Table C-1: Catalyst 2926 Series Console Port Pinouts
| Pin |
Signal |
Direction |
Description |
| 1 |
GND |
|
Ground |
| 2 |
RxD |
—> |
Receive Data |
| 3 |
TxD |
<— |
Transmit Data |
| 4 |
CTS |
<— |
Clear To Send |
| 5 |
RTS |
—> |
Return To Send |
| 7 |
GND |
|
Ground |
| 8 |
DTR |
—> |
Data Terminal Ready |
| 20 |
DCD |
<— |
Data Carrier Detect |
Catalyst 2926G Series Switch
The next figure shows the console and auxiliary (AUX) ports, which you find on the front panel of the Catalyst 2926G series switch.
Note: There is currently no support for the AUX port.
Figure: Console and AUX Port Connectors

The console port, which is an EIA/TIA-232 async serial port with an RJ-45 connector, is a full-featured DTE connection with hardware flow control.
Connect the terminal with a thin, flat RJ-45-to-RJ-45 rollover cable and one of these adapters:
Note: The adapter you use depends on the terminal connector.
Table C-2: Catalyst 2926G Series Console Port Pinouts
| Console Port |
Console Device |
| Pin (Signal) |
Connect to |
| 1 is looped to pin 8 |
— |
| 2 (DTR) |
DSR |
| 3 (RxD) |
TxD |
| 4 (GND) |
GND |
| 5 (GND) |
GND |
| 6 (TxD) |
RxD |
| 7 (DSR) |
DTR |
| 8 is looped to pin 1 |
— |
Note: You find an RJ-45-to-RJ-45 rollover cable and the adapters in the console port accessories kit that shipped with your Catalyst 2926G series switch.
Connect a Terminal to the Catalyst 4500/4000 Supervisor Engine I Console Port
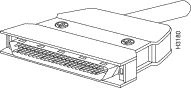
The console port, which appears in the figure that follows, is a DCE DB-25 receptacle that supports a DCE EIA/TIA-232 interface. EIA/TIA-232 supports unbalanced circuits at signal speeds of up to 64 kbps.
Figure: DCE DB-25 Connector
Use a null modem cable to connect the switch to a remote DCE device, such as a modem or a DSU. Use a straight-through cable to connect the switch to a DTE device, such as a terminal or a PC.
The console port of the Catalyst 4500/4000 Supervisor Engine I uses a DB-25 connector and supports DTR, DSR, CTS, and RTS handshake signals. Table G-1 lists the Catalyst 4500/4000 Supervisor Engine I console port pinouts.
Table G-1: Catalyst 4003 Console Port Pinouts
| Pin |
Signal |
Direction |
Description |
| 1 |
Ground |
|
| 2 |
RxD |
Input |
Receive Data |
| 3 |
TxD |
Output |
Transmit Data |
| 4 |
CTS |
Input |
Clear To Send |
| 5 |
RTS |
Output |
Request To Send |
| 7 |
Ground |
|
| 8 |
DTR |
Output |
Data Terminal Ready |
| 20 |
DSR |
Input |
Data Set Ready |
Connect a Terminal to the Catalyst 4500 Supervisor Engine II/II+/III/IV, 2948G, 2980G, and 4912G
You can configure the Catalyst 4500/4000 series switches from a direct console connection to the console port.
-
Use the RJ-45-to-RJ-45 rollover cable and RJ-45-to-DB-9 female DTE adapter (with the label Terminal ) to connect the console port to a PC that runs terminal emulation software. If you use a direct console connection, configure your terminal emulation program for 9600 baud, 8 data bits, no parity, and 1 stop bit.
Table H-1 lists the switch console port pinouts. Use a straight-through cable to connect the switch to a DTE device, such as a terminal or a PC.
Table H-1: Catalyst 4500/4000 Supervisor Engine II and later, 2948G, 2980G, and 4912G Console Port Pinouts
| Pin |
Signal |
Direction |
Description |
| 1 |
RTS |
Output |
Request To Send |
| 2 |
DTR |
Output |
Data Terminal Ready |
| 3 |
TxD |
Output |
Transmit Data |
| 4 |
Ground |
|
| 5 |
Ground |
|
| 6 |
RxD |
Input |
Receive Data |
| 7 |
DSR |
Input |
Data Set Ready |
| 8 |
CTS |
Input |
Clear To Send |
Catalyst 6500/6000 Supervisor Engine I, II, and 720 Console Port Signals and Pinouts
The Catalyst 6500/6000 series switches come with an accessory kit that contains the cable and adapters you need to connect a console (an ASCII terminal or a PC that runs terminal emulation software) or modem to the console port. The accessory kit includes these items:
-
RJ-45-to-RJ-45 rollover cable
-
RJ-45-to-DB-9 female DTE adapter (with the label Terminal )
-
RJ-45-to-DB-25 female DTE adapter (with the label Terminal )
-
RJ-45-to-DB-25 male DCE adapter (with the label Modem )
These items are the same cable and adapters that ship with the Cisco 2500 series routers and other Cisco products.
Console Port Mode Switch
The Supervisor Engine front-panel console port mode switch allows you to connect a terminal or modem to the console port in this way:
Note: Use a ball-point pen tip or other small, pointed object to access the console port mode switch. The switch ships in the in position.
-
Mode 1: The switch is in the in position. Use this mode to connect a terminal to the console port with the RJ-45-to-RJ-45 rollover cable and the DTE adapter (with the label Terminal ). You can also use this mode to connect a modem to the console port with the RJ-45-to-RJ-45 rollover cable and the DCE adapter (with the label Modem ). See the sectionConsole Port Mode 1 Signaling and Pinouts.
-
Mode 2: The switch is in the out position. Use this mode to connect a terminal to the console port with the Catalyst 5500/5000 series Supervisor Engine III console straight-through cable and an appropriate adapter for the terminal connection. (The cable and adapter are not provided.) See the section Console Port Mode 2 Signaling and Pinouts.
Console Port Mode 1 Signaling and Pinouts
This section provides the signaling and pinouts for the console port in mode 1. (The port mode switch is in the in position.)
-
DB-9 Adapter (for Connection to a PC)
Use the RJ-45-to-RJ-45 rollover cable and the RJ-45-to-DB-9 female DTE adapter (with the label Terminal ) to connect the console port to a PC that runs terminal emulation software.Table I-1 lists the pinouts for the async serial console port, the RJ-45-to-RJ-45 rollover cable, and the RJ-45-to-DB-9 female DTE adapter.
Table I-1: Port Mode 1—Console Port Signaling and Pinouts (DB-9 Adapter)
| Console Port |
RJ-45-to-RJ-45 Rollover Cable |
RJ-45-to-DB-9 Terminal Adapter |
Console Device |
| Signal |
RJ-45 Pin |
RJ-45 Pin |
DB-9 Pin |
Signal |
| RTS |
11 |
8 |
8 |
CTS |
| DTR |
2 |
7 |
6 |
DSR |
| TxD |
3 |
6 |
2 |
RxD |
| GND |
4 |
5 |
5 |
GND |
| GND |
5 |
4 |
5 |
GND |
| GND |
6 |
3 |
3 |
TxD |
| DSR |
7 |
2 |
4 |
DTR |
| CTS |
81 |
1 |
7 |
RTS |
1Pin 1 has an internal connection to pin 8.
-
DB-25 Adapter (for Connection to a Terminal)
Use the RJ-45-to-RJ-45 rollover cable and the RJ-45-to-DB-25 female DTE adapter (with the label Terminal ) to connect the console port to a terminal. Table I-2 lists the pinouts for the async serial console port, the RJ-45-to-RJ-45 rollover cable, and the RJ-45-to-DB-25 female DTE adapter.
Table I-2: Port Mode 1—Console Port Signaling and Pinouts (DB-25 Adapter)
| Console Port |
RJ-45-to-RJ-45 Rollover Cable |
RJ-45-to-DB-25 Terminal Adapter |
Console Device |
| Signal |
RJ-45 Pin |
RJ-45 Pin |
DB-25 Pin |
Signal |
| RTS |
11 |
8 |
5 |
CTS |
| DTR |
2 |
7 |
6 |
DSR |
| TxD |
3 |
6 |
3 |
RxD |
| GND |
4 |
5 |
7 |
GND |
| GND |
5 |
4 |
7 |
GND |
| RxD |
6 |
3 |
2 |
TxD |
| DSR |
7 |
2 |
20 |
DTR |
| CTS |
81 |
1 |
4 |
RTS |
1Pin 1 has an internal connection to pin 8.
-
Modem Adapter
Use the RJ-45-to-RJ-45 rollover cable and the RJ-45-to-DB-25 male DCE adapter (with the label Modem ) to connect the console port to a modem. Table I-3 lists the pinouts for the async serial auxiliary port, the RJ-45-to-RJ-45 rollover cable, and the RJ-45-to-DB-25 male DCE adapter.
Table I-3: Port Mode 1—Console Port Signaling and Pinouts (Modem Adapter)
| Console Port |
RJ-45-to-RJ-45 Rollover Cable |
RJ-45-to-DB-25 Modem Adapter |
Modem |
| Signal |
RJ-45 Pin |
RJ-45 Pin |
DB-25 Pin |
Signal |
| RTS |
11 |
8 |
4 |
RTS |
| DTR |
2 |
7 |
20 |
DTR |
| TxD |
3 |
6 |
3 |
TxD |
| GND |
4 |
5 |
7 |
GND |
| GND |
5 |
4 |
7 |
GND |
| RxD |
6 |
3 |
2 |
RxD |
| DSR |
7 |
2 |
8 |
DCD |
| CTS |
81 |
1 |
5 |
CTS |
1Pin 1 has an internal connection to pin 8.
Console Port Mode 2 Signaling and Pinouts
This section provides the signaling and pinouts for the console port in mode 2. (The port mode switch is in the out position). SeeTable I-4 for the pinouts. Mode 2 gives you the option to use a standard RJ-45 straight-through cable to connect a terminal.
Table I-4: Console Port Pinouts (Port Mode Switch Out)
| Console Port |
Console Device |
| Pin (Signal) |
Input/Output |
| 1 (RTS)1 |
Output |
| 2 (DTR) |
Output |
| 3 (RxD) |
Input |
| 4 (GND) |
GND |
| 5 (GND) |
GND |
| 6 (TxD) |
Output |
| 7 (DSR) |
Input |
| 8 (CTS)1 |
Input |
1Pin 1 has an internal connection to pin 8.
Troubleshoot the Connection of a Terminal to the Console Port on Catalyst Switches
If you have trouble with connection to the device via the console connection, perform these tasks:
-
Verify that the rollover or straight-through cable is a known good cable. (Do not use a crossover cable.)
-
Try to use a different DB-9 adapter that connects to your PC.
-
Verify that your terminal emulation software settings are 9600 baud, 8 data bits, no parity, and 1 stop bit. Also, try to set the flow control to none, instead of hardware.
-
Make sure that the rollover or straight-through cable terminates into the console port on the Catalyst switch. The cable must not terminate on the AUX port.
-
Try to connect to the console port of the Catalyst switch from another PC or terminal.
Related Information
 Feedback