-
Cisco Unity System Administration Guide, Release 3.1
-
Preface
-
Introduction
-
System Overview
-
Subscriber Accounts
-
Call Management Tools
-
Subscriber and Operator Orientation
-
Maintaining Cisco Unity
-
Maintaining Cisco Unity Failover
-
Enhanced Phone Security
-
Multiple Languages
-
Integrating a Fax Server with Cisco Unity
-
Subscriber Template Settings
-
Class of Service Settings
-
Creating Subscriber Accounts
-
Subscriber Settings
-
Public Distribution List Settings
-
Account Policy Settings
-
Call Handler Settings
-
Directory Handler Settings
-
Interview Handler Settings
-
Call Routing
-
Restriction Tables
-
Reports
-
Network Settings
-
System Settings
-
Glossary
-
 Feedback
Table Of Contents
Getting Acquainted with Cisco Unity
Introducing the Cisco Unity Administrator
Accessing and Exiting the Cisco Unity Administrator
Exiting and Starting the Cisco Unity Software and Server
Exiting the Cisco Unity Software
Shutting Down or Restarting the Cisco Unity Server
Starting the Cisco Unity Software
Cisco Unity Data and Message Storage
Introduction
Overview: Cisco Unity
Cisco Unity is a Windows 2000-based communications solution that brings you voice mail and unified messaging, and integrates them with the desktop applications you use every day. Cisco Unity works with Exchange to deliver and store all messages—voice, fax, and e-mail—giving you the ability to access all of your messages by using your desktop PC, a touchtone phone, or the Internet.
Cisco Unity is the unified messaging component within the Cisco family of AVVID (Architecture for Voice, Video and Integrated Data) offerings, and it integrates with Cisco CallManager, the call-processing component of Cisco AVVID. Although designed for a Voice over IP environment, Cisco Unity also integrates with several traditional, circuit-switched phone systems. When you are ready to transition to Voice over IP, Cisco Unity allows you to do so in stages, by setting up a dual-switch integration with both the circuit-switched phone system and Cisco CallManager.
Cisco Unity Features
Cisco Unity features include the following. (Your system may not include all of these features.)
Intelligent voice mail
The Cisco Unity voice messaging capabilities allow subscribers to listen to their messages, send voice messages to other subscribers, and customize settings such as personal greetings. With Cisco Unity you can set up an automated attendant, which serves as an electronic receptionist that answers and routes incoming calls.
Cisco Unity Administrator
The Web administrator allows you access to the Cisco Unity server via an intranet and remotely. Use the Cisco Unity Administrator to create or modify subscriber accounts, configure messaging options, assign classes of service, record greetings, and run reports.
ActiveAssistant
The ActiveAssistant Web interface gives subscribers the ability to customize personal settings—including recorded greetings or message delivery options—on their computers.
ViewMail for Outlook
ViewMail for Microsoft Outlook, which is integrated with the Microsoft desktop clients (including Outlook 98, Outlook 2000, and Outlook 2002), provides a graphical user interface accessible from any networked computer. Subscribers listen to voice messages by using VCR-style controls.
Cisco Unity Visual Messaging Interface
The Cisco Unity Visual Messaging Interface (VMI) Web site lets subscribers listen to, compose, reply to, forward, and delete voice messages from a "virtual" Inbox.
Multiple languages
With multiple languages installed, you can change the language in which Cisco Unity plays system prompts to subscribers and callers. You can also choose one or more languages with which to display the Cisco Unity Administrator pages and the Help files.
Text-to-speech
This feature allows you to listen to your e-mail over the phone. Cisco Unity reads the text portion of e-mail messages and provides additional information such as the name of the sender (if the sender is a subscriber), and the time and date that the message was sent.
Third-party fax integrations
Cisco Unity supports fax servers that can install an Exchange gateway and have dedicated fax lines set up to the fax ports on the fax server. When a third-party fax server is integrated with Cisco Unity, the administration of the fax server is controlled by the fax server software.
A list of officially supported fax servers that you can use with Cisco Unity can be found in the appropriate version of the Cisco Unity Release Notes, available in HTML format on Cisco.com. Refer to
http://www.cisco.com/univercd/cc/td/doc/product/voice/c_unity/unity31/rel_note/index.htm.
Digital Networking
This feature enables subscribers to send and receive voice messages between Cisco Unity servers at different locations, between a Cisco Unity server and the Internet, and between a Cisco Unity server and another messaging system.
AMIS support
Cisco Unity supports the Audio Messaging Interchange Specification (AMIS) protocol, which provides an analog mechanism for transferring voice messages between different voice messaging systems. A list of voice messaging systems that Cisco Unity can exchange AMIS voice messages with can be found in the appropriate version of the Cisco Unity Release Notes, available in HTML format on Cisco.com. Refer to
http://www.cisco.com/univercd/cc/td/doc/product/voice/c_unity/unity31/rel_note/index.htm.
Live record
Live record allows subscribers to record a conversation while talking to a caller. The recorded conversation is stored as a message in the subscriber Inbox and the subscriber can review it later, or redirect it to another subscriber or group of subscribers.
Enhanced failover
Failover is a feature that provides a simple redundancy, allowing voice messaging functions to continue if the Cisco Unity server fails or when you need to perform maintenance. To set up failover, you install and configure Cisco Unity on two servers, a primary server and a secondary server. If the primary server fails or if the Cisco Unity service on the primary server stops, the secondary Cisco Unity server automatically starts performing standard Cisco Unity operations.
Getting Acquainted with Cisco Unity
Refer to the following sections in this chapter for more information:
•
Introducing the Cisco Unity Administrator—This section describes the Cisco Unity Administrator, the primary tool with which you perform administration tasks.
•
•
•
•
•
Introducing the Cisco Unity Administrator
The Cisco Unity Administrator is the interface with which you perform most administration tasks. It is a Web site that you access by using Internet Explorer.
The interface is divided into three areas.
Cisco Unity Data
The Cisco Unity Administrator features links from the main navigation bar to five groupings of data, representing the subscribers and other Cisco Unity entities that you create on your local Cisco Unity server. The Cisco Unity Administrator does not allow you to view or modify the accounts of subscribers or other entities that were created on another Cisco Unity server.
The five data groupings available from the Cisco Unity Administrator include:
Subscriber
These pages are used to enter data related to individual subscriber records. Also included are subscriber template pages, which contain settings that are applied to groups of subscribers. Settings include schedules, passwords, account permissions, call processing and transfer options, and distribution lists.
Call management
These pages are used to set how Cisco Unity answers, routes, transfers, and records calls. Settings include call routing, prerecorded caller interviews, call recording, and allowing or blocking certain dial strings.
Reports
These pages are used to generate reports on subscriber-based and system-based data. Reports can be generated for any of the data stored in the system, such as subscriber message activity, distribution lists, phone logons, disk storage, administration access, and port usage.
Network
These pages are used to add and view information about other Cisco Unity locations and to specify AMIS settings. Note that the network data pages are only available if Digital Networking and AMIS are installed.
System
These pages are used to customize and view numerous system features, including business schedules, annual holidays, port settings, phone system (switch) settings, and diagnostic tools.
Navigation
There are two levels of navigation in the Cisco Unity Administrator.
•
•
Always use the Cisco Unity navigation bar, rather than the Internet Explorer navigation buttons, to move between pages. Otherwise, incorrect data will be displayed.
Command Icons
The command icons are located in the title bar, which is in the upper-right area of each Cisco Unity Administrator page.
Saving Data
Save newly entered data by clicking the Save icon. Cisco Unity requires you to save new data before moving to another record or to another part of the Cisco Unity Administrator. You will see one of three cues when the displayed record contains unsaved data:
•
•
•
Finding Records
A record is the group of settings or collection of data for an individual subscriber, class of service, or other Cisco Unity entity. For example, a subscriber record contains the subscriber account data.
To find a subscriber record
Step 1
Step 2
Step 3
Step 4
Step 5
Step 6
To find other types of records
Step 1
Step 2
Step 3
Step 4
Step 5
Adding Records
Always enter information for a new record in an Add window. Entering new record information on an existing page will change the displayed record rather than create a new record.
To add a record
Step 1
Step 2
Step 3
Step 4
Accessing and Exiting the Cisco Unity Administrator
Cisco Unity restricts access to the Cisco Unity Administrator by using class of service to designate which areas of the interface, if any, administrators can access. Cisco Unity does not permit more than five administrators to access the Cisco Unity Administrator at the same time.
You can grant one or more domain accounts access to the Cisco Unity Administrator on one or more Cisco Unity servers without adding a new subscriber account for each one by using the GrantUnityAccess utility. For more information about using the GrantUnityAccess utility, see the "Granting Administrative Rights to Other Cisco Unity Servers" section on page 23-11.
The Cisco Unity Administrator relies on Integrated Windows authentication (formerly called Windows NT Challenge/Response authentication), which runs in the background, to authenticate the user name and password. You may or may not be asked for a name and password when accessing the Cisco Unity Administrator.
No name and password required
You are not prompted for a name and password if you are logged on to a trusted domain as an administrator. If security is a concern in this situation, lock the workstation when it is unattended.
Name and password required
You are prompted for a name and password if you are logged on to an untrusted domain or if you are connecting over the Internet. After 15 minutes of inactivity on the Cisco Unity server, the Cisco Unity Administrator will not accept additional input. In order to continue input, refresh the browser, log on again, and enter the password. If security is a concern in this situation, log off of Cisco Unity when the workstation is unattended.
For additional information on securing access to Cisco Unity, refer to the white paper, "Security Best Practices for Cisco Unity 3.0" available at http://www.cisco.com/univercd/cc/td/doc/product/voice/c_unity/whitpapr/security.htm.
To access the Cisco Unity Administrator from the Cisco Unity server
Step 1
Step 2
To access the Cisco Unity Administrator from another computer
Step 1
Step 2
To exit the Cisco Unity Administrator
If you exit Internet Explorer without first logging off of Cisco Unity, it takes up to 20 minutes for your logon connection to be terminated.
Step 1
Step 2
Using the Online Help
The Cisco Unity Administrator includes two types of context-sensitive online Help:
Displays Help for the current page in the Cisco Unity Administrator.
Displays descriptions for individual fields in the Cisco Unity Administrator.
To display Online Documentation
Step 1
Step 2
To display Field Help
Step 1
Step 2
Step 3
Exiting and Starting the Cisco Unity Software and Server
The following sections provide instructions on exiting the Cisco Unity software, shutting down and restarting the Cisco Unity server, and starting the Cisco Unity software.
Exiting the Cisco Unity Software
This section provides two procedures for exiting the software: from the Cisco Unity server and from another computer.
Caution
To exit the Cisco Unity software from the Cisco Unity server
Step 1
Step 2
Step 3
(If the Cisco Unity icon is not in the taskbar, browse to the CommServer directory and double-click AvCsTrayStatus.exe.)
Step 4
Step 5
To exit the Cisco Unity software from another computer
Step 1
Step 2
Step 3
•
•
Step 4
Shutting Down or Restarting the Cisco Unity Server
If the Cisco Unity system has an expansion chassis or is set up for failover, consider the following before shutting down or restarting the Cisco Unity server:
To shut down or restart the Cisco Unity server
Step 1
Step 2
Step 3
During a restart, the Cisco Unity software starts automatically.
When Cisco Unity starts successfully, three tones play and a check mark appears in the Cisco Unity icon in the status area of the taskbar.
When Cisco Unity does not start successfully, two tones play and an "X" appears in the Cisco Unity icon in the status area of the taskbar.
Starting the Cisco Unity Software
This section provides two procedures for starting the software: from the Cisco Unity server and from another computer.
Cisco Unity is a Windows service that is configured to start automatically when you turn on or restart the server. Do one of the following procedures only if you exited the Cisco Unity software but did not restart the server.
Exchange must be running before you start the Cisco Unity software, whether or not Exchange is installed on the Cisco Unity server:
If Exchange stops for any reason while Cisco Unity is running, Cisco Unity will continue to take messages.
To start the Cisco Unity software from the Cisco Unity server
Step 1
Step 2
(If the Cisco Unity icon is not in the taskbar, browse to the CommServer directory and double-click AvCsTrayStatus.exe.)
Step 3
When Cisco Unity starts successfully, three tones play and a check mark appears in the Cisco Unity icon.
When Cisco Unity does not start successfully, two tones play and an "X" appears in the Cisco Unity icon.
Step 4
Step 5
To start the Cisco Unity software from another computer
Step 1
Step 2
Step 3
Step 4
Recording Greetings and Names
Subscribers can record their own names and personal greetings by using either the Cisco Unity conversation or the ActiveAssistant. Subscriber and call handler names and greetings can also be recorded from pages within the Cisco Unity Administrator. In addition, public distribution lists, private lists, interview handlers, and the directory handler have recorded names which are recorded from pages within the Cisco Unity Administrator.
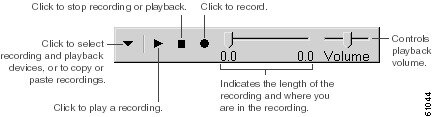
The Media Master control bar appears on each page of the Cisco Unity Administrator where recordings can be made. It allows you to make recordings, either with a phone or with a microphone, by clicking the Media Master controls.
Note that in order to record by phone, you must have at least one port enabled with Media Master Recording-by-Phone. See the "Voice Port Settings" section on page 24-14 for more information.
If you are accessing the Media Master remotely and your network has a firewall, you cannot use a multimedia microphone or multimedia speakers. To record and play from an external phone, you must set the appropriate options in the Options menu on the Media Master control bar. (The Options menu button is on the far left of the Media Master control bar. See Figure 1-1.)
Figure 1-1 Media Master Control Bar
Cisco Unity Data and Message Storage
Information about subscriber accounts and other Cisco Unity data is stored in an SQL database on the Cisco Unity server. Additionally, a small subset of the Cisco Unity information is also stored in the directory. Cisco Unity keeps the information in the directory and in the SQL database synchronized.
The directory that Cisco Unity uses for data storage depends on what was selected when Cisco Unity was installed. During installation, you specify a "bridgehead" Exchange server for Cisco Unity to communicate with. This bridgehead server can be either an Exchange 5.5 or Exchange 2000 server and can be either on the same computer as Cisco Unity or on another computer. When the bridgehead server is an Exchange 5.5 server, the directory in which Cisco Unity stores data is the Exchange 5.5 directory. When Exchange 2000 is the bridgehead server, Cisco Unity stores data in Active Directory.
By storing its data in a SQL database, Cisco Unity derives many performance, reliability, and scalability benefits. Cisco Unity supports a Global Address List (GAL) of 250,000 users while maintaining current performance levels of the telephone user interface (TUI) in a networked configuration. This allows installations where the GAL is very large and Cisco Unity subscribers are a subset of the GAL.
Because very little information is stored in the directory, and because that information is not likely to change often, directory replication caused by changes to Cisco Unity data is minimal after the initial creation of subscriber accounts.
Cisco Unity functions when the network is down
In addition to the SQL database that contains subscriber names and extensions, the Cisco Unity Messaging Repository is also on the Cisco Unity server. When an Exchange server or even the entire Exchange network is down, Cisco Unity can answer calls, allow outside callers to look up subscriber extensions, and take voice messages. While the e-mail system or network is off line, new voice messages are stored in the messaging repository on the Cisco Unity server. During this time, subscribers checking their voice messages hear the Cisco Unity Messaging Repository conversation, which explains that their Exchange server is not available but lets them access voice messages left since it went down. When the Exchange server or network is back on line, the voice messages stored in the messaging repository are routed to the subscriber mailboxes.