-
Cisco MeetingPlace for Outlook Release 4.3.0 System Manager's Guide
-
Preface
-
Concepts and Functions
-
Installing Cisco MeetingPlace for Outlook
-
Configuring and Managing Cisco MeetingPlace for Outlook
-
Customizing Meeting Notifications
-
Using Cisco MeetingPlace for Outlook
-
Troubleshooting
-
Notification Items
-
Customizing the Cisco MeetingPlace for Outlook Scheduling Form
-
Upgrading Cisco MeetingPlace for Outlook
-
 Feedback
Table Of Contents
Configuring and Managing Cisco MeetingPlace for Outlook
Configure Client Setup Utility
Configuring MeetingPlace for Outlook for Reservationless Meetings
Configuring MeetingPlace for Outlook for Reservationless Meetings
Changing Settings in the Configure Client Setup Utility
MeetingPlace Gateway Configuration Utility
Enabling Authentication and Security Options
Integrated Windows Authentication
Configuring and Managing Cisco MeetingPlace for Outlook
Several utilities are available to help you set up and manage Cisco MeetingPlace for Outlook:
•
Configure Client Setup Utility
•
•
Configure Client Setup Utility
The Configure Client Setup Utility, also referred to as the ConfigClient Utility, generates the MeetingPlace for Outlook Client setup program (Setup.exe) and allows you to modify settings in five areas: Servers, Logins, Client Options, Notification Options, and Template.
Configure the client during MeetingPlace for Outlook installation or upgrade
Visit all tabs in the Configure Client Setup Utility, described in this section, and select options as needed.
After you finish, click Save, then click Close. During an upgrade, do this even if you have not made changes. You will automatically return to the installation process at Step 14 of the installation instructions in "Installing Cisco MeetingPlace for Outlook".
After you finish installing and configuring MeetingPlace for Outlook, see Distributing and Installing the MeetingPlace for Outlook Client.
Configure the client at other times
Choose Start > Settings > Control Panel > MeetingPlace Gateways, then click the Outlook Gateway tab. Make changes using the information in the Configure Client Setup Utility, then click Save, then click Close.
After you make changes, see Changing Settings in the Configure Client Setup Utility.
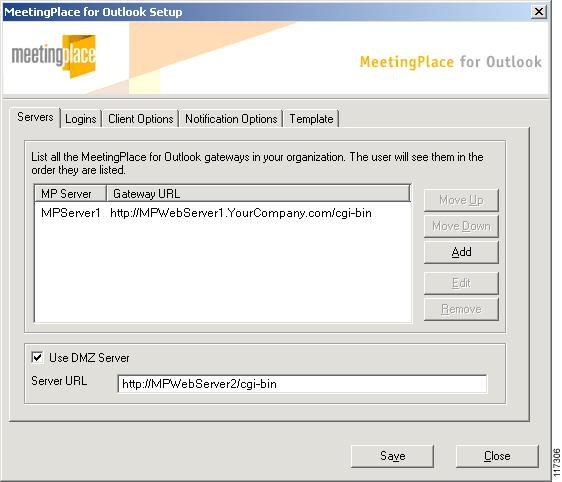
Servers Tab
Specify the MeetingPlace server that meetings will be scheduled on.
If you have more than one MeetingPlace server configured for access by MeetingPlace for Outlook, and you wish users to be able to choose the server they schedule a meeting on, identify each server here. The order in which they are listed here is the order users will see. The first server in the list is the default.
To add a MeetingPlace Audio Server to the list:
Step 1
Step 2
Step 3
.Step 4
Step 5
To modify server information:
Step 1
Step 2
Step 3
Step 4
If you have more than one MeetingPlace for Outlook server listed, you can change the order in which the server names appear in the drop-down list from which users choose a server when they schedule a meeting. To change the order in which servers are listed:
Step 1
Step 2
Step 3
Step 4
Logins Tab
MeetingPlace for Outlook provides multiple authentication options. Click the Logins tab to specify how users will authenticate.
To enter or change login settings:
Step 1
Step 2
Require users to login each time they wish to use MeetingPlace for Outlook (disable any form of automatic authentication).
Do not persist login information
None.
Store login information in the registry after an initial session.
Persist login information in registry
The scheduler and invitee must both have MeetingPlace for Outlook client software installed.
Users who do not have MeetingPlace for Outlook installed, or those using the click-to-attend link, are required to log on. Restricted meetings are only accessible to those who log on as profiled users.
Store login information in the form of cookies for automatic authentication during subsequent sessions.
Persist login information in browser cookies
Users login only the first time they use MeetingPlace for Outlook.
Automatically authenticate users into MeetingPlace as soon as they open a calendar appointment.
Use integrated Windows authentication
The MeetingPlace user ID of each user must match the Outlook login ID of that user. This match must be identical and is case-sensitive. See the notes following this table for important information.
Automatically authenticate users using directory lookup.
Use MeetingPlace Directory Services
Your organization must have MeetingPlace Directory Services installed and synchronized with your company's corporate directory.
Implementing MeetingPlace Directory Services for MeetingPlace for Outlook requires MeetingPlace Professional Services. Contact your support representative for information. See Obtaining Technical Assistance, page x.
To use integrated Windows authentication:
•
•
Step 3
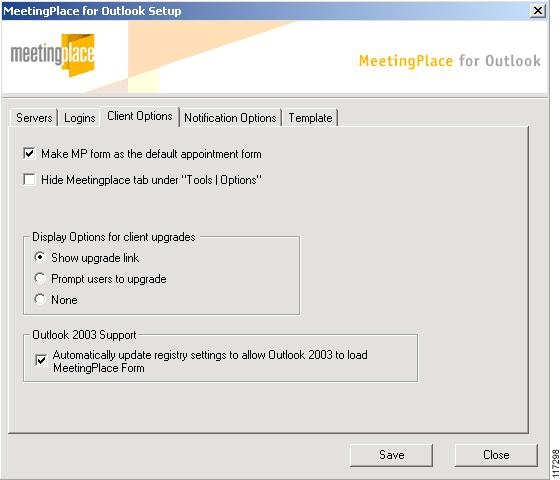
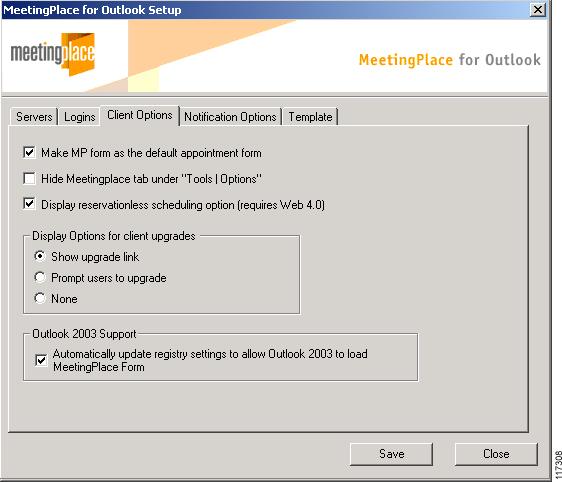
Client Options Tab
The Client Options tab includes information about the MeetingPlace scheduling form and MeetingPlace for Outlook client upgrades. It also allows you to enable MeetingPlace for Outlook 2003.
To configure or modify the MeetingPlace for Outlook scheduling form:
Step 1
Step 2
Enable your users to schedule MeetingPlace meetings whenever they open the default scheduling form.
Select Make MP form as the default appointment form
Clearing this option forces users to click the calendar icon at the top left of their Outlook calendar to specify that they want to use the MeetingPlace scheduling form to schedule a meeting.
Hide the MeetingPlace tab under the Microsoft Outlook Tools menu > Options.
Select Hide MeetingPlace tab under Tools | Options
In the MeetingPlace window, users can choose to make the MeetingPlace scheduling form their default scheduling form, configure their default MeetingPlace Audio Server, and allow automatic authentication.
Enable Outlook 2003 users to use MeetingPlace for Outlook.
Check the check box to Automatically update registry settings to allow Outlook 2003 to load the MeetingPlace form
This will change the registry settings on the computers of Outlook 2003 users to allow one-off forms with trusted controls.
Visit http://www.microsoft.com/office/ork/2003/seven/ch26/SecD01.htm for information.
This option is enabled by default.
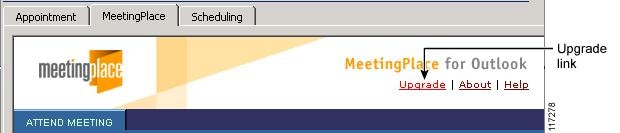
MeetingPlace for Outlook automatically detects when a newer version of the MeetingPlace for Outlook client is available. To determine how your users will receive client upgrade alerts, select one of the following options. When finished, click Save.
Figure 3-1 Client Upgrade Options
Step 3
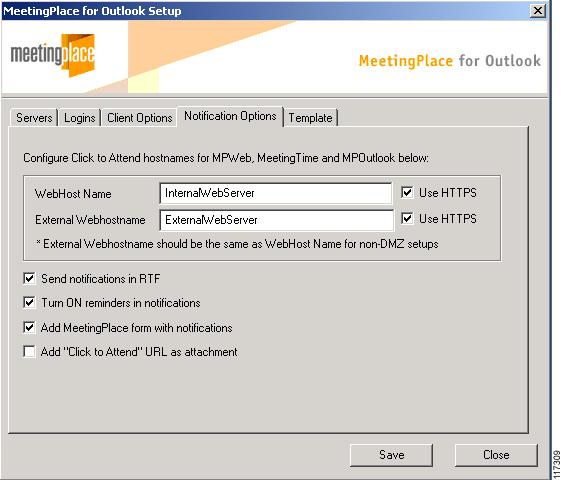
Notification Options Tab
The Notification Options tab allows you to specify how users will receive notifications for meetings scheduled in MeetingPlace for Outlook, MeetingPlace Web, or MeetingTime. Not all options apply to all scheduling clients; see the table in this section for applicability.
To set or change notification options:
Step 1
Step 2
Configure the Click-to-Attend links with your MeetingPlace Web server host name(s).
Notifications for meetings scheduled in MeetingPlace for Outlook, MeetingPlace Web, or MeetingTime.
If you have a DMZ configuration:
Enter the name of the internal MeetingPlace Web server in WebHost Name. Enter the name of the external MeetingPlace Web server in External Webhostname.
If you do not have a DMZ configuration:
Enter the name of your MeetingPlace Web server into both WebHost Name and External Webhostname.
This information is the same as the information in Notification Tab.
If a MeetingPlace Web host name changes, update your notification templates. See Chapter 4, "Customizing Meeting Notifications".
Make the Click-to-Attend links initiate secure connections via SSL.
Notifications for meetings scheduled in MeetingPlace for Outlook.
Check the Use HTTPS check box beside one or both server names.
See Enabling Authentication and Security Options for further information about enabling secure connections.
To enable secure connections via HTTPS for notifications for meetings scheduled in MeetingPlace Web or MeetingTime, see Enabling Authentication and Security Options.
Set notifications to display formatting, such as bold, italics, and color, that you may have included in your notification templates.
Notifications for meetings scheduled in MeetingPlace Web or MeetingTime.
Select Send notifications in RTF.
Notifications sent via the Microsoft Exchange server must be plain text.
Ensure that invitees receive a meeting reminder from Outlook before the start of their meeting.
Notifications for meetings scheduled in MeetingPlace Web or MeetingTime.
Select Turn ON reminders in notifications.
For meetings scheduled in MeetingPlace for Outlook, the user sets reminders in the Outlook scheduling form.
Add the MeetingPlace tab to the meeting notification so all invitees can review meeting details.
Notifications for meetings scheduled in MeetingPlace Web or MeetingTime.
Select Add MeetingPlace form with notifications.
If you select this option, you must also do the following:
In the MeetingPlace Gateways Configuration Utility, click the Notification tab, then select Attach Links as URL. See Notification Tab.
Include a click-to-attend link as an attachment in your notifications.
Notifications for meetings scheduled in MeetingPlace Web or MeetingTime.
Select Add "click-to-attend" URL as attachment.
Some Exchange Servers may block the receipt of attachments.Therefore, this option is turned off by default.
If you select this option, you must also do the following:
In the MeetingPlace Gateways Configuration Utility, click the Notification tab, then select Attach Links as URL. See Notification Tab.
Step 3
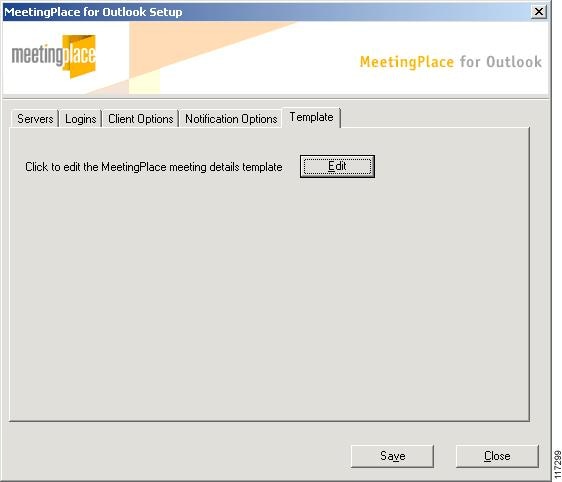
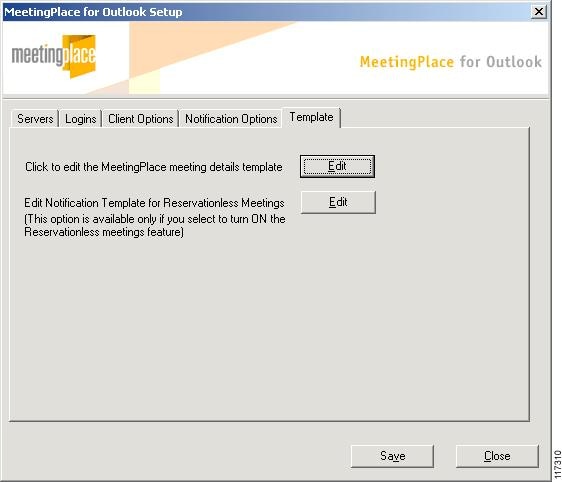
Template Tab
The Template tab allows you to modify the text of your MeetingPlace for Outlook notification template.
To edit the notification template:
Step 1
Step 2
If your system is configured for Reservationless meetings, you can also edit the reservationless meeting template. However, editing this template is not recommended.
Step 3
Step 4
Configuring MeetingPlace for Outlook for Reservationless Meetings
If your MeetingPlace system is configured for reservationless meetings, users can initiate and attend reservationless meetings through MeetingPlace for Outlook.
The reservationless meeting feature allows users to start a meeting at any time, without scheduling resources in advance. The meeting ID of a reservationless meeting is always the MeetingPlace profile ID of the scheduler.
Requirements
In order to enable reservationless meetings in MeetingPlace for Outlook:
•
•
•
Configuring MeetingPlace for Outlook for Reservationless Meetings
To configure MeetingPlace for Outlook to support reservationless meetings:
Step 1
Step 2
Step 3
Step 4
For information on how to modify the notification template for reservationless meetings, see Chapter 4, "Customizing Meeting Notifications".
Changing Settings in the Configure Client Setup Utility
MeetingPlace for Outlook requires little maintenance after installation. However, if you need to change any of the settings in the MeetingPlace for Outlook client, use the Configure Client Setup Utility.
If you modified any of the following in the Configure Client Setup Utility, distribute the newly generated Setup.exe file to your users.
•
•
–
–
–
Your users run the newly generated Setup.exe to upgrade their computers with the changes you made. See Client Options Tab for information about notifying users to upgrade.
If your company uses an automated distribution service, such as Microsoft SMS, you may use this service to update the computers of your users with any changes you make in the Configure Client Setup Utility, as long your end user workstations are not locked down. See "Installing Cisco MeetingPlace for Outlook" for more information about using such services.
MeetingPlace Gateway Configuration Utility
The MeetingPlace Gateway Configuration Utility allows you to change the configuration of the MeetingPlace Gateway SIM, Notifications, and MeetingPlace for Outlook. These settings are initially set with values you entered during installation.
To access this utility: Choose Start > Settings > Control Panel > MeetingPlace Gateways.
The following sections describe the settings in this management utility.
Gateway SIM Tab
The Gateway System Integrity Manager (SIM) improves the reliability and serviceability of your MeetingPlace for Outlook by:
•
•
•
For further information on the Gateway SIM tab, refer to the Cisco MeetingPlace Web System Manager's Guide.
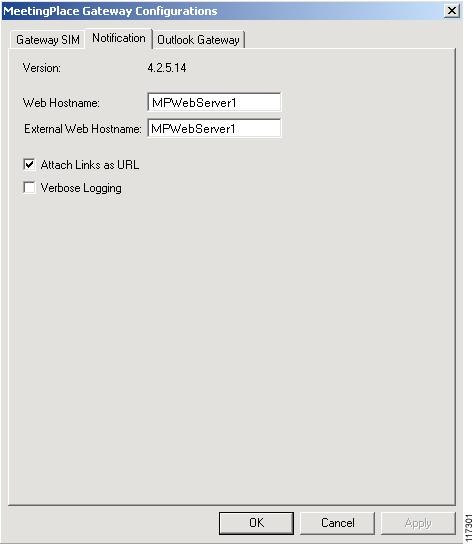
Notification Tab
The Notification tab allows you to configure the host names of the MeetingPlace Web servers required for MeetingPlace for Outlook notifications. Each field is described below.
Important information:
•
•
•
–
–
•
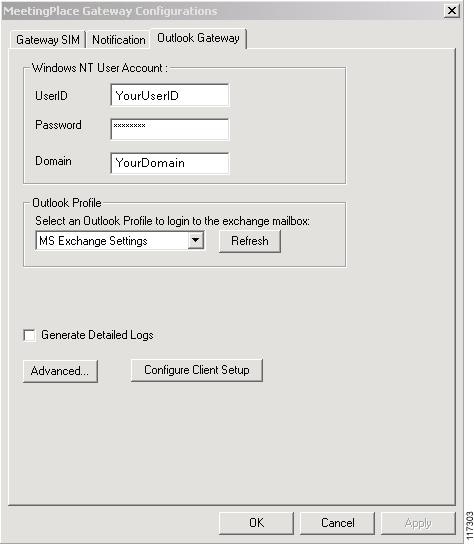
Outlook Gateway Tab
The Outlook Gateway tab allows you to change some of the settings that were determined during the MeetingPlace for Outlook installation, such as the Exchange Server host name and the password for the Windows 2000 user account. Each field is described in the table that follows the figure.
You must restart the Outlook service to implement any changes to the Outlook Gateway tab.
Figure 3-2 Outlook Gateway Tab
Windows NT User Account
The user ID, password, and domain for the MeetingPlace for Outlook account on the Windows 2000 server.
Outlook Profile
The Outlook profile used to log on to the Exchange mailbox. Each Outlook profile is preconfigured to connect with a particular Exchange Server and mailbox. Click Refresh to update the list of available profiles.
Generate Detailed Logs
Whether detailed entries should be logged to the Gateway SIM event log. Used for troubleshooting purposes and should not be selected.
Advanced
Click to access the Advanced Configuration window where you can specify how you want MeetingPlace for Outlook to handle undeliverable messages. You can also specify a time zone.
Configure Client Setup
Click to open the Configure Client Setup Utility, where you can modify settings relating to servers, login options, and client updates. You can also edit notification templates. See Configure Client Setup Utility.
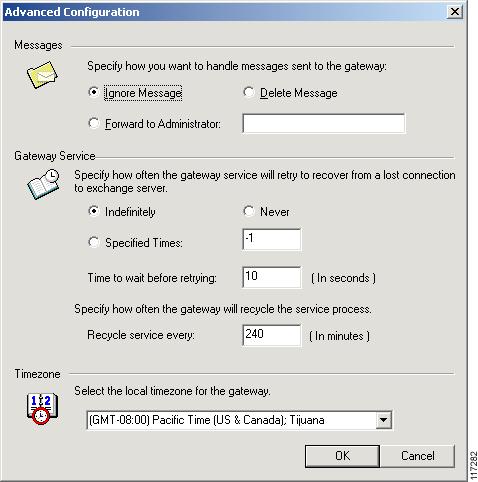
Advanced Configuration
The Advanced Configuration window allows you to further configure your MeetingPlace for Outlook. It is organized into three sections: Messages, Gateway Service, and Time Zone.
Figure 3-3 Advanced Configuration Window
Enabling Authentication and Security Options
If you select authentication and security options in the ConfigClient utility, you must also make other changes.
Integrated Windows Authentication
If you select Use integrated Windows authentication in the Logins Tab:
•
hklm\software\Latitude\Mpweb\mpagent\remoteuserallowed=1•
SSL
SSL connections are recommended for extra security, especially if external users will attend meetings via an external MeetingPlace Web server in a DMZ. After the following changes are made, click-to-attend links from the server(s) you specify will be secure https links.
To allow MeetingPlace for Outlook to take advantage of secure connections using SSL:
Step 1
Step 2
Step 3
•
•
Step 4
[HKEY_LOCAL_MACHINE\SOFTWARE\Latitude\MeetingPlace Notification Gateway]"AttendConfURL"="https://%HOSTNAME%/attend/Type=Attend&uMTGId=%UMTGID%""RecurringAttendConfURL"="https://%HOSTNAME%/attend/Type=List&MtgID=%MTGID%&time=%STAR TTIME%&id=%SCHEDULERID%""AttendConfURL External"="https://%HOSTNAME%/attend/Type=Attend&uMTGId=%UMTGID%""RecurringAttendConfURL External"="https://%HOSTNAME%/attend/Type=List&MtgID=%MTGID%&time=%STARTTIME%&id=%SCHE DULERID%"Step 5
[HKEY_LOCAL_MACHINE\SOFTWARE\Latitude\MeetingPlace Notification Gateway\Language URLs]"3"="https://%HOSTNAME%/attend/Type=Attend&uMTGId=%UMTGID%&VLang=3"Step 6
[HKEY_LOCAL_MACHINE\SOFTWARE\Latitude\MeetingPlace Notification Gateway\Language URLs]"6"="https://%HOSTNAME%/attend/Type=Attend&uMTGId=%UMTGID%&VLang=6"
System Manager Agents
System Manager Agents are system-wide parameters configurable in MeetingTime 2001 and later. When these parameters are configured, users receive e-mail notifications about any:
•
•
For more information on System Manager Agents, refer to the Cisco MeetingPlace Audio Server System Manager's Guide.
If the two recurring meeting triggers overlap, the no-show recurring meeting trigger overrides the recurring meeting ending trigger. The scheduler only receives the no-show notification.
No-show Recurring Meeting
If a recurring meeting has no attendance for more than a prespecified number of periods, an e-mail notification is sent to the meeting organizer suggesting that they cancel the remainder of the recurring meeting series.
If the meeting was scheduled from Outlook, the notification includes a text message suggesting that the user cancel the meeting series from their Outlook calendar.
If the meeting was scheduled from MeetingPlace Web or MeetingTime, the notification includes a Click here to Cancel Meetings link that leads the user to a cancellation page on MeetingPlace Web.
Recurring Meeting Ending
If a recurring meeting series is within a prespecified number of periods before expiration, an e-mail notification is sent to the meeting organizer. The notification informs the meeting organizer that the series is set to expire and reminds them to schedule another recurring meeting if the series is to continue.
If the meeting was scheduled from Outlook, the notification suggests scheduling another recurring series via Outlook.
If the meeting was scheduled from MeetingPlace Web or MeetingTime, the notification includes a Click here to Schedule Another Series link that leads the user to the scheduling page where they can renew the meeting.
No other notifications are sent out as the recurring meeting continues towards its expiration.