- What's in This Guide
- Using the Cisco TelePresence System Administration
- Device Information
- Configuring the Cisco TelePresence System
- Troubleshooting the CTS 500
- Troubleshooting the CTS 500-32
- Troubleshooting the CTS 1000
- Troubleshooting the CTS 1100
- Troubleshooting the CTS 1300
- Troubleshooting the TX1300 47
- Troubleshooting the TX1310 65
- Troubleshooting the CTS 3000 and CTS 3200
- Troubleshooting the CTS 3010 and CTS 3210
- Troubleshooting the TX9000 and TX9200
- Monitoring the Cisco TelePresence System
- Satellite Licenses for the Cisco TelePresence System
- Glossary
- Index
- Contents
- First Time Setup Wizard for the CTS500-32 and CTS500-37
- First Time Setup for All Other CTS Models
- IP Settings
- Network Settings
- Cisco Unified Communications Manager Settings
- Address Book
- Telephony Settings
- SNMP Settings
- System Settings
- Troubleshooting Your Configuration
- Upgrading CTS Codec Firmware
- Upgrading Software for CiscoTelePresence Touch12
- Managing Passwords
- Where to Go Next
Contents
This chapter contains the following sections:
- First Time Setup Wizard for the CTS 500-32 and CTS 500-37
- First Time Setup for All Other CTS Models
- IP Settings
- Network Settings
- Cisco Unified Communications Manager Settings
- Address Book
- Telephony Settings
- SNMP Settings
- System Settings
- Troubleshooting Your Configuration
- Upgrading CTS Codec Firmware
- Upgrading Software for Cisco TelePresence Touch 12
- Managing Passwords
- Where to Go Next
First Time Setup Wizard for the CTS 500-32 and CTS 500-37
Because the CTS 500-32 and CTS 500-37 use a first-time setup wizard, the configuration process is somewhat different than other CTS models. See First Time Setup section of the following documentation for complete instructions:
First Time Setup for All Other CTS Models
To set up your Cisco TelePresence System (CTS) for the first time, you must first load the CTS Administration software and bootup the system.
This section contains the following information:
- Loading CTS Administration Software
- Logging In To the Cisco TelePresence System Administration Interface Directly
- Configuring a Static IP Address for Networks That Do Not Use DHCP
- Configuring an Alternate TFTP Server (Optional)
- Configuring Your System After Initial Bootup
Loading CTS Administration Software
CTS Administration Software is factory-installed on each codec and loads during initial bootup. To boot up CTS Administration Software:
Step 1![]() Power on the PDU that is on the bottom of the CTS cabinet by turning the switch to the On position.
Power on the PDU that is on the bottom of the CTS cabinet by turning the switch to the On position.
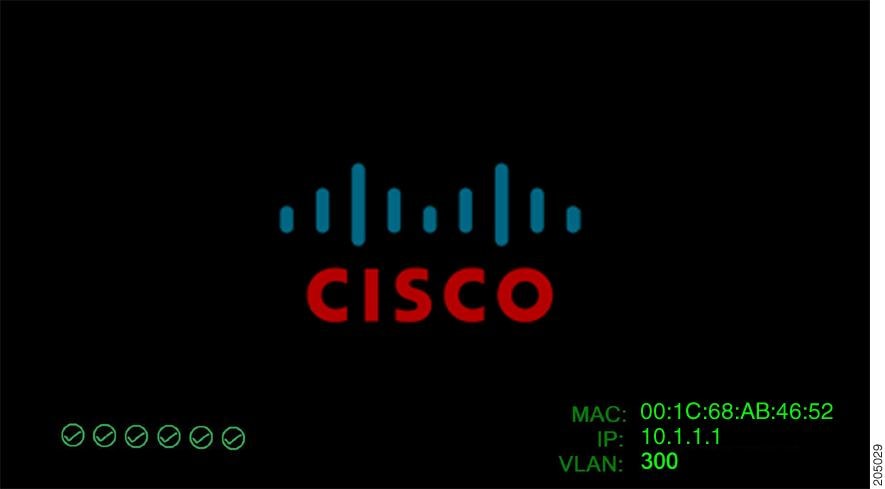
Step 2![]() Turn on the codecs that are associated with your CTS device. The displays associated with each codec become active. CTS displays green check marks on all displays to show bootup progress. Bootup is complete when the system displays six check marks, as shown in Figure 1-1.
Turn on the codecs that are associated with your CTS device. The displays associated with each codec become active. CTS displays green check marks on all displays to show bootup progress. Bootup is complete when the system displays six check marks, as shown in Figure 1-1.

Tip Ignore any messages that indicate a communication error with the camera; this message indicates that the system has not yet downloaded the correct software or firmware.

Note If the last check mark displayed is a red “X,” there has been a compact flash error. If you receive this error, contact Cisco Technical Support.
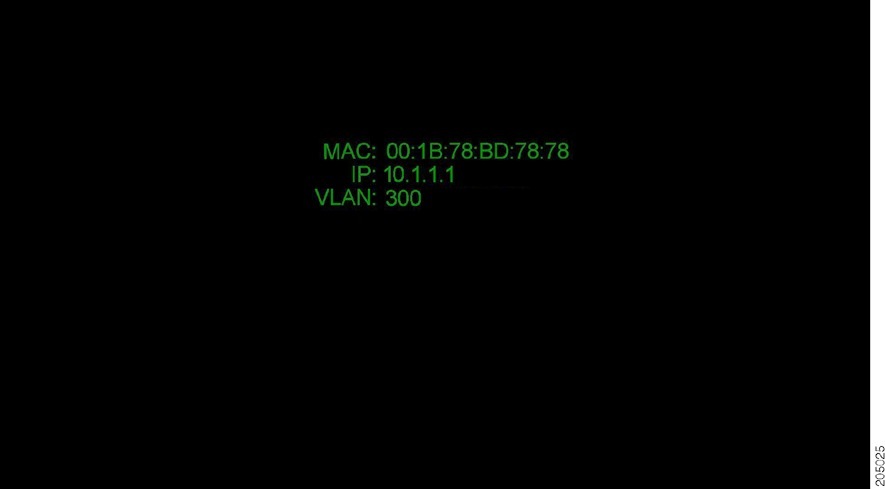
Step 3![]() After bootup completes, make a note of the IP and MAC address that displays on the center of the screen, as shown in Figure 1-2. Use this information to log in to the Cisco TelePresence System Administration interface. This IP address displays until you log in to Cisco TelePresence System Administration or use Secure Shell (SSH) to log in to your CTS device.
After bootup completes, make a note of the IP and MAC address that displays on the center of the screen, as shown in Figure 1-2. Use this information to log in to the Cisco TelePresence System Administration interface. This IP address displays until you log in to Cisco TelePresence System Administration or use Secure Shell (SSH) to log in to your CTS device.
Note If the IP address that displays is 192.168.100.2, the CTS device could not contact the DHCP server or your system does not use DHCP. Do one of the following:
1. If your network does not use DHCP, navigate to Configuration > IP Settings, change the DHCP Enabled setting to No, and specify a static IP address, subnet mask, gateway, and DNS server. Remember to reboot your codec after you configure a static IP address.
2. Set up a Cisco TelePresence system for a network that does not use DHCP by completing the procedure in the “Network Settings” section
3. Log into the CTS Administration interface directly by following the steps in Logging In To the Cisco TelePresence System Administration Interface Directly.
Logging In To the Cisco TelePresence System Administration Interface Directly
If your CTS cannot contact the DHCP server, of if your network does not use DHCP, log in to the Cisco TelePresence System Administration directly by following these steps:
Step 1![]() Connect an Ethernet cable between your PC and the Camera Ethernet connection on the codec.
Connect an Ethernet cable between your PC and the Camera Ethernet connection on the codec.
For more information, see the First Time Setup Guide for your system on Cisco.com:
–![]() Cisco TelePresence System 3200 Series
Cisco TelePresence System 3200 Series
–![]() Cisco TelePresence System 3000 Series
Cisco TelePresence System 3000 Series
–![]() Cisco TelePresence System 1300 Series
Cisco TelePresence System 1300 Series
–![]() Cisco TelePresence System T Series
Cisco TelePresence System T Series
–![]() Cisco TelePresence System 1100
Cisco TelePresence System 1100
–![]() Cisco TelePresence System 1000
Cisco TelePresence System 1000
–![]() Cisco TelePresence System 500 Series
Cisco TelePresence System 500 Series
Step 2![]() Make a note of the IP address that was assigned to your Ethernet LAN adapter.
Make a note of the IP address that was assigned to your Ethernet LAN adapter.
Step 3![]() Open a browser and type in the IP address and press Enter. The Cisco TelePresence System Administration login screen displays.
Open a browser and type in the IP address and press Enter. The Cisco TelePresence System Administration login screen displays.
Step 4![]() In the Admin field, type
admin
.
In the Admin field, type
admin
.
Step 5![]() In the Password field, type
cisco
.
In the Password field, type
cisco
.
Step 7![]() Make network and DHCP changes to the CTS configuration as required.
Make network and DHCP changes to the CTS configuration as required.
Tip If your network does not use DHCP, navigate to Configuration > IP Settings, change the DHCP Enabled setting to No, and specify a static IP address, subnet mask, gateway and DNS server. You must reboot your codec after you configure a static IP address.
Configuring a Static IP Address for Networks That Do Not Use DHCP
If your network does not use DHCP, complete one of the following procedures to configure a static IP address for your Cisco TelePresence system.
Configuring a Static IP Address Using the Cisco TelePresence System GUI
To configure a static IP address using the Cisco TelePresence system GUI:
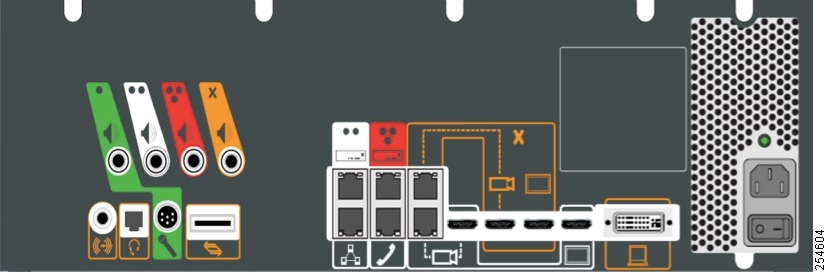
Step 1![]() Connect a DHCP-enabled PC to the secondary camera port of the primary codec. This connection is listed as the auxiliary network port in Figure 1-3.
Connect a DHCP-enabled PC to the secondary camera port of the primary codec. This connection is listed as the auxiliary network port in Figure 1-3.
Figure 1-3 Auxiliary Network Port Location
Step 2![]() Determine the IP address that the Cisco TelePresence system provided for your session.
Determine the IP address that the Cisco TelePresence system provided for your session.
Tip For Windows-based systems, you can see the IP address in the Support tab in the Local Area Connection Status window.
Step 3![]() Using Secure Shell SSH or another secure client program, start a CLI session with the Cisco TelePresence system using the IP address
xxx
.
xxx
.
xxx
.1,
Using Secure Shell SSH or another secure client program, start a CLI session with the Cisco TelePresence system using the IP address
xxx
.
xxx
.
xxx
.1,
Where:
xxx
.
xxx
.
xxx
is the IP address that Cisco TelePresence provided for your session.
For example, if your determine that the Cisco Telepresence system![]() provided an IP address of 10.1.0.2, enter the address 10.1.0.1.
provided an IP address of 10.1.0.2, enter the address 10.1.0.1.
By default, the username is
admin
and the password is
cisco
.
Step 4![]() Network services are started automatically. If needed, enter the following command to start network services:
Network services are started automatically. If needed, enter the following command to start network services:
utils service start Calling_Services
Step 5![]() Using a supported Internet browser, log in to the Cisco TelePresence system GUI with the IP address that you used in Step 3.
Using a supported Internet browser, log in to the Cisco TelePresence system GUI with the IP address that you used in Step 3.
Step 6![]() Enter the username and password when prompted. By default, the user is
admin
and the password is
cisco
.
Enter the username and password when prompted. By default, the user is
admin
and the password is
cisco
.
Step 7![]() Navigate to
Configuration
>
IP Settings
.
Navigate to
Configuration
>
IP Settings
.
Step 8![]() Change the DHCP Enabled setting to
No
.
Change the DHCP Enabled setting to
No
.
Step 9![]() Enter a static IP address, subnet mask, and IP gateway for your system into the fields. Optionally, enter DNS server(s) and the network domain name. Your system saves the changes and automatically restarts.
Enter a static IP address, subnet mask, and IP gateway for your system into the fields. Optionally, enter DNS server(s) and the network domain name. Your system saves the changes and automatically restarts.
Configuring a Static IP Address Using Command-Line Interface Commands
To configure a static IP address using command-line commands:
Step 1![]() Connect a DHCP-enabled PC to the secondary camera port of the primary codec. This connection is listed as the auxiliary network port in Figure 1-3.
Connect a DHCP-enabled PC to the secondary camera port of the primary codec. This connection is listed as the auxiliary network port in Figure 1-3.
Step 2![]() Determine the IP address that the Cisco TelePresence system provided for your session.
Determine the IP address that the Cisco TelePresence system provided for your session.
Tip For Windows-based systems, you can see the IP address in the Support tab in the Local Area Connection Status window.
Step 3![]() Using Secure Shell SSH or another secure client program, start a CLI session with the TelePresence system using the IP address
xxx
.
xxx
.
xxx
.1,
Using Secure Shell SSH or another secure client program, start a CLI session with the TelePresence system using the IP address
xxx
.
xxx
.
xxx
.1,
Where:
xxx
.
xxx
.
xxx
is the IP address that Cisco TelePresence provided for your session.
For example, if your determine that the Cisco Telepresence system![]() provided an IP address of 10.1.0.2, enter the address 10.1.0.1.
provided an IP address of 10.1.0.2, enter the address 10.1.0.1.
By default, the username is
admin
and the password is
cisco
.
Step 4![]() Enter the following command to configure a static network IP address:
Enter the following command to configure a static network IP address:
set network IP static ip-address ip-subnet ip-gateway [ dns-address 1][ dns-address2 ][ domain-name ]
ip-address is the IP address of the system
ip-subnet is the IP subnet mask of the system
ip-gateway is the IP gateway of the system
dns-address1 is the IP address of DNS server 1 (Optional)
Command Example
The following example gives the Cisco TelePresence system with an IP address of 10.0.0.2, a subnet of 255.255.255.0, a gateway of 10.0.0.1, a DNS server of 172.16.1.5, and a domain name of cisco.com:
admin:set network IP static 10.0.0.2 255.255.255.0 10.0.0.1 172.16.1.5 cisco.com
Configuring an Alternate TFTP Server (Optional)
If you need to use an alternative TFTP server, configure the parameters for the alternative TFTP server and related Cisco IP phone parameters in Unified CM on the Cisco Unified Communications Manager IP Phone Device page. See the Cisco Unified Communications Manager Configuration Guide for the Cisco TelePresence System for more information.
Note If you are using the TFTP address that DHCP supplies for Cisco Unified Communications Manager, do not perform this action.
Configuring Your System After Initial Bootup
After successful bootup, the CTS Administration Software loads. When the CTS Administration software completes loading, the Cisco Unified IP phone displays a welcome message that shows the system IP address. The welcome screen only appears the first time the system is booted up after initial installation or after a factory reset.
Note The telephone displays a directory number of 7000, but the telephone is not yet registered and does not function.
If you have not already done so, configure Cisco Unified Communications Manager. See the Cisco Unified Communications Manager Configuration Guide for the Cisco TelePresence System .
To continue your initial setup:
Step 1![]() From the CTS Cisco Unified IP phone welcome page, press Next. The system reboots.
From the CTS Cisco Unified IP phone welcome page, press Next. The system reboots.
Note The system might reboot several times during the initial startup process.
Step 2![]() Open a browser on a computer that is connected to the network.
Open a browser on a computer that is connected to the network.
Step 3![]() In the URL field, type in your IP address and press
Enter
. The browser launches the Cisco TelePresence System
In the URL field, type in your IP address and press
Enter
. The browser launches the Cisco TelePresence System![]() Administration interface.
Administration interface.
Note If you need to obtain the IP address, complete the following steps:
a.![]() On the CTS Cisco Unified IP phone, press the Manual softkey at the bottom of the screen.
On the CTS Cisco Unified IP phone, press the Manual softkey at the bottom of the screen.
b.![]() Locate “Info” at the bottom of the screen and press the Info soft key.
Locate “Info” at the bottom of the screen and press the Info soft key.
c.![]() Scroll down to the IP Address listing and copy the address.
Scroll down to the IP Address listing and copy the address.
Step 4![]() Log in to the system by entering the following information:
Log in to the system by entering the following information:
Note You can change your password in Unified CM. See the Cisco Unified Communications Manager Configuration Guide for the Cisco TelePresence System.
Step 5![]() Click
Login
. The Device Information window appears, as shown in Figure 1-4.
Click
Login
. The Device Information window appears, as shown in Figure 1-4.
Figure 1-4 Device Information Screen

Note See the “Upgrading CTS Codec Firmware” section for information about upgrading to new CTS firmware releases.
Step 6![]() Navigate to the following to continue configuring your system:
Navigate to the following to continue configuring your system:
- IP Settings
- Network Settings
- Cisco Unified Communications Manager Settings
- Address Book
- Telephony Settings
- SNMP Settings
- System Settings
IP Settings
This section contains the following topics:
Viewing IP Settings
Note Use Unified CM to make changes in the IP Settings window. See the
Cisco Unified Communications Manager Configuration Guide for the Cisco TelePresence System.
The IP Settings window displays the Cisco TelePresence System (CTS) MAC address and hostname and you can view and manage the following:
- DHCP—Select a static IP address, which allows the Cisco IP phone to be configured so that the system recognizes it as a device in the network, rather than a router.
- Domain name
- IP Address
- Default gateway
- DNS servers.
To view and manage IP settings:
Step 1![]() Choose Configuration > IP Settings. The IP Settings window appears, as shown in Figure 1-5 (DHCP Enabled) and Figure 1-5 (DHCP Not Enabled).
Choose Configuration > IP Settings. The IP Settings window appears, as shown in Figure 1-5 (DHCP Enabled) and Figure 1-5 (DHCP Not Enabled).
Figure 1-5 CTS IP Settings - DHCP Enabled
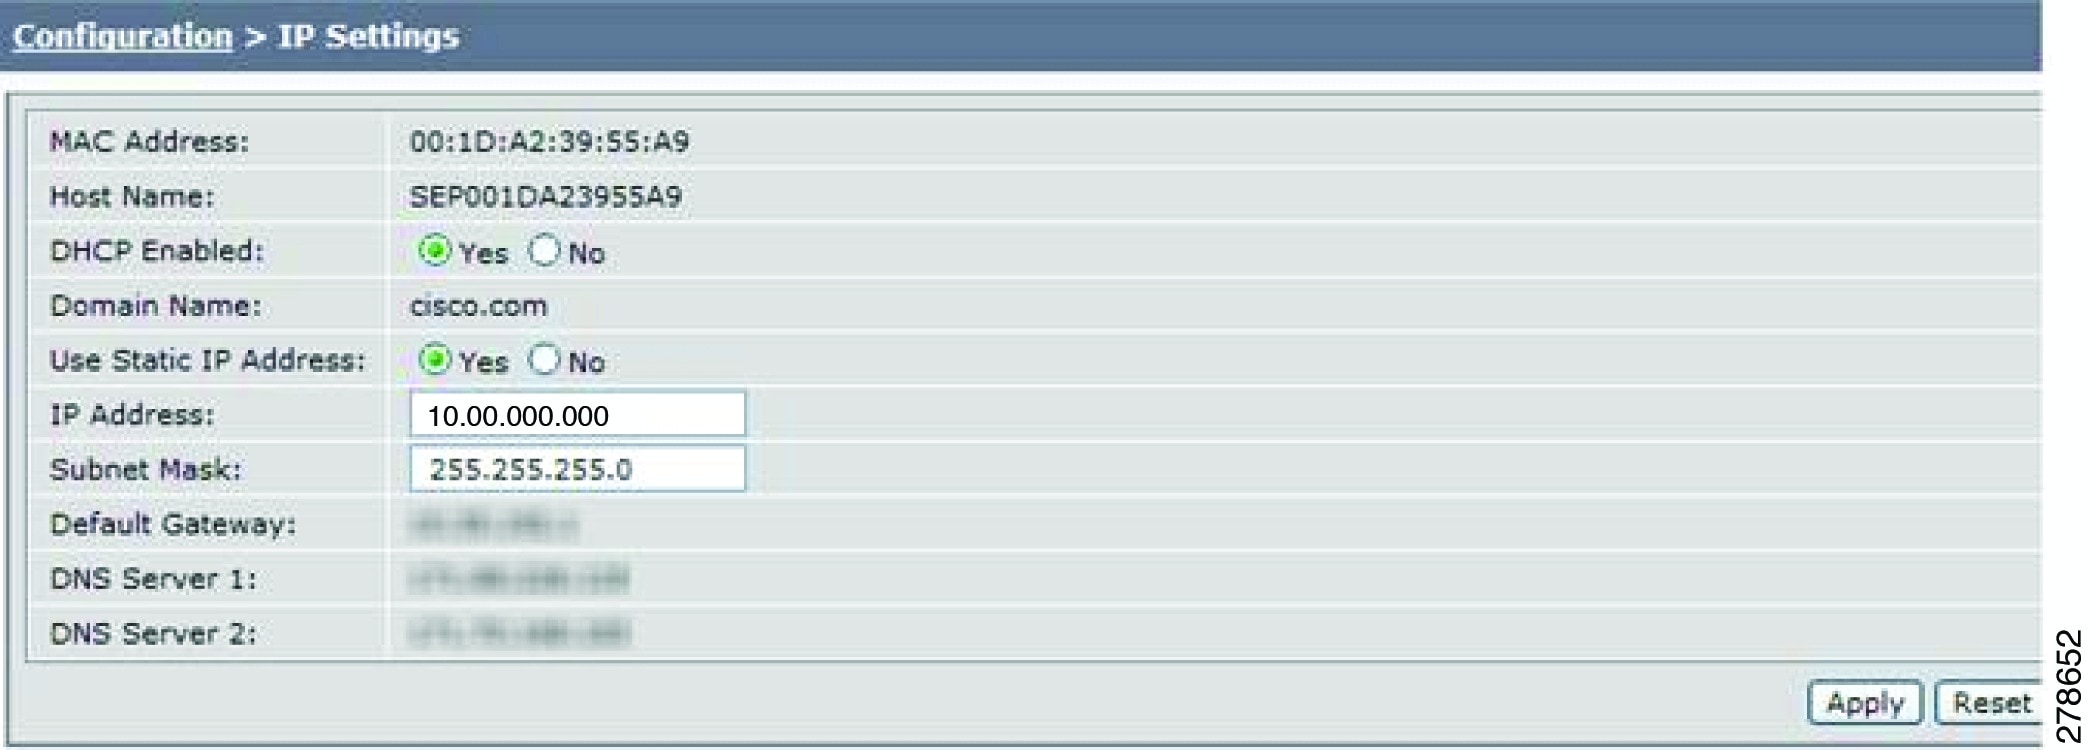
Figure 1-6 CTS IP Settings - DHCP Not Enabled

Step 2![]() Configure settings for the Cisco TelePresence System uplink to your network using the information in
Table 1-1
as a guide. The Cisco TelePresence System
Configure settings for the Cisco TelePresence System uplink to your network using the information in
Table 1-1
as a guide. The Cisco TelePresence System![]() can be configured in the following ways:
can be configured in the following ways:
- Pure dynamic—Uses DHCP for everything.
- Pure static—Uses static settings for everything.
- Hybrid—Uses static settings for the IP Address, Netmask and gateway, but uses DHCP for name servers and other options like Option 150 for the Unified CM TFTP servers.
Tip When you make a change in any of the Configuration > IP Settings fields, the Apply and Reset buttons are activated.
Step 3![]() Click
Apply
to register
Click
Apply
to register![]() new or modified settings.
new or modified settings.
Step 4![]() Click
Reset
to restore the original settings.
Click
Reset
to restore the original settings.
Note All codecs on the system must be connected and enabled for the factory reset to complete. To register a device, see the “Optional Hardware” section of the Cisco Unified Communications Manager Configuration Guide for the Cisco TelePresence System.
Network Settings
You can view or configure the following settings in the Network Settings window:
Operational VLAN ID
This field shows a display-only VLAN ID that is standard for networks with a Cisco Unified IP phone.
Administrative VLAN ID
The CTS must have a VLAN membership ID before it can proceed with a DHCP request for an IP address.
To view or configure the administrative VLAN ID:
Step 1![]() Choose Configuration > Network Settings.
Choose Configuration > Network Settings.
Step 2![]() Enter an administrative VLAN ID for Cisco TelePresence in this field.
Enter an administrative VLAN ID for Cisco TelePresence in this field.
Note The Apply and Reset buttons become active when a value is entered in this field.
Step 3![]() Click
Apply
to register
Click
Apply
to register![]() a new or modified setting.
a new or modified setting.
Step 4![]() Click
Reset
to restore the administrative VLAN ID setting displayed when you opened this window.
Click
Reset
to restore the administrative VLAN ID setting displayed when you opened this window.
Syslog Address
This field shows the display-only syslog address that is standard for networks with a Cisco Unified IP phone, as shown in Figure 1-7.
Figure 1-7 Network Settings Syslog Address
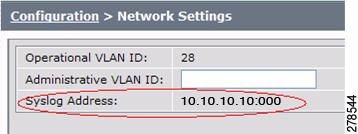
Note You must also configure the External Syslog Address in the Product Specific Configuration Layout field for your CTS. See the Cisco Unified Communications Configuration Guide for the Cisco TelePresence System.
Cisco Unified Communications Manager Settings
To specify TFTP server locations and view a list of available settings for this Cisco TelePresence system:
Step 1![]() Choose Configuration > Cisco Unified Communications Manager Settings. The Cisco Unified Communications Manager Settings window appears, as shown in Figure 1-8.
Choose Configuration > Cisco Unified Communications Manager Settings. The Cisco Unified Communications Manager Settings window appears, as shown in Figure 1-8.
Figure 1-8 Cisco Unified Communications Manager Settings
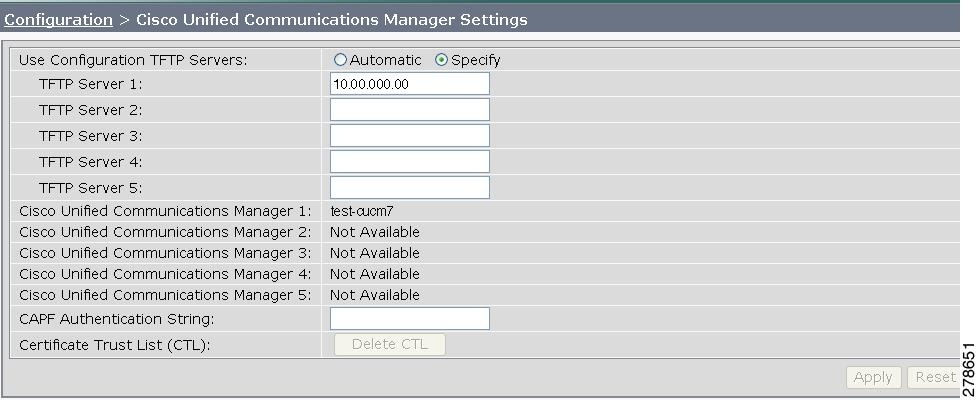
Step 2![]() Configure Unified CM settings using the information in
Table 1-2
.
Configure Unified CM settings using the information in
Table 1-2
.
Note The Apply and Reset buttons become active when a value is entered in this field.
Step 3![]() Click
Apply
to register
Click
Apply
to register![]() new or modified settings.
new or modified settings.
Step 4![]() Click
Reset
to restore the original settings.
Click
Reset
to restore the original settings.
Note All codecs on the system must be connected and enabled for the factory reset to complete. To register a device, see the “Optional Hardware” and “Troubleshooting the Cisco TelePresence Configuration” sections of the Cisco Unified Communications Manager Configuration Guide for the Cisco TelePresence System.
Address Book
The Address Book window displays read-only entries that have been set during Cisco Unified Communications Manager (Unified CM) configuration. You can create listings for up to 40 meeting rooms.
To view the phone list of Cisco TelePresence system-enabled meeting rooms:
Step 1![]() Choose Configuration > Address Book. The Address Book window appears, as shown in Figure 1-9.
Choose Configuration > Address Book. The Address Book window appears, as shown in Figure 1-9.
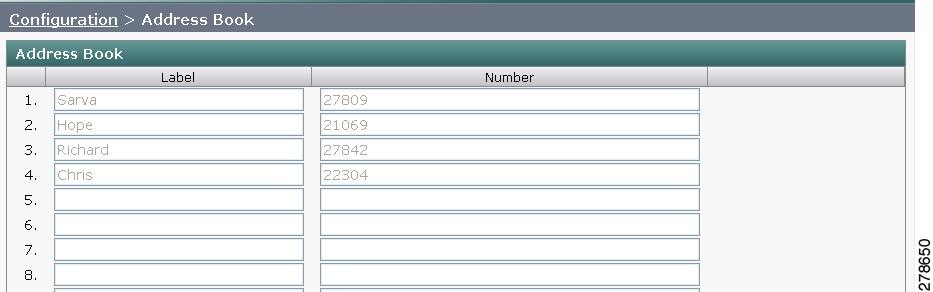
Step 2![]() Use Unified CM to make changes to the Address Book. See the
Cisco Unified Communications Manager Configuration Guide for the Cisco TelePresence System
Use Unified CM to make changes to the Address Book. See the
Cisco Unified Communications Manager Configuration Guide for the Cisco TelePresence System![]() .
.
Telephony Settings
The Telephony Settings window displays read-only information about the telephony settings for the Cisco TelePresence System that were set in the Unified CM.
To view entries in the Telephony Settings window:
Step 1![]() Choose Configuration > Telephony Settings. The Telephony Settings window appears, as shown in
Choose Configuration > Telephony Settings. The Telephony Settings window appears, as shown in
Figure 1-10 CTS Telephony Settings
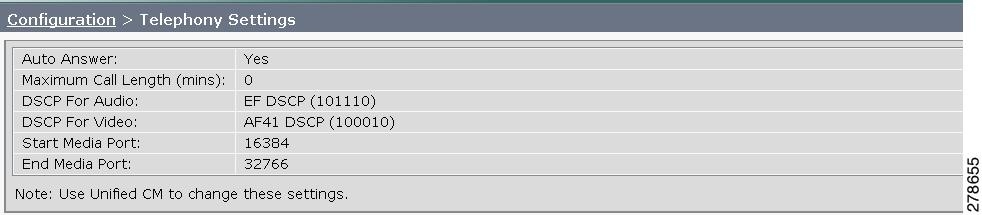
Step 2![]() View the telephony settings described in
Table 1-3
.
View the telephony settings described in
Table 1-3
.
Step 3![]() Use Unified CM to make changes to Telephony Settings. See the
Cisco Unified Communications Manager Configuration Guide for the Cisco TelePresence System
Use Unified CM to make changes to Telephony Settings. See the
Cisco Unified Communications Manager Configuration Guide for the Cisco TelePresence System![]() .
.
SNMP Settings
The Simple Network Management Protocol (SNMP) Settings window displays read-only information about the SNMP settings for the Cisco TelePresence System that were set in Unified CM configuration.
Step 1![]() Choose Configuration > SNMP Settings. The SNMP Settings window appears, as shown in Figure 1-11.
Choose Configuration > SNMP Settings. The SNMP Settings window appears, as shown in Figure 1-11.
Figure 1-11 Verify SNMP Settings

Step 2![]() View the SNMP settings fields described in
Table 1-4
.
View the SNMP settings fields described in
Table 1-4
.
Identifies the local or remote SNMP engine. The remote agent SNMP engine ID and user password are used to compute authentication and privacy digests. |
|
Parameters that access the SNMP server associated with this Cisco TelePresence System. Unified CM for CTS supports SNMP Version 2c and Version 3. SNMP fields displayed in this window reflect the configured SNMP version. The following fields are included: |
|
SNMP settings for the receiver to which this Cisco TelePresence system will send traps . The following information is shown for Traps 1 through 5: |
Step 3![]() Use Unified CM to make changes to the SNMP settings. See the
Cisco Unified Communications Manager Configuration Guide for the Cisco TelePresence System
Use Unified CM to make changes to the SNMP settings. See the
Cisco Unified Communications Manager Configuration Guide for the Cisco TelePresence System![]() .
.
System Settings
The System Settings window displays read-only information about the system settings for the Cisco TelePresence System that were set in Unified CM configuration.
Step 1![]() Choose Configuration > System Settings. The System Settings window appears, as shown in Figure 1-12.
Choose Configuration > System Settings. The System Settings window appears, as shown in Figure 1-12.
Figure 1-12 CTS System Settings
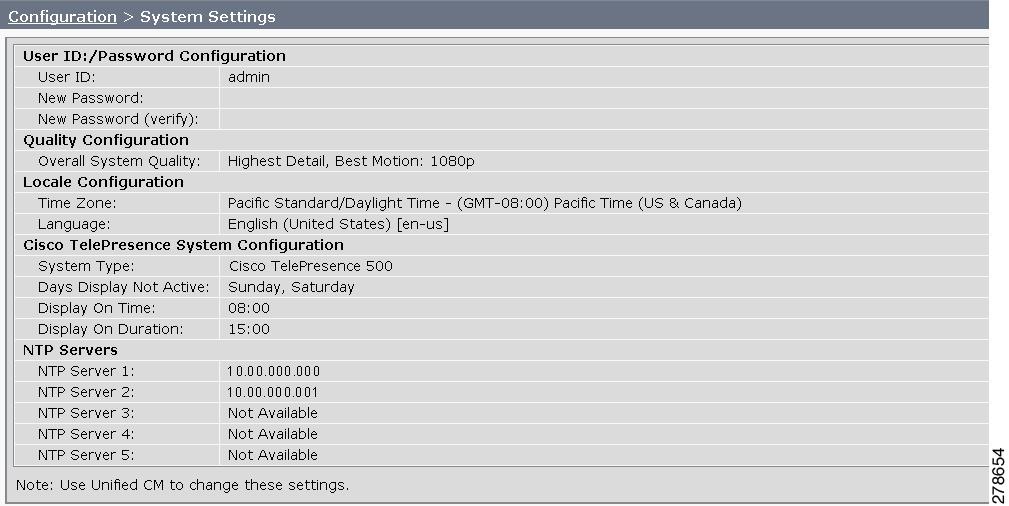
Step 2![]() View the system settings information described in
Table 1-5
.
View the system settings information described in
Table 1-5
.
Step 3![]() Use Unified CM to make changes to the system settings. See the
Cisco Unified Communications Manager Configuration Guide for the Cisco TelePresence System
Use Unified CM to make changes to the system settings. See the
Cisco Unified Communications Manager Configuration Guide for the Cisco TelePresence System![]() for more information.
for more information.
Troubleshooting Your Configuration
Use the information in Table 1-6 to help you troubleshoot your configuration.
First check that the following conditions have been met:
- Power has been applied.
- The Cisco TelePresence System has been installed and configured according to the instructions in Cisco TelePresence System Assembly Guides.
- Unified CM has been configured to support the Cisco TelePresence System as described in the Cisco Unified Communications Manager Configuration Guide for Cisco TelePresence System.
Selecting the Test Connection function on the Unified CM web page results in an error. |
Incorrect Cisco TelePresence Manager Application User credentials: |
1.
2. |
1.
2. |
||
Verify Phone Registration—Log in to the Unified CM administration interface. Click the IP address and verify phone registration. |
||
The phone does not display the Cisco TelePresence idle screen. |
–
– |
1.
2.
3. |
The CTS rings and auto-answers a call based on how these features were configured in Unified CM. If the call is connected as audio only, check your IP phone configuration and make sure the “Disable Speaker/Headset” box is checked. To disable the IP phone speaker/headset:
2.
4.
5.
–
6. See the Cisco Unified Communications Manager Configuration Guide for Cisco TelePresence System for more information. |
||
CTS devices are backward compatible up to two CTS Software Releases. You may want to upgrade your software. |
||
The Cisco TelePresence Recording Server (CTRS) Studio Mode recording feature is not working and the room has been unsubscribed. One or more of the rooms in a conference does not support the feature. |
Check Room View on CTS-Man to verify whether a CTS device is capable of supporting the features in a specific room. Then check your Unified CM configuration settings to configure the device. See the Cisco Unified Communications Manager Configuration Guide for the Cisco TelePresence System for more information. |
Upgrading CTS Codec Firmware
Note Upgrades should only be performed at night or during minimal Cisco TelePresence usage times. An upgrade takes up to 30 minutes to complete.
The procedure to upgrade CTS firmware is the same as the firmware upgrade procedure for the Cisco Unified CM IP phones. See the Uploading Files to the Cisco Unified CM TFTP Directory section of the Cisco Unified Communications Manager Configuration Guide for the Cisco TelePresence System for complete instructions.
Step 1![]() Log into the
Download Software Select a Product
page on Cisco.com:
Log into the
Download Software Select a Product
page on Cisco.com:
http://www.cisco.com/cisco/software/navigator.html
The Tools & Resources Download Software appears.
Step 2![]() Expand the Cisco TelePresence System folder and open the Cisco TelePresence System sub folder. A list of CTS devices appears.
Expand the Cisco TelePresence System folder and open the Cisco TelePresence System sub folder. A list of CTS devices appears.
Step 4![]() Upload the firmware file to the TFTP directory of your Unified CM TFTP server.
Upload the firmware file to the TFTP directory of your Unified CM TFTP server.
Step 5![]() Restart the TFTP server.
Restart the TFTP server.
Step 6![]() Change the firmware filename for the system(s) that you want to upgrade (either via the Device Defaults page, or on a per system basis) in the Cisco Unified CM Administration interface.
Change the firmware filename for the system(s) that you want to upgrade (either via the Device Defaults page, or on a per system basis) in the Cisco Unified CM Administration interface.
Step 7![]() Click the Restart button in Unified CM for the device(s) that you want to upgrade.
Click the Restart button in Unified CM for the device(s) that you want to upgrade.
Upgrading Software for Cisco TelePresence Touch 12
See the following important software upgrade information in the Upgrading From a Cisco Unified IP Phone to a Cisco TelePresence Touch 12 document at the following URL:
http://www.cisco.com/en/US/docs/telepresence/peripherals/cisco_touch/installation/cisco_touch_installation_upgrade.html
Managing Passwords
This section contains the following information about managing and troubleshooting password issues on the Cisco TelePresence System (CTS):
Resetting Your CTS Codec Password
Note You must be in the Cisco TelePresence room to read the newly requested passcode that shows on the main display.
At each point where the pwrecovery account requires input, the program will wait up to 60 seconds. If nothing is entered, the system will inform you that the entry took too long and will exit.
If you encounter any difficulty, open a case with Technical Assistance Center (TAC) via the Internet at http://tools.cisco.com/ServiceRequestTool/create/, or contact your Cisco technical support representative and provide the representative with the information you have gathered about the problem.
Make sure that the CTS is not in a call, and that there is only one instance of someone trying to reset the password, otherwise the session will abort.
To reset your CTS codec password:
Step 1![]() SSH into the codec from your laptop.
SSH into the codec from your laptop.
Step 2![]() Login with the following:
Login with the following:
The following message appears in the SSH client window:
Example 1-1 Welcome to Password Reset
***********************************************
***********************************************
Do you want to continue ? (y/n):y
Preparing the system...
Please enter the passcode:
***********************************************
Do you want to continue ? (y/n):y
Preparing the system...
Please enter the passcode:
Step 3![]() The system will ask whether you want to continue. Type Y then return to continue
The system will ask whether you want to continue. Type Y then return to continue
Note If desired, type any other key then return to exit.
This system will now prepare for password reset and prompt you for a passcode. The new passcode is displayed on the CTS main display, as shown in the following example:
Password reset is now being run
Note The passcode is a randomly generated number and will be different for each login attempt. If you enter the wrong passcode, the system will inform you that the passcode was incorrect and will exit, as shown in the following example. If this happens, repeat Step 1 and Step 2.
Example 1-2 Invalid Password Reset Request
When you enter the correct passcode, the CTS will then reset the administration account name and password to the system defaults. The following example shows successful password reset information:
Example 1-3 Successful Password Reset Request
Note If you are using the CTS with a Cisco Unified Communications Manager, the next time you perform a “Refresh” or “Reset” from the Unified CM, the administration account name and password will be reconfigured to the values specified in the Unified CM device page.
Restoring Connectivity to the Codec
If you lose connectivity to the codec, refer to the Cisco TelePresence System Assembly, Use & Care, and Field-Replaceable Unit Guide for your system on Cisco.com:
–![]() Cisco TelePresence System 3200 Series
Cisco TelePresence System 3200 Series
–![]() Cisco TelePresence System 3000 Series
Cisco TelePresence System 3000 Series
–![]() Cisco TelePresence System 1300 Series
Cisco TelePresence System 1300 Series
–![]() Cisco TelePresence System T Series
Cisco TelePresence System T Series
–![]() Cisco TelePresence System 1100
Cisco TelePresence System 1100
Where to Go Next
Proceed to the following chapters to troubleshoot your CTS:
- Chapter 1, “Troubleshooting the CTS 500”
- Chapter 1, “Troubleshooting the CTS 500-32”
- Chapter 1, “Troubleshooting the CTS 1000”
- Chapter 1, “Troubleshooting the CTS 1100”
- Chapter 1, “Troubleshooting the CTS 1300”
- Chapter 1, “Troubleshooting the CTS 3000 and CTS 3200”
- Chapter 1, “Troubleshooting the CTS 3010 and CTS 3210”
 Feedback