Catalyst 6500 Series Supervisor Engine 2 Boot ROM and Bootflash Device Upgrade Installation Note
Available Languages
Table Of Contents
Catalyst 6500 Series Supervisor Engine 2 Boot ROM and Bootflash Device Upgrade Installation Note
Checking the Boot ROM Version on the Supervisor Engine
Checking the Boot ROM Version on the Supervisor Engine with Cisco IOS Software
Checking the Boot ROM Version on the Supervisor Engine with Catalyst Software
Upgrading the Supervisor Engine 2 Boot ROM
Upgrading the Bootflash Device
Statement 1030—Equipment Installation
Statement 1071—Warning Definition
Obtaining Documentation and Submitting a Service Request
Catalyst 6500 Series Supervisor Engine 2 Boot ROM and Bootflash Device Upgrade Installation Note
Part Number: WS-X6K-S2-KIT=
This publication describes how to determine if you need to upgrade the boot ROM on your Catalyst 6500 series Supervisor Engine 2 (WS-X6K-S2-MSFC2) and also describes how to upgrade the boot ROM and bootflash device.
This upgrade kit contains the boot ROM upgrade and bootflash device upgrade. The boot ROM upgrade will upgrade the Supervisor Engine 2 boot ROM version from 6.1(2) to 6.1(3). The bootflash device upgrade will upgrade the bootflash device from 16 MB to 32 MB.

Note
The default bootflash configuration on WS-X6K-S2-MSFC2 shipped since late January 2001, is 32 MB. Enter the show version command to determine what size bootflash device is installed on the Supervisor Engine 2.
Note

Caution
Note
•
•
http://www.pluscom.ru/cisco_product/cc/td/doc/product/lan/cat6000/relnotes/ol_2864.htm
Contents
This publication consists of these sections:
•
•
•
•
Safety Overview
Safety warnings appear throughout this publication in procedures that may harm you if performed incorrectly. A warning symbol precedes each warning statement.
WarningChecking the Boot ROM Version on the Supervisor Engine
These sections describe how to check the boot ROM version on the supervisor engine:
•
•
Checking the Boot ROM Version on the Supervisor Engine with Cisco IOS Software
To check the boot ROM version number on the Supervisor Engine 2, follow these steps:
Step 1
Step 2
If the Supervisor Engine 2 boot ROM version is release 6.1(2), you must upgrade the boot ROM.
This example shows how to check the boot ROM version on the Supervisor Engine 2 in slot 1:
Router# show module 1Mod Ports Card Type Model Serial No.--- ----- -------------------------------------- ------------------ -----------1 2 Catalyst 6000 supervisor 2 (Active) WS-X6K-SUP2-2GE SAD04450LF1Mod MAC addresses Hw Fw Sw Status--- ---------------------------------- ------ ------------ ------------ -------1 0001.6461.39c0 to 0001.6461.39c1 1.1 6.1(2) 6.1(1) Ok...Router#In this example, the Supervisor Engine 2 boot ROM version is release 6.1(2).
Checking the Boot ROM Version on the Supervisor Engine with Catalyst Software
To check the boot ROM version number on the Supervisor Engine 2, follow these steps:
Step 1
Step 2
If the Supervisor Engine 2 boot ROM version is release 6.1(2), you must upgrade the boot ROM.
This example shows how to check the boot ROM version on the Supervisor Engine 2 in slot 1:
Console> show module 1Mod Slot Ports Module-Type Model Sub Status--- ---- ----- ------------------------- ------------------- --- --------1 1 2 1000BaseX Supervisor WS-X6K-SUP2-2GE yes okMod Module-Name Serial-Num--- ------------------- -----------1 SAD03436055Mod MAC-Address(es) Hw Fw Sw--- -------------------------------------- ------ ---------- --------------1 00-30-80-f7-a5-06 to 00-30-80-f7-a5-07 1.0 6.1(2) 6.1(1)In this example, the Supervisor Engine 2 boot ROM version is release 6.1(2).
Required Tools
These tools are required to upgrade the Supervisor Engine 2 boot ROM:
•
•
•
•
•
Removing the MSFC2
Caution
Note
Figure 1 Supervisor Engine 2 with MSFC2 Shipped After November 2001
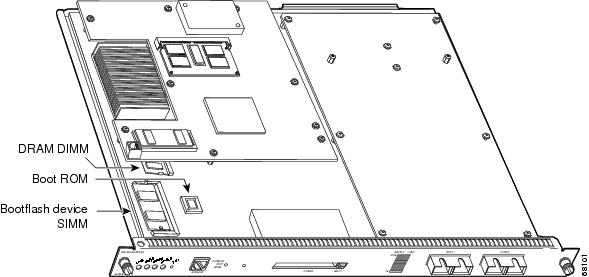
Before you remove the Supervisor Engine 2, you should first upload the current configuration to a server. If necessary, you can recover the configuration by downloading it from the server to the nonvolatile memory of the Supervisor Engine 2. For more information, refer to Chapter 26, "Working with Configuration Files," in the Catalyst 6500 Series Switch Software Configuration Guide.
The boot ROM is located beneath the MSFC2. To install the boot ROM, you must remove the MSFC2 from the Supervisor Engine 2.
To remove the MSFC2 from the Supervisor Engine 2, follow these steps:
Step 1
Step 2
Step 3
Step 4
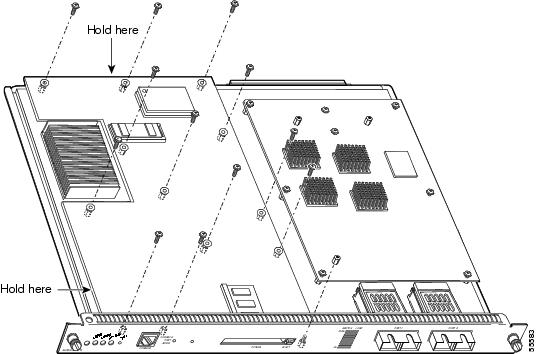
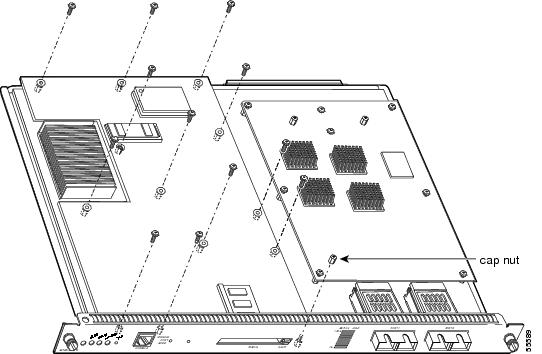
Figure 2 Removing MSFC2 Securing Screws and Cap Nut
Step 5
Caution
Step 6
Proceed to the "Upgrading the Supervisor Engine 2 Boot ROM" section to install the boot ROM.
Upgrading the Supervisor Engine 2 Boot ROM
Caution
To upgrade the boot ROM in the Supervisor Engine 2, follow these steps:
Step 1
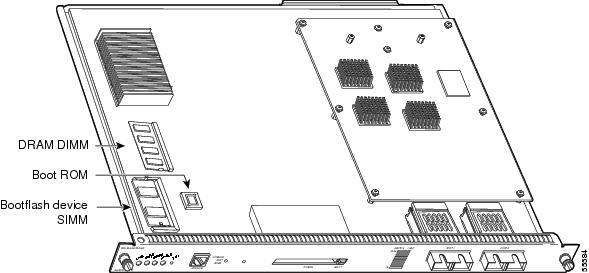
Figure 3 Supervisor Engine Boot ROM Location
Step 2
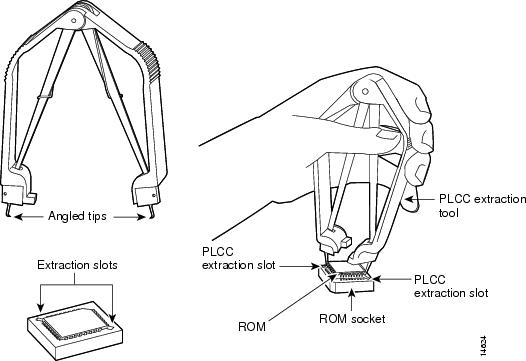
Holding the tool as shown in Figure 4, remove the chip from the socket by squeezing the handles of the extraction tool evenly and pulling the boot ROM device straight upward until it is released from the socket. Use care not to damage the boot ROM device or the socket.
Figure 4 Supervisor Engine Boot ROM Extraction
Step 3
Step 4
Step 5
Caution
Figure 5 Boot ROM Insertion
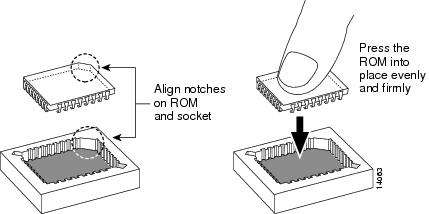
Proceed to the "Upgrading the Bootflash Device" section to upgrade the bootflash device on the Supervisor Engine 2.
Upgrading the Bootflash Device
To upgrade the bootflash device from 16 MB to 32 MB, follow these steps:
Step 1
Figure 6 Bootflash Device SIMM Location
Step 2
Figure 7 Removing and Installing the Bootflash Device SIMM
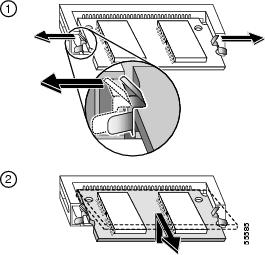
Step 3
Figure 8 Handling a SIMM
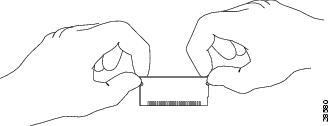
Caution
Step 4
Step 5
Step 6
Caution
Step 7
Figure 9 Installing the SIMM

Step 8
Note
If you are not upgrading the memory, or if you have already upgraded the memory, proceed to the "Installing the MSFC2" section.
Installing the MSFC2
Note
To install the MSFC2 on the Supervisor Engine 2, follow these steps:
Step 1
Figure 10 Male Standoff Location on the Supervisor Engine
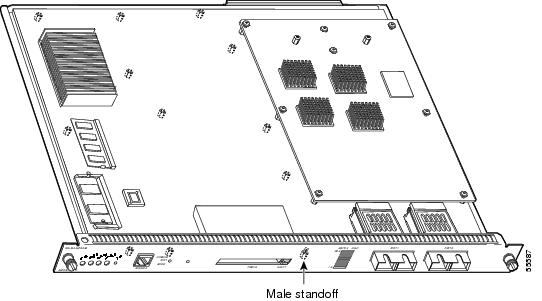
Step 2
Figure 11 MSFC2 Connectors
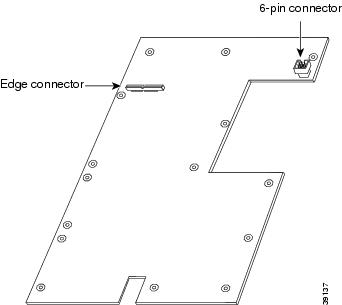
Step 3
Step 4
Caution
Figure 12 Seating the MSFC2 on the Supervisor Engine 2
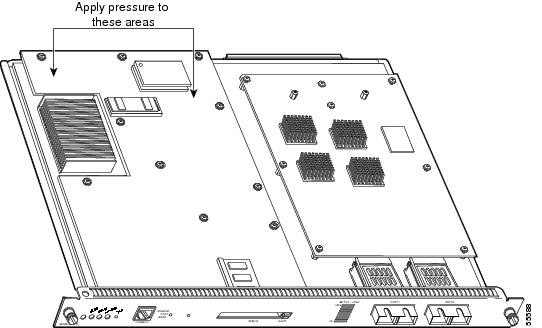
Caution
Step 5
Caution
Figure 13 Installing the Screws and Cap Nut
Step 6
If you have a redundant Supervisor Engine 2, go to the "Removing the MSFC2" section and follow the directions to upgrade the boot ROM and bootflash device on the redundant Supervisor Engine 2.
Step 7
Step 8
Translated Safety Warnings
This section repeats in multiple languages the basic warnings that appear in this publication.
Statement 1030—Equipment Installation
WarningOnly trained and qualified personnel should be allowed to install, replace, or service this equipment.
Waarschuwing
Deze apparatuur mag alleen worden geïnstalleerd, vervangen of hersteld door bevoegd geschoold personeel.
Varoitus
Tämän laitteen saa asentaa, vaihtaa tai huoltaa ainoastaan koulutettu ja laitteen tunteva henkilökunta.
Attention
Il est vivement recommandé de confier l'installation, le remplacement et la maintenance de ces équipements à des personnels qualifiés et expérimentés.
Warnung
Das Installieren, Ersetzen oder Bedienen dieser Ausrüstung sollte nur geschultem, qualifiziertem Personal gestattet werden.
Avvertenza
Questo apparato può essere installato, sostituito o mantenuto unicamente da un personale competente.
Advarsel
Bare opplært og kvalifisert personell skal foreta installasjoner, utskiftninger eller service på dette utstyret.
Aviso
Apenas pessoal treinado e qualificado deve ser autorizado a instalar, substituir ou fazer a revisão deste equipamento.
¡Advertencia!
Solamente el personal calificado debe instalar, reemplazar o utilizar este equipo.
Varning!
Endast utbildad och kvalificerad personal bör få tillåtelse att installera, byta ut eller reparera denna utrustning.


Statement 1071—Warning Definition
WarningIMPORTANT SAFETY INSTRUCTIONS
This warning symbol means danger. You are in a situation that could cause bodily injury. Before you work on any equipment, be aware of the hazards involved with electrical circuitry and be familiar with standard practices for preventing accidents. Use the statement number provided at the end of each warning to locate its translation in the translated safety warnings that accompanied this device.
SAVE THESE INSTRUCTIONS
Waarschuwing
BELANGRIJKE VEILIGHEIDSINSTRUCTIES
Dit waarschuwingssymbool betekent gevaar. U verkeert in een situatie die lichamelijk letsel kan veroorzaken. Voordat u aan enige apparatuur gaat werken, dient u zich bewust te zijn van de bij elektrische schakelingen betrokken risico's en dient u op de hoogte te zijn van de standaard praktijken om ongelukken te voorkomen. Gebruik het nummer van de verklaring onderaan de waarschuwing als u een vertaling van de waarschuwing die bij het apparaat wordt geleverd, wilt raadplegen.
BEWAAR DEZE INSTRUCTIES
Varoitus
TÄRKEITÄ TURVALLISUUSOHJEITA
Tämä varoitusmerkki merkitsee vaaraa. Tilanne voi aiheuttaa ruumiillisia vammoja. Ennen kuin käsittelet laitteistoa, huomioi sähköpiirien käsittelemiseen liittyvät riskit ja tutustu onnettomuuksien yleisiin ehkäisytapoihin. Turvallisuusvaroitusten käännökset löytyvät laitteen mukana toimitettujen käännettyjen turvallisuusvaroitusten joukosta varoitusten lopussa näkyvien lausuntonumeroiden avulla.
SÄILYTÄ NÄMÄ OHJEET
Attention
IMPORTANTES INFORMATIONS DE SÉCURITÉ
Ce symbole d'avertissement indique un danger. Vous vous trouvez dans une situation pouvant entraîner des blessures ou des dommages corporels. Avant de travailler sur un équipement, soyez conscient des dangers liés aux circuits électriques et familiarisez-vous avec les procédures couramment utilisées pour éviter les accidents. Pour prendre connaissance des traductions des avertissements figurant dans les consignes de sécurité traduites qui accompagnent cet appareil, référez-vous au numéro de l'instruction situé à la fin de chaque avertissement.
CONSERVEZ CES INFORMATIONS
Warnung
WICHTIGE SICHERHEITSHINWEISE
Dieses Warnsymbol bedeutet Gefahr. Sie befinden sich in einer Situation, die zu Verletzungen führen kann. Machen Sie sich vor der Arbeit mit Geräten mit den Gefahren elektrischer Schaltungen und den üblichen Verfahren zur Vorbeugung vor Unfällen vertraut. Suchen Sie mit der am Ende jeder Warnung angegebenen Anweisungsnummer nach der jeweiligen Übersetzung in den übersetzten Sicherheitshinweisen, die zusammen mit diesem Gerät ausgeliefert wurden.
BEWAHREN SIE DIESE HINWEISE GUT AUF.
Avvertenza
IMPORTANTI ISTRUZIONI SULLA SICUREZZA
Questo simbolo di avvertenza indica un pericolo. La situazione potrebbe causare infortuni alle persone. Prima di intervenire su qualsiasi apparecchiatura, occorre essere al corrente dei pericoli relativi ai circuiti elettrici e conoscere le procedure standard per la prevenzione di incidenti. Utilizzare il numero di istruzione presente alla fine di ciascuna avvertenza per individuare le traduzioni delle avvertenze riportate in questo documento.
CONSERVARE QUESTE ISTRUZIONI
Advarsel
VIKTIGE SIKKERHETSINSTRUKSJONER
Dette advarselssymbolet betyr fare. Du er i en situasjon som kan føre til skade på person. Før du begynner å arbeide med noe av utstyret, må du være oppmerksom på farene forbundet med elektriske kretser, og kjenne til standardprosedyrer for å forhindre ulykker. Bruk nummeret i slutten av hver advarsel for å finne oversettelsen i de oversatte sikkerhetsadvarslene som fulgte med denne enheten.
TA VARE PÅ DISSE INSTRUKSJONENE
Aviso
INSTRUÇÕES IMPORTANTES DE SEGURANÇA
Este símbolo de aviso significa perigo. Você está em uma situação que poderá ser causadora de lesões corporais. Antes de iniciar a utilização de qualquer equipamento, tenha conhecimento dos perigos envolvidos no manuseio de circuitos elétricos e familiarize-se com as práticas habituais de prevenção de acidentes. Utilize o número da instrução fornecido ao final de cada aviso para localizar sua tradução nos avisos de segurança traduzidos que acompanham este dispositivo.
GUARDE ESTAS INSTRUÇÕES
¡Advertencia!
INSTRUCCIONES IMPORTANTES DE SEGURIDAD
Este símbolo de aviso indica peligro. Existe riesgo para su integridad física. Antes de manipular cualquier equipo, considere los riesgos de la corriente eléctrica y familiarícese con los procedimientos estándar de prevención de accidentes. Al final de cada advertencia encontrará el número que le ayudará a encontrar el texto traducido en el apartado de traducciones que acompaña a este dispositivo.
GUARDE ESTAS INSTRUCCIONES
Varning!
VIKTIGA SÄKERHETSANVISNINGAR
Denna varningssignal signalerar fara. Du befinner dig i en situation som kan leda till personskada. Innan du utför arbete på någon utrustning måste du vara medveten om farorna med elkretsar och känna till vanliga förfaranden för att förebygga olyckor. Använd det nummer som finns i slutet av varje varning för att hitta dess översättning i de översatta säkerhetsvarningar som medföljer denna anordning.
SPARA DESSA ANVISNINGAR


Related Documentation
For additional information on Catalyst 6500 series switches and command-line interface (CLI) commands, refer to the following publications:
•
•
•
•
•
•
•
•
Obtaining Documentation and Submitting a Service Request
For information on obtaining documentation, submitting a service request, and gathering additional information, see the monthly What's New in Cisco Product Documentation, which also lists all new and revised Cisco technical documentation, at:
http://www.cisco.com/en/US/docs/general/whatsnew/whatsnew.html
Subscribe to the What's New in Cisco Product Documentation as a Really Simple Syndication (RSS) feed and set content to be delivered directly to your desktop using a reader application. The RSS feeds are a free service and Cisco currently supports RSS Version 2.0.
This document is to be used in conjunction with the documents listed in the "Related Documentation" section.

Copyright © 2001-2003, Cisco Systems, Inc.
All rights reserved.

 Feedback
Contact Cisco
- Open a Support Case

- (Requires a Cisco Service Contract)