- New and Changed Information
- Preface
- Cisco DCNM Introduction
- Part 1: Cisco DCNM-SAN Installation
- Preparing Cisco DCNM-SAN Client
- Installing Cisco DCNM-SAN Database
- Installing Cisco DCNM-SAN
- Maintaining Cisco DCNM-SAN
- Uninstalling Cisco DCNM-SAN
- Licensing Cisco DCNM-SAN
- Part 2: Cisco DCNM-LAN Installation
- Deploying Cisco DCNM-LAN
- Preparing Cisco DCNM-LAN Database
- Installing Cisco DCNM-LAN Servers
- Licensing Cisco DCNM-LAN Deployment
- Upgrading Cisco DCNM-LAN Servers
- Configuring Cisco DCNM-LAN Servers
- Installing and Administering Cisco DCNM VSB
- Uninstalling Cisco DCNM-LAN Servers
- Troubleshooting Cisco DCNM-LAN Server Installation
- Index
Cisco DCNM Installation and Licensing Guide, Release 5.x
Bias-Free Language
The documentation set for this product strives to use bias-free language. For the purposes of this documentation set, bias-free is defined as language that does not imply discrimination based on age, disability, gender, racial identity, ethnic identity, sexual orientation, socioeconomic status, and intersectionality. Exceptions may be present in the documentation due to language that is hardcoded in the user interfaces of the product software, language used based on RFP documentation, or language that is used by a referenced third-party product. Learn more about how Cisco is using Inclusive Language.
- Updated:
- June 17, 2012
Chapter: Installing and Administering Cisco DCNM VSB
- Information About Cisco DCNM VSB
- Installing Cisco DCNM VSB
Installing and Administering Cisco DCNM VSB
This chapter describes how to install and administer the Cisco Data Center Network Manager Virtual Service Blade (DCNM VSB) on a Cisco Nexus 1010 Virtual Services switch.
Information About Cisco DCNM VSB
The Cisco Nexus 1010 switch is a shell that hosts multiple Virtual Switch Modules (VSMs) and other service modules such as the Cisco DCNM and Network Analysis Module (NAM) but supresses all of the details about the multiple virtual machines running on a hypervisor. From a network management perspective, the hosted VSMs appear as a cluster. Each Virtual Supervisor Module (VSM) and its associated Virtual Ethernet Modules (VEMs) comprise one virtual switch.
In addition to VSMs, the Cisco Nexus1010 switch can host other service modules. Each of these components is known as a Virtual Service Blade (VSB). The Cisco DCNM VSB enables network administrators to manage the data center LAN infrastructure. The Cisco DCNM VSB is integrated with the Cisco Nexus 1010 switches. The Cisco DCNM VSB extends visibility and interconnects the virtual machines in the Cisco Nexus 1000V switch deployments.
Installing Cisco DCNM VSB
This section describes how to install Cisco DCNM VSB.
This section includes the following topics:
- System Requirements
- Installing Cisco DCNM VSB
- Installing a Cisco DCNM License on a Cisco Nexus 1010 Switch
- Using a Remote Database Server for Standalone and Cluster installations
System Requirements
The following table lists the system requirements for the Cisco DCNM VSB.
|
|
|
|---|---|
Installing Cisco DCNM VSB
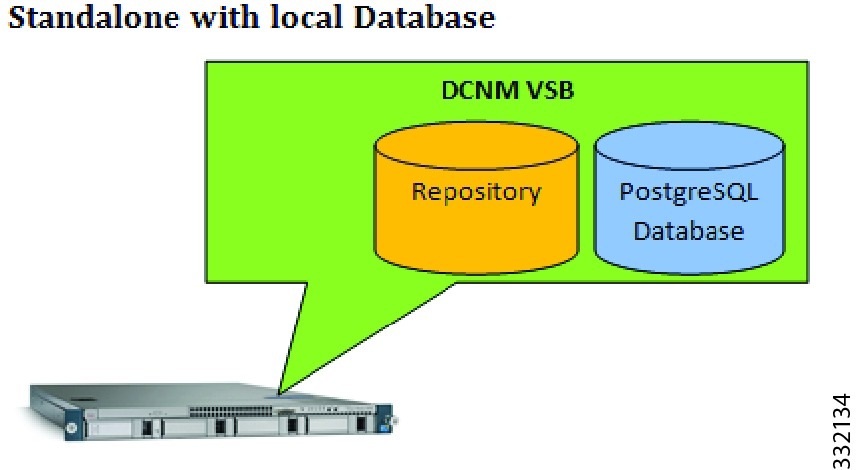
Using the local database for stand alone installation. Figure 1-1 shows local database for stand alone installation.

Note![]() When you install Cisco DCNM as a VSB, only DCNM-LAN server components are installed.
When you install Cisco DCNM as a VSB, only DCNM-LAN server components are installed.
Figure 1-1 DCNM VSB with local database
BEFORE YOU BEGIN
You must log in to the Cisco Nexus 1010 switch using the CLI or a web browser.
DETAILED STEPS
Step 1![]() Copy the Cisco DCNM ISO file to the bootflash:repository location of the Cisco Nexus 1010 switch.
Copy the Cisco DCNM ISO file to the bootflash:repository location of the Cisco Nexus 1010 switch.
Step 2![]() Enter the configuration mode and create a VSB.
Enter the configuration mode and create a VSB.
Step 3![]() Associate the ISO file with the VSB.
Associate the ISO file with the VSB.
Step 4![]() Initiate the Cisco VSB installation as follows:
Initiate the Cisco VSB installation as follows:
a.![]() Set up a cluster with a redundant Cisco Nexus 1010 switch pair.
Set up a cluster with a redundant Cisco Nexus 1010 switch pair.
b.![]() Set up a standalone DCNM VSB on the primary Cisco Nexus 1010 switch.
Set up a standalone DCNM VSB on the primary Cisco Nexus 1010 switch.
c.![]() Set up a standalone DCNM VSB on the secondary Cisco Nexus 1010 switch.
Set up a standalone DCNM VSB on the secondary Cisco Nexus 1010 switch.
Step 5![]() Enter the name of the VSB image.
Enter the name of the VSB image.
Step 6![]() Enter Y to set up a DCNM standalone VSB.
Enter Y to set up a DCNM standalone VSB.
Step 7![]() Enter the location of the VSB.
Enter the location of the VSB.
Step 9![]() Enter the management IP address.
Enter the management IP address.
Step 10![]() Enter the management subnet mask IP address.
Enter the management subnet mask IP address.
Step 11![]() Enter the IP address of the default gateway.
Enter the IP address of the default gateway.
Step 12![]() Enter the location of the database.
Enter the location of the database.
Step 13![]() Enter the DCNM database username.
Enter the DCNM database username.
Step 14![]() Enter the DCNM database password:
Enter the DCNM database password:
Step 15![]() Enter the database administrator username.
Enter the database administrator username.
Step 16![]() Enter the database administrator password
Enter the database administrator password
Step 17![]() Specify whether or not you want to mount the network file system as a data archive.
Specify whether or not you want to mount the network file system as a data archive.
Installing a Cisco DCNM License on a Cisco Nexus 1010 Switch
You can install a Cisco DCNM license on a Virtual Service Blade (VSB) by using one of the two methods:
Using a Silent Installer
You can use a silent installer on a Cisco Nexus 1010 switch.
BEFORE YOU BEGIN
You must log in to the Cisco Nexus 1010 switch using the CLI or a web browser.
DETAILED STEPS
Step 1![]() From the Cisco Nexus 1010 switch, log into the VSB.
From the Cisco Nexus 1010 switch, log into the VSB.
Step 2![]() Copy the license file to the root directory of the VSB.
Copy the license file to the root directory of the VSB.
In the root directory, you see a link to a script License_Install_DCNM.
Step 3![]() Execute the script as follows:
Execute the script as follows:
Using the GUI to Install the License
BEFORE YOU BEGIN
You must log in to the Cisco Nexus 1010 switch using the CLI or a web browser.
DETAILED STEPS
Step 1![]() Download the Reflection tool on a Windows machine.
Download the Reflection tool on a Windows machine.
Step 2![]() Double-click Reflection X Manager.
Double-click Reflection X Manager.
Step 3![]() Start a putty session to the VSB.
Start a putty session to the VSB.
Note![]() PuTTY is a free and open source terminal emulator application which can act as a client for the SSH, Telnet, rlogin, and raw TCP computing protocols and as a serial console client.
PuTTY is a free and open source terminal emulator application which can act as a client for the SSH, Telnet, rlogin, and raw TCP computing protocols and as a serial console client.
Step 4![]() From the VSB, enter the following command:
From the VSB, enter the following command:
Step 5![]() Open the DCNM installer file.
Open the DCNM installer file.
The DCNM installation dialog box appears.
Step 6![]() Choose DCNM-LAN and click Next.
Choose DCNM-LAN and click Next.
Step 7![]() Browse to the folder where the license file is available and click Next.
Browse to the folder where the license file is available and click Next.
The Cisco DCNM license is now installed.
Using a Remote Database Server for Standalone and Cluster installations
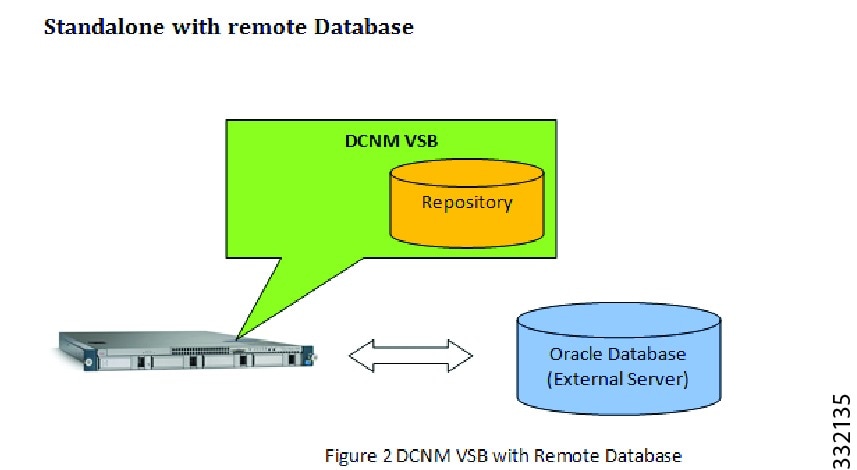
You can use a remote database for both standalone and cluster mode installations. In a standalone installation, you can configure the installation setup to use a remote Oracle database server. In a cluster mode installation, the remote database (PostgreSQL and Oracle) is shared by all of the nodes in the cluster.
Cisco DCNM installs PostgreSQL database on the Cisco Nexus 1010 switch by default. If you want to use an external database server, you can specify the URL instead of choosing the local database. The IP address entries of the slave nodes should exist in the pg_hba.conf file of the database that resides in the data folder where the PostgreSQL database is installed.
Using the Remote Database for a Standalone Installation
You can perform a standalone DCNM VSB installation using the remote database. Figure 1-2 shows standalone DCNM VSB installation using the remote database.,
Figure 1-2 DCNM VSB with remote database
BEFORE YOU BEGIN
You must log in to the Cisco Nexus 1010 switch using the CLI or a web browser.
DETAILED STEPS
Step 1![]() Copy the DCNM ISO file to the bootflash:repository location of the Cisco N1010 switch.
Copy the DCNM ISO file to the bootflash:repository location of the Cisco N1010 switch.
Step 2![]() Enter the configuration mode and create a VSB.
Enter the configuration mode and create a VSB.
Step 3![]() Associate the ISO with the VSB.
Associate the ISO with the VSB.
Step 4![]() Initiate Cisco VSB installation as follows:
Initiate Cisco VSB installation as follows:
a.![]() Set up a cluster with a redundant Cisco Nexus 1010 pair of switches.
Set up a cluster with a redundant Cisco Nexus 1010 pair of switches.
b.![]() Set up a standalone DCNM VSB on the primary Cisco Nexus 1010 switch.
Set up a standalone DCNM VSB on the primary Cisco Nexus 1010 switch.
c.![]() Set up a standalone DCNM VSB on the secondary Cisco Nexus 1010 switch.
Set up a standalone DCNM VSB on the secondary Cisco Nexus 1010 switch.
Step 5![]() Enter the name of the VSB image.
Enter the name of the VSB image.
Step 6![]() Enter Y to set up a DCNM standalone VSB.
Enter Y to set up a DCNM standalone VSB.
Step 7![]() Enter the location of the VSB
Enter the location of the VSB
Step 9![]() Enter the management IP address.
Enter the management IP address.
Step 10![]() Enter the management subnet mask IP address.
Enter the management subnet mask IP address.
Step 11![]() Enter the IP address of the default gateway.
Enter the IP address of the default gateway.
Step 12![]() Enter the location of the database.
Enter the location of the database.
Note![]() To use a remote database, you must specify the location of the database as remote.
To use a remote database, you must specify the location of the database as remote.
Step 13![]() Enter the URL of the remote database.
Enter the URL of the remote database.
Note![]() You must enter the URL of the database in the following format: jdbc:postgresql://192.177.121.11:5432/dcmdb.
You must enter the URL of the database in the following format: jdbc:postgresql://192.177.121.11:5432/dcmdb.
The pg_hba.conf file should contain the IP addresses of all the VSB nodes. You can locate the pg_hba.conf file in the PostgreSQL install folder /usr/local/cisco/dcm/db/data.
You must stop and start the database after making any changes to the pg_hba.conf file.
Step 14![]() Enter the DCNM database username.
Enter the DCNM database username.
Step 15![]() Enter the DCNM database password.
Enter the DCNM database password.
Step 16![]() Enter the database administrator username.
Enter the database administrator username.
Step 17![]() Enter the database administrator password.
Enter the database administrator password.
Step 18![]() Specify whether or not you want to mount the network file system as data archive.
Specify whether or not you want to mount the network file system as data archive.
Using the Remote Database for an HA-Enabled Cluster Mode Installation
You can perform an HA-enabled cluster mode DCNM VSB installation by using the remote database. Figure 1-3 shows the two node DCNM cluster.
Figure 1-3 Two node DCNM Cluster

BEFORE YOU BEGIN
You must log in to the Cisco Nexus 1010 switch using the CLI or a web browser.
DETAILED STEPS
Step 1![]() Copy the DCNM ISO file to the bootflash:repository location of the Cisco Nexus 1010 switch.
Copy the DCNM ISO file to the bootflash:repository location of the Cisco Nexus 1010 switch.
Step 2![]() Enter the configuration mode and create a VSB.
Enter the configuration mode and create a VSB.
Step 3![]() Associate the ISO with the VSB.
Associate the ISO with the VSB.
Step 4![]() Initiate Cisco VSB installation as follows:
Initiate Cisco VSB installation as follows:
a.![]() Set up a standalone DCNM VSB on the primary Cisco Nexus 1010 switch.
Set up a standalone DCNM VSB on the primary Cisco Nexus 1010 switch.
Step 5![]() Enter the name of the VSB image.
Enter the name of the VSB image.
Step 6![]() Enter Y to set up a DCNM cluster.
Enter Y to set up a DCNM cluster.
Note![]() For the above scenario select Y for step 6. You must use the remote database and data archive directory on the network file system.
For the above scenario select Y for step 6. You must use the remote database and data archive directory on the network file system.
Step 8![]() Enter the management IP address.
Enter the management IP address.
Note![]() The VSB and the master node must be under the same subnet.
The VSB and the master node must be under the same subnet.
Step 9![]() Enter the management IP address for DCNM standby.
Enter the management IP address for DCNM standby.
Step 10![]() Enter the management subnet mask IP address.
Enter the management subnet mask IP address.
Step 11![]() Enter the IP address of the default gateway.
Enter the IP address of the default gateway.
Step 12![]() Use default multicast addresses for a cluster.
Use default multicast addresses for a cluster.
Note![]() For the first Cisco Nexus 1010 switch you can use the default multicast IP address, but for the second Cisco Nexus 1010 switch it should be same as the first one.
For the first Cisco Nexus 1010 switch you can use the default multicast IP address, but for the second Cisco Nexus 1010 switch it should be same as the first one.
Note![]() If you want to use the default multicast address, enter Y. However, you can override the current set of musticast addresses. If you choose the default settings, you can continue with Step 17.
If you want to use the default multicast address, enter Y. However, you can override the current set of musticast addresses. If you choose the default settings, you can continue with Step 17.
Step 13![]() Enter the multicast IP address for cluster 1.
Enter the multicast IP address for cluster 1.
Step 14![]() Enter the multicast IP address for cluster 2.
Enter the multicast IP address for cluster 2.
Step 15![]() Enter the multicast IP address for cluster 3.
Enter the multicast IP address for cluster 3.
Step 16![]() Enter the multicast IP address for cluster 4.
Enter the multicast IP address for cluster 4.
Step 17![]() Enter the location of the database.
Enter the location of the database.
Note![]() To use a remote database, you must specify the location of the database as remote.
To use a remote database, you must specify the location of the database as remote.
Step 18![]() Enter the URL of the remote database.
Enter the URL of the remote database.
Step 19![]() Enter the DCNM database username.
Enter the DCNM database username.
Step 20![]() Enter the DCNM database password.
Enter the DCNM database password.
Step 21![]() Enter the database administrator username.
Enter the database administrator username.
Step 22![]() Enter the database administrator password.
Enter the database administrator password.
Step 23![]() Specify whether or not you want to mount the network file system as a data archive.
Specify whether or not you want to mount the network file system as a data archive.
Step 24![]() Enter the network file system path to mount.
Enter the network file system path to mount.
Note![]() If you want to use an Network File System (NFS) server as the repository for archiving configuration files and templates, you must specify the shared location. For example, you can specify 10.77.212.81:/opt/share/dcnm-repository where 10.77.212.81 is the NFS server and /opt/share/dcnm-repository is the shared directory.
If you want to use an Network File System (NFS) server as the repository for archiving configuration files and templates, you must specify the shared location. For example, you can specify 10.77.212.81:/opt/share/dcnm-repository where 10.77.212.81 is the NFS server and /opt/share/dcnm-repository is the shared directory.
Using the Local Database for a Secondary Switch Cluster Installation
BEFORE YOU BEGIN
You must log in to the Cisco Nexus 1010 switch using the CLI or a web browser.
DETAILED STEPS
Step 1![]() Deploy the secondary VSB using the following command:
Deploy the secondary VSB using the following command:
Step 2![]() Deploy the secondary VSB in the standalone mode. Enter the following information:
Deploy the secondary VSB in the standalone mode. Enter the following information:
- Choose the location of VSB[primary/secondary—[primary] secondary
- Enter the IP address of the default gateway—Specify the IP address that you wish to configure for the secondary VSB.
Step 3![]() Once VSB is deployed, uninstall Cisco DCNM in the secondary module using the following command:
Once VSB is deployed, uninstall Cisco DCNM in the secondary module using the following command:
Step 4![]() Login into the primary VSB and perform the following steps:
Login into the primary VSB and perform the following steps:
a.![]() Change the directory to the postgres database installation using the following command:
Change the directory to the postgres database installation using the following command:
b.![]() Enter the secondary VSB IP address into the pg_hba.conf file available under /usr/local/Cisco/dcm/db/data.
Enter the secondary VSB IP address into the pg_hba.conf file available under /usr/local/Cisco/dcm/db/data.
c.![]() Stop and restart the DCNM server of the primary node to enable the changes.
Stop and restart the DCNM server of the primary node to enable the changes.
Step 5![]() Using SFTP file transfer, copy the installer.properties file available in the primary node under /usr/local/Cisco/dcm/dcnm/config to /root/CSCOdcnm/install in the secondary node VSB.
Using SFTP file transfer, copy the installer.properties file available in the primary node under /usr/local/Cisco/dcm/dcnm/config to /root/CSCOdcnm/install in the secondary node VSB.
Step 6![]() Install Cisco DCNM in the secondary VSB using the following commands:
Install Cisco DCNM in the secondary VSB using the following commands:
Step 7![]() Once the installation is complete, restart the DCNM server using the following command:
Once the installation is complete, restart the DCNM server using the following command:
Administering the Cisco DCNM VSB
The Cisco DCNM installer binary file in the installer package is available at the following location: /root/CSCOdcnm/install. The default data archive location configured during installation is /root/CSCOdcnm/data_archive. You can override this value by specifying a different location during the Cisco DCNM VSB deployment.
The following table shows the soft links that are available in the /root directory of the Cisco DCNM VSB.
|
|
|
|---|---|
Installs the license. (You may need to specify the license file) |
|
This section includes the following topics:
- Verifying the Status of a Cisco DCNM VSB
- Accessing Cisco DCNM VSB Using the CLI
- Deleting a Cisco DCNM VSB
Verifying the Status of a Cisco DCNM VSB
You can verify the configuration and status of a deployed Cisco DCNM VSB.
DETAILED STEPS
Accessing Cisco DCNM VSB Using the CLI
DETAILED STEPS
|
|
|
|
|---|---|---|
Deleting a Cisco DCNM VSB
DETAILED STEPS
|
|
|
|
|---|---|---|
Managing Cisco DCNM VSBs Using the Attachmate Reflection Tool
Cisco DCNM supports the Attachmate Reflection tool on computers that run windows and connect to VSBs installed on Linux hosts. You can use the Attachmate Reflection tool to upgrade Cisco DCNM VSBs, install licenses, and manage user credentials. You must install the Attachmate Reflection tool on the computer from where you connect to the VSB node.
To access the Cisco DCNM VSB user interface on a computer that runs Windows, enter the following command on the VSB node:
where the IP address is the IP address of the computer on which the Attachmate Reflection tool is installed.
Using the Attachmate Reflection Tool to Upgrade Cisco DCNM VSBs
You can use the Attachmate Reflection tool to upgrade Cisco DCNM VSBs using the install manager script stored in the /usr/local/cisco/dcm/dcnm/bin.
DETAILED STEPS
Step 1![]() Run dcnm-install-manager.sh.
Run dcnm-install-manager.sh.
You see the DCNM Install Manager window.
Step 2![]() From the DCNM Installer Folder drop-down list, choose the installation folder.
From the DCNM Installer Folder drop-down list, choose the installation folder.
Step 3![]() From the DCNM License Folder drop-down list, choose the license folder.
From the DCNM License Folder drop-down list, choose the license folder.
Step 4![]() Specify the Data Path Location, and then click Install.
Specify the Data Path Location, and then click Install.
Using the Attachmate Reflection Tool to Install Licenses
You can use the Attachmate Reflection tool to install licenses using the install manager script stored in the /usr/local/cisco/dcm/dcnm/bin.
DETAILED STEPS
Step 1![]() Run dcnm-install-manager.sh.
Run dcnm-install-manager.sh.
You see the DCNM Install Manager window.
Step 2![]() From the DCNM License Folder drop-down list, choose the license folder.
From the DCNM License Folder drop-down list, choose the license folder.
Using the Attachmate Reflection Tool to Reset User Credentials
You can use the Attachmate Reflection tool to reset Cisco DCNM user credentials using the password reset script stored in the /usr/local/cisco/dcm/dcnm/bin.
 Feedback