- Information About RIP
- Licensing Requirements for RIP
- Prerequisites for RIP
- Configuration Guidelines and Limitations
- Configuring RIP
- Enabling the RIP Feature
- Creating a RIP Instance
- Restarting a RIP Instance
- Configuring RIP on an Interface
- Configuring RIP Authentication
- Configuring a Passive Interface
- Configuring Split Horizon with Poison Reverse
- Configuring Route Summarization
- Configuring Route Redistribution
- Configuring Virtualization
- Tuning RIP
- Verifying RIP Configuration
- Displaying RIP Statistics
- RIP Example Configuration
- Related Topics
- Default Settings
- Additional References
- Feature History for RIP
Configuring RIP
This chapter describes how to configure the Routing Information Protocol (RIP).
This chapter includes the following sections:
•![]() Licensing Requirements for RIP
Licensing Requirements for RIP
•![]() Configuration Guidelines and Limitations
Configuration Guidelines and Limitations
Information About RIP
This section includes the following topics:
RIP Overview
RIP uses User Datagram Protocol (UDP) data packets to exchange routing information in small internetworks. RIPv2 supports IPv4. RIPv2 uses an optional authentication feature supported by the RIPv2 protocol (see the "RIPv2 Authentication" section).

Note ![]() Cisco NX-OS does not support IPv6 for RIP.
Cisco NX-OS does not support IPv6 for RIP.
RIP uses the following two message types:
•![]() Request—Sent to the multicast address 224.0.0.9 to request route updates from other RIP-enabled routers.
Request—Sent to the multicast address 224.0.0.9 to request route updates from other RIP-enabled routers.
•![]() Response—Sent every 30 seconds by default (see the "Verifying RIP Configuration" section). The router also sends response messages after it receives a Request message. The response message contains the entire RIP route table. RIP sends multiple response packets for a request if the RIP routing table cannot fit in one response packet.
Response—Sent every 30 seconds by default (see the "Verifying RIP Configuration" section). The router also sends response messages after it receives a Request message. The response message contains the entire RIP route table. RIP sends multiple response packets for a request if the RIP routing table cannot fit in one response packet.
RIP uses a hop count for the routing metric. The hop count is the number of routers that a packet can traverse before reaching its destination. A directly connected network has a metric of 1; an unreachable network has a metric of 16. This small range of metrics makes RIP an unsuitable routing protocol for large networks.
RIPv2 Authentication
You can configure authentication on RIP messages to prevent unauthorized or invalid routing updates in your network. Cisco NX-OS supports a simple password or an MD5 authentication digest.
You can configure the RIP authentication per interface by using key-chain management for the authentication keys. Key-chain management allows you to control changes to the authentication keys used by an MD5 authentication digest or simple text password authentication. See the Cisco Nexus 7000 Series NX-OS Security Configuration Guide, Release 4.x for more details about creating key-chains.
To use an MD5 authentication digest, you configure a password that is shared at the local router and all remote RIP neighbors. Cisco NX-OS creates an MD5 one-way message digest based on the message itself and the encrypted password and sends this digest with the RIP message (Request or Response). The receiving RIP neighbor validates the digest by using the same encrypted password. If the message has not changed, the calculation is identical and the RIP message is considered valid.
An MD5 authentication digest also includes a sequence number with each RIP message to ensure that no message is replayed in the network.
Split Horizon
You can use split horizon to ensure that RIP never advertises a route out of the interface where it was learned.
Split horizon is a method that controls the sending of RIP update and query packets. When you enable split horizon on an interface, Cisco NX-OS does not send update packets for destinations that were learned from this interface. Controlling update packets in this manner reduces the possibility of routing loops.
You can use split horizon with poison revers to configure an interface to advertise routes learned by RIP as unreachable over the interface that learned the routes. Figure 12-1 shows a sample RIP network with split horizon with poison reverse enabled.
Figure 12-1 RIP with Split Horizon Poison Reverse
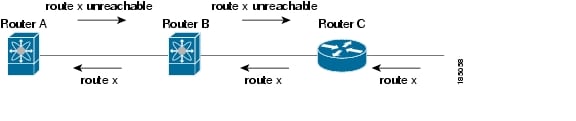
router C learns about route X and advertises that route to router B. router B in turn advertises route X to router A, but sends a route X unreachable update back to router C.
By default, split horizon is enabled on all interfaces.
Route Filtering
You can configure a route policy on a RIP-enabled interface to filter the RIP updates. Cisco NX-OS updates the route table with only those routes that the route policy allows.
Route Summarization
You can configure multiple summary aggregate addresses for a specified interface. Route summarization simplifies route tables by replacing a number of more-specific addresses with an address that represents all the specific addresses. For example, you can replace 10.1.1.0/24, 10.1.2.0/24, and 10.1.3.0/24 with one summary address, 10.1.0.0/16.
If more specific routes are in the routing table, RIP advertises the summary address from the interface with a metric equal to the maximum metric of the more specific routes.
Note ![]() Cisco NX-OS does not support automatic route summarization.
Cisco NX-OS does not support automatic route summarization.
Route Redistribution
You can use RIP to redistribute static routes or routes from other protocols. You must configure a route map with the redistribution to control which routes are passed into BGP. A route map allows you to filter routes based on attributes such as the destination, origination protocol, route type, route tag, and so on. For more information, see Chapter 16 "Configuring Route Policy Manager."
Whenever you redistribute routes into a RIP routing domain, Cisco NX-OS does not, by default, redistribute the default route into the RIP routing domain. You can generate a default route into RIP, which can be controlled by a route policy.
You also configure the default metric that is used for all imported routes into RIP.
Load Balancing
You can use load balancing to allow a router to distribute traffic over all the router network ports that are the same distance from the destination address. Load balancing increases the utilization of network segments and increases effective network bandwidth.
Cisco NX-OS supports the Equal Cost Multiple Paths (ECMP) feature with up to 16 equal-cost paths in the RIP route table and the unicast RIB. You can configure RIP to load balance traffic across some or all of those paths.
High Availability
Cisco NX-OS supports stateless restarts for RIP. After a reboot or supervisor switchover, Cisco NX-OS applies the running configuration and RIP immediately sends request packets to repopulate its routing table.
Virtualization Support
Cisco NX-OS supports multiple instances of the RIP protocol that runs on the same system. RIP supports Virtual Routing and Forwarding instances (VRFs). VRFs exist within virtual device contexts (VDCs).
You can configure up to four RIP instances on a VDC. By default, Cisco NX-OS places you in the default VDC and default VRF unless you specifically configure another VDC and VRF. See the Cisco NX-OS Virtual Device Context Configuration Guide and Chapter 14 "Configuring Layer 3 Virtualization."
Licensing Requirements for RIP
The following table shows the licensing requirements for this feature:
Prerequisites for RIP
RIP has the following prerequisites:
•![]() You must enable the RIP feature (see the "Enabling the RIP Feature" section).
You must enable the RIP feature (see the "Enabling the RIP Feature" section).
•![]() If you configure VDCs, install the Advanced Services license and enter the desired VDC (see to the Cisco NX-OS Virtual Device Context Configuration Guide).
If you configure VDCs, install the Advanced Services license and enter the desired VDC (see to the Cisco NX-OS Virtual Device Context Configuration Guide).
Configuration Guidelines and Limitations
RIP has the following configuration guidelines and limitations:
•![]() Cisco NX-OS does not support RIPv1. If Cisco NX-OS receives a RIPv1 packet, it logs a message and drops the packet.
Cisco NX-OS does not support RIPv1. If Cisco NX-OS receives a RIPv1 packet, it logs a message and drops the packet.
•![]() Cisco NX-OS does not establish adjacencies with RIPv1 routers.
Cisco NX-OS does not establish adjacencies with RIPv1 routers.
Configuring RIP
This section includes the following topics:
•![]() Configuring RIP on an Interface
Configuring RIP on an Interface
•![]() Configuring a Passive Interface
Configuring a Passive Interface
•![]() Configuring Route Summarization
Configuring Route Summarization
•![]() Configuring Route Summarization
Configuring Route Summarization
•![]() Configuring Route Redistribution
Configuring Route Redistribution
Note ![]() If you are familiar with the Cisco IOS CLI, be aware that the Cisco NX-OS commands for this feature might differ from the Cisco IOS commands that you would use.
If you are familiar with the Cisco IOS CLI, be aware that the Cisco NX-OS commands for this feature might differ from the Cisco IOS commands that you would use.
Enabling the RIP Feature
You must enable the RIP feature before you can configure RIP.
BEFORE YOU BEGIN
Ensure that you are in the correct VDC (or use the switchto vdc command).
SUMMARY STEPS
1. ![]() config t
config t
2. ![]() feature rip
feature rip
3. ![]() show feature
show feature
4. ![]() copy running-config startup-config
copy running-config startup-config
DETAILED STEPS
Use the no feature rip command to disable the RIP feature and remove all associated configuration.
|
|
|
|---|---|
no feature rip
Example: switch(config)# no feature rip |
Disables the RIP feature and removes all associated configuration. |
Creating a RIP Instance
You can create a RIP instance and configure the address family for that instance.
BEFORE YOU BEGIN
Ensure that you have enabled the RIP feature (see the "Enabling the RIP Feature" section).
Ensure that you are in the correct VDC (or use the switchto vdc command).
SUMMARY STEPS
1. ![]() config t
config t
2. ![]() router rip instance-tag
router rip instance-tag
3. ![]() address-family ip unicast
address-family ip unicast
4. ![]() show ip rip [instance instance-tag] [vrf vrf-name]
show ip rip [instance instance-tag] [vrf vrf-name]
5. ![]() copy running-config startup-config
copy running-config startup-config
DETAILED STEPS
Use the no router rip command to remove the RIP instance and the associated configuration.
|
|
|
|---|---|
no router rip instance-tag
Example: switch(config)# no router rip Enterprise |
Deletes the RIP instance and all associated configuration. |
Note ![]() You must also remove any RIP commands configured in interface mode.
You must also remove any RIP commands configured in interface mode.
You can configure the following optional parameters for RIP in address-family configuration mode:
|
|
|
|---|---|
distance value
Example: switch(config-router-af)# distance 30 |
Sets the administrative distance for RIP. The range is from 1 to 255. The default is 120. See the "Administrative Distance" section. |
maximum-paths number Example: switch(config-router-af)# maximum-paths 6 |
Configures the maximum number of equal-cost paths that RIP maintains in the route table. The range is from 1 to 16. |
The following example shows how to create a RIP instance for IPv4 and set the number of equal-cost paths for load balancing:
switch# config t
switch(config)# router rip Enterprise
switch(config-router)# address-family ipv4 unicast
switch(config-router-af)# max-paths 10
switch(config-router-af)# copy running-config startup-config
Restarting a RIP Instance
You can restart a RIP instance. This clears all neighbors for the instance.
To restart an RIP instance and remove all associated neighbors, use the following command:
|
|
|
|---|---|
restart rip instance-tag
Example: switch(config)# restart rip Enterprise |
Restarts the RIP instance and removes all neighbors. |
Configuring RIP on an Interface
You can add an interface to a RIP instance.
BEFORE YOU BEGIN
Ensure that you have enabled the RIP feature (see the "Enabling the RIP Feature" section).
Enter the correct VDC if necessary before configuring RIP.
SUMMARY STEPS
1. ![]() config t
config t
2. ![]() interface interface-type slot/port
interface interface-type slot/port
3. ![]() ip | router rip instance-tag
ip | router rip instance-tag
4. ![]() show ip rip [instance instance-tag] interface [interface-type slot/port] [vrf vrf-name] [detail]
show ip rip [instance instance-tag] interface [interface-type slot/port] [vrf vrf-name] [detail]
5. ![]() copy running-config startup-config
copy running-config startup-config
DETAILED STEPS
The following example shows how to add Ethernet 1/2 interface to a RIP instance:
switch# config t
switch(config)# interface ethernet 1/2
switch(config-if)# ip router rip Enterprise
switch(config)# copy running-config startup-config
Configuring RIP Authentication
You can configure authentication for RIP packets on an interface.
BEFORE YOU BEGIN
Ensure that you have enabled the RIP feature (see the "Enabling the RIP Feature" section).
Ensure that you are in the correct VDC (or use the switchto vdc command).
Configure a key chain if necessary before enabling authentication. See the Cisco NX-OS Security Configuration Guide for details on implementing key chains.
SUMMARY STEPS
1. ![]() config t
config t
2. ![]() interface interface-type slot/port
interface interface-type slot/port
3. ![]() ip rip authentication mode{text | md5}
ip rip authentication mode{text | md5}
4. ![]() ip rip authentication keychain key
ip rip authentication keychain key
5. ![]() copy running-config startup-config
copy running-config startup-config
DETAILED STEPS
The following example shows how to create a key chain and configure MD5 authentication on a RIP interface:
switch# config t
switch(config)# key chain RIPKey
switch(config)# key-string myrip
switch(config)# accept-lifetime 00:00:00 Jan 01 2000 infinite
switch(config)# send-lifetime 00:00:00 Jan 01 2000 infinite
switch(config)# interface ethernet 1/2
switch(config-if)# ip rip authentication mode md5
switch(config-if)# ip rip authentication keychain RIPKey
switch(config-if)# copy running-config startup-config
Configuring a Passive Interface
You can configure a RIP interface to receive routes but not send route updates by setting the interface to passive mode.
To configure a RIP interface in passive mode, use the following command in interface configuration mode:
|
|
|
|---|---|
ip rip passive-interface
Example: switch(config-if)# ip rip passive-interface |
Sets the interface into passive mode. |
Configuring Split Horizon with Poison Reverse
You can configure an interface to advertise routes learned by RIP as unreachable over the interface that learned the routes by enabling poison reverse.
To configure split horizon with poison reverse on an interface, use the following command in interface configuration mode:
|
|
|
|---|---|
ip rip poison-reverse
Example: switch(config-if)# ip rip poison-reverse |
Enables split horizon with poison reverse. Split horizon with poison reverse is disabled by default. |
Configuring Route Summarization
You can create aggregate addresses that are represented in the routing table by a summary address. Cisco NX-OS advertises the summary address metric that is the smallest metric of all the more-specific routes.
To configure a summary address on an interface, use the following command in interface configuration mode:
|
|
|
|---|---|
ip rip summary-address ip-prefix/mask-len
Example: switch(config-if)# ip router rip summary-address 192.0.2.0/24 |
Configures a summary address for RIP for IPv4 addresses. |
Configuring Route Redistribution
You can configure RIP to accept routing information from another routing protocol and redistribute that information through the RIP network. Redistributed routes can optionally be assigned a default route.
BEFORE YOU BEGIN
Ensure that you have enabled the RIP feature (see the "Enabling the RIP Feature" section).
Enter the correct VDC if necessary before configuring RIP.
Configure a route map before configuring redistribution. See the"Configuring Route Maps" section for details on configuring route maps.
SUMMARY STEPS
1. ![]() config t
config t
2. ![]() router rip instance-tag
router rip instance-tag
3. ![]() address-family ipv4 unicast
address-family ipv4 unicast
4. ![]() redistribute {bgp as | direct | eigrp | isis | ospf | ospfv3 | rip} instance-tag | static} route-map map-name
redistribute {bgp as | direct | eigrp | isis | ospf | ospfv3 | rip} instance-tag | static} route-map map-name
5. ![]() default-information originate [always] [route-map map-name]
default-information originate [always] [route-map map-name]
6. ![]() default-metric value
default-metric value
7. ![]() showip rip route [{ip-prefix [longer-prefixes | shorter-prefixes]] [vrf vrf-name] [summary]
showip rip route [{ip-prefix [longer-prefixes | shorter-prefixes]] [vrf vrf-name] [summary]
8. ![]() copy running-config startup-config
copy running-config startup-config
DETAILED STEPS
|
|
|
|
|---|---|---|
Step 1 |
config t
Example: switch# config t switch(config)# |
Enters configuration mode. |
Step 2 |
router rip instance-tag
Example: switch(config)# router rip Enterprise switch(config-router)# |
Creates a new RIP instance with the configured instance-tag. |
Step 3 |
address-family ipv4 unicast
Example: switch(config-router)# address-family ipv4 unicast switch(config-router-af)# |
Enters address family configuration mode. |
Step 4 |
redistribute {bgp as | direct |{eigrp | isis | ospf | ospfv3 | rip} instance-tag | static} route-map map-name
Example: switch(config-router-af)# redistribute eigrp 201 route-map RIPmap |
Redistributes routes from other protocols into RIP. See the "Configuring Route Maps" section for more information about route maps. |
Step 5 |
default-information originate [always] [route-map map-name]
Example: switch(config-router-af)# default-information originate always |
(Optional) Generates a default route into RIP, optionally controlled by a route map. |
Step 6 |
default-metric value
Example: switch(config-router-af)# distribute level-1 into level-2 all |
(Optional) Sets the default metric for all redistributed routes. The range is from 1 to 15. The default is 1. |
Step 7 |
show ip rip route [ip-prefix [longer-prefixes | shorter-prefixes] [vrf vrf-name] [summary]
Example: switch(config-router-af)# show ip rip route |
(Optional) Shows the routes in RIP. |
Step 8 |
copy running-config startup-config
Example: switch(config-router-af)# copy running-config startup-config |
(Optional) Saves this configuration change. |
The following example shows how to redistribute EIGRP into RIP:
switch# config t
switch(config)# router rip Enterprise
switch(config-router)# address-family ipv4 unicast
switch(config-router-af)# redistribute eigrp 201 route-map RIPmap
switch(config-router-af)# copy running-config startup-config
Configuring Virtualization
You can configure multiple RIP instances in each VDC. You can also create multiple VRFs within each VDC and use the same or multiple RIP instances in each VRF. You assign a RIP interface to a VRF.
Note ![]() Configure all other parameters for an interface after you configure the VRF for an interface. Configuring a VRF for an interface deletes all the configuration for that interface.
Configure all other parameters for an interface after you configure the VRF for an interface. Configuring a VRF for an interface deletes all the configuration for that interface.
BEFORE YOU BEGIN
Ensure that you have enabled the RIP feature (see the "Enabling the RIP Feature" section).
Create the VDCs.
SUMMARY STEPS
1. ![]() config t
config t
2. ![]() vrf context vrf_name
vrf context vrf_name
3. ![]() exit
exit
4. ![]() router rip instance-tag
router rip instance-tag
5. ![]() vrf vrf-name
vrf vrf-name
6. ![]() address-family ipv4 unicast
address-family ipv4 unicast
7. ![]() configure optional parameters
configure optional parameters
8. ![]() interface ethernet slot/port
interface ethernet slot/port
9. ![]() vrf member vrf-name
vrf member vrf-name
10. ![]() ip-address ip-prefix/length
ip-address ip-prefix/length
11. ![]() ip router rip instance-tag
ip router rip instance-tag
12. ![]() show ip rip [instance instance-tag] interface [interface-type slot/port] [vrf vrf-name]
show ip rip [instance instance-tag] interface [interface-type slot/port] [vrf vrf-name]
13. ![]() copy running-config startup-config
copy running-config startup-config
DETAILED STEPS
|
|
|
|
|---|---|---|
Step 1 |
config t
Example: switch# config t switch(config)# |
Enters configuration mode. |
Step 2 |
vrf vrf-name
Example: switch(config)# vrf RemoteOfficeVRF switch(config-vrf)# |
Creates a new VRF. |
Step 3 |
exit
Example: switch(config-vrf)# exit switch(config)# |
Exits VRF configuration mode. |
Step 4 |
router rip instance-tag
Example: switch(config)# router rip Enterprise switch(config-router)# |
Creates a new RIP instance with the configured instance tag. |
Step 5 |
vrf context vrf-name
Example: switch(config)# vrf context RemoteOfficeVRF switch(config-vrf)# |
Creates a new VRF and enters VRF configuration mode. |
Step 6 |
address-family ipv4 unicast
Example: switch(config-router-vrf)# address-family ipv4 unicast switch(config-router-vrf-af)# |
(Optional) Configures the VRF address family for this RIP instance. |
Step 7 |
redistribute {bgp as | direct | {eigrp | isis | ospf | ospfv3 | rip} instance-tag | static} route-map map-name
Example: switch(config-router-vrf-af)# redistribute eigrp 201 route-map RIPmap |
(Optional) Redistributes routes from other protocols into RIP. See the "Configuring Route Maps" section for more information about route maps. |
Step 8 |
interface ethernet slot/port
Example: switch(config-router-vrf-af)# interface ethernet 1/2 switch(config-if)# |
Enters interface configuration mode. |
Step 9 |
vrf member vrf-name
Example: switch(config-if)# vrf member RemoteOfficeVRF |
Adds this interface to a VRF. |
Step 10 |
ip address ip-prefix/length
Example: switch(config-if)# ip address 192.0.2.1/16 |
Configures an IP address for this interface. You must do this step after you assign this interface to a VRF. |
Step 11 |
ip router rip instance-tag
Example: switch(config-if)# ip router rip Enterprise |
Associates this interface with a RIP instance. |
Step 12 |
show ip rip [instance instance-tag] interface [interface-type slot/port] [vrf vrf-name]
Example: switch(config-if)# show ip rip Enterprise ethernet 1/2 |
(Optional) Displays RIP information for an interface. in a VRF. |
Step 13 |
copy running-config startup-config
Example: switch(config-if)# copy running-config startup-config |
(Optional) Saves this configuration change. |
The following example shows how to create a VRF and add an interface to the VRF:
switch# config t
switch(config)# vrf context RemoteOfficeVRF
switch(config-vrf)# exit
switch(config)# router rip Enterprise
switch(config-router)# vrf RemoteOfficeVRF
switch(config-router-vrf)# address-family ipv4 unicast
switch(config-router-vrf-af)# redistribute eigrp 201 route-map RIPmap
switch(config-router-vrf-af)# interface ethernet 1/2
switch(config-if)# vrf member RemoteOfficeVRF
switch(config-if)# ip address 192.0.2.1/16
switch(config-if)# ip router rip Enterprise
switch(config-if)# copy running-config startup-config
Tuning RIP
You can tune RIP to match your network requirements. RIP uses several timers that determine the frequency of routing updates, the length of time before a route becomes invalid, and other parameters. You can adjust these timers to tune routing protocol performance to better suit your internetwork needs.
Note ![]() You must configure the same values for the RIP timers on all RIP-enabled routers in your network.
You must configure the same values for the RIP timers on all RIP-enabled routers in your network.
You can use the following optional commands in address-family configuration mode to tune RIP:
You can use the following optional commands in interface configuration mode to tune RIP:
Verifying RIP Configuration
To verify RIP configuration, use the following commands:
Displaying RIP Statistics
To display RIP statistics, use the following commands:
Use the clear ip rip policy command to clear policy statistics.
Use the clear ip rip statistics command to clear RIP statistics.
RIP Example Configuration
This example creates the Enterprise RIP instance in a VRF and adds Ethernet interface 1/2 to this RIP instance. The example also configures authentication for Ethernet interface 1/2 and redistributes EIGRP into this RIP domain.
vrf context NewVRF
!
feature rip
router rip Enterprise
vrf NewVRF
address-family ip unicast
redistribute eigrp 201 route-map RIPmap
max-paths 10
!
interface ethernet 1/2
vrf NewVRF
ip address 192.0.2.1/16
ip router rip Enterprise
ip rip authentication mode md5
ip rip authentication keychain RIPKey
Related Topics
See Chapter 16 "Configuring Route Policy Manager" for more information on route maps.
Default Settings
Table 12-1 lists the default settings for RIP parameters.
|
|
|
|---|---|
Maximum paths for load balancing |
8 |
RIP feature |
Disabled |
Split horizon |
Enabled |
Additional References
For additional information related to implementing RIP, see the following sections:
Related Documents
Standards
|
|
|
|---|---|
No new or modified standards are supported by this feature, and support for existing standards has not been modified by this feature. |
— |
Feature History for RIP
Table 12-2 lists the release history for this feature.
|
|
|
|
|---|---|---|
RIP |
4.0(1) |
This feature was introduced. |
 Feedback