Feedback
Table Of Contents
Using the DMM CLI for Data Migration
Selecting Ports for Server-Based Jobs
Configuring Data Migration Using the CLI
Configuring the Virtual Initiator (Storage-Based Migration)
Creating the Data Migration Job
Server-Based Migration Example
Storage-Based Migration Example
(Optional) Verifying the Completed Job
Using the DMM CLI for Data Migration
This chapter describes how to use DMM CLI commands to configure and monitor data migration jobs.
This chapter includes the following sections:
•
About DMM CLI Commands, page 7-1
•
•
About DMM CLI Commands
The DMM feature includes CLI commands to configure and perform data migration jobs. Job and session configuration commands are entered at the switch CLI prompt.
A DMM job can be active on more than one switch. For example, in a dual-fabric topology with multipath configurations, the DMM job runs on a switch in each fabric. To configure the job, you enter DMM CLI commands on both switches.
The DMM feature runs on an SSM in the switch. Each session runs on only one SSM. Enter the session configuration commands on the MDS switch that will perform the session migration.
The DMM show commands are accessed directly from the SSM. From the command prompt in the switch, you must attach to the SSM module before entering these commands.
When using the DMM CLI commands, note the following guidelines:
•
•
•
Selecting Ports for Server-Based Jobs
When creating a server-based migration job, you must include all possible paths from the server HBA ports to the LUNs being migrated. This is because all writes to a migrated LUN need to be mirrored to the new storage until the cutover occurs, so that no data writes are lost.
For additional information about selecting ports for server-based jobs, refer to the "Ports to Include in a Server-Based Job" section on page 6-4.
Configuring Data Migration Using the CLI
When you enter the command to create a data migration job, the CLI enters DMM job configuration submode. This submode provides commands to configure the server HBA ports, storage ports, and job attributes. The job is only created on the SSM when you enter the commit command.
In a dual-fabric topology with redundant paths, the data migration job runs on an SSM in each fabric. You need to configure the job on both SSMs.
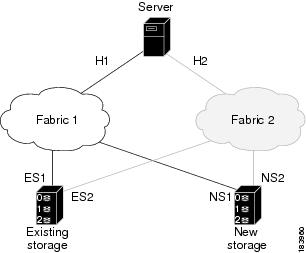
In this chapter, the examples and command descriptions use the following terminology (see Figure 7-1):
•
•
•
•
•
•
Figure 7-1 Example Topology
The steps to configure a data migration job are described in the following sections:
•
•
•
•
Configuring the Virtual Initiator (Storage-Based Migration)
Note
Prior to creating a storage-based data migration job, you must retrieve the virtual initiator (VI) port world wide name (pWWN) and create a new zone containing the pWWNs of the VI and the storage ports. To use the new zone, add the new zone to a zoneset and activate the zoneset.
To configure the VI in Fabric 1, follow these steps:
Prior to creating the data migration job, you must complete the following configuration tasks on the storage devices:
1.
2.
Note
Creating the Data Migration Job
To configure a data migration job, first create the job on Switch A. After creating the job, the CLI enters DMM job configuration mode, where you enter the commands for configuring the job.
To create the data migration job, follow these steps:
Configuring the Job
Use the commands in DMM job configuration mode to add the server and storage ports to the job.
Note
•
•
For additional information, see the "Checking Storage ASL Status" section on page 3-2.
In a dual-fabric topology, configure the IP address of the peer SSM (the DMM peers communicate using the management IP network).
Configure the data migration job using the following steps:
Step 1
switchA(config-dmm-job)# server vsan 0-4093 pwwn pWWN
Specifies the VSAN and pWWN of the server HBA port to include in the migration.
Note
Step 2
switchA(config-dmm-job)# storage vsan 0-4093 pwwn pWWN existing
Specifies the VSAN and pWWN of the existing storage port.
Note
Step 3
switchA(config-dmm-job)# storage vsan 0-4093 pwwn pWWN new
Specifies the VSAN and pWWN of the new storage port.
Note
Step 4
switchA(config-dmm-job)# attributes job_type {1 | 2} job_mode {1 | 2} job_rate {1 | 2 | 3 | 4} job_method {1|2}
Specifies the job type, job mode, and job rate:
For job_type, enter 1 for server-based migration or 2 for storage-based migration.
For job_mode, enter 1 for online or 2 for offline migration.
For job_rate enter 1 for best effort, 2 for slow, 3 for medium, and 4 for fast data migration.
For job_method enter 1 for Method 1and 2 for Method 2.
For additional information about data migration rate, see the "Configuring Migration Rate" section on page 2-6.
Step 5
switchA(config-dmm-job)# peer IP_address
Configures the IP address of the SSM on switch B.
For information about configuring SSM IP addresses, see the "Configuring IP Connectivity" section on page 2-3
Committing the Job
The next step is to commit the data migration job on switch A. To commit the job, use the commit command.
When you enter the commit command, the switch sends the job configuration to the SSM.
The DMM feature sends configuration information to other switches in the fabric as required, so that all traffic between the server HBA port and the existing storage is redirected to the SSM.
The SSM performs discovery of all existing and new storage LUNs visible to the server HBA ports/VIs in this job.
Note
Configuring the Peer SSM
The next step is to configure the data migration job on the peer SSM.
Note
To configure the data migration job on the peer SSM, follow these steps:
Configuring Sessions
The next step is to configure sessions in the data migration job. For a server-based migration, configure all of the sessions on one SSM.
For a storage-based migration, you can manually balance the load on the SSMs by configuring sessions on both SSMs.
Note
To display that the SSM has discovered the LUNs correctly, enter the show dmm job job-id job id storage command from the SSM CLI.
To configure sessions, follow these steps:
Server-Based Migration Example
The topology for this example is dual fabric with multipath ports defined in the server and redundant paths to the storage devices (as shown in Figure 7-2).
Figure 7-2 Topology for the Example
On both switches, the SSM module is located in slot 8. The pWWNs for the ports are listed here:
H1
21:00:00:e0:8b:0a:5d:e7
ES1
50:06:04:82:bf:cf:e0:43
NS1
50:06:0e:80:03:4e:95:13
H2
21:01:00:e0:8b:0a:5d:e7
ES2
50:06:04:82:bf:cf:e0:5d
NS2
50:06:0e:80:03:4e:95:03
Configure the data migration job on switch A:switchA# configure terminalswitchA(config)# dmm module 8 job 2345 createStarted New DMM Job Configuration.Do not exit sub-mode until configuration is complete and committedswitchA(config-dmm-job)# server vsan 100 pwwn 21:0d:00:0d:ec:02:2d:82switchA(config-dmm-job)# storage vsan 100 pwwn 50:06:04:82:bf:cf:e0:43 existingswitchA(config-dmm-job)# storage vsan 100 pwwn 50:06:0e:80:03:4e:95:13 newswitchA(config-dmm-job)# peer 10.10.2.4switchA(config-dmm-job)# attributes job_type 1 job_mode 1 job-rate 1 job-method 1switchA(config-dmm-job)# commitswitchA(config-dmm-job)# endEnding DMM Job Configuration.If the Job was not committed, it will be required to reconfigure the job.Configure the data migration job on switch B:switchB# configure terminalswitchB(config)# dmm module 8 job 2345 createStarted New DMM Job Configuration.Do not exit sub-mode until configuration is complete and committedswitchB(config-dmm-job)# server vsan 100 pwwn 21:0d:00:0d:0a:01:2b:82switchB(config-dmm-job)# storage vsan 100 pwwn 50:06:04:82:bf:cf:e0:5d existingswitchB(config-dmm-job)# storage vsan 100 pwwn 50:06:0e:80:03:4e:95:03 newswitchB(config-dmm-job)# peer 10.10.1.8switchB(config-dmm-job)# attributes job_type 1 job_mode 1 job-rate 1 job-method 1switchB(config-dmm-job)# commitswitchB(config-dmm-job)# endEnding DMM Job Configuration.If the Job was not committed, it will be required to reconfigure the job.switchB#Configure the data migration sessions on switch A:switchA(config)# dmm module 4 job 2345 sessionswitchA(config-session)# server 21:00:00:e0:8b:0a:5d:e7 src_tgt 50:06:04:82:bf:cf:e0:43 src_lun 0x5 dst_tgt 50:06:0e:80:03:4e:95:13 dst_lun 0x0switchA(config-session)# server 21:00:00:e0:8b:0a:5d:e7 src_tgt 50:06:04:82:bf:cf:e0:43 src_lun 0x6 dst_tgt 50:06:0e:80:03:4e:95:13 dst_lun 0x1switchA(config-session)# exitStart the data migration job on switch A:switchA(config)# dmm module 8 job 2345 startStarted New DMM Job Configuration.Do not exit sub-mode until configuration is complete and committedswitchA(config)# exitStorage-Based Migration Example
The topology for this example is dual fabric with multipath ports defined in the server and redundant paths to the storage devices (as shown in Figure 7-3).
Figure 7-3 Topology for the Example
On both switches, the SSM module is located in slot 8. The pWWNs for the ports are listed here:
Configure the VI on switch A:switchA# configure terminalswitchA(config)# dmm module 8 job 2345 get-vi vsan 100DMM Storage Job:0x929 assigned follwing VI -VI NodeWWN: 21:0c:00:0d:ec:02:2d:82VI PortWWN: 21:0d:00:0d:ec:02:2d:82sjc7-9509-6(config)#Configure the zone and zoneset on switch A:
switchA(config)# zone name DMM1 vsan 100switchA(config-zone)# member pwwn 21:0d:00:0d:ec:02:2d:82 viswitchA(config-zone)# member pwwn 50:06:04:82:bf:cf:e0:43 esswitchA(config-zone)# member pwwn 50:06:0e:80:03:4e:95:13 nsswitchA(config-zone)# exitswitchA(config)# zoneset name DMM1 vsan 100switchA(config-zoneset)# member DMM1switchA(config-zoneset)# exitswitchA(config)#Configure the data migration job on switch A:switchA(config)# dmm module 8 job 2345 createStarted New DMM Job Configuration.Do not exit sub-mode until configuration is complete and committedswitchA(config-dmm-job)# server vsan 100 pwwn 21:0d:00:0d:ec:02:2d:82switchA(config-dmm-job)# storage vsan 100 pwwn 50:06:04:82:bf:cf:e0:43 existingswitchA(config-dmm-job)# storage vsan 100 pwwn 50:06:0e:80:03:4e:95:13 newswitchA(config-dmm-job)# peer 10.10.2.4switchA(config-dmm-job)# attributes job_type 2 job_mode 1 job-rate 1 job-method 1switchA(config-dmm-job)# commitswitchA(config-dmm-job)# endEnding DMM Job Configuration.If the Job was not committed, it will be required to reconfigure the job.switchB#Configure the VI on switch B:switchB# configure terminalswitchB(config)# dmm module 8 job 2345 get-vi vsan 100DMM Storage Job:0x929 assigned follwing VI -VI NodeWWN: 21:0c:01:0e:ec:02:2d:82VI PortWWN: 21:0d:00:0d:0a:01:2b:82switchB(config)#Configure the zone and zoneset on switch B:switchB(config)# zone name DMM1 vsan 100switchB(config-zone)# member pwwn 21:0d:00:0d:0a:01:2b:82 viswitchB(config-zone)# member pwwn 50:06:04:82:bf:cf:e0:5d esswitchB(config-zone)# member pwwn 50:06:0e:80:03:4e:95:03 nsswitchB(config-zone)# exitswitchB(config)# zoneset name DMM1 vsan 100switchB(config-zoneset)# member DMM1switchB(config-zoneset)# exitswitchB(config)#Configure the data migration job on switch B:
switchB# configure terminalswitchB(config)# dmm module 8 job 2345 createStarted New DMM Job Configuration.Do not exit sub-mode until configuration is complete and committedswitchB(config-dmm-job)# server vsan 100 pwwn 21:0d:00:0d:0a:01:2b:82switchB(config-dmm-job)# storage vsan 100 pwwn 50:06:04:82:bf:cf:e0:5d existingswitchB(config-dmm-job)# storage vsan 100 pwwn 50:06:0e:80:03:4e:95:03 newswitchB(config-dmm-job)# peer 10.10.1.8switchB(config-dmm-job)# attributes job_type 2 job_mode 1 job-rate 1 job-method 1switchB(config-dmm-job)# commitswitchB(config-dmm-job)# endEnding DMM Job Configuration.If the Job was not committed, it will be required to reconfigure the job.switchB#Configure the data migration sessions on switch A: 50:06:04:82:bf:cf:e0:43switchA(config)# dmm module 4 job 2345 sessionswitchA(config-session)# server 21:0d:00:0d:ec:02:2d:82 src_tgt 50:06:04:82:bf:cf:e0:43 src_lun 0x5 dst_tgt 50:06:0e:80:03:4e:95:13 dst_lun 0x0switchA(config-session)# exitStart the data migration job on switch A:switchA(config)# dmm module 8 job 2345 startStarted New DMM Job Configuration.Do not exit sub-mode until configuration is complete and committedswitchA(config)# exitConfigure the data migration sessions on switch B:switchB(config)# dmm module 4 job 2345 sessionswitchB(config-session)# server 21:0d:00:0d:0a:01:2b:82 src_tgt 50:06:04:82:bf:cf:e0:5d src_lun 0x5 dst_tgt 50:06:0e:80:03:4e:95:03 dst_lun 0x0switchB(config-session)# exitStart the data migration job on switch B:switchB(config)# dmm module 8 job 2345 startStarted New DMM Job Configuration.Do not exit sub-mode until configuration is complete and committedswitchB(config)# exitControlling DMM Jobs
The DMM CLI provides a set of commands to control jobs that have been configured. The job state determines which commands are valid to run. Job states are shown in Table 7-1.
Table 7-1 Job Status Values
Created
The job has been created, but has not been scheduled.
Scheduled
The job has been configured with a scheduled start time. It will automatically start at that time.
Complete
The job has been completed successfully.
Verify
The completed job is being verified.
Stopped
The job has been stopped manually by the user.
Failed
The job has been stopped because of failures. See Table 5-5 for details.
In_Progress
The job is currently running.
Reset
The job has been reinitialized because of failures . See Table 5-6 for details.
Finishing
The Method 2 job is in the final copy iteration.
Verify_Stopped
The job verification has been stopped.
Verify_Complete
The job verification has been completed.
Verify_Failure
The job verification is unsuccessful.
Table 7-2 describes the data migration commands.
Note
To control the data migration job, use the following commands:
Monitoring DMM Jobs
Use the show dmm job command in the SSM CLI to monitor the status of data migration jobs, and the current progress of jobs and sessions that are in progress.
To monitor data migration jobs, follow these steps:
For additional information about monitoring and troubleshooting data migration jobs, see Chapter 5, "Troubleshooting Cisco MDS DMM."
Completing DMM Jobs
When all of the sessions in a job have completed successfully, you can delete the job in coordination with other post-migration tasks, which are described in the following sections:
•
(Optional) Verifying the Completed Job
When all of the sessions in a job have completed successfully, you can optionally perform verification of the data in the new storage location. The SSM compares the data in the new storage with the data in the existing storage by reading each migration region from the existing and new storage, and then performing a comparison of the data.
To perform migration verification, follow these steps:
Note
While verification is being performed on a job, you can display the verification progress using the following command:
show dmm job job-id session [session-id sess-id]
Post-Migration Activities
After the data migration job has completed successfully, you need to reconfigure the server to use the new storage. The exact post-migration configuration steps vary depending on the operating system of the server.
Reconfiguration may include the following steps:
•
•
•
•
For Method 1- Delete the data migration job. DMM removes the FC-Redirect entries to the SMM. Server writes are no longer mirrored to the existing and new storage.
ForMethod 2 - Finish the data migration job. When the job moves to Completed state, delete the data migration job. See the Finishing Jobs for more details.
•
•
•
•
Finishing the Job
To finish the data migration job, follow these steps:
Step 1
switchA(config)# dmm module module-id job job-id finish
switch A#
Finishes the specified data migration job. This is valid only for Method 2. See Finishing Jobs for more details.
Deleting the Job
To delete the data migration job, follow these steps:
Step 1
switchA(config)# dmm module module-id job job-id destroy
switchA#
Deletes the specified data migration job.