-
Cisco MDS 9000 Family Fabric Manager User Guide, Release 1.0(2a)
-
Index
-
Preface
-
Getting Started with Cisco Fabric Manager
-
Using Cisco MDS 9000 Family Fabric Manager Views
-
Managing Zones and Zone Sets
-
Managing VSANs
-
Managing Administrator Access
-
Managing Software and Configuration Files
-
Managing Interfaces
-
Managing the System and Components
-
Managing Fibre Channel Routing and FSPF
-
Managing Advanced Features
-
Managing Events and Alarms
-
Business Reply Thing
-
 Feedback
Table Of Contents
Activating or Enforcing Zone Sets
Displaying Port Membership Information
Deleting Zones, Zone Sets, and Members
Changing the Default Zone Policy
Managing Zones and Zone Sets
The Fabric Manager allows you to configure and monitor zones and zone sets (groups of zones) on the
Cisco 9000 switch. Zoning allows you to set up access control between hosts and storage devices. You can use zones to control access between devices or user groups, and to increase network security and prevent data loss or corruption.This chapter describes how to configure and monitor zones and zone sets using the Zone Server and the Zone Manager, which are available from the Fabric Manager.
Note
Zones and zone sets can only be created and configured in the Fabric Manager.
To verify the compatibility of the zone configuration on two connected switches, see "Analyzing the Results of Merging Zones" section. For information about zones and zone sets, and configuring them using the command-line interface (CLI), refer to the Cisco 9000 Family Configuration Guide.
This chapter includes the following sections:
•
Creating Zones and Zone Sets
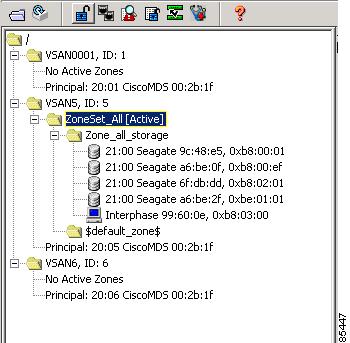
Zones are configured within VSANs, but you can configure zones without configuring any VSANs by configuring them within the default VSAN. The VSANs/Zones tab (see Figure 3-1) displays the VSANs configured in the currently discovered fabric.
Figure 3-1 VSAN/Zones Tab
Note
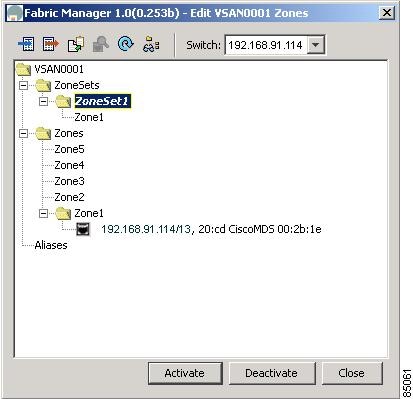
To manage zones and zone sets, select a Zone Set folder or click No Active Zones in the VSAN pane and then click the Edit VSAN button on the main toolbar. You can also choose Zones from the Fabric View Edit menu bar or right-click a zone folder in the VSANs/Zones tab and choose Edit Zones from the pop-up menu.
You see the Edit Zones dialog box for the current VSAN in the Information pane. (See Figure 3-2.) This window displays zone information for a specific switch. You can change zone information for the specific switch and when you click Activate, this configuration is distributed to the other switches in the network fabric.
Note
Figure 3-2 Edit Zones Dialog Box
Each VSAN contains a default zone, which by default, contains all connected devices assigned to the VSAN. Storage or host devices in a default zone do not belong to any other zone and, by default, are denied access to any other devices. You can change the default zone policy for any VSAN by choosing FC > Default Zone Policies from the Fabric View menu tree. However, we recommend that you establish connectivity among devices by assigning them to a nondefault zone.
The active zone set is shown in italic type. After you have made changes to the active zone set and before you activate the changes, the zone set is shown in boldface italic type. The tooltip for each zone indicates the activation time or modification time.
To create additional zones and zone sets, follow these steps:
Step 1
Step 2
The zone is automatically added to the zone database.
Step 3
You can also right-click the ZoneSets folder and choose Insert from the pop-up menu.
Adding Zones to a Zone Set
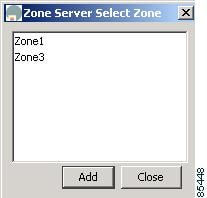
To add a zone to a zone set, on the Edit Zones window, drag and drop the zone to the folder for the zone set. Alternatively, follow these steps:
Step 1
You can also right-click the folder for the zone set to which you want to add a zone and choose Insert from the pop-up menu.
You see the Zone Server Select Zone dialog box shown in Figure 3-3.
Figure 3-3 Zone Server Select Zone
Step 2
The zone is added to the zone set in the zone database.
Cloning Zones and Zone Sets
Another method of adding zones and zone sets is to clone existing zones and zone sets. To clone a zone or zone set, follow these steps:
Step 1
You can also right-click the folder for the zone or zone set that you want to clone and choose Clone from the pop-up menu.
Step 2
By default, the dialog displays the selected zone as ClonedZone1.
Step 3
Assigning Zone Members
Once you have created a zone, you can assign members to the zone. You can assign members using the following port identification types:
•
•
•
•
For more information about port identification types, refer to the Cisco 9000 Family Configuration Guide.
To assign members to a zone, follow these steps:
Step 1
You see the window shown in Figure 3-4.
Figure 3-4 Zone Server Add Member in Vsan
Step 2
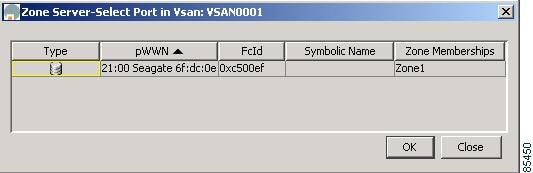
You see Zone Server Select Port in Vsan dialog box shown in Figure 3-5.
Figure 3-5 Zone Server Select Port in Vsan
Step 3
You see member in the Zone Server database in the left frame.
Step 4
Activating or Enforcing Zone Sets
Once zones and zone sets have been created and populated with members, you must activate or enforce the zone set.
Note
If zoning is activated, any member that is not assigned to an active zone belongs to the default zone. If zoning is not activated, all members belong to the default zone.
To activate a zone set, follow these steps:
Step 1
Step 2
You see the zone set in the Active Zone Set folder.
Note
Managing Zones
This section describes how to configure and monitor zones from the Zone Server and includes the following sections:
•
•
•
Searching the Zone Database
To search the zone or active zone set databases, follow these steps:
Step 1
You see the window shown in Figure 3-6.
Figure 3-6 Find in Database Dialog Box
Step 2
Step 3
Step 4
Step 5
Displaying Port Membership Information
To display port membership information for members assigned to zones, click a member within a zone and then click the Port Membership button on the toolbar, or right-click the member and choose Port Membership from the pop-up menu.
You see the window shown earlier (see Figure 3-5).
Select a row and click OK.
Note
Deleting Zones, Zone Sets, and Members
To delete zones, zone sets, or members, click the object in the Information pane and click the Delete button on the toolbar, or right-click the object and choose Delete from the pop-up menu. The selected object is deleted from the zone database.
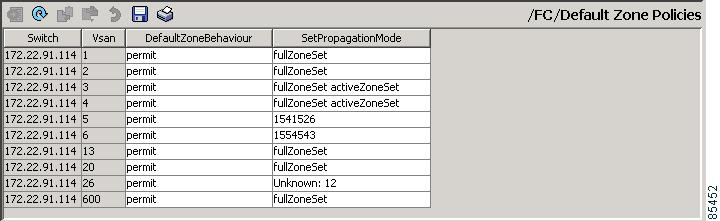
Changing the Default Zone Policy
Each member in the fabric can belong to any zone. If a member does not belong to any zone, it is part of the default zone. If no zone has been activated in the fabric, all members belong to the default zone. Even though a member can belong to multiple zones, a member in the default zone cannot be part of any other zone.
Traffic can be permitted and denied to members in the default zone. This information is not distributed to all switches. Permission and denial must be set for each switch in the fabric.
To permit or deny traffic to members in the default zone from the Zone Server, follow these steps:
Step 1
You see the dialog box shown in Figure 3-7. This dialog box displays the default zone behavior for multiple switches.
Figure 3-7 FC > Default Zone Policy Dialog Box, Fabric Manager
Step 2
The dialog box shows the display-only information described in Table 3-1.
Table 3-2 describes the configurable attributes for zone policy.
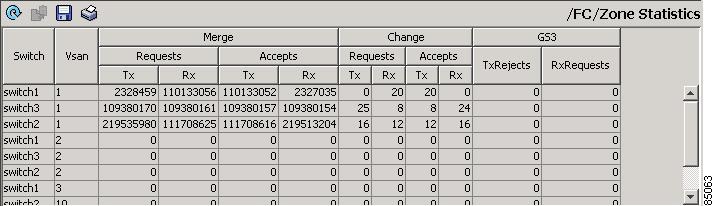
Viewing Zone Statistics
To monitor zone statistics from the Zone Server, choose FC > Zone Statistics from the Fabric Manager menu tree. You see the window shown in Figure 3-8. This view displays zone statistics for multiple switches.
Figure 3-8 FC > Zone Statistics Dialog Box
The dialog box shows the display-only attributes described in Table 3-3.