Introduction

Table Of Contents

Introduction

Understanding PIX Firewall

Introduction

Adaptive Security Algorithm

Understanding the Adaptive Security Algorithm

How Data Moves Through the Firewall

Translating Internal Addresses

For More Information

PIX Firewall Features

Creating a Security Policy

What a Security Policy Provides

Before Creating a Security Policy

Preparing a Security Policy

Know Your Enemy

Count the Cost

Identify Your Assumptions

Control Your Secrets

Remember Human Factors

Know Your Weaknesses

Limit the Scope of Access

Understand Your Environment

Limit Your Trust

Remember Physical Security

Make Security Pervasive

Deciding How to Use Multiple Interfaces

Command Line Guidelines

Access Modes

Abbreviating Commands

Backups

Command Line Editing

Command Output Paging

Comments

Configuration Size

Default Configuration

Help Information

IP Addresses

Ports

Protocols

Supported Multimedia Applications

Supported Protocols and Applications

Technical Assistance

Terminology


Introduction


This chapter provides information you need before configuring PIX Firewall and includes the following sections:

Understanding PIX Firewall

PIX Firewall Features

Creating a Security Policy

Deciding How to Use Multiple Interfaces

Command Line Guidelines

Refer to Appendix B, "" for information on acronyms used in this chapter.

Understanding PIX Firewall

The PIX Firewall, when properly configured, helps prevent unauthorized connections between two or more networks.

This section includes the following topics:

Introduction

Adaptive Security Algorithm

For More Information

Introduction

The PIX Firewall can protect one or more networks from intruders on an outer, unprotected network. The PIX Firewall optionally supports multiple outside or perimeter networks (also known as demilitarized zones (DMZs)). Connections between the networks can all be controlled by the PIX Firewall.

To effectively use a firewall in your organization, you need a security policy to ensure that all traffic from the protected networks passes only through the firewall to the unprotected network. (Refer to "Creating a Security Policy" in this chapter for more information.) You can then control who may access the networks with which services, and how to implement your security policy using the features PIX Firewall provides.

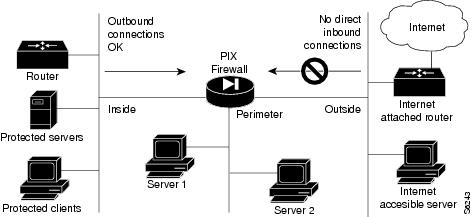
shows how a PIX Firewall protects a network while providing outbound connections secure access to the Internet.

Within this architecture, the PIX Firewall forms the boundary between the protected networks and the unprotected networks. All traffic between the protected and unprotected networks must flow through the firewall to maintain security. The unprotected network is typically accessible to the Internet. PIX Firewall lets you locate servers such as those for Web access, SNMP, electronic mail (SMTP) in the protected network and control who on the outside can access these servers.

Alternatively, server systems can be located on a perimeter network as shown in , and access to the server systems can be controlled and monitored by the PIX Firewall. The PIX Firewall also lets you implement your security policies for connection to and from the inside network.

Typically, the inside network is an organization's own internal network, or intranet, and the outside network is the Internet, but the PIX Firewall can also be used within an intranet to isolate or protect one group of internal computing systems and users from another.

Figure 1-1 The PIX Firewall in a Network

The perimeter network can be configured as secure as the inside network or with varying security levels from the most secure inside network to the least secure outside network. Both the inside and perimeter networks are protected with the PIX Firewall's Adaptive Security algorithm described later in this chapter. The inside, perimeter, and outside interfaces can listen to RIP routing updates, and all interfaces can broadcast a RIP default route if required.

Adaptive Security Algorithm

The Adaptive Security Algorithm (ASA) feature applies to the dynamic translation slots and static translation slots. You can create static translation slots with the static command and dynamic translation slots with the global command. Collectively, both types of translation slots are referred to as "xlates."

This section includes the following topics:

Understanding the Adaptive Security Algorithm

How Data Moves Through the Firewall

Translating Internal Addresses

Understanding the Adaptive Security Algorithm

The Adaptive Security algorithm is a very stateful approach to security. Every inbound packet is checked against the Adaptive Security algorithm and against connection state information in memory. This stateful approach to security is regarded in the industry as being far more secure than a stateless packet screening approach.

Adaptive Security follows these rules:

No packets can traverse the PIX Firewall without a connection and state.

Outbound connections or states are allowed, except those specifically denied by access control lists. An outbound connection is one where the originator or client is on a higher security interface than the receiver or server. The highest security interface is always the inside interface and the lowest is the outside interface. Any perimeter interfaces can have security levels between the inside and outside values.

Inbound connections or states are denied, except those specifically allowed by conduits. An inbound connection or state is one where the originator or client is on a lower security interface/network than the receiver or server. You can apply multiple exceptions to a single xlate (translation). This lets you permit access from an arbitrary machine, network, or any host on the Internet to the host defined by the xlate.

All ICMP packets are denied unless specifically permitted using the conduit permit icmp command.

All attempts to circumvent the previous rules are dropped and a message is sent to syslog.

PIX Firewall handles UDP data transfers in a manner similar to TCP. Special handling allows DNS, archie, StreamWorks, H.323, and RealAudio to work securely. The PIX Firewall creates UDP "connection" state information when a UDP packet is sent from the inside network. Response packets resulting from this traffic are accepted if they match the connection state information. The connection state information is deleted after a short period of inactivity.

How Data Moves Through the Firewall

When an outbound packet arrives at a PIX Firewall higher security level interface (security levels are set with the nameif command), the PIX Firewall checks to see if the packet is valid based on the Adaptive Security Algorithm, and then whether or not previous packets have come from that host. If not, then the packet is for a new connection, and PIX Firewall creates a translation slot in its state table for the connection. The information that PIX Firewall stores in the translation slot includes the inside IP address and a globally unique IP address assigned by Network Address Translation (NAT), Port Address Translation (PAT), or Identity (which uses the inside address as the outside address). The PIX Firewall then changes the packet's source IP address to the globally unique address, modifies the checksum and other fields as required, and forwards the packet to the lower security level interface.

When an inbound packet arrives at an unprotected interface, it must first pass the PIX Firewall Adaptive Security criteria. If the packet passes the security tests, the PIX Firewall removes the destination IP address, and the internal IP address is inserted in its place. The packet is forwarded to the protected interface.

Translating Internal Addresses

Dynamic translation slots are useful for desktop machines that do not need constant addresses on the Internet. Inside network hosts with IP addresses not registered with the NIC (Network Information Center) can directly access the Internet with standard TCP/IP software on the desktop by enabling address translation within the PIX Firewall. No special client software is needed. The PIX Firewall supports Network Address Translation (NAT) which provides a globally unique address for each inside host, and Port Address Translation (PAT) which shares a single globally unique address for up to 64K simultaneously accessing inside hosts.

Another class of address translation on the PIX Firewall is static translation. Static translation effectively moves an internal, unregistered host into the virtual network in the PIX Firewall. This is useful for internal machines that need to be addressed from the outside Internet gateways; for example, an SMTP server.

After you create the basic configuration, described in Chapter 2, "," the PIX Firewall permits all outbound connections from the protected networks to the unprotected networks, and rejects any connections inbound from the unprotected network. This default policy can be modified to match the policy requirements of your organization using the features described in .

For More Information

For more information on firewalls, refer to:

Bernstein, T., Bhimani, A.B., Schultz, E. and Siegel, C. A. Internet Security for Business. Wiley. Information about this book is available at: http://www.wiley.com

Chapman, D. B. & Zwicky, E. D. Building Internet Firewalls. O'Reilly. Information on this book is available at: http://www.ora.com/

Cheswick, W. and Bellovin, S. Firewalls & Internet Security. Addison-Wesley. Information about this book is available at: http://www.aw.com/cp/Ches.html

Garfinkel, S. and Spafford, G. Practical UNIX Security. O'Reilly. Information about this book is available at: http://www.ora.com/

Stevens, W. R.TCP/IP Illustrated, Volume 1 The Protocols. Addison-Wesley. Information about this book is available at: http://www.awl.com/cp/Vol1.html


Note   You can view information on the PIX Firewall and additional documentation over the World Wide Web at: http://www.cisco.com/warp/public/778/security/pix/


PIX Firewall Features

The PIX Firewall provides full firewall protection that completely conceals the architecture of an internal network from the outside world. The PIX Firewall allows secure access to the Internet from within existing private networks and the ability to expand and reconfigure TCP/IP networks without being concerned about a shortage of IP addresses.

The PIX Firewall features are described in .

Table 1-1 PIX Firewall Features 

Feature
Description
Benefit
Security Implication

AAA Server Groups

PIX Firewall lets you define separate groups of TACACS+ or RADIUS servers for specifying different types of traffic; such as, a TACACS+ server for inbound traffic and another for outbound traffic.

AAA server group are defined by a tag name that directs different types of traffic to each authentication server.

If accounting is in effect, the accounting information goes to the active server.

Access Lists

Controls which inside systems can establish connections to the outside network.

The default security policy can be modified to be consistent with the site security policy by limiting outgoing connections based on inside source address, outside destination address, or protocol.

Configure access lists carefully if your security policy limits outgoing connections.

ActiveX Blocking

ActiveX controls, formerly known as OLE or OCX controls, are components you can insert in a web page or other application.

The PIX Firewall ActiveX blocking feature blocks HTML <object> commands and comments them out of the HTML web page.

As a technology, ActiveX creates many potential problems for the network clients including causing workstations to fail, introducing network security problems, or be used to attack servers.

Adaptive Security Algorithm (ASA)

Implements stateful connection control through the firewall.

Allows one way (inside to outside) connections without an explicit configuration for each internal system and application.

Always in operation monitoring return packets to ensure they are valid. Actively randomizes TCP sequence numbers to minimize the risk of TCP sequence number attack.

Cisco IOS-like Configuration

Supports a command line interface similar to Cisco IOS.

Administrators familiar with the Cisco IOS router interface will be comfortable with the PIX Firewall.

Similar interfaces provide less chance to make errors and cause security holes.

Conduits

Conduits allows connections from the outside network to the inside network.

For some applications or business requirements, it is desirable to establish connections to the inside or perimeter networks. This may be to allow access from certain remote systems, or to provide access to applications hosted on inside systems.

Each conduit is a potential hole through the PIX Firewall and hence their use should be limited as your security policy and business needs require. Make conduits as specific as possible, by specifying a remote source address, local destination address, and protocol.

Cut-Through Proxies

User-based authentication of inbound or outbound connections. Unlike a proxy server that analyzes every packet at layer seven of the OSI model, a time- and processing-intensive function, the PIX Firewall first queries an authentication server, and when the connection is approved, establishes a data flow. All traffic thereafter flows directly and quickly between the two parties.

Allows security policies to be enforced on a per user ID basis. Connections must be authenticated with a user ID and password before they can be established. Supports authentication and authorization. The user ID and password are entered via an initial HTTP, Telnet, or FTP connection.

Allows much finer level of administrative control over connections compared to checking source IP addresses. When providing inbound authentication, appropriate controls need to be applied to the user ID and passwords used by external users (one-time passwords are recommended in this instance).

DC Power on PIX Firewall 520

The PIX Firewall 520 now comes in a DC power model.

Able to work in 48-volt DC environments.

Provides network security in telephony and environments where a firewall might not previously be considered.

DNS Guard

Identifies an outbound DNS resolve request, and only allows a single DNS response.

A host may query several servers for a response (in the case that the first server is slow in responding), but only the first answer to the specific question will be allowed. All the additional answers from other servers will be dropped.

Always enabled.

Failover

PIX Firewall failover allows you to configure two PIX Firewall units in a fully redundant topology.

Fault tolerant networks are an increasingly important requirement, which PIX Firewall failover provides.

Both PIX Firewall units must be configured identically; failover does not provide stateful redundancy.

FDDI Interfaces

PIX Firewall supports two FDDI network interfaces.

The Cisco FDDI card complies with ANSI specification ASC X3T9.5, which is a peer to the Ethernet IEEE802.3 or Token Ring IEEE802.5 specifications. The FDDI driver supports failover.

FDDI interfaces cannot be used with Ethernet or Token Ring interfaces.

Flood Defender

Protects inside systems from TCP SYN flood attacks. Enable by setting the maximum embryonic connections option to the nat and static commands.

Allows servers within the inside network to be protected from one style of denial of service attack. (This is not the floodguard feature.)

Protects inside systems from SYN attacks.

Flood Guard

Controls the AAA service's tolerance for unanswered login attempts, to prevent a Denial of Service attack on AAA services in particular.

Optimizes AAA system use. Enabled with the floodguard 1 command.

Enabled by default.

Four-Port Ethernet Interfaces

This component provides four 10/100 Ethernet connections and has autosense capability.

Can be intermixed with Token Ring interfaces except on PIX 515.

Connectors on the 4-port card are numbered top to bottom; however, the actual device number depends on the slot in which the 4-port card is installed.

Graphical User Interface with
PIX Firewall Manager

Provides a management interface from Windows NT, Windows 95, or Solaris web browsers.

Lets you configure the PIX Firewall via GUI interface rather than the command line interface.

Limits access of the HTML interface to specified client systems within the inside network (based on source address) and is password protected.

Identity

Allows address translation to be disabled.

If existing internal systems have valid globally unique addresses, the Identity feature allows NAT and PAT to be selectively disabled for these systems.

Makes internal network addresses visible to the outside network.

IP Frag Guard

Protects PIX Firewall from IP fragmentation attacks.

Protects PIX Firewall from IP fragmentation attacks.

Also blocks normal IP fragmentation. Disabled by default.

IPSec

Provides Virtual Private Network (VPN) access via digital certificates or pre-shared or manual keys.

Encrypts data between peers.

Works with VPN clients, routers, and another PIX Firewall. With IPSec, you can manage the PIX Firewall remotely.

Java Filtering

Lets an administrator prevent Java applets from being downloaded by an inside system.

Java applets are executable programs that are banned within some security policies.

Java programs can provide a vehicle through which an inside system can be invaded.

Mail Guard

Provides a safe conduit for Simple Mail Transfer Protocol (SMTP) connections from the outside to an inside electronic mail server.

Allows a single mail server to be deployed within the internal network without it being exposed to known security problems with some SMTP server implementations. Avoids the need for an external mail relay (or bastion host) system.

Enforces a safe minimal set of SMTP commands to avoid an SMTP server system being compromised. Also logs all SMTP connections.

Memory upgrade

Lets PIX Firewall work more effectively. 16 MB of RAM is the minimum; 32 MB is recommended.

Permits more simultaneous connections through the PIX Firewall with the memory upgrade.

Requires PIX Firewall software version 4.2 and later.

Multiple Interfaces

Additional network interfaces can be added to the PIX Firewall.

Takes the place of multiple PIX Firewall units in a single chassis.

Provides Adaptive Security for perimeter interfaces.

Multimedia Support

The PIX Firewall supports multimedia applications including RealAudio, Streamworks, CU-SeeMe, Internet Phone, IRC, H.323, Vxtreme and VDO Live.

Users increasingly make use of a wide range of multimedia applications, many of which require special handling in a firewall environment. The PIX Firewall handles these without requiring client reconfiguration and without becoming a performance bottleneck.

Support for protocols can be disabled using access-lists if required.

NETBIOS
over IP

Supports NETBIOS over IP connections from the inside network to the outside network.

Allows Microsoft client systems, such as Windows 95, within the inside network, possibly using NAT, to access servers, such as Windows NT, located within the outside network. This enables security policies to encompass Microsoft environments across the Internet and inside an intranet.

Allows access controls native to the Microsoft environment.

Network Address Translation (NAT)

For inside systems, translates the source IP address of outgoing packets per RFC 1631. Supports both dynamic and static translation.

Allows inside systems to be assigned private addresses (defined in RFC 1918), or to retain existing invalid addresses.

Hides the real network identity of internal systems from the outside network.

PIX 515

The PIX 515 contains two Ethernet 10/100 interfaces on its motherboard, 16 MB Flash memory, and 32 MB of RAM. Two PCI slots are provided for installing additional interfaces or a VPN card. The basic model has 32 MB of RAM and accepts up to 68,000 simultaneous connections.

The PIX 515 provides an entry into the low-cost firewall market.

The PIX 515 only supports Ethernet interfaces for the inside and outside interfaces.

Port Address Translation (PAT)

By using port remapping, a single valid IP address can support source
IP address translation for up to 64,000 active xlate objects.

PAT minimizes the number of globally valid IP addresses required to support private or invalid internal addressing schemes. Will not work with multimedia applications that have an inbound data stream different from the outgoing control path.

Hides the real network identity of internal systems from the outside network.

Simplified Installation with Setup Wizard

PIX Firewall Setup Wizard works with a Windows 95 or Windows NT system to simplify the initial configuration.

Speeds the initial setup by guiding you through the process with both on-screen descriptions and associated help files with more detailed information.

Eliminates common configuration problems.

Six Interfaces

PIX Firewall supports up to six interfaces, four of which are on the optional 4-port Ethernet card.

Can provide a mixed Token Ring and Ethernet environment.

Lets you distribute your network onto separate interfaces that can be protected individually with separate security policies.

SNMP MIB-II Support

Support for network monitoring via SNMP (Simple Network Management Protocol).

With its SNMP interface, the PIX Firewall integrates into traditional network management environments.

Only supports SNMP GET (read-only) access.

Syslog Server

Provides syslog server for use on Windows NT system that accepts TCP and UDP syslog messages from PIX Firewall.

Syslog server can provide time stamped syslog messages, accept messages on alternate ports, and be configured to stop PIX Firewall traffic if messages cannot be received.

Can stop PIX Firewall connections if Windows NT syslog server log disk fills or server goes down.

Telnet Interface

Provides a command-line interface similar to Cisco IOS. The Telnet interface lets you remotely manage the PIX Firewall via the console interface.

Enables remote configuration and management of the PIX Firewall console.

Limits access of the Telnet interface to specified client systems within the inside network (based on source address) and is password protected. If the inside network is not secure and sessions on the LAN can be snooped, you should limit use of the Telnet interface. If IPSec is configured, you can also access the PIX Firewall console from the outside interface.

TFTP Configuration Server

Provides PIX Firewall configuration via TFTP.

Allows one or more firewalls access to configurations from a central source.

Insecure. Do not use if your security policy prevents sharing privileged information in clear text.

TFTP Image Downloading

A .bin image you can download from CCO can be downloaded from a host on the inside interface to the PIX Firewall via the Trivial File Transfer Protocol (TFTP).

Lets you manage PIX Firewall .bin images from a remote server and download them as needed.

TFTP does not perform any authentication when transferring files, so a user name and password on the remote host are not required.

URL Filtering

The PIX Firewall URL filtering is provided in partnership with the NetPartners WebSENSE product. PIX Firewall checks outgoing URL requests with the policy defined on the WebSENSE server, which runs either on Windows NT or UNIX.

Based on the response from the NetPartners WebSENSE server, which matches a request against a list of 17 web site characteristics deemed inappropriate for business use, PIX Firewall either permits or denies the connection.

Because URL filtering is handled on a separate platform, no additional performance burden is placed on the PIX Firewall.

Check http://www.websense.com for more information.

VPN

Utilizes IPSec technology and replaces the previous Private Link software. Can work with Private Link card.

Encrypts data between peers.

Works with VPN clients, Certification Authorities, routers, and other PIX Firewalls. With IPSec, you can manage the PIX Firewall remotely.


Creating a Security Policy

The PIX Firewall separates the details of implementing a security policy from providing network services such as Web, FTP, Telnet, and SMTP.

This section includes the following topics:

What a Security Policy Provides

Before Creating a Security Policy

Preparing a Security Policy

What a Security Policy Provides

A security policy provides:

Much better scalability and performance—The PIX Firewall is dedicated to the security role and does not incur the substantial overhead required to offer server connections.

Greater security—Unless so configured, the PIX Firewall does not accept connections from the outside network (Private Link is an exception to this), and is implemented using a proprietary embedded system, rather than the full operating system necessary to support server applications.

Reduced complexity—Each device performs a dedicated function.

The following sections describe many of the issues associated with security policies; refer also to RFC 2196 "Site Security Handbook" for more information.

Before Creating a Security Policy

To effectively use a firewall in your organization, you need a security policy to protect your data resources from intrusion. By creating or improving a security policy, you can protect against malicious attack by outsiders and control the effects of errors and equipment failures.

Your security policy needs to ensure that users can only perform tasks they are authorized to do, only obtain information they are authorized to have, and not cause damage to the data, applications, or operating environment of a system.

Before creating a security policy, follow these guidelines:


Step 1 Draw a map of your complete network detailing which systems connect to the Internet, which are servers, and identify which IP addresses occur on each subnetwork. When your map is complete, disseminate it to appropriate network administrators, update it regularly, and have paper copies available for troubleshooting problems.

Step 2 Identify which systems you need to protect from Internet access and which must be visible on the outside network, such as NIC-registered IP addresses. The Network Address Translation (NAT) feature of the PIX Firewall lets you specify that NIC-registered IP addresses are visible on the outside of the firewall or that the inside network IP addresses depend solely on the global pool for translation.

Step 3 Identify which inside servers need to be visible on the outside and perimeter networks and what type of authentication and authorization you require before users can access the servers.

Step 4 Identify which router features you will need to set to accommodate the PIX Firewall in your network.


Note   When properly configured, the PIX Firewall can secure your network from outside threats. The PIX Firewall is not a turn-key system. You have to program it to identify which hosts can access your inside network and which cannot. It is your responsibility to protect your network. The PIX Firewall will not prevent all forms of security threats, but its features provide you with an arsenal of resources to repel network attacks.

The PIX Firewall cannot protect your network from inside attackers. To properly protect against these threats, all persons with access to the inside network should be given only the least privilege and access they require to perform their jobs. This access should be reviewed periodically, and updated if necessary.


Preparing a Security Policy

Security measures keep people honest in the same way that locks do.

This section includes the following topics:

Know Your Enemy

Count the Cost

Identify Your Assumptions

Control Your Secrets

Remember Human Factors

Know Your Weaknesses

Limit the Scope of Access

Understand Your Environment

Limit Your Trust

Remember Physical Security

Make Security Pervasive

Know Your Enemy

Consider who might want to circumvent your security measures and identify their motivations. Determine what they might want to do and the damage that they could cause to your network.

Security measures can never make it impossible for a user to perform unauthorized tasks with a computer system. They can only make it harder.

The goal is to make sure the network security controls are beyond the attacker's ability or motivation.

Count the Cost

Security measures almost always reduce convenience, especially for sophisticated users. Security can delay work and create expensive administrative and educational overhead. It can use significant computing resources and require dedicated hardware.

When you design your security measures, understand their costs and weigh those costs against the potential benefits. To do that, you must understand the costs of the measures themselves and the costs and likelihoods of security breaches. If you incur security costs out of proportion to the actual dangers, you have done yourself a disservice.

Identify Your Assumptions

Every security system has underlying assumptions. For example, you might assume that your network is not tapped, or that attackers know less than you do, that they are using standard software, or that a locked room is safe. Be sure to examine and justify your assumptions. Any hidden assumption is a potential security hole.

Control Your Secrets

Most security is based on secrets. Passwords and encryption keys, for example, are secrets. Too often, though, the secrets are not really all that secret. The most important part of keeping secrets is knowing the areas you need to protect. What knowledge would enable someone to circumvent your system? You should jealously guard that knowledge and assume that everything else is known to your adversaries. The more secrets you have, the harder it will be to keep all of them. Security systems should be designed so that only a limited number of secrets need to be kept.

Remember Human Factors

Many security procedures fail because their designers do not consider how users will react to them. For example, because they can be difficult to remember, automatically generated nonsense passwords are often found written on the undersides of keyboards. For convenience, a secure door that leads to the system's only tape drive is sometimes propped open. For expediency, unauthorized modems are often connected to a network to avoid onerous dial-in security measures.

If your security measures interfere with essential use of the system, those measures will be resisted and perhaps circumvented. To get compliance, you must make sure that users can get their work done, and you must sell your security measures to users. Users must understand and accept the need for security.

Any user can compromise system security, at least to some degree. Passwords, for instance, can often be found simply by calling legitimate users on the telephone, claiming to be a system administrator, and asking for them. If your users understand security issues, and if they understand the reasons for your security measures, they are far less likely to make an intruder's life easier.

At a minimum, users should be taught never to release passwords or other secrets over unsecured telephone lines (especially cellular telephones) or electronic mail (e-mail). Users should be wary of questions asked by people who call them on the telephone. Some companies have implemented formalized network security training for their employees; that is, employees are not allowed access to the Internet until they have completed a formal training program.

Know Your Weaknesses

Every security system has vulnerabilities. You should understand your system's weak points and know how they could be exploited. You should also know the areas that present the largest danger and prevent access to them immediately. Understanding the weak points is the first step toward turning them into secure areas.

Limit the Scope of Access

You should create appropriate barriers inside your system so that if intruders access one part of the system, they do not automatically have access to the rest of the system. The security of a system is only as good as the weakest security level of any single host in the system.

Understand Your Environment

Understanding how your system normally functions, knowing what is expected and what is unexpected, and being familiar with how devices are usually used, will help you to detect security problems. Noticing unusual events can help you to catch intruders before they can damage the system. Auditing tools can help you to detect those unusual events.

Limit Your Trust

You should know exactly which software you rely on, and your security system should not have to rely upon the assumption that all software is bug-free or that your firewall can prevent all attacks.

Remember Physical Security

Physical access to a computer, router, or your firewall usually gives a sufficiently sophisticated user total control over that device. Physical access to a network link usually allows a person to tap that link, jam it, or inject traffic into it. It makes no sense to install complicated software security measures when access to the hardware is not controlled.

Make Security Pervasive

Almost any change you make in your system may have security effects. This is especially true when new services are created. Administrators, programmers, and users should consider the security implications of every change they make. Understanding the security implications of a change is something that takes practice. It requires lateral thinking and a willingness to explore every way in which a service could potentially be manipulated.

Deciding How to Use Multiple Interfaces

If your PIX Firewall has two interfaces, deciding which interface does what is straight forward—the inside is the network you want to protect and the outside is unprotected. With three or four interfaces, the decision becomes more difficult.

PIX Firewall has the following conditions for interface use:

Each interface has a unique security level that you specify with the nameif command in your configuration. The inside is always the highest at level 100 and the outside is always 0. The perimeter interfaces can have a unique number between 1 and 99.

When users on a higher security level interface need to access a host on a lower security interface, you use the nat command. If you are using Network Address Translation to specify which lower security level interface can accept translated addresses, use the global command.

When users on a lower security level interface need to access a server on a higher security interface, you use the static command. To specify which services users can access, use the conduit command in conjunction with the static command.

It is easier to add nat and global commands to the configuration than static and conduit commands. The nat command can let one or all hosts, or a network start connections. The static command can specify one host or a network access to a specific host or network.

Interfaces with the same security level cannot access each other. For example, if you set the perimeter interfaces to the same security level, the two interfaces are completely isolated from each other, but each could access the inside and outside interfaces.

Locate servers on the lowest security level perimeter interface, because if compromised, the attacker could only easily attack an interface with a lower security level, the outside. The only exception to putting servers on the lowest perimeter interface is the TFTP server where you download configurations from—the TFTP server must be on the inside interface.

Access to the console via Telnet is available on the inside and third interfaces. The third interface is the network connecting to the third usable slot in the PIX Firewall. You can view the third interface with the show nameif command. The third entry from the top of the listing is the third interface.

You may also want to consider which interface should be your inside interface. You can change the cabling of your networks as they connect to the PIX Firewall to make one interface the inside and the former inside another interface.

With these conditions and the needs of your security policy, you can decide which network to connect to each interface.

Command Line Guidelines

This section includes the following topics, which provide valuable information you need before starting to configure PIX Firewall from its command line:

Access Modes

Abbreviating Commands

Backups

Command Line Editing

Command Output Paging

Comments

Configuration Size

Default Configuration

Help Information

IP Addresses

Ports

Protocols

Supported Multimedia Applications

Supported Protocols and Applications

Technical Assistance

Terminology

Access Modes

The PIX Firewall contains a command set based on Cisco IOS technologies, which provides three administrative access modes:

Unprivileged mode is available when you first access the PIX Firewall and displays the ">" prompt. This mode lets you view restricted settings.

Privileged mode displays the "#" prompt and lets you change current settings. Any unprivileged command also works in privileged mode. Use the enable command to start privileged mode and the disable, exit, or quit commands to exit.

Configuration mode displays the "(config)#" prompt and lets you change system configurations. All privileged, unprivileged, and configuration commands work in this mode. Use the configure terminal command to start configuration mode and the exit or quit commands to exit.

Abbreviating Commands

You can abbreviate most commands down to the fewest unique characters for a command; for example, you can enter write t to view the configuration instead of entering the full command write terminal, or you can enter en to start privileged mode and co t to start configuration mode.

In addition, you can enter 0 to represent 0.0.0.0.

Backups

You should back up your configuration in at least one of the following ways:

Store the configuration in Flash memory with the write memory command. Should the need arise, you can restore a configuration from Flash memory using the configure memory command.

Use the write terminal command to list the configuration. Then cut and paste the configuration into a text file. Then archive the text file. You can restore a configuration from a text file using the configure terminal command and pasting the configuration either line by line or as a whole.

Store the configuration on another system using the tftp-server command to initially specify a host and the write net command to store the configuration.

If you have a PIX 520 or older model, store the configuration on a diskette using the write floppy command. If you are using Windows, make sure the diskette is IBM formatted. If you are formatting a disk, access the MS-DOS command prompt and use the format command. Do not back up your configuration to the PIX Firewall boot disk.

Each image you store overwrites the last stored image.

Should the need arise, you can restore your configuration from Flash memory with the configure memory command, or from diskette with the configure floppy command.

Command Line Editing

PIX Firewall uses the same command line editing conventions as Cisco IOS. You can view all previously entered commands with the show history command or individually with the up arrow or ^p command. Once you have examined a previously entered command, you can move forward in the list with the down arrow or ^n command. When you reach a command you wish to reuse, you can edit it or press the Enter key to start it. You can also delete the word to the left of the cursor with ^w, or erase the line with ^u.

PIX Firewall permits up to 512 characters in a command; additional characters are ignored.

Command Output Paging

On commands such as help or ?, show, show xlate, or other commands that provide long listings, you can determine if the information displays a screenful and pauses, or lets the command run to completion. The pager command lets you choose the number of lines to display before the More prompt appears.

When paging is enabled, the following prompt appears:

<--- More --->

The More prompt uses syntax similar to the UNIX more command:

To view another screenful, press the Space bar.

To view the next line, press the Enter key.

To return to the command line, press the q key.

Comments

You can precede a line with a colon ( : ) to create a comment. However, the comment only appears in the command history buffer and not in the configuration. Therefore, you can view the comment with the show history command or by pressing an arrow key to retrieve a previous command, but because the comment is not in the configuration, the write terminal command does not display it.

Configuration Size

The maximum size of a configuration is 350 KB. This is true for the PIX 515, the PIX 520, and any previous PIX Firewall models. Use the UNIX wc command or a Windows word processing program, such as Microsoft Word, to view the number of characters in the configuration.

Default Configuration

PIX Firewall provides a default configuration on the bootable system disk that automatically provides the commands described in this section. This section also describes how to utilize the commands as you create a new configuration or augment an existing configuration.

After you start writing or changing the PIX Firewall configuration as described in "," you can view the default configuration with the write terminal command. The default configuration commands follow:

nameif—Identifies the interface name and specifies its security level. If you have more than two interfaces, you need to add a nameif command to the configuration for each interface.

enable password—Lists the encrypted privileged mode password.

passwd—Lists the encrypted password for Telnet access to the PIX Firewall console.

hostname—Sets the PIX Firewall system name to "pixfirewall." You can change this name or leave it as is.

fixup protocol commands—Specifies service port numbers at which the PIX Firewall listens. You can ignore these commands for now.

names—Lets you rename IP addresses with names from your native language to add clarity to your configuration. It is best to ignore this command until you have established network connectivity.

pager lines 24—Causes PIX Firewall to halt displaying information after 24 lines and prompts you to continue. The pager command is similar to the UNIX more command and is described in "Command Output Paging." You can ignore this command.

logging commands—Disables Syslog messages from displaying at the console or being sent to a server. The logging command lists information about each connection, ping traffic, and information useful for troubleshooting. Set this command to logging buffered debugging. To view the messages, use the show logging command.

interface—Identifies the speed of the interface or whether the network interface card can automatically sense its speed and duplex. If you have Token Ring interfaces, you need to add these commands by hand. For Ethernet interfaces, the default configuration provides interface commands for every interface, so no action is required.

mtu—Sets maximum packet size to 1500 bytes for Ethernet or to the appropriate size for Token Ring interfaces. You can ignore these commands.

ip address commands—Identifies the IP addresses of the each interface. You must reenter these commands with the correct information for every interface in the PIX Firewall, even for interfaces that you do not intend to initially use.

failover commands—Disables the failover feature. You can ignore this and the additional failover commands. Before enabling failover, read the "Failover" section in "."

arp timeout 14400—Sets the ARP cache refresh rate to 14400 seconds (4 hours) so that every four hours it refreshes the PIX Firewall's knowledge of hosts on each network interface. You can ignore this command.

no rip commands—Used when RIP is present on the networks. You can ignore these commands.

timeout commands—Sets the duration for how long PIX Firewall activities can stay active. You can ignore these commands.

snmp-server commands—Disables SNMP event processing. You can ignore these commands.

telnet timeout 5—Sets the duration a Telnet session to the PIX Firewall console can remain inactive for 5 minutes, after which the session is logged off. If you use Telnet to access the console, you should set this value to a higher number such as 15 minutes.

terminal width 80—Sets the display width on the console terminal to 80 characters wide.

Cryptochecksum—Verifies the status of the configuration with a unique number. This value changes each time you save your configuration to Flash memory with the write memory command. You can write down the checksum and verify later that the configuration has not been changed. This is useful when more than one person has access to the PIX Firewall console or you want to ensure that others have not tampered with the configuration. You can view the current checksum with the show checksum command. The checksum is called the "cryptochecksum" in the configuration because the number is computed using MD5 encryption.

Help Information

Help information is available from the PIX Firewall command line by entering help or a question mark to list all commands, or after a command to list command syntax; for example, arp ?.

The number of commands listed when you use the question mark or help command differs by access mode so that unprivileged mode offers the least commands and configuration mode offers the greatest number of commands.

In addition, you can enter any command by itself on the command line and then press Enter to view the command syntax.

IP Addresses

IP address classes are defined as follows:

Class A— If the first octet is between 1 and 127 (inclusive), the address is a Class A address. In a Class A address, the first octet is the one-byte net address and the last three octets are the host address. The network mask for Class A addresses is 255.0.0.0.

Class B— If the first octet is between 128 and 191 (inclusive), the address is a
Class B address. In a Class B address, the first two octets are the net address and the last two octets are the host address. The network mask for Class B addresses is 255.255.0.0.

Class C— If the first octet is 192 or higher, the address is a Class C address. In a
Class C address, the first three octets are the net address and the last octet is the host address. The network mask for Class C addresses is 255.255.255.0.

Cisco recommends that you use RFC 1918 IP addresses for inside and perimeter addresses. These addresses follow:

Class A: 10.0.0.0 to 10.255.255.255

Class B: 172.16.0.0 to 172.31.255.255

Class C: 192.168.0.0 to 192.168.255.255

If you are using subnet masks, refer to Appendix D, "" to be sure that each IP address you choose for global or static addresses is in the correct subnet.

PIX Firewall requires that IP addresses in the ip address, static, global, failover, and virtual commands be unique. These IP addresses cannot be the same as your router IP addresses.

In this guide, the use of "address" and "IP address" are synonymous.

IP addresses are primarily one of these values:

local_ip—An untranslated IP address on the internal, protected network. In an outbound connection originated from local_ip, the local_ip is translated to the global_ip. On the return path, the global_ip is translated to the local_ip. The local_ip to global_ip translation can be disabled with the nat 0 0 0 command. In syslog messages, this address is referenced as laddr.

global_ip—A translated global IP address in the pool or those addresses declared with the global or static commands. In syslog messages, this address is referenced as gaddr.

foreign_ip—An untranslated IP address on an external network. foreign_ip is an address for hosts on the external network. If the alias command is in use, an inbound message originating for the foreign_ip source address is translated to dnat_ip by PIX Firewall.

dnat_ip—(dual NAT) A translated (by the alias command) IP address on an external network. In an outbound connection destined to dnat_ip, it will be untranslated to foreign_ip. In syslog messages, this address is referenced as faddr.

virtual_ip—(used with the virtual command) A fictitious public or private IP address that is not the address of a real web server on the interface you are accessing. Cisco recommends that you use an RFC 1918 address or one you make up.

Ports

The following literal names can be used instead of a numerical port value in command lines:

PIX Firewall permits the following TCP literal names: bgp, chargen, cmd, daytime, discard, domain, echo, exec, finger, ftp, ftp-data, gopher, h323, hostname, http, ident, irc, klogin, kshell, lpd, nntp, pop2, pop3, pptp, rpc, smtp, sqlnet, sunrpc, tacacs, talk, telnet, time, uucp, whois, and www.

Permitted UDP literal names are biff, bootpc, bootps, discard, dnsix, echo, mobile-ip, nameserver, netbios-dgm, netbios-ns, ntp, rip, snmp, snmptrap, sunrpc, syslog, tacacs, talk, tftp, time, who, and xdmcp.


Note   To assign a port for DNS access, use domain, not dns. The dns keyword translates into the port value for dnsix.


Port numbers can be viewed online at the IANA site:

http://www.isi.edu/in-notes/iana/assignments/port-numbers

lists the literal values.

Table 1-2 Port Literal Values 

Literal
Value
Description

bgp

179

Border Gateway Protocol, RFC 1163

biff

512

Used by mail system to notify users that new mail is received

bootpc

68

Bootstrap Protocol Client

bootps

67

Bootstrap Protocol Server

chargen

19

Character Generator

cmd

514

Similar to exec except that cmd has automatic authentication

daytime

13

Day time, RFC 867

discard

9

Discard

domain

53

DNS (Domain Name System)

dnsix

195

DNSIX Session Management Module Audit Redirector

echo

7

Echo

exec

512

Remote process execution

finger

79

Finger

ftp

21

File Transfer Protocol (control port)

ftp-data

20

File Transfer Protocol (data port)

gopher

70

Gopher

hostname

101

NIC Host Name Server

nameserver

42

Host Name Server

ident

113

Ident authentication service

irc

194

Internet Relay Chat protocol

isakmp

500

ISAKMP

klogin

543

KLOGIN

kshell

544

Korn Shell

lpd

515

Line Printer Daemon - printer spooler

login

513

Remote login

mobile-ip

434

MobileIP-Agent

netbios-ns

137

NETBIOS Name Service

netbios-dgm

138

NETBIOS Datagram Service

nntp

119

Network News Transfer Protocol

ntp

123

Network Time Protocol

pim-auto-rp

496

Protocol Independent Multicast, reverse path flooding, dense mode

pop2

109

Post Office Protocol - Version 2

pop3

110

Post Office Protocol - Version 3

rip

520

Routing Information Protocol

smtp

25

Simple Mail Transport Protocol

snmp

161

Simple Network Management Protocol

snmptrap

162

Simple Network Management Protocol - Trap

sunrpc

111

Sun RPC (Remote Procedure Call)

syslog

514

System Log

tacacs

49

TACACS+ (Terminal Access Controller Access Control System Plus)

talk

517

Talk

telnet

23

RFC 854 Telnet

tftp

69

Trivial File Transfer Protocol

time

37

Time

uucp

540

UNIX-to-UNIX Copy Program

who

513

Who

whois

43

Who Is

www

80

World Wide Web

xdmcp

177

X Display Manager Control Protocol, used to communicate between X terminals and workstations running UNIX


Protocols

Possible literal values are ahp, eigrp, esp, gre, icmp, igmp, igrp, ip, ipinip, ipsec, nos, ospf, pcp, snp, tcp, and udp. You can also specify any protocol by number. The esp and ah protocols only work in conjunction with Private Link.


Note   PIX Firewall does not pass multicast packets. Many routing protocols use multicast packets to transmit their data. If you need to send routing protocols across the PIX Firewall, configure the routers with the neighbor command. Cisco considers it inherently dangerous to send routing protocols across the PIX Firewall. If the routes on the unprotected interface are corrupted, the routes transmitted to the protected side of the firewall will pollute routers there as well.


To pass protocols across the PIX Firewall in a tunnel, use the static and conduit commands as shown in the following example where the outside router is at 204.31.17.2, a static is at 204.31.17.3, and the inside router is at 10.1.1.2:

static (inside,outside) 204.31.17.3 10.1.1.2 netmask 255.255.255.255
conduit permit ip host 204.31.17.3 host 204.31.17.2

lists the numeric values for the protocol literals.

Table 1-3 Protocol Literal Values 

Literal
Value
Description

ah

51

Authentication Header for IPv6, RFC 1826

eigrp

88

Enhanced Interior Gateway Routing Protocol

esp

50

Encapsulated Security Payload for IPv6, RFC 1827

gre

47

General Routing Encapsulation

icmp

1

Internet Control Message Protocol, RFC 792

igmp

2

Internet Group Management Protocol, RFC 1112

igrp

9

Interior Gateway Routing Protocol

ip

0

Internet Protocol

ipinip

4

IP-in-IP encapsulation

nos

94

Network Operating System (Novell's NetWare)

ospf

89

Open Shortest Path First routing protocol, RFC 1247

pcp

108

Payload Compression Protocol

snp

109

Sitara Networks Protocol

tcp

6

Transmission Control Protocol, RFC 793

udp

17

User Datagram Protocol, RFC 768


Protocol numbers can be viewed online at the IANA site:

http://www.isi.edu/in-notes/iana/assignments/protocol-numbers

Supported Multimedia Applications

PIX Firewall supports the following multimedia and video conferencing applications:

CU-SeeMe Pro

Intel Internet Video Phone

MeetingPoint

Microsoft NetMeeting

Microsoft NetShow

NetMeeting

RealNetworks RealAudio and RealVideo

VDOnet VDOLive

VXtreme WebTheater

VocalTec Internet Phone

White Pine CU-SeeMe

White Pine Meeting Point

Xing StreamWorks

Supported Protocols and Applications

PIX Firewall supports the following TCP/IP protocols and applications:

Address Resolution Protocol (ARP)

Archie

Berkeley Standard Distribution (BSD)-rcmds

Bootstrap Protocol (BOOTP)

Domain Name System (DNS)

File Transfer Protocol (FTP)

Generic Route Encapsulation (GRE)

Gopher

HyperText Transport Protocol (HTTP)

Internet Control Message Protocol (ICMP)

Internet Protocol (IP)

NetBIOS over IP (Microsoft Networking)

Point-to-Point Tunneling Protocol (PPTP)

Simple Network Management Protocol (SNMP)

Sitara Networks Protocol (SNP)

SQL*Net (Oracle client/server protocol)

Sun Remote Procedure Call (RPC) services, including Network File System (NFS)

Telnet

Transmission Control Protocol (TCP)

Trivial File Transfer Protocol (TFTP)

User Datagram Protocol (UDP)

Technical Assistance

If after reading the documentation, a problem still exists, view the PIX Firewall tips at:

http://www.cisco.com/warp/public/110/index.shtml

If you need additional help, you can place a call to Cisco's Technical Assistance Center (TAC).

Before doing so:

Save your current configuration to memory using the write memory command and then reboot the PIX Firewall to see if the problem persists.

If you have changed the configuration on the routers, reboot them as well and see if the problem persists.

Make a sketch of your network that you can Fax to the TAC, or make a rough sketch in text format for inclusion in email.

List your configuration using the write terminal command for inclusion in email.

You can provide additional information with the show tech-support and show xlate commands.

If the problem is with pinging, ensure that you have included the conduit permit icmp any any command in your configuration.

Terminology

Describing how a firewall interacts with your network requires a different set of terms than may be used in other types of computing or than in other networking applications. This guide uses these terms:

Conduits—Use of the PIX Firewall conduit command to identify what services can be accessed from a global address.

DNAT address—An IP address that has been translated by the alias command.

External network—See "Unprotected network."

Global address—An IP address that is visible on an unprotected network. Local addresses are translated into global addresses as they pass through the PIX Firewall to protect the local addresses from outside detection. Global addresses are created with the global and static commands.

Internal network—See "Protected network."

Local address—An IP address on the PIX Firewall's inside network.

Protected network—One or more networks that you are protecting from intrusion. A protected network is also known as an internal network. On a PIX Firewall with two interfaces, the protected network is the inside network.

Translation—When a connection moves through the PIX Firewall from a protected network, PIX Firewall translates the originating local IP address to a global address so that the local address is protected from scrutiny on the outside address.

Unprotected network—One or more networks that feed into the PIX Firewall that connect the protected networks with access to the rest of your organization and to the Internet. An unprotected network is also known as an external network. On a PIX Firewall with two interfaces, this is the outside network.