Cisco Enterprise Policy Manager Installation and Configuration Guide, Release 3.3.2.0
JMS Configuration

Table Of Contents

JMS Configuration for PAP-PDP Database Separation

PAP-PDP Database Separation

Configuring ActiveMQ Server

Configuring Tibco JMS

Steps to Configure WebLogic to Use TIBCO EMS as JMS Provider

Steps to Create JMS Resources in Tibco Server

Steps for Weblogic Tibco integration

Configuring WebLogic JMS

Steps to Create JMS Resources in WebLogic Server

Configuring WAS MQ7 JMS


JMS Configuration for PAP-PDP Database Separation


PAP-PDP Database Separation

This chapter is intended to provide the user with the information on how to integrate a JMS provider with CEPM. It covers the following issues:

how to integrate JMS provider with CEPM

how to configure pap_config.xml and pdp_config.xml files for to enable the messaging service

how the JMS resources such as connection factories and topics get created in Administration Console of different JMS providers

JMS is a message oriented middleware used for communication in between various business components of a J2EE web application. JMS enables the application components to update each other with the essential events happened in one or the other components in a distributed architecture. In multi-tiered architecture like CEPM, JMS provider plays a significant role while communicating two or more loosely-coupled components and updating the events by exchanging messages.

In CEPM, a client application can be associated with multiple PDPs which need to interact with the PAP. This is achieved by integrating CEPM with a JMS provider using which the PAP and PDPs communicate with each other in a non-shared mode. CEPM supports the following JMS Server:

ActiveMQ V4.0.2

Tibco V3.1

WebLogic V9.2

WAS MQ7

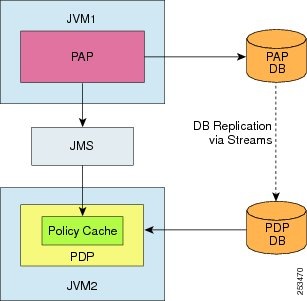
Following diagram shows the Non-Shared Mode of operation between PAP and PDP components:

Figure 11-1 Non-shared Model

In the Non-Shared Mode of deployment, PAP and PDP access separate database instances and interact with each other using Java Messaging System (JMS). CEPM uses publish-subscribe model for the asynchronous communication between PAP and one or more PDPs.

Let us assume that the PAP uses a database instance called PAP-DB and the PDP uses PDP-DB. When an event is initiated in PAP, the PAP publishes the information to the Topics within the JMS Server. The PDP subscribes to the topic in the JMS server. The PDP after receiving the message updates the policy cache with the appropriate topic information. The database updates between PAP DB and corresponding PDP DBs are done through DB replication.

CEPM recommends creation of the JMS resources such as topics, connection factories, etc. using the internal APIs. A topic can be dynamically created using the internal APIs in two instances such as at the server start-up time and during runtime. In the first case, when you start the CEPM application, it takes the PDP names from the persistence store and creates the corresponding topics in the JMS provider. During runtime, if you associate a new or existing PDP with the client application by updating it in the PAP, then a new topic is created in the JMS provider immediately after the association.

You can create the topics in the JMS provider server consoles either through GUI (in WebLogic) or through command line (in Tibco). The number of topics to be created is derived from the number of PDPs available in the entitlement repository. Apart from these topics, one more topic called Reply Topic is created which is dedicated to the PAP to communicate the messages regarding failure of any PDPs while synchronizing the messages. For example, if there are five PDPs present in the repository, a total of six topics get created. It is important to note that the reply topic name entered in the provider console should be exactly the same as mentioned in the <jms> tag of pap_config.xml file.

The communication between client and server is established by defining a set of messages. These messages are abstract java objects which contain entity objects and action events. While the entity objects include users, groups, roles, resources, policies, attributes etc., the action events are create, update and delete.

In the above scenarios, if there are multiple PDPs out of which one of the PDPs fails to update the data due to any reason, it would be done once the PDP is up and it gets the messages from JMS. The possible failover instances in case of PDPs are as follows:

any of the PDP servers is down

the database is down

any unknown problem

Configuring ActiveMQ Server

CEPM installer is prepacked with ActiveMQ server configuration as the default messaging provider. The relevant JMS configuration parameters for the default JMS are present in configure.properties file. If you are using the default JMS, JMS resources like connectionfactory, topics etc. are created by utilizing the internal APIs. Hence, you must set the <useJndi> tag to false.

Following steps must be taken to integrate ActiveMQ JMS with CEPM:


Step 1 Open the pap_config.xml file from the .../CEPM-V3.3.2.0/config folder and make the following modification:

Set the <shared-repository> tag to false. This implies the PAP-PDP database separation

Update the <jms> tag as shown below:

<jms>
	<env>
	<url>tcp://localhost:61616</url>
	<connectionFactory>org.apache.activemq.ActiveMQConnectionFactory
	</connectionFactory>
	<username>ActiveMQConnection.DEFAULT_USER</username>
	<password>c6p96kuD91p3==</password>
	<replyTopic>replyTopicName</replyTopic>
</env>
<reconnect_interval>100000</reconnect_interval>
<useJndi>false</useJndi>
<jndi>
	<providerUrl></providerUrl>
	<providerCtxFactory></providerCtxFactory>
	<jndiUserName></jndiUserName>
	<jndiPassword></jndiPassword>
	</jndi>
</jms>

<url>: Set this to the Host and Port of the machine where the JMS Server is running

<connectionFactory> refers to the connection factory package name.

<username> and <password> are optional parameters and refer to the username and password configured for the server instance in the JMS sever. The password must be in encrypted form. Refer to Step 3 of Chapter 3 "Common Installation Steps" to know how to generate encrypted password.

<replyTopic> refers to the name of the topic dedicated to the PAP which communicates all the messages regarding failure of any PDPs while synchronizing the messages.

<reconnect_interval>: Set this to the time interval (in milliseconds) after which the PAP and PDP tries to re-establish the JMS connection, in case the JMS Server is down.

<useJndi> tag must be set to false as all the JMS resources are created using internal APIs and not in the ActiveMQ server console. So there is no need of updating the <jndi> tag.

In the <handlers> tag, edit the <handlerName> as shown here:

<handlers>
      <common-properties>
            <sessionuser>superuser</sessionuser>
            <sessionpassword>admin</sessionpassword>
      </common-properties>
	<handler name="JMSPAPSYNCHandler" enabled="true" type="*.*">
      <impl>com.cisco.epm.jms.PAPHandler</impl>
	</handler>
 </handlers>

Step 2 Open the pdp_config.xml file from ../CEPM-V3.3.2.0/config/pdp folder and make the following modifications:

Set the <shared-repository> tag to false. This implies the PAP-PDP database separation.

Enter the PDP name in the <pdpName> tag. It is important to note that the provider considers this value as PDP name if <useJndi> tag is set to false

In the <jms> tag, set the JMS URL host and port to the machine IP where the JMS Server is running.

Step 3 Start the JMS server by running activemq.bat file from.../incubator-activemq-4.0.2/bin folder

Step 4 Start the PAP server and the PDP server.

Step 5 To test the JMS configuration, go to the PAP console and create a resource under the said application. Check whether the event has been synchronized in the PAP and PDP databases.


Note If JMS is enabled, data imported into PAP DB through PAP UI or by using API is not synchronized with the PDP DB. To make this happen, update the imported application in the PAP console by adding a PDP to it. When you click the update button, synchronization is done.


This completes the JMS configuration process in ActiveMQ server.


Configuring Tibco JMS

As mentioned earlier, you can create the JMS resources either by using the internal APIs or in the server console of the JMS provider. In the later case, the server administration console provides the platform to create variety of JMS resources. In Tibco, it is done in the JMS Administration Tool. Click this link for more information on how to create JMS resources in the Tibco Administration Tool.

Following steps must be taken to integrate Tibco JMS with CEPM:


Step 1 Open the pap_config.xml file from .../CEPM-V3.3.2.0/config folder and make the following modification:

Set the <shared-repository> tag to false. This implies the PAP-PDP database separation

Update the <jms> tag as shown here:

<jms>
      <env>
            <url>tcp://localhost:7222</url>
            
<connectionFactory>com.tibco.tibjms.TibjmsTopicConnectionFactory</connectionFactory>
            <username>Tibco_User</username>
            <password>c6p96kuD91p3Gwazl0w==</password>
            <replyTopic>replyTopicName99</replyTopic>
      </env>
      <reconnect_interval>100000</reconnect_interval>
      <useJndi>true</useJndi>
      <jndi>
            <providerUrl>tcp://localhost:7222</providerUrl>
	
<providerCtxFactory>com.tibco.tibjms.naming.TibjmsInitialContextFactory</providerCtxFa
ctory>
            <jndiUserName></jndiUserName>
            <jndiPassword></jndiPassword>
      </jndi>
</jms>

<url>: Set this to the Host and Port of the machine where the Tibco Server is running

<connectionFactory> refers to the connection factory package name.


Note If you are using JNDI, the connection factory name must be the same as created in the JMS Provider console. For example, if you create a connection factory called ConnFact1 then you must set the value of <connectionFactory> tag to ConnFact1.Click this link to know Steps to Create JMS Resources in Tibco Server.


<username> and <password> are optional parameters and refer to the username and password configured for the server instance in the JMS sever. The password must be in encrypted form. Refer to Step 3 of Chapter 3 "Common Installation Steps" to know how to generate encrypted password.

<replyTopic> refers to the name of the topic dedicated to the PAP which communicates all the messages regarding failure of any PDPs while synchronizing the messages.

<reconnect_interval>: Set this to the time interval (in milliseconds) after which the PAP and PDP tries to re-establish the JMS connection, in case the JMS Server is down.

<useJndi> tag is set to true if you create the JMS resources using in the Tibco server administration console. If set to false these resources are created using the internal APIs.

<providerUrl> refers to the URL where Tibco server is running.

<providerCtxtFactory> refers to the Context Factory class name.

<jndiUsename> and <jndiPassword> are optional parameters and must be mentioned in these fields if exist.

In the <handlers> tag, edit the <handlerName> as shown here:

<handlers>
      <common-properties>
            <sessionuser>superuser</sessionuser>
            <sessionpassword>admin</sessionpassword>
      </common-properties>
		<handler name="JMSPAPSYNCHandler" enabled="true" type="*.*">
      <impl>com.cisco.epm.jms.PAPHandler</impl>
		</handler>
</handlers>

This handler is a predefined handler which is employed for JMS sync.

Step 2 Open the pdp_config.xml file from ../CEPM-V3.3.2.0/config/pdp folder and make the following modifications:

Set the <shared-repository> tag to false. This implies the PAP-PDP database separation.

Enter the PDP name in the <pdpName> tag.

Set <useJndi> tag to true if you create the JMS resources in the Tibco server administration console. If the value is set to false, these resources are created using the internal APIs.

Update the <jms> tag as shown below:

<jms>
		<env>
			<url>tcp://localhost:7222</url>
			<connectionFactory>
				com.tibco.tibjms.TibjmsTopicConnectionFactory
			</connectionFactory>
			<username>ActiveMQConnection.DEFAULT_USER</username>
			<password>		c6p96kuD91p3==			</password>
		</env>
		<reconnect_interval>100000</reconnect_interval>
		<useJndi>true</useJndi>
		<jndi>
			<jndiName>jndiName</jndiName>
			<providerUrl>tcp://localhost:7222</providerUrl>
			<providerCtxFactory>
				com.tibco.tibjms.naming.TibjmsInitialContextFactory
			</providerCtxFactory>
			<jndiUserName></jndiUserName>
			<jndiPassword></jndiPassword>
		</jndi>
	</jms>

The JMS parameters such as URL, connection factory, user ID and password must contain the same field values as in case of pap_config.xml file.

Update the following JNDI parameters:

<jndiName> refers to the JNDI Name using which the topics are created.

<providerUrl> refers to the URL where Tibco server is running.

<providerCtxtFactory> refers to the Context Factory class name.

<jndiUsename> and <jndiPassword> are optional parameters and must be mentioned in these fields if exist.

Step 3 Start the Tibco server.

Step 4 Start the PAP server and the PDP server.

Step 5 To test the JMS configuration, go to the PAP console and create a resource under the said application. Check whether the event has been synchronized in the PAP and PDP databases.


Note If JMS is enabled, data imported into PAP DB through PAP UI or by using API is not synchronized with the PDP DB. To make this happen, update the imported application in the PAP console by adding a PDP to it. When you click the update button, synchronization is done.


Note If trying to configure Tibco JMS with Weblogic server, then place the TIBCO JMS releated jar files in the following weblogic server location:
<CEPM_HOME>/lib
<BEA_HOME>/domains/<DOMAIN_NAME>/lib


This completes the JMS configuration process in Tibco server.


Steps to Configure WebLogic to Use TIBCO EMS as JMS Provider

To configure WebLogic Application Server 6.1 to use TIBCO Enterprise Message Service as its JMS provider:


Step 1 Add TIBCO Enterprise Message Service as a JMS Provider.

Step 2 Configure WebLogic to use TIBCO Enterprise Message Service as a JMS provider.

a. Start the WebLogic application server.

b. Start the WebLogic Administrative Console.

c. Choose Resources > JMS > JMS providers in the WebLogic navigation pane.

d. Click New in the content pane.

e. Enter the following values for the required properties:

Name: TIBCO

Description: TIBCO Enterprise Message Service

Classpath: EMS_HOME\jar\tibjms.jar

External Initial Context Factory: com.tibco.tibjms.naming.TibjmsInitialContextFactory

External Provider URL: tibjmsnaming://<Tibcoserver>:7222

f. Click OK.

g. Click Apply.

Step 3 Configure JNDI Bindings for the Connection Factories. To create topic and queue connection factories in the WebLogic server:

a. Choose Resources > JMS > Topic connection factories

b. Click New in the content pane.

c. Choose TIBCO as the resource provider, and click OK.

d. Enter the following values for the required properties:

Name: TIBCOConnectionFactory1

Type: TOPIC

JNDI Name: ConnectionFactory1

Description: Sample Topic Connection Factory

External JNDI Name: TibcoConnectionFactory

e. Click OK.

Step 4 Configure JNDI Bindings for the Destinations.

a. Choose Resources > JMS > Topics in the WebLogic navigation pane.

b. Click New in the content pane.

c. Choose TIBCO.

d. Enter the following values for the required properties:

Name: ReplyTopicName

Type: TOPIC

JNDI Name: ReplyTopicName

Description: PAP ReplyTopicName

External JNDI Name: ReplyTopicName

Step 5 Click OK.

Step 6 Repeat the previous steps to create another topic.

Name: PDPServer

Type: TOPIC

JNDI Name: PDPServer

Description: PDP Topic Name

External JNDI Name: PDPServer


Note For the policy cache to be updated using tibco--tibjms.jar and tibjmsadmin.jar need to be placed in both CEPM and PDP applications WEB-INF\ lib folder.


Steps to Create JMS Resources in Tibco Server

You can create TIBCO Enterprise Message Service Administered Objects, Connection Factory and Topics in Tibco server in the following manner:


Step 1 Create TIBCO Enterprise Message Service Administered Objects.

a. Start the TIBCO Enterprise Message Service server.

b. Start the admin tool and connect to the EMS server using the connect command: connect -server server_name. Where server_name is the server you wish to connect to.

Step 2 Create a connection factory and two destinations as shown below:

create factory <Topic Connection Factory> topic
create factory  TibcoConnectionFactory topic
create topic <PAPReplyTopicName>
create topic ReplyTopicName
create topic <PDP Topic>
create topic PDPServer

Steps for Weblogic Tibco integration

To integrate Weblogic and Tibco:


Step 1 Install Tibco EMS 3.1.0

Step 2 Start the TIBCO Enterprise Message Server. Go to Start > Programs > TIBCO Enterprise for JMS 3.1.0 Evalution Version > Start JMS Server from the Windows Start menu.

Step 3 Start the TIBCO Enterprise Message Service administration tool. Go to Start > Programs > TIBCO Enterprise for JMS 3.1.0 Evalution Version > Start JMS Administration Tool from the Windows Start menu.

Step 4 Enter the following commands In the TIBCO Enterprise Message Service administration tool:

> connect:7222
> create factory TIBCO.tcf topic 
> create topic T.GL.GPS.PDPD1
> create jndiname T.GL.GPS.PDPD1 topic  T.GL.GPS.PDPD1
> create topic  T.GL.GPS.PAP.Reply
> create jndiname T.GL.GPS.PAP.Reply topic T.GL.GPS.PAP.Reply

Step 5 Include tibjms.jar file into WEB-INF/lib of the cepm.war, pdp.war

Sample JMS configuration in pap_config.xml, pdp_config.xml

Pap_config.xml

<jms>
       	<env>
		<url></url>
	  	<connectionFactory>TIBCO.tcf </connectionFactory>// this is jndi name of the 
topic connection factory we created in tibco.
			<username></username>
			<password></password>
			<replyTopic>T.GL.GPS.PAP.Reply</replyTopic>
</env>
		<reconnect_interval>100000</reconnect_interval>
		<db_reconnect_interval>100000</db_reconnect_interval>
		<useJndi>true</useJndi>
		<jndi>
			<providerUrl>tibjmsnaming://10.77.116.158:7222</providerUrl> // host name 
or IP of the tibco server machine
			
<providerCtxFactory>com.tibco.tibjms.naming.TibjmsInitialContextFactory</providerCtxFa
ctory>
			<jndiUserName></jndiUserName>
			<jndiPassword></jndiPassword>
		</jndi>
 </jms>

Pdp_config.xml

<pdpname>T.GL.GPS.PDPD1</pdpname>
<jms>
		<env>
			<url></url>
			<connectionFactory> TIBCO.tcf </connectionFactory> // this is jndi name of 
the topic connection factory we created in tibco.
			<username></username>
			<password></password>
		</env>
		<reconnect_interval>100000</reconnect_interval>
		<db_reconnect_interval>100000</db_reconnect_interval>
		<useJndi>true</useJndi>
		<jndi>
			<jndiName>T.GL.GPS.PDPD1</jndiName>
			<providerUrl>tibjmsnaming:// 10.77.116.158:7222</providerUrl> // host name 
or IP of the tibco machine
			
<providerCtxFactory>com.tibco.tibjms.naming.TibjmsInitialContextFactory</providerCtxFa
ctory>
			<jndiUserName></jndiUserName>
			<jndiPassword></jndiPassword>
		</jndi>
</jms>

Configuring WebLogic JMS

Following steps must be taken to integrate WebLogic JMS with CEPM:


Step 1 Open the pap_config.xml file from .../CEPM-V3.3.2.0/config folder and make the following modification:

Set the <shared-repository> tag to false. This implies the PAP-PDP database separation

Update the <jms> tag as shown here:

<jms>
      <env>
             <url>tcp://localhost:7222</url>
             <connectionFactory>weblogic.jms.ConnectionFactory
             </connectionFactory>
             <username></username>
             <password></password>
             <replyTopic>replyTopicName99</replyTopic>
       </env>
       <reconnect_interval>100000</reconnect_interval>
       <useJndi>true</useJndi>
       <jndi>
	<providerUrl>t3://localhost:7011</providerUrl>
       <providerCtxFactory>weblogic.jndi.WLInitialContextFactory
       </providerCtxFactory>
	<jndiUserName></jndiUserName>
	<jndiPassword></jndiPassword>
       </jndi>
</jms>

<url>: Set this to the Host and Port of the machine where the Tibco Server is running

<connectionFactory> refers to the connection factory package name.


Note If you are using JNDI, the connection factory name must be the same as created in the JMS Provider console. For example, if you create a connection factory called ConnFact1 then you must set the value of <connectionFactory> tag to ConnFact1.Click this link to know Steps to Create JMS Resources in WebLogic Server.


<username> and <password> are optional parameters and refer to the username and password configured for the server instance in the JMS sever. The password must be in encrypted form. Refer to Step 3 of Chapter 3 "Common Installation Steps" to know how to generate encrypted password.

<replyTopic> refers to the name of the topic dedicated to the PAP which communicates all the messages regarding failure of any PDPs while synchronizing the messages.

<reconnect_interval>: Set this to the time interval (in milliseconds) after which the PAP and PDP tries to re-establish the JMS connection, in case the JMS Server is down.

<useJndi> tag is set to true if you create the JMS resources using in the WebLogic server administration console. If set to false these resources are created using the internal APIs.

<providerUrl> refers to the URL where WebLogic server is running.

<providerCtxtFactory> refers to the Context Factory class name.

<jndiUsename> and <jndiPassword> are optional parameters and must be mentioned in these fields if exist.

In the <handlers> tag, edit the <handlerName> to JMSSYNCHandler as shown here:

<handlers>
      <common-properties>
            <sessionuser>superuser</sessionuser>
            <sessionpassword>admin</sessionpassword>
      </common-properties>
		<handler name="JMSPAPSYNCHandler" enabled="true" type="*.*">
      <impl>com.cisco.epm.jms.PAPHandler</impl>
		</handler>
</handlers>

This handler is a predefined handler which is employed for JMS sync.

Step 2 Open the pdp_config.xml file from ../CEPM-V3.3.2.0/config/pdp folder and make the following modifications:

Set the <shared-repository> tag to false. This implies the PAP-PDP database separation.

Enter the PDP name in the <pdpName> tag.

Set <useJndi> tag to true if you create the JMS resources in the WebLogic server administration console. If the value is set to false, these resources are created using the internal APIs.

Update the <jms> tag as shown below:

<jms>
		<env>
			<url>tcp://localhost:72222</url>
			<connectionFactory>
				weblogic.jms.ConnectionFactory
			</connectionFactory>
			<username>ActiveMQConnection.DEFAULT_USER</username>
			<password>		c6p96kuD91p3==			</password>
		</env>
		<reconnect_interval>100000</reconnect_interval>
		<useJndi>true</useJndi>
		<jndi>
			<jndiName>jndiName</jndiName>
			<providerUrl>tcp://64.103.172.251:61616</providerUrl>
			<providerCtxFactory>
				org.apache.activemq.jndi.ActiveMQInitialContextFactory
			</providerCtxFactory>
			<jndiUserName></jndiUserName>
			<jndiPassword></jndiPassword>
		</jndi>
	</jms>

The JMS parameters such as URL, connection factory, user ID and password must contain the same field values as in case of pap_config.xml file.

Updat e the following JNDI parameters:

<jndiName> refers to the JNDI Name using which the topics are created.

<providerUrl> refers to the URL where WebLogic server is running.

<providerCtxtFactory> refers to the Context Factory class name.

<jndiUsename> and <jndiPassword> are optional parameters and must be mentioned in these fields if exist.

Step 3 Start the WebLogic server.

Step 4 Start the PAP server and the PDP server.

Step 5 To test the JMS configuration, go to the PAP console and create a resource under the said application. Check whether the event has been synchronized in the PAP and PDP databases.


Note If JMS is enabled, data imported into PAP DB through PAP UI or by using API is not synchronized with the PDP DB. To make this happen, update the imported application in the PAP console by adding a PDP to it. When you click the update button, synchronization is done.


This completes the JMS configuration process in Tibco server.


Steps to Create JMS Resources in WebLogic Server

You can create Connection Factory and Topics in WebLogic server in the following manner:


Step 1 Create JMS Server:

You must create JMS server instance keeping the Admin Server as the target in the WebLogic Server Domain. To do this:

Login to the WebLogic Administration Console.

In the left navigation pane, go to Services > Messaging > JMS Servers. The Summary of JMS Servers page appears which enlists the existing JMS Servers already created in the current WebLogic domain.

Click New to create a new JMS server.

Enter the JMS properties such as name and persistence store details.

If you are freshly configuring JMS, you must create a new persistence store. To do this:

Click Create New Store button

Select the store type as File Store. Click Next.

Enter the store details, such as,

Name of the new store

Select the target from the dropdown

Enter the directory path of the folder where the file store is kept.

Click OK.

This creates the desired Persistence store.

Select the newly created persistence store and click OK. This takes you to the Create a New JMS Server page.

Click Next.

Select the Server instance from the Target dropdown.

Click Finish.

This takes you back to the Summary of JMS Servers page where you can find the newly created server in the list of JMS Servers.

Step 2 Create JMS modules

JMS modules are created to store the JMS resources like connection factories and topics. To create the JMS Modules:

Go to Services > Messaging > JMS Modules in the left navigation pane of the WebLogic Server Administration Console. The JMS Module page appears. Click New.

Enter the module properties such as name, descriptor file name and location in domain. Click Next.

Select the target for the module by checking the Admin Server. On this target (JMS Server) wherein the newly created module would be deployed. Click Next.

This page asks you whether you want to continue with the current process to create JMS resources under the newly created module. If so, check `Would you like to add resources to this JMS System Module?' check box. Click Finish. This creates the new JMS module wherein you can include as many JMS resources.


Note Note: You can also add resources to any existing modules by left this option unchecked. Go to the Summary of JMS Modules page, select the appropriate module and add resources to that module.


Step 3 Create Connection factory:

You can create JMS resources such as connection factories and topics in a selected JMS System Module. You must create at lease one connection factory and at least two topics, one as the reply topic and the other as the PDP topic.

To create a Connection factory:

After the JMS System module is created in Create JMS modules and you have opted for adding resource to the selected module, the Settings page for the selected module appears. This page contains a table which summarizes the JMS resources created in the module. Click New.

Chose the type of JMS resource to be created. Select Connection Factory. Click Next.

Enter the factory details such as name and JNDI name. This JNDI name looks up the changes done to the new connection factory. Click Next.

Select the target (JMS Server) wherein the newly created factory would be deployed. Click Next.

You can associate a group of resource to a subdeployment target. It can be done in this step or later at any point of time. If you assign the subdeployment to a resource and click Finish, the new connection factory is created.


Note Note: To create a subdeployment, click Create a new SubDeployment button in this page. Enter the subdeployment name and click OK. This prompts you to assign the targeted admin server and JMS server to this subdeployment. Click Finish.


Step 4 Create Topic:

To create a topic in the JMS module:

Select Topic from the list of available JMS resources in the Create a new JMS system module resource page. Click Next.

Enter the JMS destination properties such as topic name and JNDI name. Click Next.

Assign the appropriate Subdeployment to the topic. Click Finish. This creates the required topic.

Configuring WAS MQ7 JMS

Configuring WAS MQ

Following steps must be taken to configure WAS MQ7 in Websphere Application Sever version 7:

Prerequisites

WAS 7 must have been installed.

WAS MQ7 must have been installed with the patch - 7.0.1-WS-MQ-Windows-FP0003-EnUs


Note Install WAS MQ7 client if Websphere and MQ are in different machines


To configure WAS MQ, complete the following steps:


Step 1 Create Queue Manager in MQ Server as shown below:

a. Right click on "Queue Manager", select new Queue Manager.

b. Enter queue manager name and select the check box to make this queue manager as default queue manager.

c. In the Queue Manager - Enter data and log values page, click Next.

d. In the Queue Manager - Enter Configuration Options page, click Next.

e. Select the default port number that is "1414", which can be changed if required and click Next.

f. Click Finish.

Step 2 Create server connection channel on the queue manager to enable communication between client and queue manager. This is required only when MQ client is installed in different machine.

a. Click on Queuemanger > Advanced

b. Right-click on Channels

c. Select NEW > Server Connection Channel

d. Enter the channel name (e.g. SERVER.CHANNEL1).

Step 3 Add Remote Queue Manger in MQ Explorer of MQ client machine as described below:

a. Right click on "Queue Manager" and click on "Show/Hide Queue Managers".

b. Click on "Add" button and enter the queue manager that is created in MQ server, select "Connect Directly" option and click Next.

c. Enter connection details like MQ server IP address, port and server connection channel name and click Next.

d. In the Specify Security Details page, click Next.

e. In the Specify User Identification Details page, click Next.

f. In the Specify SSL Certificate Key Repository Details page, click Next

g. In the Specify SSL Option Details page, click Finish

h. Click Close after successful addition of the Queue Manager.

Step 4 Create Initial Context as shown below from MQ Explorer in the machine where Websphere application server is installed, which will be used in pap_config and pdp_config files.

a. Right click on "JMS Administrated Object" and click on "Add Initial Context".

b. Create a folder in local file system (e.g JNDI-Directory).

c. Select "File System" as JNDI location and click on browse to select binding directory ("C:\JDNI-Directory" in this case).

d. Click on Finish.

Step 5 Create Topic Connection Factory as follows, which will be used in pap_config and pdp_config files.

a. Right click on "Connection Factory", select new Connection Factory.

b. Enter topic connection factory and select "WebSphere MQ" as message provider and click Next.

c. Select Type as "Topic Connection Factory" and click Next.

d. Select Transport as "Bindings" if MQ and WAS are on same machine and as "MQ Client" if MQ and WAS are on different machines and click Next.

e. Click Next.

f. Click on "General" and select "7" as provider version, enter client id (e.g. Cisco) and click on "Finish".

g. Click on "Connection" and select base queue manager and click on "Ok".


Configuring WAS

Take the following steps in your Websphere Application Server:


Step 1 Go to Environment > WebSphere Variables > MQ_INSTALL_ROOT

Step 2 Change "MQ Install Root" value to reflect installation directory of MQ7 in Web sphere Server

Step 3 Select the Classloader if MQ Client is selected as transport type for connection factory.

For example, click on "CEPM" application and choose "Single class loader for application".


WAS MQ JMS Configuration in PAP Configuration File

Open pap_config.xml and update the <jms> tag in the following ways:

<jms>
      <env>
             <url>tcp://localhost:61616</url>
             <connectionFactory>WASTCF</connectionFactory>
             <username></username>
             <password></password>
             <replyTopic>replyTopicName92</replyTopic>
       </env>
       <reconnect_interval>100000</reconnect_interval>
		<db_reconnect_interval>100000</db_reconnect_interval>
<useJndi>true</useJndi>
       <jndi>
	<providerUrl>file:/C:/JNDI-Directory</providerUrl>
       <providerCtxFactory>com.sun.jndi.RefFSContextFactory
       </providerCtxFactory>
	<jndiUserName></jndiUserName>
	<jndiPassword></jndiPassword>
       </jndi>
</jms>

Save and close the file.

WAS MQ JMS Configuration in PDP Configuration File

Open pdp_config.xml and update the <jms> tag in the following ways:

<jms>
		<env>
			<url>tcp://localhost:61616</url>
			<connectionFactory>WASTCF</connectionFactory>
			<username></username>
			<password></password>
		</env>
		<reconnect_interval>100000</reconnect_interval>
		<db_reconnect_interval>100000</db_reconnect_interval>
		<useJndi>true</useJndi>
		<jndi>
			<jndiName>PDPServer1</jndiName>
			<providerUrl>file:/C:/JNDI-Directory</providerUrl>
			<providerCtxFactory>com.sun.jndi.RefFSContextFactory
			</providerCtxFactory>
			<jndiUserName></jndiUserName>
			<jndiPassword></jndiPassword>
		</jndi>
	</jms>