-
- IP Access List Features Roadmap
- IP Access List Overview
- Creating an IP Access List and Applying It to an Interface
- Creating an IP Access List to Filter IP Options TCP Flags Noncontiguous Ports or TTL Values
- Refining an IP Access List
- Displaying and Clearing IP Access List Data Using ACL Manageability
- Controlling Access to a Virtual Terminal Line
- Access List-Based RBSCP
- ACL IP Options Selective Drop
- ACL Authentication of Incoming rsh and rcp Requests
- Configuring Lock-and-Key Security for Dynamic Access Lists
- Configuring IP Session Filtering of Reflexive Access Lists
- Configuring TCP Intercept and Preventing Denial-of-Service Attacks
-
- Configuring Context-based Access Control
- Application Firewall - Instant Message Traffic Enforcement
- Cisco IOS Firewall MIB
- Cisco IOS Firewall Performance Improvements
- Cisco IOS Firewall Stateful Failover
- Cisco IOS Firewall Support for TRP
- Email Inspection Engine
- ESMTP Support for Cisco IOS Firewall
- Firewall ACL Bypass
- Firewall N2H2 Support
- Firewall Stateful Inspection of ICMP
- Firewall Support for SIP
- Firewall Support of Skinny Client Control Protocol
- Firewall Websense URL Filtering
- Granular Protocol Inspection
- HTTP Inspection Engine
- Inspection of Router-Generated Traffic
- TCP Out-of-Order Packet Support for Cisco IOS Firewall and Cisco IOS IPS
- Transparent Cisco IOS Firewall
- Virtual Fragmentation Reassembly
- VRF Aware Cisco IOS Firewall
- Configuring Port to Application Mapping
- Configuring Cisco IOS Intrusion Prevention System (IPS)
- Configuring IP Security Options
Configuring IP Security Options
Cisco provides IP Security Option (IPSO) support as described in RFC 1108. Cisco's implementation is only minimally compliant with RFC 1108 because the Cisco IOS software only accepts and generates a 4-byte IPSO.
IPSO is generally used to comply with the U.S. government's Department of Defense security policy.
For a complete description of IPSO commands, refer to the chapter "IP Security Options Commands" of the Cisco IOS Security Command Reference. To locate documentation of other commands that appear in this chapter, use the command reference master index or search online.
To identify the hardware platform or software image information associated with a feature, use the Feature Navigator on Cisco.com to search for information about the feature or refer to the software release notes for a specific release. For more information, see the "Identifying Supported Platforms" section in the chapter "Using Cisco IOS Software."
In This Chapter
This chapter describes how to configure IPSO for both the basic and extended security options described in RFC 1108. This chapter also describes how to configure auditing for IPSO. This chapter includes the following sections:
IPSO Configuration Task List
This section describes the following configuration tasks:
•![]() Configuring Basic IP Security Options
Configuring Basic IP Security Options
•![]() Configuring Extended IP Security Options
Configuring Extended IP Security Options
•![]() Configuring the DNSIX Audit Trail Facility
Configuring the DNSIX Audit Trail Facility
Configuring Basic IP Security Options
Cisco's basic IPSO support provides the following features:
•![]() Defines security level on a per-interface basis
Defines security level on a per-interface basis
•![]() Defines single-level or multilevel interfaces
Defines single-level or multilevel interfaces
•![]() Provides a label for incoming packets
Provides a label for incoming packets
•![]() Strips labels on a per-interface basis
Strips labels on a per-interface basis
•![]() Reorders options to put any basic security options first
Reorders options to put any basic security options first
To configure basic IPSO, complete the tasks in the following sections:
•![]() Enabling IPSO and Setting the Security Classifications
Enabling IPSO and Setting the Security Classifications
•![]() Specifying How IP Security Options Are Processed
Specifying How IP Security Options Are Processed
Enabling IPSO and Setting the Security Classifications
To enable IPSO and set security classifications on an interface, use either of the following commands in interface configuration mode:
Use the no ip security command to reset an interface to its default state.
Specifying How IP Security Options Are Processed
To specify how IP security options are processed, use any of the following optional commands in interface configuration mode:
Default Values for Command Keywords
To fully comply with IPSO, the default values for the minor keywords have become complex. Default value usages include the following:
•![]() The default for all of the minor keywords is off, with the exception of implicit-labelling and add.
The default for all of the minor keywords is off, with the exception of implicit-labelling and add.
•![]() The default value of implicit-labelling is on if the interface is "unclassified Genser;" otherwise, it is off.
The default value of implicit-labelling is on if the interface is "unclassified Genser;" otherwise, it is off.
•![]() The default value for add is on if the interface is not "unclassified Genser;" otherwise, it is off.
The default value for add is on if the interface is not "unclassified Genser;" otherwise, it is off.
Table 67 provides a list of all default values.
The default value for any interface is "dedicated, unclassified Genser." Note that this implies implicit labeling. This might seem unusual, but it makes the system entirely transparent to packets without options. This is the setting generated when you specify the no ip security interface configuration command.
Configuring Extended IP Security Options
Cisco's extended IPSO support is compliant with the Department of Defense Intelligence Information System Network Security for Information Exchange (DNSIX) specification documents. Extended IPSO functionality can unconditionally accept or reject Internet traffic that contains extended security options by comparing those options to configured allowable values. This support allows DNSIX networks to use additional security information to achieve a higher level of security than that achievable with basic IPSO.
Cisco also supports a subset of the security features defined in the DNSIX version 2.1 specification. Specifically, Cisco supports DNSIX definitions of the following:
•![]() How extended IPSO is processed
How extended IPSO is processed
•![]() Audit trail facility
Audit trail facility
There are two kinds of extended IPSO fields defined by the DNSIX 2.1 specification and supported by Cisco's implementation of extended IPSO—Network-level Extended Security Option (NLESO) and Auxiliary Extended Security Option (AESO) fields.
NLESO processing requires that security options be checked against configured allowable information, source, and compartment bit values, and requires that the router be capable of inserting extended security options in the IP header.
AESO is similar to NLESO, except that its contents are not checked and are assumed to be valid if its source is listed in the AESO table.
To configure extended IPSO, complete the tasks in the following sections:
•![]() Configuring Global Default Settings
Configuring Global Default Settings
•![]() Attaching ESOs to an Interface
Attaching ESOs to an Interface
•![]() Attaching AESOs to an Interface
Attaching AESOs to an Interface
Configuring Global Default Settings
To configure global default setting for extended IPSO, including AESOs, use the following command in global configuration mode:
|
|
|
|---|---|
Router(config)# ip security eso-info source compartment-size default-bit |
Configures system-wide default settings. |
Attaching ESOs to an Interface
To specify the minimum and maximum sensitivity levels for an interface, use the following commands in interface configuration mode:
Attaching AESOs to an Interface
To specify the extended IPSO sources that are to be treated as AESO sources, use the following command in interface configuration mode:
|
|
|
|---|---|
Router(config-if)# ip security aeso source compartment-bits |
Specifies AESO sources. |
DNSIX version 2.1 causes slow-switching code.
See the "IPSO Configuration Examples" section at the end of this chapter.
Configuring the DNSIX Audit Trail Facility
The audit trail facility is a UDP-based protocol that generates an audit trail of IPSO security violations. This facility allows the system to report security failures on incoming and outgoing packets. The Audit Trail Facility sends DNSIX audit trail messages when a datagram is rejected because of IPSO security violations. This feature allows you to configure organization-specific security information.
The DNSIX audit trail facility consists of two protocols:
•![]() DNSIX Message Deliver Protocol (DMDP) provides a basic message-delivery mechanism for all DNSIX elements.
DNSIX Message Deliver Protocol (DMDP) provides a basic message-delivery mechanism for all DNSIX elements.
•![]() Network Audit Trail Protocol provides a buffered logging facility for applications to use to generate auditing information. This information is then passed on to DMDP.
Network Audit Trail Protocol provides a buffered logging facility for applications to use to generate auditing information. This information is then passed on to DMDP.
To configure the DNSIX auditing facility, complete the tasks in the following sections:
•![]() Enabling the DNSIX Audit Trail Facility
Enabling the DNSIX Audit Trail Facility
•![]() Specifying Hosts to Receive Audit Trail Messages
Specifying Hosts to Receive Audit Trail Messages
•![]() Specifying Transmission Parameters
Specifying Transmission Parameters
Enabling the DNSIX Audit Trail Facility
To enable the DNSIX audit trail facility, use the following command in global configuration mode:
|
|
|
|---|---|
Router(config)# dnsix-nat source ip-address |
Starts the audit writing module. |
Specifying Hosts to Receive Audit Trail Messages
To define and change primary and secondary addresses of the host to receive audit messages, use the following commands in global configuration mode:
Specifying Transmission Parameters
To specify transmission parameters, use the following commands in global configuration mode:
IPSO Configuration Examples
The following sections provide IPSO configuration examples:
Example 1
In this example, three Ethernet interfaces are presented. These interfaces are running at security levels of Confidential Genser, Secret Genser, and Confidential to Secret Genser, as shown in Figure 106.
Figure 106 IPSO Security Levels
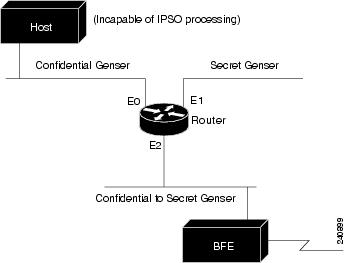
The following commands set up interfaces for the configuration in Figure 106:
interface ethernet 0
ip security dedicated confidential genser
interface ethernet 1
ip security dedicated secret genser
interface ethernet 2
ip security multilevel confidential genser to secret genser
It is possible for the setup to be much more complex.
Example 2
In the following example, there are devices on Ethernet 0 that cannot generate a security option, and so must accept packets without a security option. These hosts do not understand security options; therefore, never place one on such interfaces. Furthermore, there are hosts on the other two networks that are using the extended security option to communicate information, so you must allow these to pass through the system. Finally, there also is a host (a Blacker Front End; see the "Configuring X.25 and LABP" chapter of the Cisco IOS Wide-Area Networking Configuration Guide for more information about Blacker emergency mode) on Ethernet 2 that requires the security option to be the first option present, and this condition also must be specified. The new configuration follows.
interface ethernet 0
ip security dedicated confidential genser
ip security implicit-labelling
ip security strip
interface ethernet 1
ip security dedicated secret genser
ip security extended-allowed
!
interface ethernet 2
ip security multilevel confidential genser to secret genser
ip security extended-allowed
ip security first
Example 3
This example shows how to configure a Cisco router with HP-UX CMW DNSIX hosts. The following commands should be configured on each LAN interface of the router for two DNSIX hosts to communicate:
ip security multilevel unclassified nsa to top secret nsa
ip security extended allowed
DNSIX hosts do not need to know the router's IP addresses, and DNSIX hosts do not need to set up M6RHDB entries for the routers.

 Feedback