Downloads |
 Feedback Feedback
|
Table Of Contents
Container Status Readouts or Icons
Getting Started
This chapter describes the procedures you use the first time you run Cisco Access Manager (CAM). This chapter also describes the CAM graphical user interface (GUI) that you use to configure and monitor high density remote access servers.
Introduction
CAM can perform a variety of tasks to help you configure, monitor, and manage your high density remote access servers. The following provides an introduction to CAM functionality, most of which is explained in more detail later on.
To use CAM to configure, monitor, and manage your high density remote access servers, you must create the appropriate containers and shelves in CAM and then download these configurations to your systems.
The procedures for creating containers and shelves are explained in "." This introduction to the configuration procedure is only meant to provide a general outline of the process.
1
Create the appropriate container(s). Creating a group is optional, but you must create a System Controller or stack. (See Chapter 4, "Configuring Containers.")
2
Starting CAM
Take these steps:
1
Open your Java-enabled Netscape Communicator Web browser.
Use version 4.05 only. (A copy of Netscape Communicator for Solaris is included in the directory opt/CSCOcam/navigator-v405/netscape.)1
2
Enter the following URL:
http://cam_server_name/camwhere cam_server_name is the name of the CAM server.
Go to the CAM home page.
3
Enter your CAM username.
Your username for your CAM account.
4
Enter your CAM password.
Your password for your CAM account.
5
Click OK.
1 For a Windows platform, a self-extracting zip file cp32e405.exe is in the /opt/CSCOcam/win directory. You can FTP the executable file to your Windows NT or Windows 95 machine, and run the executable to install Communicator on your machine.
Figure 2-1 Cisco Access Manager Login Dialog Box
CAM Home Page
The CAM home page displays the status of each configured container within the CAM system. To customize the display, click the Sort button. The Sort Order option dialog box lets you customize the information being presented by selecting the key on which to sort. In addition, the Ascending or Descending button sorts the list in ascending or descending order.
Note
The CAM home page display provides the following information to help you manage your system:
•
•
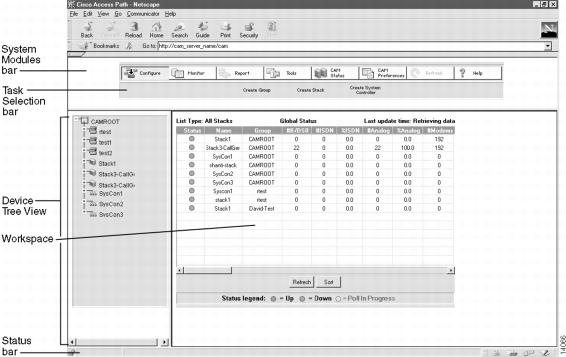
Figure 2-2 Cisco Access Manager Home Page Dialog Box
Global Status Fields
This is a tabular display that contains high-level status information regarding the health and performance of all the configured containers within the CAM system. Each container is represented as a row that contains the options shown in the following table:
Container Status Readouts or Icons
The status of a container is shown by a circular icon in the beginning of each row of the table. A change in the color of the icon indicates a change of status in any of the shelves within the container.
Defined colors are:
•
•
•
Refreshing Your System
You can refresh your system by clicking the Refresh button. Refreshing your system keeps all clients logged into the server synchronized. You can only refresh your system when the Refresh button is enabled. The Refresh button becomes enabled only if a scheduled job has been executed successfully or another user has successfully executed a container or device operation such as add or delete shelf, stack, System Controller, or group. The Refresh button is also enabled on the machine where a task has been scheduled and on all other clients running CAM on that server at the time the task executes successfully. If you click the Refresh button, CAM updates the tree applet. If a task is not executed successfully, the Refresh button remains disabled.
Navigating in CAM
Navigating in CAM allows you to select various system modules, tasks, and devices to manage in your CAM system. The CAM interface is divided into the following areas:
identifies each of these CAM interface areas.
Figure 2-3 CAM Interface Areas
To navigate in CAM:
System Modules Bar
The System Modules bar is the CAM interface area from which you select the operation you want to perform. The System Modules bar is device dependent; the enabled system modules change with the device you select from the Device Tree View.
The possible system modules include:
Allows you to create, modify, and delete groups, stacks, and devices from the Device Tree View. The Configure system module can be selected for groups, stacks, System Controllers, and shelves. However, the options in the Task Selection Bar change.
Provides a status overview of stacks, switch shelves (Catalyst 5002), terminal server shelves (Cisco 3640), offload server shelves (Cisco 7206), NAS shelves (Cisco AS5300), and System Controller shelves (Cisco AS5800). It also allows you to monitor shelf status, modem status, line status, channel statistics, line statistics of Cisco AS5300 and Cisco AS5800 shelves. This task selection does not apply to groups or System Controller devices.
Provides reports for stacks and shelves based on historical modem activity and utilization, call counts, and DS1 activity and utilization. These reports include cumulative data for the Cisco AccessPath system or System Controller shelves in the stack and data for each individual shelf that makes up the stack.
Allows you to manage templates, configurations, Cisco IOS images, modem firmware images, tasks, and user accounts for your Cisco AccessPath system and System Controller.
Provides global status information about your CAM system. You can select the global status parameters and the order in which they display.
Allows you to customize preferences for the User Interface (UI), database, poller, report, and e-mail list. The preferences determine the information that is presented and how it is presented in CAM.

Refreshes your system and keeps all clients logged into the server synchronized. See the "Refreshing Your System" section for details.

Provides context-sensitive help for the dialog boxes displayed in the Workspace.
Task Selection Bar
The Task Selection bar shows the tasks that can be performed for a device. The Task Selection bar is system module and device dependent. For example, the Configure system module applies to all devices, but the options available for a shelf include only Delete and Modify. For a stack and System Controller, however, the Task Selection bar options include Create Shelf, Delete, and Modify. But, the Monitor system module does not apply to System Controller devices.
Device Tree View
The Device Tree View (Tree View) shows all the groups, stacks, System Controllers, and shelves that are currently defined in CAM. The Tree View uses the following display conventions:
•
•
icon. The root group cannot be deleted.
•
icon. This is the highest level of container. A group can contain any number of stacks, System Controllers, and shelves. It can even contain other groups. However, to be deleted, the group must be empty. The home group cannot be deleted.
•
icon. A stack can contain stack shelves.
•
icon. A System Controller can contain System Controller shelves.
•
icon. This is the lowest level of a stack hierarchy. The Device Tree View cannot be expanded any further.
•
icon. This is the lowest level of a System Controller hierarchy. The Device Tree View cannot be expanded any further.
To be a managed by CAM, the item must be listed in the Device Tree View. If the item you want to manage is not listed, try expanding the hierarchy. If it still is not listed, you might need to add it to your configuration.
Workspace
The Workspace is the area in which CAM displays status and other information about a device. In addition, it is the area in which you provide information to CAM about the device you are creating or managing.
Status Bar
The Status bar provides information about the processing being done by CAM as you make selections in the System Modules bar, Task Selection bar, and Workspace.
Where to Go from Here
Now that you have started up CAM and know something about the CAM home page, you are ready to begin using CAM to configure, monitor, and manage your high density remote access servers. Other procedures that you might find useful are described in the remainder of this guide.